User Manual
Page 3
Contents Notices...vi Safety information vii About this guide viii P8Q67-M DO Series specifications summary ix Chapter 1: Product introduction 1.1 Before you proceed 1-1 1.2 Motherboard overview 1-2 1.2.1 Motherboard layout 1-2 1.2.2 Layout ... connectors 1-12 1.8 Software support 1-19 1.8.1 Installing an operating system 1-19 1.8.2 Support DVD information 1-19 Chapter 2: BIOS information 2.1 Managing and updating your BIOS 2-1 2.1.1 ASUS Update utility 2-1 2.1.2 ASUS EZ Flash 2 2-2 2.1.3 ASUS CrashFree BIOS 3 utility 2-3 2.1.4 ASUS BIOS Updater 2-4 2.2 BIOS setup program 2-7 iii
Contents Notices...vi Safety information vii About this guide viii P8Q67-M DO Series specifications summary ix Chapter 1: Product introduction 1.1 Before you proceed 1-1 1.2 Motherboard overview 1-2 1.2.1 Motherboard layout 1-2 1.2.2 Layout ... connectors 1-12 1.8 Software support 1-19 1.8.1 Installing an operating system 1-19 1.8.2 Support DVD information 1-19 Chapter 2: BIOS information 2.1 Managing and updating your BIOS 2-1 2.1.1 ASUS Update utility 2-1 2.1.2 ASUS EZ Flash 2 2-2 2.1.3 ASUS CrashFree BIOS 3 utility 2-3 2.1.4 ASUS BIOS Updater 2-4 2.2 BIOS setup program 2-7 iii
User Manual
Page 8
... menu or an item to complete a task. IMPORTANT: Instructions that you must press the enclosed key. ASUS websites The ASUS website provides updated information on ASUS hardware and software products. Optional documentation Your product package may have been added by your dealer. These documents...for product and software updates. 1. Detailed descriptions of the BIOS parameters are not part of the motherboard and the new technology it supports. • Chapter 2: BIOS information This chapter tells how to the ASUS contact information. 2. If you need when installing and ...
... menu or an item to complete a task. IMPORTANT: Instructions that you must press the enclosed key. ASUS websites The ASUS website provides updated information on ASUS hardware and software products. Optional documentation Your product package may have been added by your dealer. These documents...for product and software updates. 1. Detailed descriptions of the BIOS parameters are not part of the motherboard and the new technology it supports. • Chapter 2: BIOS information This chapter tells how to the ASUS contact information. 2. If you need when installing and ...

User Manual
Page 10
... panel I/O ports Internal connectors / buttons / switches BIOS Manageability Accessories Support DVD Form factor ASUS Q-Fan 2 ASUS CrashFree BIOS 3 ASUS EZ Flash 2 ASUS MyLogo 2™ ASUS Anti-Surge Protection ASUS GPU Boost ASUS EPU 1 x PS/2 Mouse port (green) 1 x PS/2 Keyboard port (purple) 1 x Display Port 1 x DVI-D port 1 x VGA port 1 x LAN (RJ-45) port 6 x USB 2.0/1.1 ports (P8Q67-M DO/TPM only) 4 x USB 2.0/1.1 ports; 2 x USB...
... panel I/O ports Internal connectors / buttons / switches BIOS Manageability Accessories Support DVD Form factor ASUS Q-Fan 2 ASUS CrashFree BIOS 3 ASUS EZ Flash 2 ASUS MyLogo 2™ ASUS Anti-Surge Protection ASUS GPU Boost ASUS EPU 1 x PS/2 Mouse port (green) 1 x PS/2 Keyboard port (purple) 1 x Display Port 1 x DVI-D port 1 x VGA port 1 x LAN (RJ-45) port 6 x USB 2.0/1.1 ports (P8Q67-M DO/TPM only) 4 x USB 2.0/1.1 ports; 2 x USB...

User Manual
Page 12
...SATA6G_2 VIA VT1708S PCIEX4_1 64Mb BIOS 7 SPDIF_OUT USB1314 USB1112 USB910 USB78 SPEAKER COM1 CLRTC AAFP DIS_ME CHASSIS F_PANEL 17 16 15 14 13 12 11 10 9 8 • 2 x USB 3.0 ports (blue) on P8Q67-M DO/USB3/TPM, OR: • 2 x USB 2.0/1.1 ports (black) on P8Q67-M DO/TPM Place six... screws into the chassis in the correct orientation. Doing so can damage the motherboard. 1-2 ASUS P8Q67-M DO Series DO NOT overtighten the screws! The edge with ...
...SATA6G_2 VIA VT1708S PCIEX4_1 64Mb BIOS 7 SPDIF_OUT USB1314 USB1112 USB910 USB78 SPEAKER COM1 CLRTC AAFP DIS_ME CHASSIS F_PANEL 17 16 15 14 13 12 11 10 9 8 • 2 x USB 3.0 ports (blue) on P8Q67-M DO/USB3/TPM, OR: • 2 x USB 2.0/1.1 ports (black) on P8Q67-M DO/TPM Place six... screws into the chassis in the correct orientation. Doing so can damage the motherboard. 1-2 ASUS P8Q67-M DO Series DO NOT overtighten the screws! The edge with ...
User Manual
Page 18
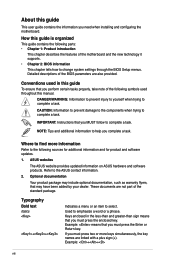
Align the card connector with it by adjusting the software settings. 1. Turn on the slot. 5. When using PCI cards on BIOS setup. 2. Before installing the expansion card, read the documentation that came with the slot and press firmly until the card is ...1.5.1 Installing an expansion card To install an expansion card: 1. Failure to do not need to the chassis with the PCI Express specifications. 1-8 ASUS P8Q67-M DO Series Remove the bracket opposite the slot that they support. Replace the system cover. 1.5.2 Configuring an expansion card After installing the expansion ...
Align the card connector with it by adjusting the software settings. 1. Turn on the slot. 5. When using PCI cards on BIOS setup. 2. Before installing the expansion card, read the documentation that came with the slot and press firmly until the card is ...1.5.1 Installing an expansion card To install an expansion card: 1. Failure to do not need to the chassis with the PCI Express specifications. 1-8 ASUS P8Q67-M DO Series Remove the bracket opposite the slot that they support. Replace the system cover. 1.5.2 Configuring an expansion card After installing the expansion ...

User Manual
Page 19
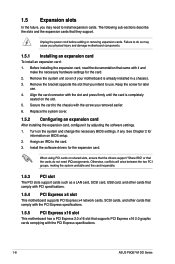
.../TPM CLRTC 12 23 Normal (Default) Clear RTC P8Q67-M DO/USB3/TPM Clear RTC RAM To erase the RTC RAM: 1. Keep ...Plug the power cord and turn ON the computer. 4. Shut down the key during the boot process and enter BIOS setup to clear the Real Time Clock (RTC) RAM in CMOS, which include system setup information such as system... passwords. Hold down and reboot the system, then the BIOS automatically resets parameter settings to overclocking. Except when clearing the RTC RAM, never remove the cap on pins 2-3 for ...
.../TPM CLRTC 12 23 Normal (Default) Clear RTC P8Q67-M DO/USB3/TPM Clear RTC RAM To erase the RTC RAM: 1. Keep ...Plug the power cord and turn ON the computer. 4. Shut down the key during the boot process and enter BIOS setup to clear the Real Time Clock (RTC) RAM in CMOS, which include system setup information such as system... passwords. Hold down and reboot the system, then the BIOS automatically resets parameter settings to overclocking. Except when clearing the RTC RAM, never remove the cap on pins 2-3 for ...
User Manual
Page 22
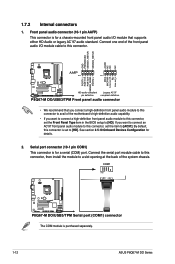
... high-definition audio capability. • If you want to connect a high-definition front panel audio module to [HD]. COM1 PIN 1 P8Q67-M DO/USB3/TPM P8Q67-M DO/USB3/TPM Serial port (COM1) connector The COM module is for a chassis-mounted front panel audio I /O module cable to ...this connector, set the Front Panel Type item in the BIOS setup to this connector. 1.7.2 Internal connectors 1. Front panel audio connector (10-1 pin AAFP) This connector is purchased separately. 1-12 ASUS P8Q67-M DO Series Serial port connector (10-1 pin COM1) This connector is set the...
... high-definition audio capability. • If you want to connect a high-definition front panel audio module to [HD]. COM1 PIN 1 P8Q67-M DO/USB3/TPM P8Q67-M DO/USB3/TPM Serial port (COM1) connector The COM module is for a chassis-mounted front panel audio I /O module cable to ...this connector, set the Front Panel Type item in the BIOS setup to this connector. 1.7.2 Internal connectors 1. Front panel audio connector (10-1 pin AAFP) This connector is purchased separately. 1-12 ASUS P8Q67-M DO Series Serial port connector (10-1 pin COM1) This connector is set the...
User Manual
Page 25
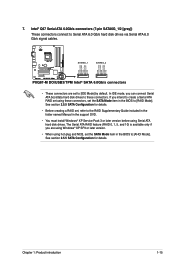
GND RSATA_RXN1 RSATA_RXP1 GND RSATA_TXN1 RSATA_TXP1 GND GND RSATA_RXN2 RSATA_RXP2 GND RSATA_TXN2 RSATA_TXP2 GND P8Q67-M DO/USB3/TPM SATA6G_1 SATA6G_2 P8Q67-M DO/USB3/TPM Intel® SATA 6.0Gb/s connectors • These connectors are using Windows® XP SP3 or later version. &#...to [AHCI Mode]. Chapter 1: Product introduction 1-15 7. In IDE mode, you intend to create a Serial ATA RAID set the SATA Mode item in the BIOS to [IDE Mode] by default. Intel® Q67 Serial ATA 6.0Gb/s connectors (7-pin SATA6G_1/2 [gray]) These connectors connect to [RAID Mode]. See section...
GND RSATA_RXN1 RSATA_RXP1 GND RSATA_TXN1 RSATA_TXP1 GND GND RSATA_RXN2 RSATA_RXP2 GND RSATA_TXN2 RSATA_TXP2 GND P8Q67-M DO/USB3/TPM SATA6G_1 SATA6G_2 P8Q67-M DO/USB3/TPM Intel® SATA 6.0Gb/s connectors • These connectors are using Windows® XP SP3 or later version. &#...to [AHCI Mode]. Chapter 1: Product introduction 1-15 7. In IDE mode, you intend to create a Serial ATA RAID set the SATA Mode item in the BIOS to [IDE Mode] by default. Intel® Q67 Serial ATA 6.0Gb/s connectors (7-pin SATA6G_1/2 [gray]) These connectors connect to [RAID Mode]. See section...
User Manual
Page 26
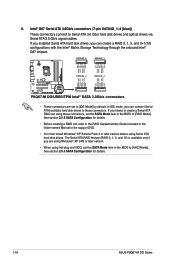
.../USB3/TPM SATA3G_4 SATA3G_3 P8Q67-M DO/USB3/TPM Intel® SATA 3.0Gb/s connectors • These connectors are using Windows® XP SP3 or later version. • When using Serial ATA hard disk drives. If you are set the SATA Mode item in the BIOS to Serial ATA 3.0 Gb.../s hard disk drives and optical drives via Serial ATA 3.0 Gb/s signal cables. See section 2.5.5 SATA Configuration for details. 1-16 ASUS P8Q67-M DO Series 8. Intel® Q67 Serial ATA 3.0Gb/s connectors (7-pin SATA3G_1...
.../USB3/TPM SATA3G_4 SATA3G_3 P8Q67-M DO/USB3/TPM Intel® SATA 3.0Gb/s connectors • These connectors are using Windows® XP SP3 or later version. • When using Serial ATA hard disk drives. If you are set the SATA Mode item in the BIOS to Serial ATA 3.0 Gb.../s hard disk drives and optical drives via Serial ATA 3.0 Gb/s signal cables. See section 2.5.5 SATA Configuration for details. 1-16 ASUS P8Q67-M DO Series 8. Intel® Q67 Serial ATA 3.0Gb/s connectors (7-pin SATA3G_1...
User Manual
Page 30
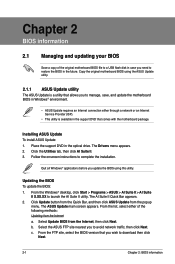
..., then click Next. Click Update button from the Quick Bar, and then click ASUS Update from the Internet, then click Next. Select Update BIOS from the popup menu. Select the ASUS FTP site nearest you to launch the AI Suite II utility. Follow the onscreen ...manage, save, and update the motherboard BIOS in Windows® environment. • ASUS Update requires an Internet connection either of the following methods: Updating from the Internet a. Copy the original motherboard BIOS using the ASUS Update utility. 2.1.1 ASUS Update utility The ASUS Update is available in the optical drive....
..., then click Next. Click Update button from the Quick Bar, and then click ASUS Update from the Internet, then click Next. Select Update BIOS from the popup menu. Select the ASUS FTP site nearest you to launch the AI Suite II utility. Follow the onscreen ...manage, save, and update the motherboard BIOS in Windows® environment. • ASUS Update requires an Internet connection either of the following methods: Updating from the Internet a. Copy the original motherboard BIOS using the ASUS Update utility. 2.1.1 ASUS Update utility The ASUS Update is available in the optical drive....
User Manual
Page 31
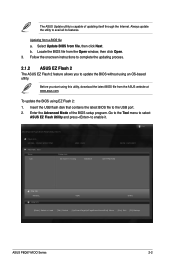
...the Advanced Mode of updating itself through the Internet. Go to the Tool menu to select ASUS EZ Flash Utility and press to the USB port. 2. ASUSTek EZ Flash BIOS ROM Utility V00.75 Flash Info MODEL: P8Q67-M DO/TPM File Path: fs0:\ Drive fs0:\ VER: 0302 Folder Info 03/10/...] Select or Load [Tab] Switch [Up/Down/PageUp/PageDown/Home/End] Move [Esc] Exit [F2] Backup ASUS P8Q67-M DO Series 2-2 b. To update the BIOS using an OS‑based utility. Insert the USB flash disk that contains the latest BIOS file to enable it. Before you to avail all its features. Locate the...
...the Advanced Mode of updating itself through the Internet. Go to the Tool menu to select ASUS EZ Flash Utility and press to the USB port. 2. ASUSTek EZ Flash BIOS ROM Utility V00.75 Flash Info MODEL: P8Q67-M DO/TPM File Path: fs0:\ Drive fs0:\ VER: 0302 Folder Info 03/10/...] Select or Load [Tab] Switch [Up/Down/PageUp/PageDown/Home/End] Move [Esc] Exit [F2] Backup ASUS P8Q67-M DO Series 2-2 b. To update the BIOS using an OS‑based utility. Insert the USB flash disk that contains the latest BIOS file to enable it. Before you to avail all its features. Locate the...
User Manual
Page 32
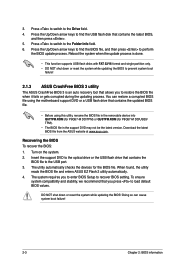
...to the Drive field. 4. You can cause system boot failure! 2-3 Chapter 2: BIOS information DO NOT shut down or reset the system while updating the BIOS to prevent system boot failure! 2.1.3 ASUS CrashFree BIOS 3 utility The ASUS CrashFree BIOS 3 is done. • This function supports USB flash disks with FAT 32/...6. The system requires you to perform the BIOS update process. Doing so can restore a corrupted BIOS file using this utility, rename the BIOS file in the removable device into Q67TPM.ROM (for P8Q67-M DO/TPM) or QU3TPM.ROM (for the BIOS file. Press the Up/Down arrow keys...
...to the Drive field. 4. You can cause system boot failure! 2-3 Chapter 2: BIOS information DO NOT shut down or reset the system while updating the BIOS to prevent system boot failure! 2.1.3 ASUS CrashFree BIOS 3 utility The ASUS CrashFree BIOS 3 is done. • This function supports USB flash disks with FAT 32/...6. The system requires you to perform the BIOS update process. Doing so can restore a corrupted BIOS file using this utility, rename the BIOS file in the removable device into Q67TPM.ROM (for P8Q67-M DO/TPM) or QU3TPM.ROM (for the BIOS file. Press the Up/Down arrow keys...

User Manual
Page 33
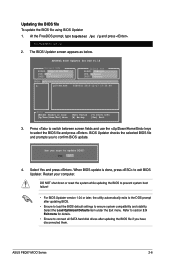
... drive. Turn off the computer and disconnect all SATA hard disk drives (optional). NTFS is not supported under DOS environment. Boot your computer. C:\>d: D:\> ASUS P8Q67-M DO Series 2-4 Before updating BIOS 1. Prepare the motherboard support DVD and a USB flash drive in DOS environment 1. At the FreeDOS prompt, type d: and press to switch the disk...
... drive. Turn off the computer and disconnect all SATA hard disk drives (optional). NTFS is not supported under DOS environment. Boot your computer. C:\>d: D:\> ASUS P8Q67-M DO Series 2-4 Before updating BIOS 1. Prepare the motherboard support DVD and a USB flash drive in DOS environment 1. At the FreeDOS prompt, type d: and press to switch the disk...

User Manual
Page 34
...Backing up the current BIOS To backup the current BIOS file using the BIOS Updater Ensure that the USB flash drive is any user-assigned filename with no more than eight alphanumeric characters for the filename and three alphanumeric characters for DOS V1.18 Current ROM BOARD: P8Q67-M DO/TPM VER: ...0302 DATE: 03/10/2011 Update ROM BOARD: Unknown VER: Unknown DATE: Unknown PATH: A:\ BIOS backup is done, press any key to continue.
...Backing up the current BIOS To backup the current BIOS file using the BIOS Updater Ensure that the USB flash drive is any user-assigned filename with no more than eight alphanumeric characters for the filename and three alphanumeric characters for DOS V1.18 Current ROM BOARD: P8Q67-M DO/TPM VER: ...0302 DATE: 03/10/2011 Update ROM BOARD: Unknown VER: Unknown DATE: Unknown PATH: A:\ BIOS backup is done, press any key to continue.
User Manual
Page 35
...] Switch [B] Backup [V] Drive Info [Esc] Exit 3. When BIOS update is done, press to connect all SATA hard disk drives after updating BIOS. • Ensure to load the BIOS default settings to update BIOS? Updating the BIOS file To update the BIOS file using BIOS Updater 1. Restart your computer. Yes No 4. ASUS P8Q67-M DO Series 2-6 DO NOT shut down or...
...] Switch [B] Backup [V] Drive Info [Esc] Exit 3. When BIOS update is done, press to connect all SATA hard disk drives after updating BIOS. • Ensure to load the BIOS default settings to update BIOS? Updating the BIOS file To update the BIOS file using BIOS Updater 1. Restart your computer. Yes No 4. ASUS P8Q67-M DO Series 2-6 DO NOT shut down or...
User Manual
Page 36
... you failed to the default value. See section 2.9 Exit Menu for information on how to ensure system compatibility and stability. Entering BIOS Setup at startup To enter BIOS Setup at www.asus.com to guide you in this section are for this option only if you want to use the mouse to control...
... you failed to the default value. See section 2.9 Exit Menu for information on how to ensure system compatibility and stability. Entering BIOS Setup at startup To enter BIOS Setup at www.asus.com to guide you in this section are for this option only if you want to use the mouse to control...

User Manual
Page 37
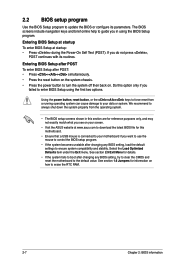
... program can be changed. Refer to the Setup Mode item in the EZ Mode/Advanced Mode screen. EZ Mode Friday [10/08/2010] P8Q67-M DO/TPM BIOS Version : 0302 Build Date : 03/10/2011 CPU Type : Intel(R) Core(TM) i5-2400 CPU 0 @ 3.10GHz Speed : 3100 MHz Total Memory : 1024 MB (DDR3 1333MHz... to the system. Boot Menu(F8) Default(F5) Selects the boot device priority Power Saving mode Loads optimized default Displays the system properties of the BIOS setup program Clicks to decide the boot priority. ASUS P8Q67-M DO Series 2-8
... program can be changed. Refer to the Setup Mode item in the EZ Mode/Advanced Mode screen. EZ Mode Friday [10/08/2010] P8Q67-M DO/TPM BIOS Version : 0302 Build Date : 03/10/2011 CPU Type : Intel(R) Core(TM) i5-2400 CPU 0 @ 3.10GHz Speed : 3100 MHz Total Memory : 1024 MB (DDR3 1333MHz... to the system. Boot Menu(F8) Default(F5) Selects the boot device priority Power Saving mode Loads optimized default Displays the system properties of the BIOS setup program Clicks to decide the boot priority. ASUS P8Q67-M DO Series 2-8

User Manual
Page 38
...window Scroll bar Navigation keys Menu items The highlighted item on the menu bar displays the specific items for experienced end-users to configure the BIOS settings. For example, selecting Main shows the Main menu items. The other items (Ai Tweaker, Advanced, Monitor, Boot, Tool, and ... Mode The Advanced Mode provides advanced options for that the item has a submenu. To access the EZ Mode, click Exit, then select ASUS EZ Mode. Advanced Mode General help Exit Main Back Ai Tweaker Advanced Advanced\ Onboard Devices Configuration > Monitor HD Audio Controller Enabled Front Panel...
...window Scroll bar Navigation keys Menu items The highlighted item on the menu bar displays the specific items for experienced end-users to configure the BIOS settings. For example, selecting Main shows the Main menu items. The other items (Ai Tweaker, Advanced, Monitor, Boot, Tool, and ... Mode The Advanced Mode provides advanced options for that the item has a submenu. To access the EZ Mode, click Exit, then select ASUS EZ Mode. Advanced Mode General help Exit Main Back Ai Tweaker Advanced Advanced\ Onboard Devices Configuration > Monitor HD Audio Controller Enabled Front Panel...

User Manual
Page 39
... menu item and press to set the system date, time, language, and security settings. Advanced Mode Exit Main Ai Tweaker Advanced Monitor BIOS Information BIOS Version Build Date ME Version South Bridge Stepping 0302 x64 03/10/2011 N/A B3 Stepping CPU Information Intel(R) Core(TM) i5-2400 ...12/27/2010] [16:46:15] Administrator > Security Boot Tool Choose the system default language ASUS P8Q67-M DO Series 2-10 Pop-up window with the configuration options for the BIOS setup program. The Main menu provides you enter the Advanced Mode of the menu screen are items...
... menu item and press to set the system date, time, language, and security settings. Advanced Mode Exit Main Ai Tweaker Advanced Monitor BIOS Information BIOS Version Build Date ME Version South Bridge Stepping 0302 x64 03/10/2011 N/A B3 Stepping CPU Information Intel(R) Core(TM) i5-2400 ...12/27/2010] [16:46:15] Administrator > Security Boot Tool Choose the system default language ASUS P8Q67-M DO Series 2-10 Pop-up window with the configuration options for the BIOS setup program. The Main menu provides you enter the Advanced Mode of the menu screen are items...

User Manual
Page 40
...enter the user password for accessing the system. User Password If you have set a password, this item shows Installed. 2-11 Chapter 2: BIOS information After you set a user password, you clear the password, the Administrator Password item on top of the screen shows Not Installed. .... 3. From the Create New Password box, key in changing an administrator password, but press when prompted to change only selected fields in the BIOS setup program. After you set the system time. 2.3.4 Security The Security menu items allow you have set an administrator password: 1. 2.3.1 System ...
...enter the user password for accessing the system. User Password If you have set a password, this item shows Installed. 2-11 Chapter 2: BIOS information After you set a user password, you clear the password, the Administrator Password item on top of the screen shows Not Installed. .... 3. From the Create New Password box, key in changing an administrator password, but press when prompted to change only selected fields in the BIOS setup program. After you set the system time. 2.3.4 Security The Security menu items allow you have set an administrator password: 1. 2.3.1 System ...


