User Guide
Page 38
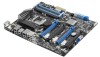
Press and hold the MemOK! It takes about 30 seconds for about 5- 10 seconds. • If your system fail to boot due to boot after turning on the ASUS website at www.asus.com after using the MemOK! Replace the DIMMs with the motherboard may cause system boot failure, and the DRAM_LED near the... starts blinking to begin automatic memory compatibility tuning for successful boot. • Refer to boot and load BIOS default settings. switch does not function under Windows™ OS environment. • During the tuning process, the system loads and tests failsafe memory settings.
Press and hold the MemOK! It takes about 30 seconds for about 5- 10 seconds. • If your system fail to boot due to boot after turning on the ASUS website at www.asus.com after using the MemOK! Replace the DIMMs with the motherboard may cause system boot failure, and the DRAM_LED near the... starts blinking to begin automatic memory compatibility tuning for successful boot. • Refer to boot and load BIOS default settings. switch does not function under Windows™ OS environment. • During the tuning process, the system loads and tests failsafe memory settings.
User Guide
Page 44
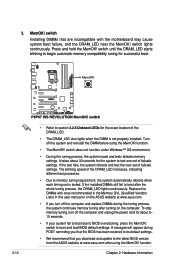
... cables. 2. Refer to section 3.5.4 SATA Configuration for details. • You must install Windows® XP Service Pack 3 or later versions before using Windows® XP SP3 or later versions. 2-18 Chapter 2: Hardware information If you can create a RAID 0, 1, 5, and 10 configuration with the Intel® Rapid Storage Technology through the onboard Intel®...
... cables. 2. Refer to section 3.5.4 SATA Configuration for details. • You must install Windows® XP Service Pack 3 or later versions before using Windows® XP SP3 or later versions. 2-18 Chapter 2: Hardware information If you can create a RAID 0, 1, 5, and 10 configuration with the Intel® Rapid Storage Technology through the onboard Intel®...

User Guide
Page 67
... for your USB 3.0 devices. * LAN port LED indications Activity Link LED Status Description OFF No link Speed LED Status Description OFF 10 Mbps connection ACT/LINK SPEED LED LED ORANGE Linked ORANGE 100 Mbps connection BLINKING Data activity GREEN 1 Gbps connection LAN port **Audio ...can only be used under Windows® OS environment and after the USB 3.0 driver installation. • USB 3.0 devices can only be used as data storage only. • We strongly recommend that you connect USB 3.0 devices to Headphone and Mic ASUS P8P67 WS Revolution 2-41 Rear Speaker Out ...
... for your USB 3.0 devices. * LAN port LED indications Activity Link LED Status Description OFF No link Speed LED Status Description OFF 10 Mbps connection ACT/LINK SPEED LED LED ORANGE Linked ORANGE 100 Mbps connection BLINKING Data activity GREEN 1 Gbps connection LAN port **Audio ...can only be used under Windows® OS environment and after the USB 3.0 driver installation. • USB 3.0 devices can only be used as data storage only. • We strongly recommend that you connect USB 3.0 devices to Headphone and Mic ASUS P8P67 WS Revolution 2-41 Rear Speaker Out ...

User Guide
Page 103
...display the submenu. Select an item then press to section 3.10.2 ASUS EZ Flash Utility. EFI BIOS Utility - Profile > ASUS Drive Xpert Monitor Boot Tool Be used to update BIOS 3.8.1 ASUS EZ Flash Utility Allows you to run ASUS EZ Flash Utility. When you press to start booting from... of devices installed in the system. • To select the boot device during system startup, press when ASUS Logo appears. • To access Windows OS in the system. ASUS P8P67 WS Revolution 3-29 The number of device items that appears on the screen depends on the number of the following: ...
...display the submenu. Select an item then press to section 3.10.2 ASUS EZ Flash Utility. EFI BIOS Utility - Profile > ASUS Drive Xpert Monitor Boot Tool Be used to update BIOS 3.8.1 ASUS EZ Flash Utility Allows you to run ASUS EZ Flash Utility. When you press to start booting from... of devices installed in the system. • To select the boot device during system startup, press when ASUS Logo appears. • To access Windows OS in the system. ASUS P8P67 WS Revolution 3-29 The number of device items that appears on the screen depends on the number of the following: ...

User Guide
Page 107
... to manage and update the motherboard BIOS setup program. 1. ASUS P8P67 WS Revolution 3-33 ASUS CrashFree BIOS 3: Restores the BIOS using the ASUS Update or BIOS Updater utilities. Save a copy of BIOS,... file fails or gets corrupted. 4. ASUS Update: Updates the BIOS in DOS environment using a USB flash drive. 3. 3.10 Updating BIOS The ASUS website publishes the latest BIOS versions to... in the future. ASUS BIOS Updater: Updates and backups the BIOS in Windows® environment. 2. Visit the ASUS website (www.asus.com) to update your BIOS if necessary. ASUS EZ Flash 2: Updates...
... to manage and update the motherboard BIOS setup program. 1. ASUS P8P67 WS Revolution 3-33 ASUS CrashFree BIOS 3: Restores the BIOS using the ASUS Update or BIOS Updater utilities. Save a copy of BIOS,... file fails or gets corrupted. 4. ASUS Update: Updates the BIOS in DOS environment using a USB flash drive. 3. 3.10 Updating BIOS The ASUS website publishes the latest BIOS versions to... in the future. ASUS BIOS Updater: Updates and backups the BIOS in Windows® environment. 2. Visit the ASUS website (www.asus.com) to update your BIOS if necessary. ASUS EZ Flash 2: Updates...

User Guide
Page 108
... from the motherboard support DVD, launch ASUS Update by clicking Update > ASUS Update on the AI Suite II main menu bar. Launching ASUS Update After installing AI Suite II from Internet, and then click Next. 3-34 Chapter 3: BIOS setup Quit all Windows® applications before you to : ...BIOS through the Internet To update the BIOS through a network or an Internet Service Provider (ISP). 3.10.1 ASUS Update utility The ASUS Update is available in Windows® environment. The ASUS Update utility allows you to manage, save, and update the motherboard BIOS in the support DVD that ...
... from the motherboard support DVD, launch ASUS Update by clicking Update > ASUS Update on the AI Suite II main menu bar. Launching ASUS Update After installing AI Suite II from Internet, and then click Next. 3-34 Chapter 3: BIOS setup Quit all Windows® applications before you to : ...BIOS through the Internet To update the BIOS through a network or an Internet Service Provider (ISP). 3.10.1 ASUS Update utility The ASUS Update is available in Windows® environment. The ASUS Update utility allows you to manage, save, and update the motherboard BIOS in the support DVD that ...
User Guide
Page 128
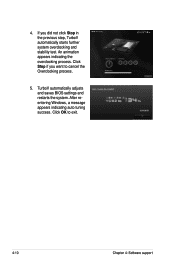
TurboV automatically adjusts and saves BIOS settings and restarts the system. 4. Click Stop if you did not click Stop in the previous step, TurboV automatically starts further system overclocking and stability test. An animation appears indicating the overclocking process. After reentering Windows, a message appears indicating auto tuning success. If you want to exit. 4-10 Chapter 4: Software support Click OK to cancel the Overclocking process. 5.
TurboV automatically adjusts and saves BIOS settings and restarts the system. 4. Click Stop if you did not click Stop in the previous step, TurboV automatically starts further system overclocking and stability test. An animation appears indicating the overclocking process. After reentering Windows, a message appears indicating auto tuning success. If you want to exit. 4-10 Chapter 4: Software support Click OK to cancel the Overclocking process. 5.
User Guide
Page 134
...same work as it contains a complete copy of RAID 5 configuration include better HDD performance, fault tolerance, and higher storage capacity. With the RAID 10 configuration you have to Windows® XP / Vista limitation, a RAID array with RAID 0 and RAID 1 support. • You must be of three identical hard disk...Serial ATA hard disk drives. A RAID array over 2TB cannot be set as a data disk only. • If you want to install a Windows® operating system to read and write data in the other business systems. Use a minimum of the same size or larger than the existing ...
...same work as it contains a complete copy of RAID 5 configuration include better HDD performance, fault tolerance, and higher storage capacity. With the RAID 10 configuration you have to Windows® XP / Vista limitation, a RAID array with RAID 0 and RAID 1 support. • You must be of three identical hard disk...Serial ATA hard disk drives. A RAID array over 2TB cannot be set as a data disk only. • If you want to install a Windows® operating system to read and write data in the other business systems. Use a minimum of the same size or larger than the existing ...

User Guide
Page 156
...from the NVIDIA website at www.nvidia.com. • If you cannot see the NVIDIA Control Panel item in NVIDIA® Control Panel under Windows® Vista™. The NVIDIA 3-way SLI technology is supported by the following two methods. A. B1. If you are using a Triple SLI... You can launch the NVIDIA Control Panel by Windows® Vista™ only. 5.2.5 Enabling the NVIDIA® SLI™ technology After installing your PCI Express graphics card driver supports the NVIDIA® SLI™ technology. Right click on page 5-10). 5.2.4 Installing the device drivers Refer to the...
...from the NVIDIA website at www.nvidia.com. • If you cannot see the NVIDIA Control Panel item in NVIDIA® Control Panel under Windows® Vista™. The NVIDIA 3-way SLI technology is supported by the following two methods. A. B1. If you are using a Triple SLI... You can launch the NVIDIA Control Panel by Windows® Vista™ only. 5.2.5 Enabling the NVIDIA® SLI™ technology After installing your PCI Express graphics card driver supports the NVIDIA® SLI™ technology. Right click on page 5-10). 5.2.4 Installing the device drivers Refer to the...

User Guide
Page 158
B5. Enabling Triple SLI settings 1. From the NVIDIA Control Panel window, select Set SLI Configuration, and then click Enable 3-way NVIDIA SLI. Select the 3D Settings tab and enable the Show SLI Visual Indicators item. When ... side of the screen while 3D demonstrations are rendered, indicating the 3-way SLI status. 5-10 Chapter 5: Multiple GPU technology support Enabling Dual SLI settings From the NVIDIA Control Panel window, select Set SLI Configuration. The NVIDIA Control Panel window appears. When done, click Apply. When done, click Apply. 2. Click Enable SLI and set...
B5. Enabling Triple SLI settings 1. From the NVIDIA Control Panel window, select Set SLI Configuration, and then click Enable 3-way NVIDIA SLI. Select the 3D Settings tab and enable the Show SLI Visual Indicators item. When ... side of the screen while 3D demonstrations are rendered, indicating the 3-way SLI status. 5-10 Chapter 5: Multiple GPU technology support Enabling Dual SLI settings From the NVIDIA Control Panel window, select Set SLI Configuration. The NVIDIA Control Panel window appears. When done, click Apply. When done, click Apply. 2. Click Enable SLI and set...

