User Manual
Page 2
No part of this manual, including the products and software described in it from http://support.asus.com/download; The GPL and LGPL licensed code in obtaining the full corresponding source code we can coordinate the terms and cost of the product including the ... OR ERROR IN THIS MANUAL OR PRODUCT. Offer to Provide Source Code of reproduction and shipment, which you want to have it shipped to, by downloading it , may obtain the complete corresponding source code (as the corresponding binary/object code. or (2) for which is valid to the owners' benefit, without any...
No part of this manual, including the products and software described in it from http://support.asus.com/download; The GPL and LGPL licensed code in obtaining the full corresponding source code we can coordinate the terms and cost of the product including the ... OR ERROR IN THIS MANUAL OR PRODUCT. Offer to Provide Source Code of reproduction and shipment, which you want to have it shipped to, by downloading it , may obtain the complete corresponding source code (as the corresponding binary/object code. or (2) for which is valid to the owners' benefit, without any...
User Manual
Page 34
... performance. 1. It takes about 5-10 seconds. • If your system fail to boot due to the latest BIOS version from the ASUS website at www.asus.com after using the MemOK! Replace the DIMMs with the motherboard may cause system boot failure, and the DRAM_LED near the MemOK! switch...to boot and load BIOS default settings. function. • The MemOK! switch to fine-tune performance when working on the ASUS website at www.asus.com. • If you download and update to BIOS overclocking, press the MemOK! Press and hold the MemOK! To stop memory tuning, turn off the ...
... performance. 1. It takes about 5-10 seconds. • If your system fail to boot due to the latest BIOS version from the ASUS website at www.asus.com after using the MemOK! Replace the DIMMs with the motherboard may cause system boot failure, and the DRAM_LED near the MemOK! switch...to boot and load BIOS default settings. function. • The MemOK! switch to fine-tune performance when working on the ASUS website at www.asus.com. • If you download and update to BIOS overclocking, press the MemOK! Press and hold the MemOK! To stop memory tuning, turn off the ...
User Manual
Page 96
... update the BIOS using the ASUS Update or BIOS Updater utilities. 3.10.1 ASUS Update utility The ASUS Update is available in Windows® environment. Chapter 3 3-30 Chapter 3: BIOS setup Copy the original motherboard BIOS using this chapter to download the latest BIOS file for ... : • Update the BIOS directly from the Internet • Download the latest BIOS file from the Internet • Update the BIOS from the motherboard support DVD, launch ASUS Update by clicking Update > ASUS Update on system stability, compatibility, or performance. If there is potentially...
... update the BIOS using the ASUS Update or BIOS Updater utilities. 3.10.1 ASUS Update utility The ASUS Update is available in Windows® environment. Chapter 3 3-30 Chapter 3: BIOS setup Copy the original motherboard BIOS using this chapter to download the latest BIOS file for ... : • Update the BIOS directly from the Internet • Download the latest BIOS file from the Internet • Update the BIOS from the motherboard support DVD, launch ASUS Update by clicking Update > ASUS Update on system stability, compatibility, or performance. If there is potentially...
User Manual
Page 97
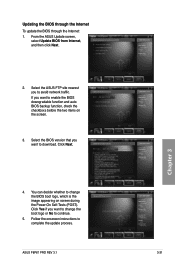
... screen, select Update BIOS from Internet, and then click Next. 2. ASUS P8P67 PRO REV 3.1 3-31 If you want to change the BIOS boot logo, which is the image appearing on the screen. 3. Click Next. Follow the onscreen instructions to download. Select the BIOS version that you to change the boot logo or No to...
... screen, select Update BIOS from Internet, and then click Next. 2. ASUS P8P67 PRO REV 3.1 3-31 If you want to change the BIOS boot logo, which is the image appearing on the screen. 3. Click Next. Follow the onscreen instructions to download. Select the BIOS version that you to change the boot logo or No to...
User Manual
Page 99
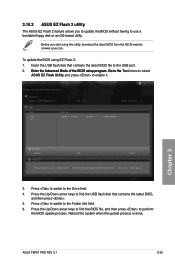
To update the BIOS using this utility, download the latest BIOS from the ASUS website at www.asus.com. Before you to update the BIOS without having to use a bootable floppy disk or an OS‑based utility. Insert the USB flash disk ...;G��o�t�o��th�e� Tool menu to select ASUS EZ Flash Utility and press to perform the BIOS update process. Chapter 3 ASUS P8P67 PRO REV 3.1 3-33 ASUSTek EZ Flash BIOS ROM Utility V00.75 Flash Info MODEL: P8P67 PRO REV 3.1 VER: 0301 fs0:\ Drive fs0:\ fs1:\ Folder Info 08/05/10...
To update the BIOS using this utility, download the latest BIOS from the ASUS website at www.asus.com. Before you to update the BIOS without having to use a bootable floppy disk or an OS‑based utility. Insert the USB flash disk ...;G��o�t�o��th�e� Tool menu to select ASUS EZ Flash Utility and press to perform the BIOS update process. Chapter 3 ASUS P8P67 PRO REV 3.1 3-33 ASUSTek EZ Flash BIOS ROM Utility V00.75 Flash Info MODEL: P8P67 PRO REV 3.1 VER: 0301 fs0:\ Drive fs0:\ fs1:\ Folder Info 08/05/10...
User Manual
Page 100
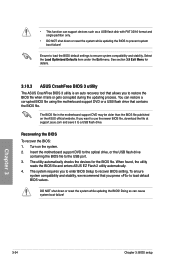
...flash drive containing the BIOS file to ensure system compatibility and stability. The utility automatically checks the devices for details. 3.10.3 ASUS CrashFree BIOS 3 utility The ASUS CrashFree BIOS 3 utility is an auto recovery tool that allows you press to recover BIOS setting. If you to enter BIOS...while updating the BIOS! DO NOT shut down or reset the system while updating the BIOS to use the newer BIOS file, download the file at support.asus.com and save it fails or gets corrupted during the updating process. Recovering the BIOS To recover the BIOS: 1. Select ...
...flash drive containing the BIOS file to ensure system compatibility and stability. The utility automatically checks the devices for details. 3.10.3 ASUS CrashFree BIOS 3 utility The ASUS CrashFree BIOS 3 utility is an auto recovery tool that allows you press to recover BIOS setting. If you to enter BIOS...while updating the BIOS! DO NOT shut down or reset the system while updating the BIOS to use the newer BIOS file, download the file at support.asus.com and save it fails or gets corrupted during the updating process. Recovering the BIOS To recover the BIOS: 1. Select ...
User Manual
Page 101
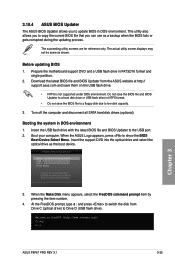
...BIOS Updater to FreeDOS (http://www.freedos.org)! At the FreeDOS prompt, type d: and press to switch the disk from the ASUS website at http:// support.asus.com and save them on the USB flash drive. • NTFS is not supported under DOS environment. Welcome to the USB ... using defaults 3. When the Make Disk menu appears, select the FreeDOS command prompt item by pressing the item number. 4. C:\>d: D:\> Chapter 3 ASUS P8P67 PRO REV 3.1 3-35 Download the latest BIOS file and BIOS Updater from Drive C (optical drive) to update BIOS in NTFS format. • Do not save the BIOS...
...BIOS Updater to FreeDOS (http://www.freedos.org)! At the FreeDOS prompt, type d: and press to switch the disk from the ASUS website at http:// support.asus.com and save them on the USB flash drive. • NTFS is not supported under DOS environment. Welcome to the USB ... using defaults 3. When the Make Disk menu appears, select the FreeDOS command prompt item by pressing the item number. 4. C:\>d: D:\> Chapter 3 ASUS P8P67 PRO REV 3.1 3-35 Download the latest BIOS file and BIOS Updater from Drive C (optical drive) to update BIOS in NTFS format. • Do not save the BIOS...

User Manual
Page 127
For Windows Vista, select Uninstall. 5. ASUS P8P67 PRO REV 3.1 5-1 For Windows XP, select Add/Remove. Follow the installation procedures in this section. 5.1.1 Requirements • In Dual CrossFireX mode, you should have to uninstall all current applications. 2. Download the latest driver from the AMD website (www.amd.com). • Ensure that your power supply unit (PSU...
For Windows Vista, select Uninstall. 5. ASUS P8P67 PRO REV 3.1 5-1 For Windows XP, select Add/Remove. Follow the installation procedures in this section. 5.1.1 Requirements • In Dual CrossFireX mode, you should have to uninstall all current applications. 2. Download the latest driver from the AMD website (www.amd.com). • Ensure that your power supply unit (PSU...
User Manual
Page 129
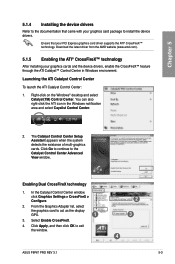
Download the latest driver from the AMD website (www.amd.com). 5.1.5 Enabling the ATI® CrossFireX™ technology After installing your graphics card package to install ... > CrossFireX > Configure. 2. Launching the ATI Catalyst Control Center To launch the ATI Catalyst Control Center: 1. Click Apply, and then click OK to exit the window. 2 3 4 ASUS P8P67 PRO REV 3.1 5-3 Chapter 5 5.1.4 Installing the device drivers Refer to the documentation that your PCI Express graphics card driver supports the ATI® CrossFireX™ technology. Ensure...
Download the latest driver from the AMD website (www.amd.com). 5.1.5 Enabling the ATI® CrossFireX™ technology After installing your graphics card package to install ... > CrossFireX > Configure. 2. Launching the ATI Catalyst Control Center To launch the ATI Catalyst Control Center: 1. Click Apply, and then click OK to exit the window. 2 3 4 ASUS P8P67 PRO REV 3.1 5-3 Chapter 5 5.1.4 Installing the device drivers Refer to the documentation that your PCI Express graphics card driver supports the ATI® CrossFireX™ technology. Ensure...
User Manual
Page 130
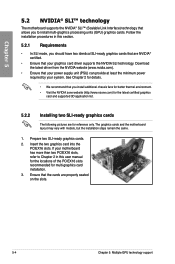
...; certified. • Ensure that your system. If your motherboard has more than two PCIEX16 slots, refer to install multi-graphics processing units (GPU) graphics cards. Download the latest driver from the NVIDIA website (www.nvidia.com). • Ensure that the cards are properly seated on the slots. 5-4 Chapter 5: Multiple GPU technology...
...; certified. • Ensure that your system. If your motherboard has more than two PCIEX16 slots, refer to install multi-graphics processing units (GPU) graphics cards. Download the latest driver from the NVIDIA website (www.nvidia.com). • Ensure that the cards are properly seated on the slots. 5-4 Chapter 5: Multiple GPU technology...
User Manual
Page 131
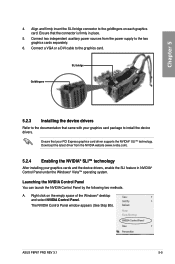
...™ technology After installing your PCI Express graphics card driver supports the NVIDIA® SLI™ technology. Download the latest driver from the power supply to the graphics card. Right click on each graphics card. ASUS P8P67 PRO REV 3.1 5-5 Connect a VGA or a DVI cable to the two graphics cards separately. 6. The NVIDIA Control Panel...
...™ technology After installing your PCI Express graphics card driver supports the NVIDIA® SLI™ technology. Download the latest driver from the power supply to the graphics card. Right click on each graphics card. ASUS P8P67 PRO REV 3.1 5-5 Connect a VGA or a DVI cable to the two graphics cards separately. 6. The NVIDIA Control Panel...


