User Manual
Page 4
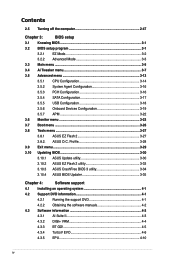
Profile 3-28 3.9 Exit menu 3-29 3.10 Updating BIOS 3-30 3.10.1 ASUS Update utility 3-30 3.10.2 ASUS EZ Flash 2 utility 3-33 3.10.3 ASUS CrashFree BIOS 3 utility 3-34 3.10.4 ASUS BIOS Updater 3-35 Chapter 4: Software support 4.1 Installing an operating system 4-1 4.2 Support DVD information 4-1 4.2.1 Running the support DVD 4-1 4.2.2 Obtaining the software manuals 4-2 4.3 Software information 4-3 4.3.1 AI Suite ...
Profile 3-28 3.9 Exit menu 3-29 3.10 Updating BIOS 3-30 3.10.1 ASUS Update utility 3-30 3.10.2 ASUS EZ Flash 2 utility 3-33 3.10.3 ASUS CrashFree BIOS 3 utility 3-34 3.10.4 ASUS BIOS Updater 3-35 Chapter 4: Software support 4.1 Installing an operating system 4-1 4.2 Support DVD information 4-1 4.2.1 Running the support DVD 4-1 4.2.2 Obtaining the software manuals 4-2 4.3 Software information 4-3 4.3.1 AI Suite ...
User Manual
Page 11
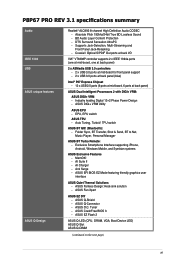
... II - ASUS Fanless Design: Heat-sink solution - ASUS Q-Connector - ASUS EZ Flash 2 ASUS Q-LED (CPU, DRAM, VGA, Boot Device LED) ASUS Q-Slot ASUS Q-DIMM (continued on the next page) xi EPU, EPU switch ASUS TPU - ...ASUS Exclusive Features - ASUS Fan Xpert ASUS EZ DIY - Anti Surge - ASUS EFI BIOS EZ Mode featuring friendly graphics user interface ASUS Quiet Thermal Solutions - ASUS Q-Shield - ASUS CrashFree BIOS 3 - Industry leading Digital 12+2 Phase Power Design - MemOK! - BD Audio Layer Content Protection - ASUS DIGI+ VRM Utility ASUS EPU - ASUS O.C. P8P67 PRO...
... II - ASUS Fanless Design: Heat-sink solution - ASUS Q-Connector - ASUS EZ Flash 2 ASUS Q-LED (CPU, DRAM, VGA, Boot Device LED) ASUS Q-Slot ASUS Q-DIMM (continued on the next page) xi EPU, EPU switch ASUS TPU - ...ASUS Exclusive Features - ASUS Fan Xpert ASUS EZ DIY - Anti Surge - ASUS EFI BIOS EZ Mode featuring friendly graphics user interface ASUS Quiet Thermal Solutions - ASUS Q-Shield - ASUS CrashFree BIOS 3 - Industry leading Digital 12+2 Phase Power Design - MemOK! - BD Audio Layer Content Protection - ASUS DIGI+ VRM Utility ASUS EPU - ASUS O.C. P8P67 PRO...
User Manual
Page 12
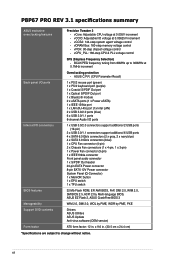
... x TPU switch 32 Mb Flash ROM, EFI AMI BIOS, PnP, DMI 2.0, WfM 2.0, SM BIOS 2.5, ACPI 2.0a, Multi-language BIOS, ASUS EZ Flash 2, ASUS CrashFree BIOS 3 WfM 2.0, DMI 2.0, WOL by PME, WOR by PME, PXE Drivers ASUS Utilities ASUS Update Anti-virus software (OEM...0.1MHz increment Back panel I/O ports Internal I/O connectors BIOS features Manageability Support DVD contents Form factor Overclocking protection - P8P67 PRO REV 3.1 specifications summary ASUS exclusive overclocking features Precision Tweaker 2 - vCCSA: 144-step system agent voltage control - vPCH: 90-step chipset voltage...
... x TPU switch 32 Mb Flash ROM, EFI AMI BIOS, PnP, DMI 2.0, WfM 2.0, SM BIOS 2.5, ACPI 2.0a, Multi-language BIOS, ASUS EZ Flash 2, ASUS CrashFree BIOS 3 WfM 2.0, DMI 2.0, WOL by PME, WOR by PME, PXE Drivers ASUS Utilities ASUS Update Anti-virus software (OEM...0.1MHz increment Back panel I/O ports Internal I/O connectors BIOS features Manageability Support DVD contents Form factor Overclocking protection - P8P67 PRO REV 3.1 specifications summary ASUS exclusive overclocking features Precision Tweaker 2 - vCCSA: 144-step system agent voltage control - vPCH: 90-step chipset voltage...
User Manual
Page 17
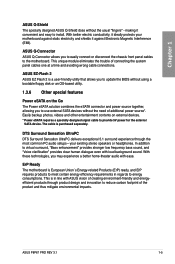
...at a time and avoiding wrong cable connections. ErP Ready The motherboard is purchased separately. making it against Electronic Magnetic Interference (EMI). ASUS EZ-Flash 2 ASUS EZ Flash 2 is in regards to energy consumptions. The cable is European Union´s Energy-related Products (ErP) ready, and ErP requires products... does without the need of additional power source*. In addition to provide 5V power for the external SATA device. ASUS P8P67 PRO REV 3.1 1-5 Easily backup photos, videos and other entertainment contents on the Go The Power eSATA solution combines the eSATA ...
...at a time and avoiding wrong cable connections. ErP Ready The motherboard is purchased separately. making it against Electronic Magnetic Interference (EMI). ASUS EZ-Flash 2 ASUS EZ Flash 2 is in regards to energy consumptions. The cable is European Union´s Energy-related Products (ErP) ready, and ErP requires products... does without the need of additional power source*. In addition to provide 5V power for the external SATA device. ASUS P8P67 PRO REV 3.1 1-5 Easily backup photos, videos and other entertainment contents on the Go The Power eSATA solution combines the eSATA ...
User Manual
Page 48
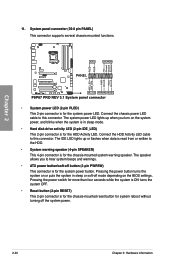
The system power LED lights up or flashes when data is for the HDD Activity LED. Connect the HDD Activity LED cable to hear system beeps and warnings. • ATX power button/soft-...
The system power LED lights up or flashes when data is for the HDD Activity LED. Connect the HDD Activity LED cable to hear system beeps and warnings. • ATX power button/soft-...
User Manual
Page 93
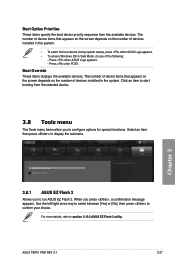
... confirm your choice. EFI BIOS Utility - For more details, refer to run ASUS EZ Flash 2. Boot Override These items displays the available devices. ASUS P8P67 PRO REV 3.1 3-27 Profile Monitor Boot Tool Be used to update BIOS 3.8.1 ASUS EZ Flash 2 Allows you to section 3.10.2 ASUS EZ Flash 2 utility. Use the left/right arrow key to select between [Yes...
... confirm your choice. EFI BIOS Utility - For more details, refer to run ASUS EZ Flash 2. Boot Override These items displays the available devices. ASUS P8P67 PRO REV 3.1 3-27 Profile Monitor Boot Tool Be used to update BIOS 3.8.1 ASUS EZ Flash 2 Allows you to section 3.10.2 ASUS EZ Flash 2 utility. Use the left/right arrow key to select between [Yes...
User Manual
Page 94
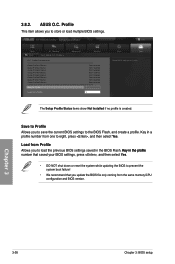
... version. Load from Profile Allows you to load the previous BIOS settings saved in the BIOS Flash. �K�e��y��in a profile number from one to the BIOS Flash, and create a profile. EFI BIOS Utility - Save to Profile Allows you to Profile The... Setup Profile Status items show Not Installed if no profile is created. ASUS O.C. 3.8.2. Key in ��t�h�e��&#...
... version. Load from Profile Allows you to load the previous BIOS settings saved in the BIOS Flash. �K�e��y��in a profile number from one to the BIOS Flash, and create a profile. EFI BIOS Utility - Save to Profile Allows you to Profile The... Setup Profile Status items show Not Installed if no profile is created. ASUS O.C. 3.8.2. Key in ��t�h�e��&#...
User Manual
Page 96
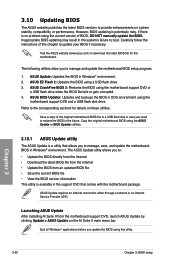
... program. 1. Save a copy of the original motherboard BIOS file to a USB flash disk in the future. Copy the original motherboard BIOS using the motherboard support DVD and a USB flash disk drive. ASUS Update requires an Internet connection either through a network or an Internet Service Provider (...and backups the BIOS in Windows® environment. 2. The ASUS Update utility allows you update the BIOS using the current version of this motherboard. ASUS EZ Flash 2: Updates the BIOS using the motherboard support DVD or a USB flash drive when the BIOS file fails or gets corrupted. 4. ...
... program. 1. Save a copy of the original motherboard BIOS file to a USB flash disk in the future. Copy the original motherboard BIOS using the motherboard support DVD and a USB flash disk drive. ASUS Update requires an Internet connection either through a network or an Internet Service Provider (...and backups the BIOS in Windows® environment. 2. The ASUS Update utility allows you update the BIOS using the current version of this motherboard. ASUS EZ Flash 2: Updates the BIOS using the motherboard support DVD or a USB flash drive when the BIOS file fails or gets corrupted. 4. ...
User Manual
Page 99
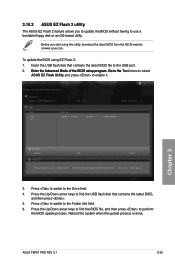
... the BIOS update process. Reboot the system when the update process is done. Chapter 3 ASUS P8P67 PRO REV 3.1 3-33 3.10.2 ASUS EZ Flash 2 utility The ASUS EZ Flash 2 feature allows you start using EZ Flash 2: 1. ASUSTek EZ Flash BIOS ROM Utility V00.75 Flash Info MODEL: P8P67 PRO REV 3.1 VER: 0301 fs0:\ Drive fs0:\ fs1:\ Folder Info 08/05/10 10:23p...
... the BIOS update process. Reboot the system when the update process is done. Chapter 3 ASUS P8P67 PRO REV 3.1 3-33 3.10.2 ASUS EZ Flash 2 utility The ASUS EZ Flash 2 feature allows you start using EZ Flash 2: 1. ASUSTek EZ Flash BIOS ROM Utility V00.75 Flash Info MODEL: P8P67 PRO REV 3.1 VER: 0301 fs0:\ Drive fs0:\ fs1:\ Folder Info 08/05/10 10:23p...
User Manual
Page 100
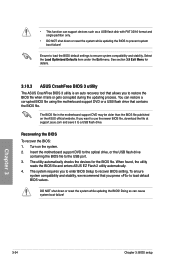
... boot failure! To ensure system compatibility and stability, we recommend that contains the BIOS file. Turn on the ASUS official website. Insert the motherboard support DVD to the optical drive, or the USB flash drive containing the BIOS file to ensure system compatibility and stability. Recovering the BIOS To recover the BIOS... while updating the BIOS! Ensure to load the BIOS default settings to the USB port. 3. When found, the utility reads the BIOS file and enters ASUS EZ Flash 2 utility automatically. 4. The system requires you press to recover BIOS setting.
... boot failure! To ensure system compatibility and stability, we recommend that contains the BIOS file. Turn on the ASUS official website. Insert the motherboard support DVD to the optical drive, or the USB flash drive containing the BIOS file to ensure system compatibility and stability. Recovering the BIOS To recover the BIOS... while updating the BIOS! Ensure to load the BIOS default settings to the USB port. 3. When found, the utility reads the BIOS file and enters ASUS EZ Flash 2 utility automatically. 4. The system requires you press to recover BIOS setting.
User Manual
Page 101
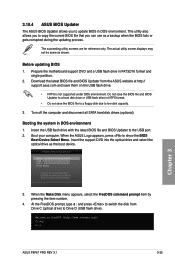
...hard disk drives (optional). When the Make Disk menu appears, select the FreeDOS command prompt item by pressing the item number. 4. C:\>d: D:\> Chapter 3 ASUS P8P67 PRO REV 3.1 3-35 The actual utility screen displays may not be same as a backup when the BIOS fails or gets corrupted during the updating process. ...also allows you to copy the current BIOS file that you to update BIOS in NTFS format. • Do not save them on the USB flash drive. • NTFS is not supported under DOS environment. Booting the system in FAT32/16 format and single partition. 2. At the FreeDOS prompt...
...hard disk drives (optional). When the Make Disk menu appears, select the FreeDOS command prompt item by pressing the item number. 4. C:\>d: D:\> Chapter 3 ASUS P8P67 PRO REV 3.1 3-35 The actual utility screen displays may not be same as a backup when the BIOS fails or gets corrupted during the updating process. ...also allows you to copy the current BIOS file that you to update BIOS in NTFS format. • Do not save them on the USB flash drive. • NTFS is not supported under DOS environment. Booting the system in FAT32/16 format and single partition. 2. At the FreeDOS prompt...
User Manual
Page 102
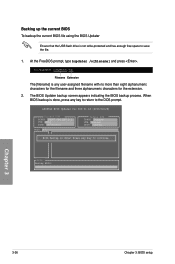
Backing up the current BIOS To backup the current BIOS file using the BIOS Updater Ensure that the USB flash drive is done, press any key to return to the DOS prompt. When BIOS backup is not write-protected and has enough free space to ... bupdater /o[filename] and press . Note Saving BIOS: Chapter 3 3-36 Chapter 3: BIOS setup ASUSTek BIOS Updater for DOS V1.18 [2010/04/29] Current ROM BOARD: P8P67 PRO REV 3.1 VER: 0204 DATE: 08/05/2010 Update ROM BOARD: Unknown VER: Unknown DATE: Unknown PATH: A:\ BIOS backup is any key to save the file. 1.
Backing up the current BIOS To backup the current BIOS file using the BIOS Updater Ensure that the USB flash drive is done, press any key to return to the DOS prompt. When BIOS backup is not write-protected and has enough free space to ... bupdater /o[filename] and press . Note Saving BIOS: Chapter 3 3-36 Chapter 3: BIOS setup ASUSTek BIOS Updater for DOS V1.18 [2010/04/29] Current ROM BOARD: P8P67 PRO REV 3.1 VER: 0204 DATE: 08/05/2010 Update ROM BOARD: Unknown VER: Unknown DATE: Unknown PATH: A:\ BIOS backup is any key to save the file. 1.
User Manual
Page 124
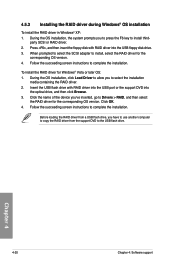
During the OS installation, click Load Driver to allow you have to use another computer to copy the RAID driver from a USB flash drive, you to select the installation media containing the RAID driver. 2. Click OK. 4. Follow the succeeding screen instructions to complete the ... instructions to complete the installation. Chapter 4 4-20 Chapter 4: Software support When prompted to select the SCSI adapter to the USB flash drive. Insert the USB flash drive with RAID driver into the optical drive, and then click Browse. 3. Before loading the RAID driver from the support DVD...
During the OS installation, click Load Driver to allow you have to use another computer to copy the RAID driver from a USB flash drive, you to select the installation media containing the RAID driver. 2. Click OK. 4. Follow the succeeding screen instructions to complete the ... instructions to complete the installation. Chapter 4 4-20 Chapter 4: Software support When prompted to select the SCSI adapter to the USB flash drive. Insert the USB flash drive with RAID driver into the optical drive, and then click Browse. 3. Before loading the RAID driver from the support DVD...


