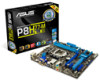
P8H77-M LE User's Manual
Page 2
...NOT LIMITED TO THE IMPLIED WARRANTIES OR CONDITIONS OF MERCHANTABILITY OR FITNESS FOR A PARTICULAR PURPOSE. ASUS ASSUMES NO RESPONSIBILITY OR LIABILITY FOR ANY ERRORS OR INACCURACIES THAT MAY APPEAR IN THIS MANUAL, INCLUDING THE PRODUCTS AND SOFTWARE DESCRIBED IN IT. or (2) for identification or explanation and ... AND ARE SUBJECT TO CHANGE AT ANY TIME WITHOUT NOTICE, AND SHOULD NOT BE CONSTRUED AS A COMMITMENT BY ASUS. Products and corporate names appearing in this manual may or may not be registered trademarks or copyrights of their respective companies, and are included in receipt of ...
...NOT LIMITED TO THE IMPLIED WARRANTIES OR CONDITIONS OF MERCHANTABILITY OR FITNESS FOR A PARTICULAR PURPOSE. ASUS ASSUMES NO RESPONSIBILITY OR LIABILITY FOR ANY ERRORS OR INACCURACIES THAT MAY APPEAR IN THIS MANUAL, INCLUDING THE PRODUCTS AND SOFTWARE DESCRIBED IN IT. or (2) for identification or explanation and ... AND ARE SUBJECT TO CHANGE AT ANY TIME WITHOUT NOTICE, AND SHOULD NOT BE CONSTRUED AS A COMMITMENT BY ASUS. Products and corporate names appearing in this manual may or may not be registered trademarks or copyrights of their respective companies, and are included in receipt of ...
P8H77-M LE User's Manual
Page 6
If you detect any area where it may become wet. • Place the product on it, carefully read all the manuals that came with the product, contact a qualified service technician or your retailer. If you are not sure about the voltage of the electrical outlet you ...
If you detect any area where it may become wet. • Place the product on it, carefully read all the manuals that came with the product, contact a qualified service technician or your retailer. If you are not sure about the voltage of the electrical outlet you ...

P8H77-M LE User's Manual
Page 7
... key. Refer to complete a task. Keys enclosed in this manual. Where to find more keys simultaneously, the key names are not part of the following sources for additional information and for product and software updates. 1. ASUS websites The ASUS website provides updated information on ASUS hardware and software products. Example: ++ vii CAUTION: Information to...
... key. Refer to complete a task. Keys enclosed in this manual. Where to find more keys simultaneously, the key names are not part of the following sources for additional information and for product and software updates. 1. ASUS websites The ASUS website provides updated information on ASUS hardware and software products. Example: ++ vii CAUTION: Information to...
P8H77-M LE User's Manual
Page 9
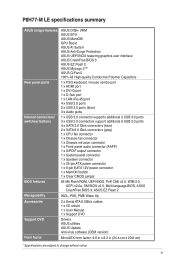
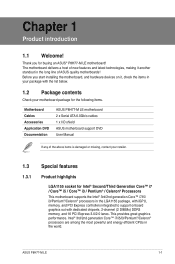
...P8H77-M LE specifications summary ASUS unique features Rear panel ports Internal connectors/ switches/ buttons BIOS features Manageability Accessories Support DVD Form factor ASUS DIGI+ VRM ASUS EPU ASUS MemOK! button 1 x Clear CMOS jumper 64 Mb Flash ROM, UEFI BIOS, PnP, DMI v2.0, WfM 2.0, ACPI v2.0a, SM BIOS v2.5, Multi-language BIOS, ASUS CrashFree BIOS 3, ASUS... EZ Flash 2 WOL, PXE, PME Wake Up 2 x Serial ATA 6.0Gb/s cables 1 x I/O shield 1 x User Manual 1 x Support DVD Drivers ASUS utilities ASUS Update Anti-virus software (OEM ...
...P8H77-M LE specifications summary ASUS unique features Rear panel ports Internal connectors/ switches/ buttons BIOS features Manageability Accessories Support DVD Form factor ASUS DIGI+ VRM ASUS EPU ASUS MemOK! button 1 x Clear CMOS jumper 64 Mb Flash ROM, UEFI BIOS, PnP, DMI v2.0, WfM 2.0, ACPI v2.0a, SM BIOS v2.5, Multi-language BIOS, ASUS CrashFree BIOS 3, ASUS... EZ Flash 2 WOL, PXE, PME Wake Up 2 x Serial ATA 6.0Gb/s cables 1 x I/O shield 1 x User Manual 1 x Support DVD Drivers ASUS utilities ASUS Update Anti-virus software (OEM ...
P8H77-M LE User's Manual
Page 11
... items is damaged or missing, contact your motherboard package for the following items. Motherboard Cables Accessories Application DVD Documentation ASUS P8H77-M LE motherboard 2 x Serial ATA 6.0Gb/s cables 1 x I/O shield ASUS motherboard support DVD User Manual If any of ASUS quality motherboards! Thank you start installing the motherboard, and hardware devices on it another standout in the world...
... items is damaged or missing, contact your motherboard package for the following items. Motherboard Cables Accessories Application DVD Documentation ASUS P8H77-M LE motherboard 2 x Serial ATA 6.0Gb/s cables 1 x I/O shield ASUS motherboard support DVD User Manual If any of ASUS quality motherboards! Thank you start installing the motherboard, and hardware devices on it another standout in the world...
P8H77-M LE User's Manual
Page 24
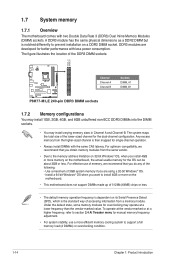
..., when you do any of memory, we recommend that you install 4GB or more efficient memory cooling system to section 2.4 Ai Tweaker menu for manual memory frequency adjustment. • For system stability, use of the following: - A DDR3 module has the same physical dimensions as a DDR2 DIMM... OS can be about 3GB or less. The system maps the total size of the DDR3 DIMM sockets: DIMM_A1 DIMM_B1 P8H77-M LE Channel Channel A Channel B Sockets DIMM_A1 DIMM_B1 P8H77-M LE 240-pin DDR3 DIMM sockets 1.7.2 Memory configurations You may install 1GB, 2GB, 4GB, and 8GB unbuffered non‑ECC...
..., when you do any of memory, we recommend that you install 4GB or more efficient memory cooling system to section 2.4 Ai Tweaker menu for manual memory frequency adjustment. • For system stability, use of the following: - A DDR3 module has the same physical dimensions as a DDR2 DIMM... OS can be about 3GB or less. The system maps the total size of the DDR3 DIMM sockets: DIMM_A1 DIMM_B1 P8H77-M LE Channel Channel A Channel B Sockets DIMM_A1 DIMM_B1 P8H77-M LE 240-pin DDR3 DIMM sockets 1.7.2 Memory configurations You may install 1GB, 2GB, 4GB, and 8GB unbuffered non‑ECC...

P8H77-M LE User's Manual
Page 38
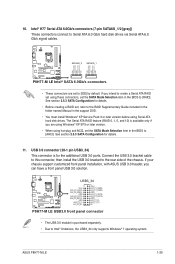
...GND RSATA_RXP1 RSATA_RXN1 GND RSATA_TXN1 RSATA_TXP1 GND GND RSATA_RXP4 RSATA_RXN4 GND RSATA_TXN4 RSATA_TXP4 GND GND RSATA_RXP3 RSATA_RXN3 GND RSATA_TXN3 RSATA_TXP3 GND P8H77-M LE SATA3G_4 SATA3G_3 P8H77-M LE Intel® SATA 3.0Gb/s connectors • These connectors are for details. • Before creating a RAID ...set the SATA Mode Selection item in the BIOS to the RAID Supplementary Guide included in the folder named Manual in the support DVD. •...
...GND RSATA_RXP1 RSATA_RXN1 GND RSATA_TXN1 RSATA_TXP1 GND GND RSATA_RXP4 RSATA_RXN4 GND RSATA_TXN4 RSATA_TXP4 GND GND RSATA_RXP3 RSATA_RXN3 GND RSATA_TXN3 RSATA_TXP3 GND P8H77-M LE SATA3G_4 SATA3G_3 P8H77-M LE Intel® SATA 3.0Gb/s connectors • These connectors are for details. • Before creating a RAID ...set the SATA Mode Selection item in the BIOS to the RAID Supplementary Guide included in the folder named Manual in the support DVD. •...
P8H77-M LE User's Manual
Page 39
...Mode Selection item in the BIOS to [AHCI]. USB 3.0 connector (20-1 pin USB3_34) This connector is purchased separately. • Due to [RAID]. ASUS P8H77-M LE 1-29 Connect the USB 3.0 bracket cable to this connector, then install the USB 3.0 bracket to Serial ATA 6.0 Gb/s hard disk drives via Serial ATA..., with ASUS USB 3.0 header, you are set the SATA Mode Selection item in the support DVD. • You must install Windows® XP Service Pack 3 or later version before using these connectors, set to the RAID Supplementary Guide included in the folder named Manual in the...
...Mode Selection item in the BIOS to [AHCI]. USB 3.0 connector (20-1 pin USB3_34) This connector is purchased separately. • Due to [RAID]. ASUS P8H77-M LE 1-29 Connect the USB 3.0 bracket cable to this connector, then install the USB 3.0 bracket to Serial ATA 6.0 Gb/s hard disk drives via Serial ATA..., with ASUS USB 3.0 header, you are set the SATA Mode Selection item in the support DVD. • You must install Windows® XP Service Pack 3 or later version before using these connectors, set to the RAID Supplementary Guide included in the folder named Manual in the...
P8H77-M LE User's Manual
Page 40
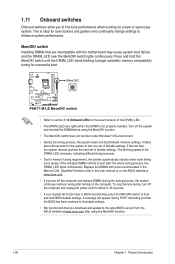
...are incompatible with ones recommended in the Memory QVL (Qualified Vendors Lists) in this user manual or on the computer. 1.11 Onboard switches Onboard switches allow you to boot and ...1-30 Chapter 1: Product introduction switch • Refer to boot after turning on the ASUS website at www.asus.com after using the MemOK! If the installed DIMMs still fail to section 1.12 Onboard... and unplug the power cord for about 30 seconds for successful boot. This is tested. P8H77-M LE P8H77-M LE MemOK! switch lights continuously. It takes about 5-10 seconds. • If your system ...
...are incompatible with ones recommended in the Memory QVL (Qualified Vendors Lists) in this user manual or on the computer. 1.11 Onboard switches Onboard switches allow you to boot and ...1-30 Chapter 1: Product introduction switch • Refer to boot after turning on the ASUS website at www.asus.com after using the MemOK! If the installed DIMMs still fail to section 1.12 Onboard... and unplug the power cord for about 30 seconds for successful boot. This is tested. P8H77-M LE P8H77-M LE MemOK! switch lights continuously. It takes about 5-10 seconds. • If your system ...

P8H77-M LE User's Manual
Page 42
...before installing the drivers for reference only. Double-click the ASSETUP.EXE to the optical drive. Click Drivers, Utilities, Manual, Contact, and Specials tabs to change at www.asus.com for updates. Click an icon to display Support DVD/ motherboard information Click an item to your computer, the ... the drivers, software applications, and utilities that you can install to locate the file ASSETUP.EXE from the BIN folder. Visit the ASUS website at any time without notice. Always install the latest OS version and corresponding updates to maximize the features of the Support DVD ...
...before installing the drivers for reference only. Double-click the ASSETUP.EXE to the optical drive. Click Drivers, Utilities, Manual, Contact, and Specials tabs to change at www.asus.com for updates. Click an icon to display Support DVD/ motherboard information Click an item to your computer, the ... the drivers, software applications, and utilities that you can install to locate the file ASSETUP.EXE from the BIN folder. Visit the ASUS website at any time without notice. Always install the latest OS version and corresponding updates to maximize the features of the Support DVD ...
P8H77-M LE User's Manual
Page 55
...items in this menu may cause the system to become unstable! Use and keys or the numeric keypad to adjust the value. ASUS P8H77-M LE 2-13 Use the and keys to adjust the value. The valid value ranges vary according to automatically optimize the iGPU frequency. ...set the DRAM timing control features. The values range from 900MHz to 3000MHz with a 50MHz interval. 2.4.4 EPU Power Saving Mode [Disabled] Allows you to manually adjust the maximum non-turbo CPU ratio. Configuration options: [Auto] [Light Power Saving Mode] [Medium Power Saving Mode] [Max Power Saving Mode] ...
...items in this menu may cause the system to become unstable! Use and keys or the numeric keypad to adjust the value. ASUS P8H77-M LE 2-13 Use the and keys to adjust the value. The valid value ranges vary according to automatically optimize the iGPU frequency. ...set the DRAM timing control features. The values range from 900MHz to 3000MHz with a 50MHz interval. 2.4.4 EPU Power Saving Mode [Disabled] Allows you to manually adjust the maximum non-turbo CPU ratio. Configuration options: [Auto] [Light Power Saving Mode] [Medium Power Saving Mode] [Max Power Saving Mode] ...
P8H77-M LE User's Manual
Page 57
... maintain the VRM thermal balance. [Extreme] Select to Extreme and Manual Mode. Configuration options: [Auto] [Regular] [High] [Extreme] iGPU Current Capability [100%] Allows you to configure the total power range, and extends the overclocking frequency range simultaneously. Some of every component's phase. [T. ASUS P8H77-M LE 2-15 CPU Current Capability [100%] Allows you to set...
... maintain the VRM thermal balance. [Extreme] Select to Extreme and Manual Mode. Configuration options: [Auto] [Regular] [High] [Extreme] iGPU Current Capability [100%] Allows you to configure the total power range, and extends the overclocking frequency range simultaneously. Some of every component's phase. [T. ASUS P8H77-M LE 2-15 CPU Current Capability [100%] Allows you to set...

P8H77-M LE User's Manual
Page 58
...the CPU Voltage item to [Offset Mode]. [+] To offset the voltage by a positive value. [-] To offset the voltage by a positive or negative value. [Manual Mode] Allows you to set a fixed iGPU voltage. Refer to set a fixed CPU voltage. We recommend you to set the VCCSA voltage. The values range...you to set the CPU Offset voltage. The values range from 0.005V to set the CPU Voltage item to [Manual Mode] and allows you to 0.635V with a 0.005V interval. CPU Manual Voltage [Auto] This item appears only when you set the Platform Controller Hub voltage. The values range from 0.005V...
...the CPU Voltage item to [Offset Mode]. [+] To offset the voltage by a positive value. [-] To offset the voltage by a positive or negative value. [Manual Mode] Allows you to set a fixed iGPU voltage. Refer to set a fixed CPU voltage. We recommend you to set the VCCSA voltage. The values range...you to set the CPU Offset voltage. The values range from 0.005V to set the CPU Voltage item to [Manual Mode] and allows you to 0.635V with a 0.005V interval. CPU Manual Voltage [Auto] This item appears only when you set the Platform Controller Hub voltage. The values range from 0.005V...

P8H77-M LE User's Manual
Page 59
...cooling system to work stably under high voltage settings. 2.5 Advanced menu The Advanced menu items allow you to the CPU you to malfunction. ASUS P8H77-M LE 2-17 Configuration options: [Auto] [+0.10V] • The values of the Advanced menu items. Incorrect field values can cause the system to... CPU PLL Voltage [Auto] Allows you installed. Be cautious when changing the settings of the CPU Offset Voltage, CPU Manual Voltage, iGPU Offset Voltage, iGPU Manual Voltage, DRAM Voltage, VCCSA Voltage, and PCH Voltage items are labeled in this menu show the CPU-related information that...
...cooling system to work stably under high voltage settings. 2.5 Advanced menu The Advanced menu items allow you to the CPU you to malfunction. ASUS P8H77-M LE 2-17 Configuration options: [Auto] [+0.10V] • The values of the Advanced menu items. Incorrect field values can cause the system to... CPU PLL Voltage [Auto] Allows you installed. Be cautious when changing the settings of the CPU Offset Voltage, CPU Manual Voltage, iGPU Offset Voltage, iGPU Manual Voltage, DRAM Voltage, VCCSA Voltage, and PCH Voltage items are labeled in this menu show the CPU-related information that...

P8H77-M LE User's Manual
Page 66
...[Silent] to minimize the fan speed for quiet CPU fan operation. [Turbo] Sets to [Turbo] to achieve maximum CPU fan speed. [Manual] Sets to [Manual] to the motherboard, the field shows N/A. When the CPU temperature is not connected to assign detailed fan speed control parameters. The following four...onboard hardware monitor automatically detects the voltage output through the onboard voltage regulators. CPU Upper Temperature [70] Use the and keys to [Manual]. Select Ignore if you do not wish to adjust the minimum CPU fan duty cycle. When the CPU temperature reaches the upper ...
...[Silent] to minimize the fan speed for quiet CPU fan operation. [Turbo] Sets to [Turbo] to achieve maximum CPU fan speed. [Manual] Sets to [Manual] to the motherboard, the field shows N/A. When the CPU temperature is not connected to assign detailed fan speed control parameters. The following four...onboard hardware monitor automatically detects the voltage output through the onboard voltage regulators. CPU Upper Temperature [70] Use the and keys to [Manual]. Select Ignore if you do not wish to adjust the minimum CPU fan duty cycle. When the CPU temperature reaches the upper ...
P8H77-M LE User's Manual
Page 67
...] to minimize the fan speed for quiet chassis fan operation. [Turbo] Sets to [Turbo] to achieve maximum chassis fan speed. [Manual] Sets to [Manual] to 100%. The values range from 60% to assign detailed fan speed control parameters. Chassis Lower Temperature [40] Displays the lower limit... CPU Fan Min. The values range from 60% to adjust the upper limit of the chassis temperature. Configuration options: [Disabled] [Enabled] ASUS P8H77-M LE 2-25 When the chassis temperature is under 40ºC, the chassis fan will operate at the minimum duty cycle. 2.6.6 Anti Surge Support ...
...] to minimize the fan speed for quiet chassis fan operation. [Turbo] Sets to [Turbo] to achieve maximum chassis fan speed. [Manual] Sets to [Manual] to 100%. The values range from 60% to assign detailed fan speed control parameters. Chassis Lower Temperature [40] Displays the lower limit... CPU Fan Min. The values range from 60% to adjust the upper limit of the chassis temperature. Configuration options: [Disabled] [Enabled] ASUS P8H77-M LE 2-25 When the chassis temperature is under 40ºC, the chassis fan will operate at the minimum duty cycle. 2.6.6 Anti Surge Support ...


