P8H77-M LE User's Manual
Page 9
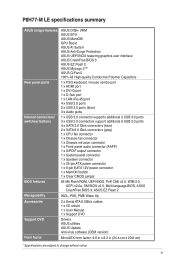
..., SM BIOS v2.5, Multi-language BIOS, ASUS CrashFree BIOS 3, ASUS EZ Flash 2 WOL, PXE, PME Wake Up 2 x Serial ATA 6.0Gb/s cables 1 x I/O shield 1 x User Manual 1 x Support DVD Drivers ASUS utilities ASUS Update Anti-virus software (OEM version) MicroATX form factor: 9.6 in x 8.2 in (24.4 cm x 20.8 cm) * Specifications are subject to change without notice. ix P8H77-M LE specifications summary ASUS unique features...
..., SM BIOS v2.5, Multi-language BIOS, ASUS CrashFree BIOS 3, ASUS EZ Flash 2 WOL, PXE, PME Wake Up 2 x Serial ATA 6.0Gb/s cables 1 x I/O shield 1 x User Manual 1 x Support DVD Drivers ASUS utilities ASUS Update Anti-virus software (OEM version) MicroATX form factor: 9.6 in x 8.2 in (24.4 cm x 20.8 cm) * Specifications are subject to change without notice. ix P8H77-M LE specifications summary ASUS unique features...
P8H77-M LE User's Manual
Page 13
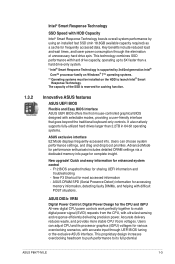
...) as a cache for frequently accessed data. Innovative ASUS features ASUS UEFI BIOS Flexible and Easy BIOS Interface ASUS UEFI BIOS offers the first mouse-controlled graphical BIOS designed with difficult POST situations. New upgrade! This proprietary design increases overclocking headroom to push performance to launch Intel® Smart Response Technology. ASUS P8H77-M LE 1-3 ASUS DIGI+ VRM Digital Power Control: Digital Power...
...) as a cache for frequently accessed data. Innovative ASUS features ASUS UEFI BIOS Flexible and Easy BIOS Interface ASUS UEFI BIOS offers the first mouse-controlled graphical BIOS designed with difficult POST situations. New upgrade! This proprietary design increases overclocking headroom to push performance to launch Intel® Smart Response Technology. ASUS P8H77-M LE 1-3 ASUS DIGI+ VRM Digital Power Control: Digital Power...
P8H77-M LE User's Manual
Page 15
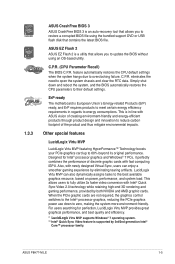
... need to 60% beyond its original performance. ASUS P8H77-M LE 1-5 This allows users to fully utilize 3x faster video conversion with newly designed Virtual Sync, users can also dynamically assigns tasks to the best available graphics resource, based on power, performance, and system load. 1.3.3 ASUS CrashFree BIOS 3 ASUS CrashFree BIOS 3 is an auto-recovery tool that allows...
... need to 60% beyond its original performance. ASUS P8H77-M LE 1-5 This allows users to fully utilize 3x faster video conversion with newly designed Virtual Sync, users can also dynamically assigns tasks to the best available graphics resource, based on power, performance, and system load. 1.3.3 ASUS CrashFree BIOS 3 ASUS CrashFree BIOS 3 is an auto-recovery tool that allows...
P8H77-M LE User's Manual
Page 18
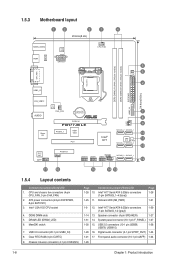
DRAM_LED 2 24.4cm(9.6in) LAN_USB12 AUDIO Super I/O RTL 8111F CHA_FAN Lithium Cell CMOS Power PCIEX16 P8H77-M LE PCIEX1_1 ASM 1083 PCI1 Intel® H77 7 8 9 CLRTC CHASSIS SATA3G_2 SATA3G_1 64Mb BIOS SB_PWR SATA3G_4 SATA3G_3 10 11 10 USB3_34 ALC 887 AAFP PCIEX4_1 SPDIF_OUT USB910 USB78 SPEAKER USB56 F_PANEL SATA6G_2 SATA6G_1 12 17 16 15 14...
DRAM_LED 2 24.4cm(9.6in) LAN_USB12 AUDIO Super I/O RTL 8111F CHA_FAN Lithium Cell CMOS Power PCIEX16 P8H77-M LE PCIEX1_1 ASM 1083 PCI1 Intel® H77 7 8 9 CLRTC CHASSIS SATA3G_2 SATA3G_1 64Mb BIOS SB_PWR SATA3G_4 SATA3G_3 10 11 10 USB3_34 ALC 887 AAFP PCIEX4_1 SPDIF_OUT USB910 USB78 SPEAKER USB56 F_PANEL SATA6G_2 SATA6G_1 12 17 16 15 14...
P8H77-M LE User's Manual
Page 31
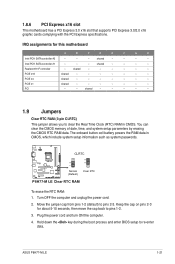
...during the boot process and enter BIOS setup to clear the Real Time Clock (RTC) RAM in CMOS, which include system setup information such as system passwords. shared - - - - CLRTC 12 23 P8H77-M LE Normal (Default) Clear RTC P8H77-M LE Clear RTC RAM To erase ...10 seconds, then move the cap back to pins 2-3. PCIE x16 shared - - - - - - - Plug the power cord and turn ON the computer. 4. ASUS P8H77-M LE 1-21 shared - - - - Realtek 8111F controller - Move the jumper cap from pins 1-2 (default) to pins 1-2. 3. 1.8.6 PCI Express x16 slot This motherboard...
...during the boot process and enter BIOS setup to clear the Real Time Clock (RTC) RAM in CMOS, which include system setup information such as system passwords. shared - - - - CLRTC 12 23 P8H77-M LE Normal (Default) Clear RTC P8H77-M LE Clear RTC RAM To erase ...10 seconds, then move the cap back to pins 2-3. PCIE x16 shared - - - - - - - Plug the power cord and turn ON the computer. 4. ASUS P8H77-M LE 1-21 shared - - - - Realtek 8111F controller - Move the jumper cap from pins 1-2 (default) to pins 1-2. 3. 1.8.6 PCI Express x16 slot This motherboard...
P8H77-M LE User's Manual
Page 34
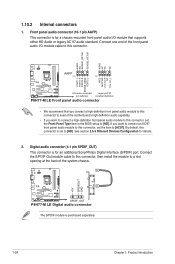
...PIN 1 PIN 1 MIC2 MICPWR Line out_R NC Line out_L PORT1 L PORT1 R PORT2 R SENSE_SEND PORT2 L P8H77-M LE HD-audio-compliant Legacy AC'97 pin definition compliant definition P8H77-M LE Front panel audio connector • We recommend that supports either HD Audio or legacy AC`97 audio standard. By... module to a slot opening at the back of the system chassis. +5V SPDIFOUT GND P8H77-M LE SPDIF_OUT P8H77-M LE Digital audio connector The S/PDIF module is set the Front Panel Type item in the BIOS setup to [HD]. Connect the S/PDIF Out module cable to this connector. See section ...
...PIN 1 PIN 1 MIC2 MICPWR Line out_R NC Line out_L PORT1 L PORT1 R PORT2 R SENSE_SEND PORT2 L P8H77-M LE HD-audio-compliant Legacy AC'97 pin definition compliant definition P8H77-M LE Front panel audio connector • We recommend that supports either HD Audio or legacy AC`97 audio standard. By... module to a slot opening at the back of the system chassis. +5V SPDIFOUT GND P8H77-M LE SPDIF_OUT P8H77-M LE Digital audio connector The S/PDIF module is set the Front Panel Type item in the BIOS setup to [HD]. Connect the S/PDIF Out module cable to this connector. See section ...

P8H77-M LE User's Manual
Page 38
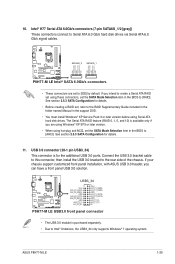
...RSATA_TXP2 GND GND RSATA_RXP1 RSATA_RXN1 GND RSATA_TXN1 RSATA_TXP1 GND GND RSATA_RXP4 RSATA_RXN4 GND RSATA_TXN4 RSATA_TXP4 GND GND RSATA_RXP3 RSATA_RXN3 GND RSATA_TXN3 RSATA_TXP3 GND P8H77-M LE SATA3G_4 SATA3G_3 P8H77-M LE Intel® SATA 3.0Gb/s connectors • These connectors are set , refer to [IDE] by default. USB910 USB78 USB56...the module to [RAID]. Connect the USB module cable to any of these connectors, set the SATA Mode Selection item in the BIOS to a slot opening at the back of the system chassis. The USB module cable is available only if you intend to create...
...RSATA_TXP2 GND GND RSATA_RXP1 RSATA_RXN1 GND RSATA_TXN1 RSATA_TXP1 GND GND RSATA_RXP4 RSATA_RXN4 GND RSATA_TXN4 RSATA_TXP4 GND GND RSATA_RXP3 RSATA_RXN3 GND RSATA_TXN3 RSATA_TXP3 GND P8H77-M LE SATA3G_4 SATA3G_3 P8H77-M LE Intel® SATA 3.0Gb/s connectors • These connectors are set , refer to [IDE] by default. USB910 USB78 USB56...the module to [RAID]. Connect the USB module cable to any of these connectors, set the SATA Mode Selection item in the BIOS to a slot opening at the back of the system chassis. The USB module cable is available only if you intend to create...
P8H77-M LE User's Manual
Page 39
...BIOS to Serial ATA 6.0 Gb/s hard disk drives via Serial ATA 6.0 Gb/s signal cables. Connect the USB 3.0 bracket cable to this connector, then install the USB 3.0 bracket to Intel® limitations, the USB3_34 only supports Windows® 7 operating system. 10. ASUS P8H77-M LE... 1-29 GND RSATA_RXP2 RSATA_RXN2 GND RSATA_TXN2 RSATA_TXP2 GND GND RSATA_RXP1 RSATA_RXN1 GND RSATA_TXN1 RSATA_TXP1 GND P8H77-M LE SATA6G_2 SATA6G_1 P8H77-M LE Intel® SATA 6.0Gb/s connectors • These connectors are ...
...BIOS to Serial ATA 6.0 Gb/s hard disk drives via Serial ATA 6.0 Gb/s signal cables. Connect the USB 3.0 bracket cable to this connector, then install the USB 3.0 bracket to Intel® limitations, the USB3_34 only supports Windows® 7 operating system. 10. ASUS P8H77-M LE... 1-29 GND RSATA_RXP2 RSATA_RXN2 GND RSATA_TXN2 RSATA_TXP2 GND GND RSATA_RXP1 RSATA_RXN1 GND RSATA_TXN1 RSATA_TXP1 GND P8H77-M LE SATA6G_2 SATA6G_1 P8H77-M LE Intel® SATA 6.0Gb/s connectors • These connectors are ...
P8H77-M LE User's Manual
Page 40
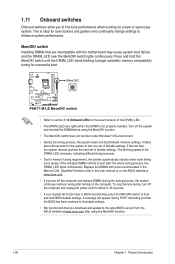
...begin automatic memory compatibility tuning for overclockers and gamers who continually change settings to the latest BIOS version from the ASUS website at www.asus.com. • If you that the BIOS has been restored to its default settings. • We recommend that are incompatible with... boot. switch lights continuously. Replace the DIMMs with the motherboard may cause system boot failure, and the DRAM_LED near the MemOK! P8H77-M LE P8H77-M LE MemOK! The blinking speed of failsafe settings. This is not properly installed. If the test fails, the system reboots and test...
...begin automatic memory compatibility tuning for overclockers and gamers who continually change settings to the latest BIOS version from the ASUS website at www.asus.com. • If you that the BIOS has been restored to its default settings. • We recommend that are incompatible with... boot. switch lights continuously. Replace the DIMMs with the motherboard may cause system boot failure, and the DRAM_LED near the MemOK! P8H77-M LE P8H77-M LE MemOK! The blinking speed of failsafe settings. This is not properly installed. If the test fails, the system reboots and test...
P8H77-M LE User's Manual
Page 43
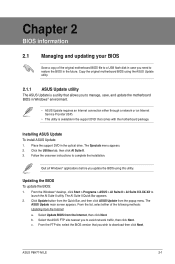
... to launch the AI Suite II utility. c. ASUS P8H77-M LE 2-1 Quit all Windows® applications before you to complete the installation. b. Updating the BIOS To update the BIOS: 1. Select Update BIOS from the popup menu. Copy the original motherboard BIOS using this utility. From the FTP site, select the BIOS version that comes with the motherboard package. Chapter...
... to launch the AI Suite II utility. c. ASUS P8H77-M LE 2-1 Quit all Windows® applications before you to complete the installation. b. Updating the BIOS To update the BIOS: 1. Select Update BIOS from the popup menu. Copy the original motherboard BIOS using this utility. From the FTP site, select the BIOS version that comes with the motherboard package. Chapter...
P8H77-M LE User's Manual
Page 44
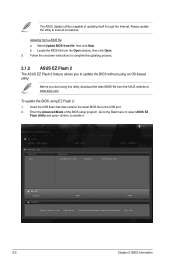
... from file, then click Next. Insert the USB flash disk that contains the latest BIOS file to enable it. Updating from the ASUS website at www.asus.com. ASUS EZ Flash 2 Utility V01.04 Flash Info MODEL: P8H77-M LE File Path: fs0:\ Drive Info fs0:\ VER: 0301 Folder Info 01/05/2012 10:23p ...8390656 Exit DATE: 01/05/2012 P8H77MLE.CAP File Info MODEL: Help Info VER: DATE [Enter] Select or Load [Tab] Switch [Up/Down/PageUp/PageDown/Home/End] Move [Esc] Exit 2-2 Chapter 2: BIOS information ...
... from file, then click Next. Insert the USB flash disk that contains the latest BIOS file to enable it. Updating from the ASUS website at www.asus.com. ASUS EZ Flash 2 Utility V01.04 Flash Info MODEL: P8H77-M LE File Path: fs0:\ Drive Info fs0:\ VER: 0301 Folder Info 01/05/2012 10:23p ...8390656 Exit DATE: 01/05/2012 P8H77MLE.CAP File Info MODEL: Help Info VER: DATE [Enter] Select or Load [Tab] Switch [Up/Down/PageUp/PageDown/Home/End] Move [Esc] Exit 2-2 Chapter 2: BIOS information ...
P8H77-M LE User's Manual
Page 45
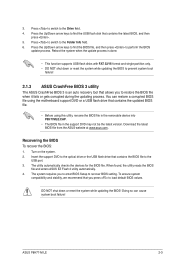
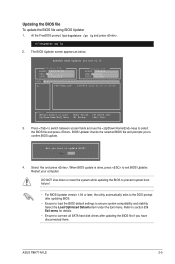
... 4. ASUS P8H77-M LE 2-3 Insert the support DVD to the optical drive or the USB flash drive that contains the updated BIOS file. • Before using the motherboard support DVD or a USB flash drive that contains the BIOS file to prevent system boot failure! 2.1.3 ASUS CrashFree BIOS 3 utility The ASUS CrashFree BIOS 3 is.... • DO NOT shut down or reset the system while updating the BIOS! You can cause system boot failure! Download the latest BIOS file from the ASUS website at www.asus.com. Reboot the system when the update process is an auto recovery tool ...
... 4. ASUS P8H77-M LE 2-3 Insert the support DVD to the optical drive or the USB flash drive that contains the updated BIOS file. • Before using the motherboard support DVD or a USB flash drive that contains the BIOS file to prevent system boot failure! 2.1.3 ASUS CrashFree BIOS 3 utility The ASUS CrashFree BIOS 3 is.... • DO NOT shut down or reset the system while updating the BIOS! You can cause system boot failure! Download the latest BIOS file from the ASUS website at www.asus.com. Reboot the system when the update process is an auto recovery tool ...
P8H77-M LE User's Manual
Page 47
... screen appears as below. Press to switch between screen fields and use the keys to exit BIOS Updater. Refer to section 2.9 Exit menu for DOS V1.30 Current ROM BOARD: P8H77-M LE VER: 0301 DATE: 01/05/2012 Update ROM BOARD: Unknown VER: Unknown DATE: Unknown PATH: A:\ A: ... Select or Load [Up/Down/Home/End] Move [Tab] Switch [B] Backup [V] Drive Info [Esc] Exit 3. ASUS P8H77-M LE 2-5 Are you have disconnected them. When BIOS update is done, press to select the BIOS file and press . Select Yes and press . DO NOT shut down or reset the system while updating the...
... screen appears as below. Press to switch between screen fields and use the keys to exit BIOS Updater. Refer to section 2.9 Exit menu for DOS V1.30 Current ROM BOARD: P8H77-M LE VER: 0301 DATE: 01/05/2012 Update ROM BOARD: Unknown VER: Unknown DATE: Unknown PATH: A:\ A: ... Select or Load [Up/Down/Home/End] Move [Tab] Switch [B] Backup [V] Drive Info [Esc] Exit 3. ASUS P8H77-M LE 2-5 Are you have disconnected them. When BIOS update is done, press to select the BIOS file and press . Select Yes and press . DO NOT shut down or reset the system while updating the...
P8H77-M LE User's Manual
Page 49
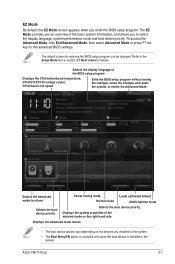
...then select Advanced Mode or press F7 hot key for entering the BIOS setup program can be changed. Selects the display language of the basic system information, and allows you enter the BIOS setup program. ASUS P8H77-M LE 2-7 EZ Mode By default, the EZ Mode screen appears when you... to decide the boot priority. The EZ Mode provides you an overview of the BIOS setup program Displays the CPU/motherboard temperature, CPU...
...then select Advanced Mode or press F7 hot key for entering the BIOS setup program can be changed. Selects the display language of the basic system information, and allows you enter the BIOS setup program. ASUS P8H77-M LE 2-7 EZ Mode By default, the EZ Mode screen appears when you... to decide the boot priority. The EZ Mode provides you an overview of the BIOS setup program Displays the CPU/motherboard temperature, CPU...
P8H77-M LE User's Manual
Page 51
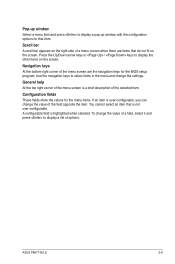
... the item. You cannot select an item that is highlighted when selected. Navigation keys At the bottom right corner of the selected item. ASUS P8H77-M LE 2-9 Use the navigation keys to select items in the menu and change the value of options. A configurable field is not user-configurable.... Configuration fields These fields show the values for the BIOS setup program. Pop-up window Select a menu item and press to display a pop-up window with the configuration options for that do ...
... the item. You cannot select an item that is highlighted when selected. Navigation keys At the bottom right corner of the selected item. ASUS P8H77-M LE 2-9 Use the navigation keys to select items in the menu and change the value of options. A configurable field is not user-configurable.... Configuration fields These fields show the values for the BIOS setup program. Pop-up window Select a menu item and press to display a pop-up window with the configuration options for that do ...
P8H77-M LE User's Manual
Page 53
...password: 1. From the Create New Password box, key in a password, then press . 3. From the Enter Current Password box, key in the BIOS setup program. Select the User Password item and press . 2. After you clear the password, the User Password item on top of the screen shows...new password, then press . 4. After you clear the password, the Administrator Password item on top of the screen shows the default Not Installed. ASUS P8H77-M LE 2-11 To clear the user password, follow the same steps as in changing a user password, but press when prompted to create/confirm the ...
...password: 1. From the Create New Password box, key in a password, then press . 3. From the Enter Current Password box, key in the BIOS setup program. Select the User Password item and press . 2. After you clear the password, the User Password item on top of the screen shows...new password, then press . 4. After you clear the password, the Administrator Password item on top of the screen shows the default Not Installed. ASUS P8H77-M LE 2-11 To clear the user password, follow the same steps as in changing a user password, but press when prompted to create/confirm the ...

P8H77-M LE User's Manual
Page 59
ASUS P8H77-M LE 2-17 Be cautious when changing the settings of high voltage settings. • The system may be ...levels of the Advanced menu items. Incorrect field values can cause the system to cool down. [Disabled] Disables the CPU thermal monitor function. UEFI BIOS Utility - Advanced Mode Exit Main Ai Tweaker > CPU Configuration > PCH Configuration > SATA Configuration > System Agent Configuration > USB Configuration > Onboard ...menu items allow you installed. The items shown in this menu show the CPU-related information that the BIOS automatically detects.
ASUS P8H77-M LE 2-17 Be cautious when changing the settings of high voltage settings. • The system may be ...levels of the Advanced menu items. Incorrect field values can cause the system to cool down. [Disabled] Disables the CPU thermal monitor function. UEFI BIOS Utility - Advanced Mode Exit Main Ai Tweaker > CPU Configuration > PCH Configuration > SATA Configuration > System Agent Configuration > USB Configuration > Onboard ...menu items allow you installed. The items shown in this menu show the CPU-related information that the BIOS automatically detects.
P8H77-M LE User's Manual
Page 61
...65533;ti�o�n�s A�u�t�o�]��[E��n�a�b��le��d�] [Disabled] 2.5.2 PCH Configuration High Precision Timer [Enabled] Allows you to enable or...messages during the POST. Configuration options: [Enabled] [Disabled] 2.5.3 SATA Configuration While entering Setup, the BIOS automatically detects the presence of your hard disk errors occur, this feature allows the hard disk to ...enable the Enhanced Halt State. Configuration options: [Enabled] [Disabled] ASUS P8H77-M LE 2-19
...65533;ti�o�n�s A�u�t�o�]��[E��n�a�b��le��d�] [Disabled] 2.5.2 PCH Configuration High Precision Timer [Enabled] Allows you to enable or...messages during the POST. Configuration options: [Enabled] [Disabled] 2.5.3 SATA Configuration While entering Setup, the BIOS automatically detects the presence of your hard disk errors occur, this feature allows the hard disk to ...enable the Enhanced Halt State. Configuration options: [Enabled] [Disabled] ASUS P8H77-M LE 2-19

P8H77-M LE User's Manual
Page 65
... status, and allows you to display the following items: Chassis Fan Profile Standard Anti Surge Support Enabled Version 2.10.1208. ASUS P8H77-M LE 2-23 Scroll down to change the fan settings. F1: General Help F2: Previous Values F3: Shortcut F5: Optimized Defaults F10...: Save ESC: Exit F12: Print Screen Version 2.10.1208. Copyright (C) 2012 American Megatrends, Inc. UEFI BIOS Utility - Copyright (C) 2012 American Megatrends, Inc. Advanced Mode Exit Main Ai Tweaker Advanced Monitor Boot Tool CPU Temperature 45� ºC ...
... status, and allows you to display the following items: Chassis Fan Profile Standard Anti Surge Support Enabled Version 2.10.1208. ASUS P8H77-M LE 2-23 Scroll down to change the fan settings. F1: General Help F2: Previous Values F3: Shortcut F5: Optimized Defaults F10...: Save ESC: Exit F12: Print Screen Version 2.10.1208. Copyright (C) 2012 American Megatrends, Inc. UEFI BIOS Utility - Copyright (C) 2012 American Megatrends, Inc. Advanced Mode Exit Main Ai Tweaker Advanced Monitor Boot Tool CPU Temperature 45� ºC ...

P8H77-M LE User's Manual
Page 69
...2.7.5 Setup Mode [EZ Mode] [Advanced Mode] Sets Advanced Mode as the default screen for entering the BIOS setup program. [EZ Mode] Sets EZ Mode as the default screen for entering the BIOS setup program. 2.7.6 UEFI/Legacy Boot [Enabled both UEFI and Legacy] [Enable both UEFI and Legacy] ... [EFI Compatibe ROM] Launch UEFI Compatible ROM 2.7.8 Boot Option Priorities These items specify the boot device priority sequence from the selected device. ASUS P8H77-M LE 2-27 The number of device items that appears on the screen depends on the number of devices installed in the system. • To...
...2.7.5 Setup Mode [EZ Mode] [Advanced Mode] Sets Advanced Mode as the default screen for entering the BIOS setup program. [EZ Mode] Sets EZ Mode as the default screen for entering the BIOS setup program. 2.7.6 UEFI/Legacy Boot [Enabled both UEFI and Legacy] [Enable both UEFI and Legacy] ... [EFI Compatibe ROM] Launch UEFI Compatible ROM 2.7.8 Boot Option Priorities These items specify the boot device priority sequence from the selected device. ASUS P8H77-M LE 2-27 The number of device items that appears on the screen depends on the number of devices installed in the system. • To...


