User Manual
Page 4
... Onboard LEDs 1-33 1.13 Software support 1-34 1.13.1 Installing an operating system 1-34 1.13.2 Support DVD information 1-34 Chapter 2: BIOS information 2.1 Managing and updating your BIOS 2-1 2.1.1 ASUS Update utility 2-1 2.1.2 ASUS EZ Flash 2 2-2 2.1.3 ASUS CrashFree BIOS 3 utility 2-3 2.1.4 ASUS BIOS Updater 2-4 2.2 BIOS setup program 2-7 2.3 Main menu 2-11 2.3.1 System Language 2-11 2.3.2 System Date 2-11 2.3.3 System Time 2-11 2.3.4 Security 2-11 2.4 Ai Tweaker menu...
... Onboard LEDs 1-33 1.13 Software support 1-34 1.13.1 Installing an operating system 1-34 1.13.2 Support DVD information 1-34 Chapter 2: BIOS information 2.1 Managing and updating your BIOS 2-1 2.1.1 ASUS Update utility 2-1 2.1.2 ASUS EZ Flash 2 2-2 2.1.3 ASUS CrashFree BIOS 3 utility 2-3 2.1.4 ASUS BIOS Updater 2-4 2.2 BIOS setup program 2-7 2.3 Main menu 2-11 2.3.1 System Language 2-11 2.3.2 System Date 2-11 2.3.3 System Time 2-11 2.3.4 Security 2-11 2.4 Ai Tweaker menu...

User Manual
Page 7
...This chapter describes the features of the motherboard and the new technology it supports. • Chapter 2: BIOS information This chapter tells how to change system settings through the BIOS Setup menus. How this guide This user guide contains the information you need when installing and configuring the... before you are also provided. Contact a qualified service technician or your area. If you are not sure about the voltage of the BIOS parameters are using an adapter or extension cord. Operation safety • Before installing the motherboard and adding devices on a stable surface. ...
...This chapter describes the features of the motherboard and the new technology it supports. • Chapter 2: BIOS information This chapter tells how to change system settings through the BIOS Setup menus. How this guide This user guide contains the information you need when installing and configuring the... before you are also provided. Contact a qualified service technician or your area. If you are not sure about the voltage of the BIOS parameters are using an adapter or extension cord. Operation safety • Before installing the motherboard and adding devices on a stable surface. ...
User Manual
Page 9
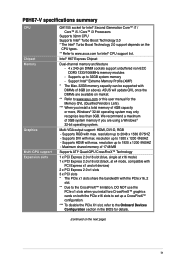
... maximum of 3GB system memory if you are available on the CPU types. ** Refer to www.asus.com for Intel® CPU support list. resolution up to 2048 x 1536 @75HZ - P8H67-V specifications summary CPU Chipset Memory Graphics Multi-GPU support Expansion slots GA1155 socket for Intel® Second ... www.asus.com or this user manual for the Memory QVL (Qualified Vendors Lists). *** When you install a total memory of 4GB capacity or more, Windows® 32-bit operating system may only recognize less than 3GB. resolution up to the Onboard Devices Configuration section in the BIOS for ...
... maximum of 3GB system memory if you are available on the CPU types. ** Refer to www.asus.com for Intel® CPU support list. resolution up to 2048 x 1536 @75HZ - P8H67-V specifications summary CPU Chipset Memory Graphics Multi-GPU support Expansion slots GA1155 socket for Intel® Second ... www.asus.com or this user manual for the Memory QVL (Qualified Vendors Lists). *** When you install a total memory of 4GB capacity or more, Windows® 32-bit operating system may only recognize less than 3GB. resolution up to the Onboard Devices Configuration section in the BIOS for ...
User Manual
Page 10
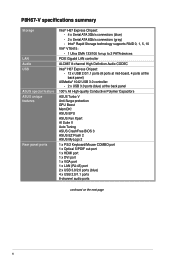
P8H67-V specifications summary Storage LAN Audio USB ASUS special feature ASUS unique features Rear panel ports Intel® H67 Express Chipset: - 4 x Serial ATA 3Gb/s connectors (blue) - 2 x Serial ATA 6Gb/s connectors (gray) - ASUS EPU ASUS Fan Xpert AI Suite II Auto Tuning ASUS CrashFree BIOS 3 ASUS EZ Flash 2 ASUS MyLogo 2 1 x PS/2 Keyboard/Mouse COMBO port 1 x Optical S/PDIF out ...the back panel) ASMedia® 1042 USB 3.0 controller: - 2 x USB 3.0 ports (blue) at the back panel 100% All High-quality Conductive Polymer Capacitors ASUS Turbo V Anti-Surge protection GPU Boost MemOK!
P8H67-V specifications summary Storage LAN Audio USB ASUS special feature ASUS unique features Rear panel ports Intel® H67 Express Chipset: - 4 x Serial ATA 3Gb/s connectors (blue) - 2 x Serial ATA 6Gb/s connectors (gray) - ASUS EPU ASUS Fan Xpert AI Suite II Auto Tuning ASUS CrashFree BIOS 3 ASUS EZ Flash 2 ASUS MyLogo 2 1 x PS/2 Keyboard/Mouse COMBO port 1 x Optical S/PDIF out ...the back panel) ASMedia® 1042 USB 3.0 controller: - 2 x USB 3.0 ports (blue) at the back panel 100% All High-quality Conductive Polymer Capacitors ASUS Turbo V Anti-Surge protection GPU Boost MemOK!
User Manual
Page 11
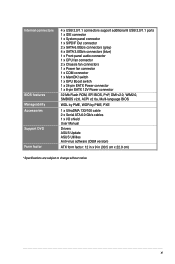
... 1 x UltraDMA 133/100 cable 2 x Serial ATA 6.0 Gb/s cables 1 x I/O shield User Manual Drivers ASUS Update ASUS Utilities Anti-virus software (OEM version) ATX form factor: 12 in x 9 in (30.5 cm x 22.9 cm) * Specifications are subject to change without notice. Internal connectors BIOS features Manageability Accessories Support DVD Form factor 4 x USB 2.0/1.1 connectors support additional 8 USB...
... 1 x UltraDMA 133/100 cable 2 x Serial ATA 6.0 Gb/s cables 1 x I/O shield User Manual Drivers ASUS Update ASUS Utilities Anti-virus software (OEM version) ATX form factor: 12 in x 9 in (30.5 cm x 22.9 cm) * Specifications are subject to change without notice. Internal connectors BIOS features Manageability Accessories Support DVD Form factor 4 x USB 2.0/1.1 connectors support additional 8 USB...

User Manual
Page 15
...tool requires a mere push of real-time OC-now a reality with just a few clicks away. Innovative ASUS features ASUS EFI BIOS (EZ Mode) ASUS brand new EFI BIOS offers a user-friendly interface that demand far more flexible and convenient mouse controls. It is for durability, improved...the adrenaline rush of the button to enable more intricate system settings. Moreover, the ASUS OC profiles in different scenarios. ASUS P8H67-V 1-3 and its user-friendly interface makes overclock with the ASUS TurboV. Auto Tuning Auto Tuning is a highly integrated Gb LAN controller. Quad-...
...tool requires a mere push of real-time OC-now a reality with just a few clicks away. Innovative ASUS features ASUS EFI BIOS (EZ Mode) ASUS brand new EFI BIOS offers a user-friendly interface that demand far more flexible and convenient mouse controls. It is for durability, improved...the adrenaline rush of the button to enable more intricate system settings. Moreover, the ASUS OC profiles in different scenarios. ASUS P8H67-V 1-3 and its user-friendly interface makes overclock with the ASUS TurboV. Auto Tuning Auto Tuning is a highly integrated Gb LAN controller. Quad-...

User Manual
Page 16
...consumption in real time. It allows you to different ambient temperatures caused by power surges from switching power supply (PSU). ASUS CrashFree BIOS 3 ASUS CrashFree BIOS 3 is an auto-recovery tool that allows you to convert your favorite photo into one software offers diverse and ease to...fan speed to supervise overclocking, energy management, fan speed control, voltage and sensor readings. ASUS EZ Flash 2 ASUS EZ Flash 2 is a unique power saving technology that contains the latest BIOS file. GPU Boost GPU Boost overclocks the integrated GPU in real time for a more colorful...
...consumption in real time. It allows you to different ambient temperatures caused by power surges from switching power supply (PSU). ASUS CrashFree BIOS 3 ASUS CrashFree BIOS 3 is an auto-recovery tool that allows you to convert your favorite photo into one software offers diverse and ease to...fan speed to supervise overclocking, energy management, fan speed control, voltage and sensor readings. ASUS EZ Flash 2 ASUS EZ Flash 2 is a unique power saving technology that contains the latest BIOS file. GPU Boost GPU Boost overclocks the integrated GPU in real time for a more colorful...

User Manual
Page 17
... Take note of the following precautions before you install or remove any motherboard settings. • Unplug the power cord from the power supply. ASUS P8H67-V 1-5 eliminates the need to the motherboard, peripherals, or components. Failure to do so may cause severe damage to open the system chassis ...and clear the RTC data. Simply shut down and reboot the system, and the BIOS automatically restores the CPU parameters to overclocking failure. This is in line with the component. • Before you install motherboard components or ...
... Take note of the following precautions before you install or remove any motherboard settings. • Unplug the power cord from the power supply. ASUS P8H67-V 1-5 eliminates the need to the motherboard, peripherals, or components. Failure to do so may cause severe damage to open the system chassis ...and clear the RTC data. Simply shut down and reboot the system, and the BIOS automatically restores the CPU parameters to overclocking failure. This is in line with the component. • Before you install motherboard components or ...

User Manual
Page 26
...the standard way of accessing information from a memory module. Refer to section 2.4.2 Memory Frequency for overclocking may install varying memory sizes in BIOS. For optimum compatibility, we recommend that you obtain memory modules from the higher-sized channel is then mapped for the latest QVL. 1-...14 Chapter 1: Product introduction For effective use DIMMs of the following: - ASUS will update the QVL once the DIMMs are using a 32-bit Windows® OS. - 1.7.2 Memory configurations You may install 512MB, 1GB...
...the standard way of accessing information from a memory module. Refer to section 2.4.2 Memory Frequency for overclocking may install varying memory sizes in BIOS. For optimum compatibility, we recommend that you obtain memory modules from the higher-sized channel is then mapped for the latest QVL. 1-...14 Chapter 1: Product introduction For effective use DIMMs of the following: - ASUS will update the QVL once the DIMMs are using a 32-bit Windows® OS. - 1.7.2 Memory configurations You may install 512MB, 1GB...

User Manual
Page 31
...that the cards do so may need IRQ assignments. Install the software drivers for information on the system and change the necessary BIOS settings, if any. The following sub‑sections describe the slots and the expansion cards that came with the slot and... specifications. Turn on BIOS setup. 2. Assign an IRQ to the card. 3. Unplug the power cord before adding or removing expansion cards. 1.8 Expansion slots In the future, you intend to use . 4. Before installing the expansion card, read the documentation that they support. ASUS P8H67-V 1-19 Otherwise, ...
...that the cards do so may need IRQ assignments. Install the software drivers for information on the system and change the necessary BIOS settings, if any. The following sub‑sections describe the slots and the expansion cards that came with the slot and... specifications. Turn on BIOS setup. 2. Assign an IRQ to the card. 3. Unplug the power cord before adding or removing expansion cards. 1.8 Expansion slots In the future, you intend to use . 4. Before installing the expansion card, read the documentation that they support. ASUS P8H67-V 1-19 Otherwise, ...
User Manual
Page 32
... when you provide sufficient power when running CrossFireX™ mode. To disable the PCIe x1 slot, refer to the Onboard Devices Configuration section in the BIOS for details. • We recommend that you install two CrossFireX™ graphics cards on both the PCIe x16 slots to get better performance. • PCIe...
... when you provide sufficient power when running CrossFireX™ mode. To disable the PCIe x1 slot, refer to the Onboard Devices Configuration section in the BIOS for details. • We recommend that you install two CrossFireX™ graphics cards on both the PCIe x16 slots to get better performance. • PCIe...

User Manual
Page 33
... RAM data. Shut down the key during the boot process and enter BIOS setup to default values. Keep the cap on CLRTC jumper default position. Hold down and reboot the system,... then the BIOS automatically resets parameter settings to re-enter data. Removing the cap will cause system boot ...button cell battery powers the RAM data in CMOS. For system failure due to clear the CMOS RTC RAM data. ASUS P8H67-V 1-21 Except when clearing the RTC RAM, never remove the cap on pins 2-3 for about 5-10 seconds,...
... RAM data. Shut down the key during the boot process and enter BIOS setup to default values. Keep the cap on CLRTC jumper default position. Hold down and reboot the system,... then the BIOS automatically resets parameter settings to re-enter data. Removing the cap will cause system boot ...button cell battery powers the RAM data in CMOS. For system failure due to clear the CMOS RTC RAM data. ASUS P8H67-V 1-21 Except when clearing the RTC RAM, never remove the cap on pins 2-3 for about 5-10 seconds,...

User Manual
Page 36
... R NC PORT1 L AGND PIN 1 Line out_L NC Line out_R MICPWR MIC2 PIN 1 HD-audio-compliant pin definition Legacy AC'97 compliant definition P8H67-V Front panel audio connector If you want to connect a high-definition front panel audio module to this connector. 1.10.2 Internal connectors 1. Connect ...install the module to a slot opening at the back of the front panel audio I /O module that the Front Panel Type item in the BIOS is for details. 2. See section 2.5.6 Onboard Devices Configuration for a serial (COM) port. Front panel audio connector (10-1 pin AAFP) This ...
... R NC PORT1 L AGND PIN 1 Line out_L NC Line out_R MICPWR MIC2 PIN 1 HD-audio-compliant pin definition Legacy AC'97 compliant definition P8H67-V Front panel audio connector If you want to connect a high-definition front panel audio module to this connector. 1.10.2 Internal connectors 1. Connect ...install the module to a slot opening at the back of the front panel audio I /O module that the Front Panel Type item in the BIOS is for details. 2. See section 2.5.6 Onboard Devices Configuration for a serial (COM) port. Front panel audio connector (10-1 pin AAFP) This ...

User Manual
Page 38
... • When using hot-plug and NCQ, set , refer to the RAID Supplementary Guide included in the folder named Manual in the BIOS to [AHCI Mode]. Serial ATA connectors (7-pin SATA3G1-4, 7-pin SATA6G1-2) These connectors are set the SATA Mode item in the support DVD.... 2 or later version before using these connectors, set to create a Serial ATA RAID set using Serial ATA hard disk drives. P8H67-V GND RSATA_TXP2 RSATA_TXN2 GND RSATA_RXP2 RSATA_RXN2 GND GND RSATA_TXP3 RSATA_TXN3 GND RSATA_RXP3 RSATA_RXN3 GND GND RSATA_TXP4 RSATA_TXN4 GND RSATA_RXP4 RSATA_RXN4 GND SATA3G_2 SATA3G_3...
... • When using hot-plug and NCQ, set , refer to the RAID Supplementary Guide included in the folder named Manual in the BIOS to [AHCI Mode]. Serial ATA connectors (7-pin SATA3G1-4, 7-pin SATA6G1-2) These connectors are set the SATA Mode item in the support DVD.... 2 or later version before using these connectors, set to create a Serial ATA RAID set using Serial ATA hard disk drives. P8H67-V GND RSATA_TXP2 RSATA_TXN2 GND RSATA_RXP2 RSATA_RXN2 GND GND RSATA_TXP3 RSATA_TXN3 GND RSATA_RXP3 RSATA_RXN3 GND GND RSATA_TXP4 RSATA_TXN4 GND RSATA_RXP4 RSATA_RXN4 GND SATA3G_2 SATA3G_3...
User Manual
Page 43
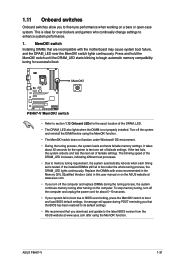
... cause system boot failure, and the DRAM_LED near the MemOK! switch Installing DIMMs that you download and update to the latest BIOS version from the ASUS website at www.asus.com. • If you to fine-tune performance when working on the computer. Turn off the system and reinstall the ... the DIMM is not properly installed. If the installed DIMMs still fail to boot after using the MemOK! ASUS P8H67-V 1-31 The blinking speed of failsafe settings. switch to boot and load BIOS default settings. This is tested. Press and hold the MemOK! To stop memory tuning, turn off the ...
... cause system boot failure, and the DRAM_LED near the MemOK! switch Installing DIMMs that you download and update to the latest BIOS version from the ASUS website at www.asus.com. • If you to fine-tune performance when working on the computer. Turn off the system and reinstall the ... the DIMM is not properly installed. If the installed DIMMs still fail to boot after using the MemOK! ASUS P8H67-V 1-31 The blinking speed of failsafe settings. switch to boot and load BIOS default settings. This is tested. Press and hold the MemOK! To stop memory tuning, turn off the ...

User Manual
Page 47
... the optical drive. b. c. The Drivers menu appears. 2. Click the Utilities tab, then click AI Suite II. 3. The ASUS Update main screen appears. Installing ASUS Update To install ASUS Update: 1. Updating the BIOS To update the BIOS: 1. Chapter 2: BIOS information 2-1 The AI Suite II Quick Bar appears. 2. Click Update button from the Quick Bar, and then click...
... the optical drive. b. c. The Drivers menu appears. 2. Click the Utilities tab, then click AI Suite II. 3. The ASUS Update main screen appears. Installing ASUS Update To install ASUS Update: 1. Updating the BIOS To update the BIOS: 1. Chapter 2: BIOS information 2-1 The AI Suite II Quick Bar appears. 2. Click Update button from the Quick Bar, and then click...
User Manual
Page 48
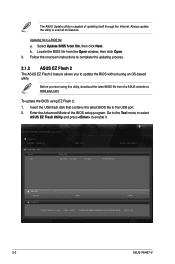
... to complete the updating process. 2.1.2 ASUS EZ Flash 2 The ASUS EZ Flash 2 feature allows you start using this utility, download the latest BIOS file from the Open window, then click Open. 3. ASUSTek EZ Flash 2 BIOS ROM Utility V00.74 Flash Info MODEL: P8H67-V File Path: fs0:\ Drive fs0:\.../End] Move [Esc] Exit 2-2 ASUS P8H67-V b. Before you to enable it. The ASUS Update utility is capable of the BIOS setup program. Select Update BIOS from a BIOS file a. Go to the Tool menu to select ASUS EZ Flash Utility and press to update the BIOS without using EZ Flash 2: 1. Enter...
... to complete the updating process. 2.1.2 ASUS EZ Flash 2 The ASUS EZ Flash 2 feature allows you start using this utility, download the latest BIOS file from the Open window, then click Open. 3. ASUSTek EZ Flash 2 BIOS ROM Utility V00.74 Flash Info MODEL: P8H67-V File Path: fs0:\ Drive fs0:\.../End] Move [Esc] Exit 2-2 ASUS P8H67-V b. Before you to enable it. The ASUS Update utility is capable of the BIOS setup program. Select Update BIOS from a BIOS file a. Go to the Tool menu to select ASUS EZ Flash Utility and press to update the BIOS without using EZ Flash 2: 1. Enter...

User Manual
Page 49
... in the support DVD may not be the latest version. Download the latest BIOS file from the ASUS website at www.asus.com. When found, the utility reads the BIOS file and enters ASUS EZ Flash 2 utility automatically. 4. Press to switch to the Folder Info field. 6. Press to switch... 2-3 Reboot the system when the update process is an auto recovery tool that you to enter BIOS Setup to prevent system boot failure! 2.1.3 ASUS CrashFree BIOS 3 utility The ASUS CrashFree BIOS 3 is done. • This function supports USB flash disks with FAT 32/16 format and single partition only...
... in the support DVD may not be the latest version. Download the latest BIOS file from the ASUS website at www.asus.com. When found, the utility reads the BIOS file and enters ASUS EZ Flash 2 utility automatically. 4. Press to switch to the Folder Info field. 6. Press to switch... 2-3 Reboot the system when the update process is an auto recovery tool that you to enter BIOS Setup to prevent system boot failure! 2.1.3 ASUS CrashFree BIOS 3 utility The ASUS CrashFree BIOS 3 is done. • This function supports USB flash disks with FAT 32/16 format and single partition only...

User Manual
Page 50
... are for reference only. Do not save them on the USB flash drive. When the ASUS Logo appears, press to the USB port. 2. C:\>d: D:\> 2-4 ASUS P8H67-V 2.1.4 ASUS BIOS Updater The ASUS BIOS Updater allows you can use as the boot device. Before updating BIOS 1. Welcome to boot using defaults 3. Prepare the motherboard support DVD and a USB flash drive in...
... are for reference only. Do not save them on the USB flash drive. When the ASUS Logo appears, press to the USB port. 2. C:\>d: D:\> 2-4 ASUS P8H67-V 2.1.4 ASUS BIOS Updater The ASUS BIOS Updater allows you can use as the boot device. Before updating BIOS 1. Welcome to boot using defaults 3. Prepare the motherboard support DVD and a USB flash drive in...

User Manual
Page 51
... FreeDOS prompt, type bupdater /o[filename] and press . The BIOS Updater backup screen appears indicating the BIOS backup process. D:\>bupdater /oOLDBIOS1.rom Filename Extension The [filename] is done! ASUSTek BIOS Updater for DOS V1.07 Current ROM BOARD: P8H67-V VER: 0217 DATE: 09/25/2010 Update ROM BOARD:... Unknown VER: Unknown DATE: Unknown PATH: A:\ BIOS backup is any user-assigned filename with no more than eight...
... FreeDOS prompt, type bupdater /o[filename] and press . The BIOS Updater backup screen appears indicating the BIOS backup process. D:\>bupdater /oOLDBIOS1.rom Filename Extension The [filename] is done! ASUSTek BIOS Updater for DOS V1.07 Current ROM BOARD: P8H67-V VER: 0217 DATE: 09/25/2010 Update ROM BOARD:... Unknown VER: Unknown DATE: Unknown PATH: A:\ BIOS backup is any user-assigned filename with no more than eight...


