
P8H61-M LE R2.0 User's Manual
Page 12
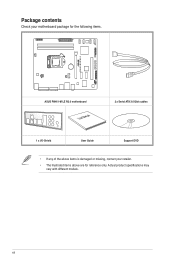
xii Package contents Check your motherboard package for the following items. P8H61-M LE R2.0 ASUS P8H61-M LE R2.0 motherboard User Manual 2 x Serial ATA 3.0 Gb/s cables 1 x I/O-Shield User Guide Support DVD • If any of the above items is damaged or missing, contact your retailer. • The illustrated items above are for reference only. Actual product specifications may vary with different models.
xii Package contents Check your motherboard package for the following items. P8H61-M LE R2.0 ASUS P8H61-M LE R2.0 motherboard User Manual 2 x Serial ATA 3.0 Gb/s cables 1 x I/O-Shield User Guide Support DVD • If any of the above items is damaged or missing, contact your retailer. • The illustrated items above are for reference only. Actual product specifications may vary with different models.
P8H61-M LE R2.0 User's Manual
Page 13
... PCI Express bus standard that supports the 1155 socket Intel® 3rd/2nd generation Core™ i7 / i5 / i3, Pentium®, and Celeron® processors. ASUS P8H61-M LE R2.0 1-1 Dual-Channel DDR3 2200 (O.C.)*/ 2133 (O.C.)/ 2000 (O.C.)/ 1866 (O.C.)/ 1600/ 1333/ 1066MHz support The motherboard supports DDR3 memory that automatically detects and identifies what types of peripherals...
... PCI Express bus standard that supports the 1155 socket Intel® 3rd/2nd generation Core™ i7 / i5 / i3, Pentium®, and Celeron® processors. ASUS P8H61-M LE R2.0 1-1 Dual-Channel DDR3 2200 (O.C.)*/ 2133 (O.C.)/ 2000 (O.C.)/ 1866 (O.C.)/ 1600/ 1333/ 1066MHz support The motherboard supports DDR3 memory that automatically detects and identifies what types of peripherals...
P8H61-M LE R2.0 User's Manual
Page 15
...the bundled support DVD or USB flash disk that allows you to update the BIOS without exiting or rebooting the OS. ASUS MyLogo2™ This feature allows you to launch and operate these utilities simultaneously. feature automatically restores the CPU default settings when... frequencies and related voltages, remotely control the system via a mobile device, and other easy-to their default settings. ASUS P8H61-M LE R2.0 1-3 ASUS Anti-Surge Protection This special design prevents expensive devices and the motherboard from damage caused by power surges from switching power supply (...
...the bundled support DVD or USB flash disk that allows you to update the BIOS without exiting or rebooting the OS. ASUS MyLogo2™ This feature allows you to launch and operate these utilities simultaneously. feature automatically restores the CPU default settings when... frequencies and related voltages, remotely control the system via a mobile device, and other easy-to their default settings. ASUS P8H61-M LE R2.0 1-3 ASUS Anti-Surge Protection This special design prevents expensive devices and the motherboard from damage caused by power surges from switching power supply (...
P8H61-M LE R2.0 User's Manual
Page 17
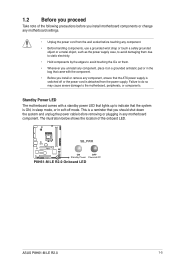
... by the edges to indicate that the ATX power supply is detached from the wall socket before removing or plugging in any motherboard component. SB_PWR P8H61-M LE R2.0 ON OFF Standby Power Powered Off P8H61-M LE R2.0 Onboard LED ASUS P8H61-M LE R2.0 1-5 Failure to do so may cause severe damage to the motherboard, peripherals, or components.
... by the edges to indicate that the ATX power supply is detached from the wall socket before removing or plugging in any motherboard component. SB_PWR P8H61-M LE R2.0 ON OFF Standby Power Powered Off P8H61-M LE R2.0 Onboard LED ASUS P8H61-M LE R2.0 1-5 Failure to do so may cause severe damage to the motherboard, peripherals, or components.
P8H61-M LE R2.0 User's Manual
Page 21
... purchase of the motherboard, ensure that the PnP cap is shipment/ transit-related. • Keep the cap after installing the motherboard. ASUS P8H61-M LE R2.0 1-9 Contact your retailer immediately if the PnP cap is missing, or if you see any damage to the socket contacts resulting from incorrect... is on the LGA1155 socket. • The product warranty does not cover damage to the PnP cap/socket contacts/motherboard components. ASUS will process Return Merchandise Authorization (RMA) requests only if the motherboard comes with a surface mount LGA1155 socket designed for the Intel&#...
... purchase of the motherboard, ensure that the PnP cap is shipment/ transit-related. • Keep the cap after installing the motherboard. ASUS P8H61-M LE R2.0 1-9 Contact your retailer immediately if the PnP cap is missing, or if you see any damage to the socket contacts resulting from incorrect... is on the LGA1155 socket. • The product warranty does not cover damage to the PnP cap/socket contacts/motherboard components. ASUS will process Return Merchandise Authorization (RMA) requests only if the motherboard comes with a surface mount LGA1155 socket designed for the Intel&#...
P8H61-M LE R2.0 User's Manual
Page 25
To uninstall the CPU heatsink and fan assembly 1 2 B A B A ASUS P8H61-M LE R2.0 1-13
To uninstall the CPU heatsink and fan assembly 1 2 B A B A ASUS P8H61-M LE R2.0 1-13
P8H61-M LE R2.0 User's Manual
Page 27
... and its Serial Presence Detect (SPD), which is not the JEDEC memory standard. The system maps the total size of accessing information from a memory module. ASUS P8H61-M LE R2.0 1-15 Any excess memory from the same vendor. For optimal compatibility, we recommend that you do any of 3GB system memory if you are using...
... and its Serial Presence Detect (SPD), which is not the JEDEC memory standard. The system maps the total size of accessing information from a memory module. ASUS P8H61-M LE R2.0 1-15 Any excess memory from the same vendor. For optimal compatibility, we recommend that you do any of 3GB system memory if you are using...
P8H61-M LE R2.0 User's Manual
Page 33
... force. Firmly insert the DIMM into a socket in only one direction. DIMM notch 2. Failure to do so can cause severe damage to unlock a DIMM socket. 2. ASUS P8H61-M LE R2.0 1-21 Remove the DIMM from the socket. Align a DIMM on the socket. 1 Unlocked retaining clip 2 DIMM notch 1 DIMM slot key A DIMM is properly seated. Press...
... force. Firmly insert the DIMM into a socket in only one direction. DIMM notch 2. Failure to do so can cause severe damage to unlock a DIMM socket. 2. ASUS P8H61-M LE R2.0 1-21 Remove the DIMM from the socket. Align a DIMM on the socket. 1 Unlocked retaining clip 2 DIMM notch 1 DIMM slot key A DIMM is properly seated. Press...
P8H61-M LE R2.0 User's Manual
Page 35
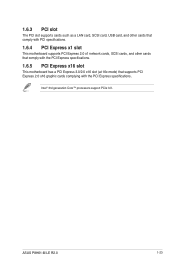
ASUS P8H61-M LE R2.0 1-23 Intel® 3rd generation Core™ processors support PCIe 3.0. 1.6.3 PCI slot The PCI slot supports cards such as a LAN card, SCSI card, USB card, and other cards that comply with PCI specifications. 1.6.4 PCI Express x1 slot This motherboard supports PCI Express 2.0 x1 network cards, SCSI cards, and other cards that comply with the PCI Express specifications. 1.6.5 PCI Express x16 slot This motherboard has a PCI Express 3.0/2.0 x16 slot (at 16x mode) that supports PCI Express 2.0 x16 graphic cards complying with the PCI Express specifications.
ASUS P8H61-M LE R2.0 1-23 Intel® 3rd generation Core™ processors support PCIe 3.0. 1.6.3 PCI slot The PCI slot supports cards such as a LAN card, SCSI card, USB card, and other cards that comply with PCI specifications. 1.6.4 PCI Express x1 slot This motherboard supports PCI Express 2.0 x1 network cards, SCSI cards, and other cards that comply with the PCI Express specifications. 1.6.5 PCI Express x16 slot This motherboard has a PCI Express 3.0/2.0 x16 slot (at 16x mode) that supports PCI Express 2.0 x16 graphic cards complying with the PCI Express specifications.

P8H61-M LE R2.0 User's Manual
Page 37
... 8-channel audio output. This port allows Gigabit connection to the tape, CD, DVD player, or other audio sources. 4. This port connects to a headphone or a speaker. ASUS P8H61-M LE R2.0 1-25 LAN port LED indications Activity/Link LED Speed LED Activity Link Speed LED LED Status Description Status Description OFF No link OFF 10Mbps connection...
... 8-channel audio output. This port allows Gigabit connection to the tape, CD, DVD player, or other audio sources. 4. This port connects to a headphone or a speaker. ASUS P8H61-M LE R2.0 1-25 LAN port LED indications Activity/Link LED Speed LED Activity Link Speed LED LED Status Description Status Description OFF No link OFF 10Mbps connection...

P8H61-M LE R2.0 User's Manual
Page 39
... uncertain about the minimum power supply requirement for your system, refer to the Recommended Power Supply Wattage Calculator at http://support.asus. P8H61-M LE R2.0 ATX12V EATXPWR +12V DC +12V DC +3 Volts +12 Volts +12 Volts +5V Standby Power OK GND PIN ... Volts PIN 1 GND +5 Volts +5 Volts +5 Volts -5 Volts GND GND GND PSON# GND -12 Volts +3 Volts GND GND P8H61-M LE R2.0 ATX power connectors • For a fully configured system, we recommend that you use a power supply unit (PSU) that you ... recommend that complies with more power-consuming devices. ASUS P8H61-M LE R2.0 1-27
... uncertain about the minimum power supply requirement for your system, refer to the Recommended Power Supply Wattage Calculator at http://support.asus. P8H61-M LE R2.0 ATX12V EATXPWR +12V DC +12V DC +3 Volts +12 Volts +12 Volts +5V Standby Power OK GND PIN ... Volts PIN 1 GND +5 Volts +5 Volts +5 Volts -5 Volts GND GND GND PSON# GND -12 Volts +3 Volts GND GND P8H61-M LE R2.0 ATX power connectors • For a fully configured system, we recommend that you use a power supply unit (PSU) that you ... recommend that complies with more power-consuming devices. ASUS P8H61-M LE R2.0 1-27
P8H61-M LE R2.0 User's Manual
Page 41
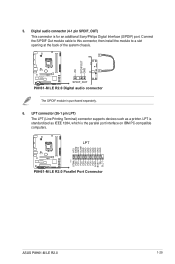
... ERR# INIT# SLIN# GND GND GND GND GND GND GND GND PIN 1 STB# PD0 PD1 PD2 PD3 PD4 PD5 PD6 PD7 ACK# BUSY PE SLCT ASUS P8H61-M LE R2.0 1-29 LPT is standardized as a printer. Digital audio connector (4-1 pin SPDIF_OUT) This connector is for an additional Sony/Philips Digital Interface (S/PDIF) port. +5V SPDIFOUT...
... ERR# INIT# SLIN# GND GND GND GND GND GND GND GND PIN 1 STB# PD0 PD1 PD2 PD3 PD4 PD5 PD6 PD7 ACK# BUSY PE SLCT ASUS P8H61-M LE R2.0 1-29 LPT is standardized as a printer. Digital audio connector (4-1 pin SPDIF_OUT) This connector is for an additional Sony/Philips Digital Interface (S/PDIF) port. +5V SPDIFOUT...
P8H61-M LE R2.0 User's Manual
Page 43
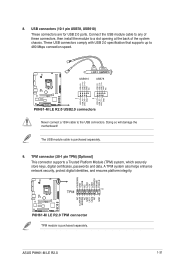
...+5V USB_P8USB_P8+ GND NC USB+5V USB_P9USB_P9+ GND USB+5V USB_P7USB_P7+ GND P8H61-M LE R2.0 PIN 1 PIN 1 P8H61-M LE R2.0 USB2.0 connectors Never connect a 1394 cable to 480 Mbps connection speed. P8H61-M LE R2.0 P8H61-M LE R2.0 TPM connector TPM module is purchased separately. 9. Doing so will damage the... Module (TPM) system, which securely store keys, digital certificates, passwords and data. The USB module cable is purchased separately. ASUS P8H61-M LE R2.0 1-31 8. Connect the USB module cable to any of these connectors, then install the module to a slot opening at the...
...+5V USB_P8USB_P8+ GND NC USB+5V USB_P9USB_P9+ GND USB+5V USB_P7USB_P7+ GND P8H61-M LE R2.0 PIN 1 PIN 1 P8H61-M LE R2.0 USB2.0 connectors Never connect a 1394 cable to 480 Mbps connection speed. P8H61-M LE R2.0 P8H61-M LE R2.0 TPM connector TPM module is purchased separately. 9. Doing so will damage the... Module (TPM) system, which securely store keys, digital certificates, passwords and data. The USB module cable is purchased separately. ASUS P8H61-M LE R2.0 1-31 8. Connect the USB module cable to any of these connectors, then install the module to a slot opening at the...
P8H61-M LE R2.0 User's Manual
Page 45
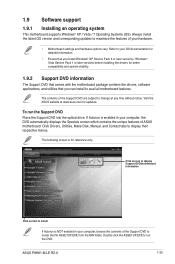
... and hardware options vary. To run the DVD. Visit the ASUS website at any time without notice. Click Drivers, Utilities, Make Disk, Manual, and Contact tabs to install If Autorun is for updates. ASUS P8H61-M LE R2.0 1-33 Refer to run the Support DVD Place the Support ...DVD into the optical drive. The following screen is NOT enabled in your computer, browse the contents of ASUS motherboard. 1.9 Software support 1.9.1 Installing an operating...
... and hardware options vary. To run the DVD. Visit the ASUS website at any time without notice. Click Drivers, Utilities, Make Disk, Manual, and Contact tabs to install If Autorun is for updates. ASUS P8H61-M LE R2.0 1-33 Refer to run the Support DVD Place the Support ...DVD into the optical drive. The following screen is NOT enabled in your computer, browse the contents of ASUS motherboard. 1.9 Software support 1.9.1 Installing an operating...
P8H61-M LE R2.0 User's Manual
Page 47
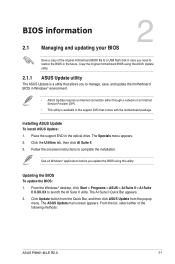
...ASUS P8H61-M LE R2.0 2-1 The ASUS Update main screen appears. Click Update button from the Quick Bar, and then click ASUS Update from the popup menu. The Specials menu appears. 2. Quit all Windows® applications before you update the BIOS using the ASUS Update utility. 2.1.1 ASUS Update utility The ASUS...instructions to launch the AI Suite II utility. The AI Suite II Quick Bar appears. 2. Installing ASUS Update To install ASUS Update: 1. From the Windows® desktop, click Start > Programs > ASUS > AI Suite II > AI Suite II X.XX.XX to complete the installation. From the ...
...ASUS P8H61-M LE R2.0 2-1 The ASUS Update main screen appears. Click Update button from the Quick Bar, and then click ASUS Update from the popup menu. The Specials menu appears. 2. Quit all Windows® applications before you update the BIOS using the ASUS Update utility. 2.1.1 ASUS Update utility The ASUS...instructions to launch the AI Suite II utility. The AI Suite II Quick Bar appears. 2. Installing ASUS Update To install ASUS Update: 1. From the Windows® desktop, click Start > Programs > ASUS > AI Suite II > AI Suite II X.XX.XX to complete the installation. From the ...
P8H61-M LE R2.0 User's Manual
Page 49
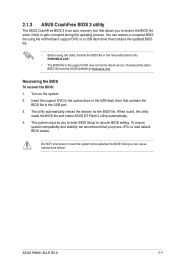
... BIOS 3 is an auto recovery tool that contains the BIOS file to the USB port. 3. Recovering the BIOS To recover the BIOS: 1. ASUS P8H61-M LE R2.0 2-3 Insert the support DVD to the optical drive or the USB flash drive that allows you to restore the BIOS file when it fails or ... Flash 2 utility automatically. 4. DO NOT shut down or reset the system while updating the BIOS! Download the latest BIOS file from the ASUS website at www.asus.com. Turn on the system. 2. Doing so can restore a corrupted BIOS file using this utility, rename the BIOS file in the removable device into ...
... BIOS 3 is an auto recovery tool that contains the BIOS file to the USB port. 3. Recovering the BIOS To recover the BIOS: 1. ASUS P8H61-M LE R2.0 2-3 Insert the support DVD to the optical drive or the USB flash drive that allows you to restore the BIOS file when it fails or ... Flash 2 utility automatically. 4. DO NOT shut down or reset the system while updating the BIOS! Download the latest BIOS file from the ASUS website at www.asus.com. Turn on the system. 2. Doing so can restore a corrupted BIOS file using this utility, rename the BIOS file in the removable device into ...

P8H61-M LE R2.0 User's Manual
Page 51
... FreeDOS prompt, type bupdater /pc /g and press . 2. BIOS Updater checks the selected BIOS file and prompts you have disconnected them. Refer to confirm BIOS update. 4. ASUS P8H61-M LE R2.0 2-5 Select Yes and press . When BIOS update is done, press to select the BIOS file and press . Select the Load Optimized Defaults item under the...
... FreeDOS prompt, type bupdater /pc /g and press . 2. BIOS Updater checks the selected BIOS file and prompts you have disconnected them. Refer to confirm BIOS update. 4. ASUS P8H61-M LE R2.0 2-5 Select Yes and press . When BIOS update is done, press to select the BIOS file and press . Select the Load Optimized Defaults item under the...
P8H61-M LE R2.0 User's Manual
Page 53
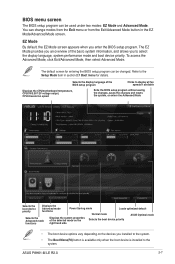
... Exit menu or from the Exit/Advanced Mode button in section 2.7 Boot menu for entering the BIOS setup program can be changed. ASUS P8H61-M LE R2.0 2-7 The EZ Mode provides you an overview of the selected mode on the right hand side Selects the boot device priority •...or enters the Advanced Mode Selects the boot device priority Displays the Advanced mode functions Power Saving mode Loads optimized default Normal mode ASUS Optimal mode Selects the Advanced mode functions Displays the system properties of the basic system information, and allows you installed to the ...
... Exit menu or from the Exit/Advanced Mode button in section 2.7 Boot menu for entering the BIOS setup program can be changed. ASUS P8H61-M LE R2.0 2-7 The EZ Mode provides you an overview of the selected mode on the right hand side Selects the boot device priority •...or enters the Advanced Mode Selects the boot device priority Displays the Advanced mode functions Power Saving mode Loads optimized default Normal mode ASUS Optimal mode Selects the Advanced mode functions Displays the system properties of the basic system information, and allows you installed to the ...
P8H61-M LE R2.0 User's Manual
Page 55
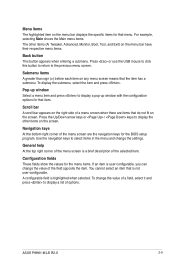
... the navigation keys for the menu items. If an item is not user-configurable. Navigation keys At the bottom right corner of the selected item. ASUS P8H61-M LE R2.0 2-9 Press or use the USB mouse to click this button to return to select items in the menu and change the settings. Pop-up window...
... the navigation keys for the menu items. If an item is not user-configurable. Navigation keys At the bottom right corner of the selected item. ASUS P8H61-M LE R2.0 2-9 Press or use the USB mouse to click this button to return to select items in the menu and change the settings. Pop-up window...
P8H61-M LE R2.0 User's Manual
Page 57
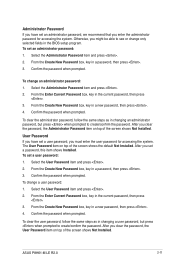
.... From the Enter Current Password box, key in the current password, then press . 3. Select the Administrator Password item and press . 2. After you set a user password: 1. ASUS P8H61-M LE R2.0 2-11 Administrator Password If you have set an administrator password: 1. To change an administrator password: 1. Confirm the password when prompted. After you clear the password...
.... From the Enter Current Password box, key in the current password, then press . 3. Select the Administrator Password item and press . 2. After you set a user password: 1. ASUS P8H61-M LE R2.0 2-11 Administrator Password If you have set an administrator password: 1. To change an administrator password: 1. Confirm the password when prompted. After you clear the password...


