
P8B75-M LX User's Manual
Page 18
...the socket contacts are not bent. P8B75-M LX P8B75-M LX CPU socket LGA1155 Unplug all power cables before installing the CPU. • Upon purchase of repair only if the damage is shipment/transit-related. • Keep the cap after installing the motherboard. ASUS will process Return Merchandise Authorization (RMA)... LGA1155 socket. • The product warranty does not cover damage to the PnP cap/socket contacts/motherboard components. ASUS will shoulder the cost of the motherboard, ensure that the PnP cap is missing, or if you see any damage to the socket contacts resulting from ...
...the socket contacts are not bent. P8B75-M LX P8B75-M LX CPU socket LGA1155 Unplug all power cables before installing the CPU. • Upon purchase of repair only if the damage is shipment/transit-related. • Keep the cap after installing the motherboard. ASUS will process Return Merchandise Authorization (RMA)... LGA1155 socket. • The product warranty does not cover damage to the PnP cap/socket contacts/motherboard components. ASUS will shoulder the cost of the motherboard, ensure that the PnP cap is missing, or if you see any damage to the socket contacts resulting from ...

P8B75-M LX User's Manual
Page 32
... remove the onboard battery and move the cap back to overclocking, use the CPU Parameter Recall (C.P.R.) feature. Shut down the key during the boot process and enter BIOS setup to pins 2-3. P8B75-M LX CLRTC 12 23 Normal (Default) P8B75-M LX Clear RTC RAM Clear RTC To erase the... RTC RAM: 1. shared - - - - For system failure due to pins 1-2. 3. shared - - - - Plug the power cord and turn ON the computer. 4. Removing the cap will cause system boot ...
... remove the onboard battery and move the cap back to overclocking, use the CPU Parameter Recall (C.P.R.) feature. Shut down the key during the boot process and enter BIOS setup to pins 2-3. P8B75-M LX CLRTC 12 23 Normal (Default) P8B75-M LX Clear RTC RAM Clear RTC To erase the... RTC RAM: 1. shared - - - - For system failure due to pins 1-2. 3. shared - - - - Plug the power cord and turn ON the computer. 4. Removing the cap will cause system boot ...

P8B75-M LX User's Manual
Page 37
5. Do not place jumper caps on the fan connectors! • The CPU_FAN connector supports a CPU fan of the connector. These are not jumpers! CPU_FAN CPU FAN PWM CPU FAN IN +12V GND P8B75-M LX CHA_FAN GND CHA FAN PWR CHA FAN IN P8B75-M LX fan connectors Do not forget to connect the fan cables to the... black wire of each cable matches the ground pin of maximum 2A (24 W) fan power. • Only the 4-pin CPU fan supports the ASUS Fan Xpert feature. 6. P8B75-M LX SLCT PE BUSY ACK# PD7 PD6 PD5 PD4 PD3 PD2 PD1 PD0 STB# LPT PIN 1 GND GND GND GND GND GND GND GND SLIN...
5. Do not place jumper caps on the fan connectors! • The CPU_FAN connector supports a CPU fan of the connector. These are not jumpers! CPU_FAN CPU FAN PWM CPU FAN IN +12V GND P8B75-M LX CHA_FAN GND CHA FAN PWR CHA FAN IN P8B75-M LX fan connectors Do not forget to connect the fan cables to the... black wire of each cable matches the ground pin of maximum 2A (24 W) fan power. • Only the 4-pin CPU fan supports the ASUS Fan Xpert feature. 6. P8B75-M LX SLCT PE BUSY ACK# PD7 PD6 PD5 PD4 PD3 PD2 PD1 PD0 STB# LPT PIN 1 GND GND GND GND GND GND GND GND SLIN...
P8B75-M LX User's Manual
Page 41
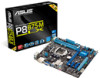
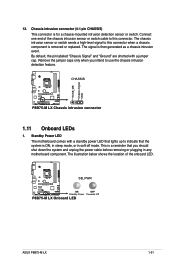
... motherboard component. Remove the jumper caps only when you should shut down the system and unplug the power cable before removing or plugging in soft-off mode. SB_PWR P8B75-M LX ON OFF Standby Power Powered Off P8B75-M LX Onboard LED ASUS P8B75-M LX 1-31 Standby Power LED The ...motherboard comes with a jumper cap. This is removed or replaced. +5VSB_MB Chassis Signal GND 13. Chassis...
... motherboard component. Remove the jumper caps only when you should shut down the system and unplug the power cable before removing or plugging in soft-off mode. SB_PWR P8B75-M LX ON OFF Standby Power Powered Off P8B75-M LX Onboard LED ASUS P8B75-M LX 1-31 Standby Power LED The ...motherboard comes with a jumper cap. This is removed or replaced. +5VSB_MB Chassis Signal GND 13. Chassis...
P8B75-M LX User's Manual
Page 46
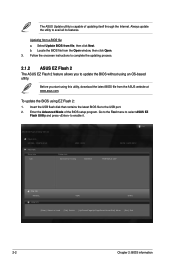
... and press to avail all its features. Locate the BIOS file from file, then click Next. The ASUS Update utility is capable of the BIOS setup program. ASUS EZ Flash 2 Utility V01.04 Flash Info MODEL: P8B75-M LX File Path: Drive Info fs0:\ VER: 0203 Folder Info 04/01/2012 10:23p 8390656 Exit... DATE: 04/01/2012 P8B75MLX.CAP File Info MODEL: Help Info VER: DATE [Enter] Select or Load [Tab] Switch...
... and press to avail all its features. Locate the BIOS file from file, then click Next. The ASUS Update utility is capable of the BIOS setup program. ASUS EZ Flash 2 Utility V01.04 Flash Info MODEL: P8B75-M LX File Path: Drive Info fs0:\ VER: 0203 Folder Info 04/01/2012 10:23p 8390656 Exit... DATE: 04/01/2012 P8B75MLX.CAP File Info MODEL: Help Info VER: DATE [Enter] Select or Load [Tab] Switch...

P8B75-M LX User's Manual
Page 47
... or a USB flash drive that contains the updated BIOS file. • Before using this utility, rename the BIOS file in the removable device into P8B75MLX.CAP. • The BIOS file in the support DVD may not be the latest version. Press the Up/Down arrow keys to find the USB flash... disk that allows you to the USB port. 3. Download the latest BIOS file from the ASUS website at www.asus.com. The system requires you press to recover BIOS setting. ASUS P8B75-M LX 2-3 Press to switch to the Drive field. 4. Turn on the system. 2. Insert the support DVD to the optical...
... or a USB flash drive that contains the updated BIOS file. • Before using this utility, rename the BIOS file in the removable device into P8B75MLX.CAP. • The BIOS file in the support DVD may not be the latest version. Press the Up/Down arrow keys to find the USB flash... disk that allows you to the USB port. 3. Download the latest BIOS file from the ASUS website at www.asus.com. The system requires you press to recover BIOS setting. ASUS P8B75-M LX 2-3 Press to switch to the Drive field. 4. Turn on the system. 2. Insert the support DVD to the optical...

P8B75-M LX User's Manual
Page 49
.../01/2012 Update ROM BOARD: Unknown VER: Unknown DATE: Unknown PATH: A:\ A: P8B75LX.CAP 8390656 2012-041-01 17:30:48 Note [Enter] Select or Load [Up/Down/Home/End] Move [Tab] Switch [B] Backup [V] Drive Info [Esc] Exit 3. Yes No 4. ASUS P8B75-M LX 2-5 Updating the BIOS file To update the BIOS file using BIOS Updater...
.../01/2012 Update ROM BOARD: Unknown VER: Unknown DATE: Unknown PATH: A:\ A: P8B75LX.CAP 8390656 2012-041-01 17:30:48 Note [Enter] Select or Load [Up/Down/Home/End] Move [Tab] Switch [B] Backup [V] Drive Info [Esc] Exit 3. Yes No 4. ASUS P8B75-M LX 2-5 Updating the BIOS file To update the BIOS file using BIOS Updater...
