User Guide
Page 2
... and are used only for identification or explanation and to the owners' benefit, without intent to infringe. All Rights Reserved. ASUS PROVIDES THIS MANUAL "AS IS" WITHOUT WARRANTY OF ANY KIND, EITHER EXPRESS OR IMPLIED, INCLUDING BUT NOT LIMITED TO THE IMPLIED WARRANTIES OR ...CONDITIONS OF MERCHANTABILITY OR FITNESS FOR A PARTICULAR PURPOSE. No part of this manual may or may be registered trademarks or copyrights of ASUSTeK COMPUTER INC. ("ASUS"). IN NO EVENT SHALL ASUS, ITS DIRECTORS, OFFICERS, EMPLOYEES OR AGENTS BE LIABLE FOR ANY INDIRECT, SPECIAL, INCIDENTAL...
... and are used only for identification or explanation and to the owners' benefit, without intent to infringe. All Rights Reserved. ASUS PROVIDES THIS MANUAL "AS IS" WITHOUT WARRANTY OF ANY KIND, EITHER EXPRESS OR IMPLIED, INCLUDING BUT NOT LIMITED TO THE IMPLIED WARRANTIES OR ...CONDITIONS OF MERCHANTABILITY OR FITNESS FOR A PARTICULAR PURPOSE. No part of this manual may or may be registered trademarks or copyrights of ASUSTeK COMPUTER INC. ("ASUS"). IN NO EVENT SHALL ASUS, ITS DIRECTORS, OFFICERS, EMPLOYEES OR AGENTS BE LIABLE FOR ANY INDIRECT, SPECIAL, INCIDENTAL...
User Guide
Page 8
... a stable surface. • If you are connected. This symbol of parts and recycling. Contact a qualified service technician or your retailer. If possible, disconnect all the manuals that the product (electrical and electronic equipment) should not be placed in any damage, contact your area. This product has been designed to fix it...
... a stable surface. • If you are connected. This symbol of parts and recycling. Contact a qualified service technician or your retailer. If possible, disconnect all the manuals that the product (electrical and electronic equipment) should not be placed in any damage, contact your area. This product has been designed to fix it...
User Guide
Page 10
..., type the command line: format A:/S x IMPORTANT: Instructions that you MUST follow to emphasize a word or a phrase. Italics Used to complete a task. Conventions used throughout this manual. Typography Bold text Indicates a menu or an item to complete a task. DANGER/WARNING: Information to prevent injury to yourself when trying to select. Example: Command...
..., type the command line: format A:/S x IMPORTANT: Instructions that you MUST follow to emphasize a word or a phrase. Italics Used to complete a task. Conventions used throughout this manual. Typography Bold text Indicates a menu or an item to complete a task. DANGER/WARNING: Information to prevent injury to yourself when trying to select. Example: Command...

User Guide
Page 79
...time-out value. Aptio Setup Utility - Configuration options: [Disabled] [Enabled] USB transfer time-out [20 sec] Allows you to [manual]. The values range from 1 to 40 with a one-second interval. 4.5.10 Onboard Devices Configuration The Onboard Devices Configuration menu items ...] [30 sec] [40 sec] Device power-up delay [Auto] Configuration options: [Auto] [Manual] Device power-up delay in this menu allow you set the serial port 1/2 configuration. Configuration options: [Enabled] [Disabled] ASUS P8B-M series 4-21 Configuration options: [1 sec] [5 sec] [10 sec] [20 sec] Device ...
...time-out value. Aptio Setup Utility - Configuration options: [Disabled] [Enabled] USB transfer time-out [20 sec] Allows you to [manual]. The values range from 1 to 40 with a one-second interval. 4.5.10 Onboard Devices Configuration The Onboard Devices Configuration menu items ...] [30 sec] [40 sec] Device power-up delay [Auto] Configuration options: [Auto] [Manual] Device power-up delay in this menu allow you set the serial port 1/2 configuration. Configuration options: [Enabled] [Disabled] ASUS P8B-M series 4-21 Configuration options: [1 sec] [5 sec] [10 sec] [20 sec] Device ...
User Guide
Page 91
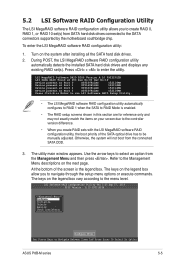
Press + to Navigate Between Items And Press Enter To Select An Option ASUS P8B-M series 5-5 The utility main window appears. Refer to the Management Menu descriptions on the legend box vary according to RAID Mode is the legend box. ... the SATA to the menu level. Otherwise, the system will not boot from the Management Menu and then press . Use the arrow keys to be manually adjusted. The keys on the next page. At the bottom of the screen is enabled. • The RAID setup screens shown in this section are...
Press + to Navigate Between Items And Press Enter To Select An Option ASUS P8B-M series 5-5 The utility main window appears. Refer to the Management Menu descriptions on the legend box vary according to RAID Mode is the legend box. ... the SATA to the menu level. Otherwise, the system will not boot from the Management Menu and then press . Use the arrow keys to be manually adjusted. The keys on the next page. At the bottom of the screen is enabled. • The RAID setup screens shown in this section are...
User Guide
Page 92
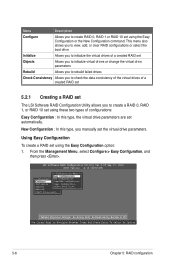
Menu Description Configure Allows you manually set the virtual drive parameters. This menu also allows you to view, add, or clear RAID configurations or select the boot drive Initialize Allows you ...
Menu Description Configure Allows you manually set the virtual drive parameters. This menu also allows you to view, add, or clear RAID configurations or select the boot drive Initialize Allows you ...
User Guide
Page 103
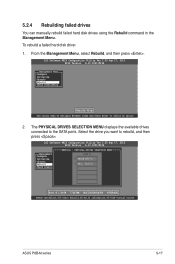
... # 0 ONLIN A00-00 1 FAIL A00-01 Port # 1 DISK 77247MB HDS728080PLA380 PF20A60A SPACE-(De)Select,F10-Start Rebuild,F2-Drive Information,F3-View Virtual Drives ASUS P8B-M series 5-17 5.2.4 Rebuilding failed drives You can manually rebuild failed hard disk drives using the Rebuild command in the Management Menu. To rebuild a failed hard disk drive: 1.
... # 0 ONLIN A00-00 1 FAIL A00-01 Port # 1 DISK 77247MB HDS728080PLA380 PF20A60A SPACE-(De)Select,F10-Start Rebuild,F2-Drive Information,F3-View Virtual Drives ASUS P8B-M series 5-17 5.2.4 Rebuilding failed drives You can manually rebuild failed hard disk drives using the Rebuild command in the Management Menu. To rebuild a failed hard disk drive: 1.
User Guide
Page 110
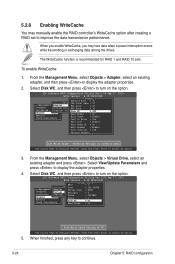
... Between Items And Press Enter To Select An Option 3. When finished, press any key to display the adapter properties. 2. When you enable WriteCache, you may manually enable the RAID controller's WriteCache option after creating a RAID set to turn on the option. From the Management Menu, select Objects > Adapter, select an existing...
... Between Items And Press Enter To Select An Option 3. When finished, press any key to display the adapter properties. 2. When you enable WriteCache, you may manually enable the RAID controller's WriteCache option after creating a RAID set to turn on the option. From the Management Menu, select Objects > Adapter, select an existing...
User Guide
Page 123
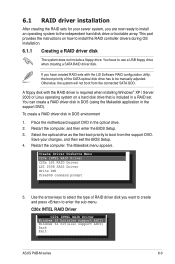
...drive or bootable array. To create a RAID driver disk in the support DVD). Select the optical drive as the first boot priority to be manually adjusted. The Makedisk menu appears. Use the arrow keys to select the type of the SATA optical disk drive has to boot from the connected... SATA ODD. C20x INTEL RAID Driver C20x INTEL RAID Driver Windows 32 bit(also support AHCI) Windows 64 bit(also support AHCI) Back Exit ASUS P8B-M series 6-3 If you want to create and press to install the RAID controller drivers during OS installation. 6.1.1 Creating a RAID driver disk The system ...
...drive or bootable array. To create a RAID driver disk in the support DVD). Select the optical drive as the first boot priority to be manually adjusted. The Makedisk menu appears. Use the arrow keys to select the type of the SATA optical disk drive has to boot from the connected... SATA ODD. C20x INTEL RAID Driver C20x INTEL RAID Driver Windows 32 bit(also support AHCI) Windows 64 bit(also support AHCI) Back Exit ASUS P8B-M series 6-3 If you want to create and press to install the RAID controller drivers during OS installation. 6.1.1 Creating a RAID driver disk The system ...
User Guide
Page 126
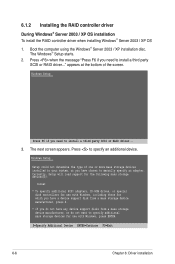
... with Windows, press ENTER. S=Specify Additional Device ENTER=Continue F3=Exit 6-6 Chapter 6: Driver installation Press when the message "Press F6 if you have chosen to manually specify an adapter. The next screen appears. Windows Setup Setup could not determine the type of the screen. Currently, Setup will load support for the...
... with Windows, press ENTER. S=Specify Additional Device ENTER=Continue F3=Exit 6-6 Chapter 6: Driver installation Press when the message "Press F6 if you have chosen to manually specify an adapter. The next screen appears. Windows Setup Setup could not determine the type of the screen. Currently, Setup will load support for the...
User Guide
Page 135
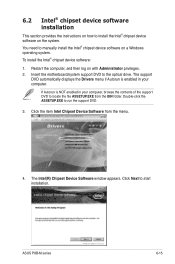
To install the Intel® chipset device software: 1. Click the item Intel Chipset Device Software from the BIN folder. ASUS P8B-M series 6-15 Double-click the ASSETUP.EXE to install the Intel® chipset device software on the system. The Intel(R) Chipset Device ...3. The support DVD automatically displays the Drivers menu if Autorun is NOT enabled in your computer, browse the contents of the support DVD to manually install the Intel® chipset device software on with Administrator privileges. 2. Restart the computer, and then log on a Windows operating system. ...
To install the Intel® chipset device software: 1. Click the item Intel Chipset Device Software from the BIN folder. ASUS P8B-M series 6-15 Double-click the ASSETUP.EXE to install the Intel® chipset device software on the system. The Intel(R) Chipset Device ...3. The support DVD automatically displays the Drivers menu if Autorun is NOT enabled in your computer, browse the contents of the support DVD to manually install the Intel® chipset device software on with Administrator privileges. 2. Restart the computer, and then log on a Windows operating system. ...
User Guide
Page 137
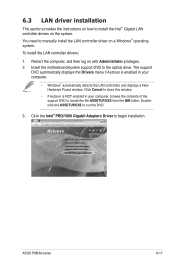
Insert the motherboard/system support DVD to manually install the LAN contrroller driver on a Windows® operating system. ASUS P8B-M series 6-17 You need to the optical drive. Restart the computer, and then log on with Administrator privileges. 2. Click Cancel to close this window. • ...
Insert the motherboard/system support DVD to manually install the LAN contrroller driver on a Windows® operating system. ASUS P8B-M series 6-17 You need to the optical drive. Restart the computer, and then log on with Administrator privileges. 2. Click Cancel to close this window. • ...
User Guide
Page 140
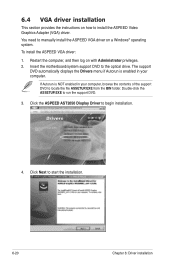
... drive. Restart the computer, and then log on with Administrator privileges. 2. Insert the motherboard/system support DVD to run the support DVD. 3. Click Next to manually install the ASPEED VGA driver on a Windows® operating system. You need to start the installation. 6-20 Chapter 6: Driver installation To install the ASPEED VGA...
... drive. Restart the computer, and then log on with Administrator privileges. 2. Insert the motherboard/system support DVD to run the support DVD. 3. Click Next to manually install the ASPEED VGA driver on a Windows® operating system. You need to start the installation. 6-20 Chapter 6: Driver installation To install the ASPEED VGA...
