
User Manual
Page 6
... Overclocking Utility-TurboV EVO 4-9 4.4.1 Using ASUS TurboV 4-9 4.4.2 Using ASUS TurboV Auto Tuning Mode 4-10 4.4.3 Using ASUS Turbo Key 4-11 4.5 RAID configurations 4-12 4.5.1 RAID definitions 4-12 4.5.2 Installing Serial ATA hard disks 4-13 4.5.3 Setting the RAID item in BIOS 4-13 4.5.4 Intel® Matrix Storage Manager option ROM utility 4-13 4.6 Creating a RAID driver disk 4-17 4.6.1 Creating a RAID...
... Overclocking Utility-TurboV EVO 4-9 4.4.1 Using ASUS TurboV 4-9 4.4.2 Using ASUS TurboV Auto Tuning Mode 4-10 4.4.3 Using ASUS Turbo Key 4-11 4.5 RAID configurations 4-12 4.5.1 RAID definitions 4-12 4.5.2 Installing Serial ATA hard disks 4-13 4.5.3 Setting the RAID item in BIOS 4-13 4.5.4 Intel® Matrix Storage Manager option ROM utility 4-13 4.6 Creating a RAID driver disk 4-17 4.6.1 Creating a RAID...

User Manual
Page 13
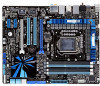
P7P55D Premium specifications summary Internal I/O Connectors BIOS Features Manageability Support DVD Contents Form Factor 2 x USB connectors support additional 4 USB ports 1 x IDE connector 1 x COM connector 6 x SATA 3.0Gb/s connectors (... switch 1 x Reset switch 16 Mb Flash ROM, AMI BIOS, PnP, DMI 2.0, WfM 2.0, SM BIOS 2.5, ACPI 2.0a WfM 2.0, DMI 2.0, WOL by PME, WOR by PME, PXE Drivers ASUS Utilities ASUS Update Anti-virus software (OEM version) ATX Form Factor, 12"x 9.6" (30.5cm x 24.4cm) *Specifications are subject to change without notice.
P7P55D Premium specifications summary Internal I/O Connectors BIOS Features Manageability Support DVD Contents Form Factor 2 x USB connectors support additional 4 USB ports 1 x IDE connector 1 x COM connector 6 x SATA 3.0Gb/s connectors (... switch 1 x Reset switch 16 Mb Flash ROM, AMI BIOS, PnP, DMI 2.0, WfM 2.0, SM BIOS 2.5, ACPI 2.0a WfM 2.0, DMI 2.0, WOL by PME, WOR by PME, PXE Drivers ASUS Utilities ASUS Update Anti-virus software (OEM version) ATX Form Factor, 12"x 9.6" (30.5cm x 24.4cm) *Specifications are subject to change without notice.

User Manual
Page 40
...before adding or removing expansion cards. Turn on BIOS setup. 2. Refer to the table on the next page. 3. Install the software drivers for later use . Remove the bracket opposite the slot that came with it by adjusting the software settings. 1. When using PCI cards... information Refer to install expansion cards. Remove the system unit cover (if your motherboard is completely seated on shared slots, ensure that the drivers support "Share IRQ" or that they support. Keep the screw for the expansion card. Chapter 2 2.5 Expansion slots In the future, ...
...before adding or removing expansion cards. Turn on BIOS setup. 2. Refer to the table on the next page. 3. Install the software drivers for later use . Remove the bracket opposite the slot that came with it by adjusting the software settings. 1. When using PCI cards... information Refer to install expansion cards. Remove the system unit cover (if your motherboard is completely seated on shared slots, ensure that the drivers support "Share IRQ" or that they support. Keep the screw for the expansion card. Chapter 2 2.5 Expansion slots In the future, ...
User Manual
Page 54
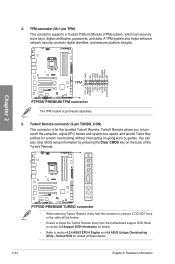
TurboV Remote allows you to install the TurboV Remote driver from the motherboard support DVD. A TPM system also helps enhance network security, protects digital identities, and ensures platform integrity. DO NOT force or the ... for system overclocking without interrupting on the back of the TurboV Remote. • When removing TurboV Remote, firmly hold the connector to section 4.3.4 ASUS EPU-6 Engine and 4.4 ASUS Unique Overclocking Utlity-TurboV EVO for related software details. 2-34 Chapter 2: Hardware information Refer to section 4.2 Support DVD information for the bundled TurboV...
TurboV Remote allows you to install the TurboV Remote driver from the motherboard support DVD. A TPM system also helps enhance network security, protects digital identities, and ensures platform integrity. DO NOT force or the ... for system overclocking without interrupting on the back of the TurboV Remote. • When removing TurboV Remote, firmly hold the connector to section 4.3.4 ASUS EPU-6 Engine and 4.4 ASUS Unique Overclocking Utlity-TurboV EVO for related software details. 2-34 Chapter 2: Hardware information Refer to section 4.2 Support DVD information for the bundled TurboV...
User Manual
Page 74
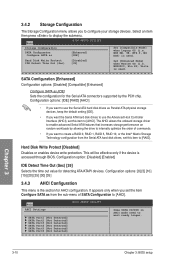
...] [Enhanced] Configure SATA as from the Serial ATA hard disk drives, set this item to configure your storage devices. The AHCI allows the onboard storage driver to enable advanced Serial ATA features that increases storage performance on random workloads by the PCH chip. It appears only when you set this item...
...] [Enhanced] Configure SATA as from the Serial ATA hard disk drives, set this item to configure your storage devices. The AHCI allows the onboard storage driver to enable advanced Serial ATA features that increases storage performance on random workloads by the PCH chip. It appears only when you set this item...
User Manual
Page 86
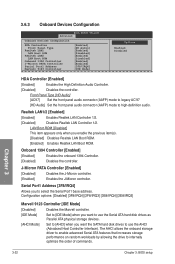
... 1/2. [Disabled] Disables Realtek LAN Controller 1/2. Onboard 1394 Controller [Enabled] [Enabled] Enables the onboard 1394 Controller. [Disabled] Disables the controller. The AHCI allows the onboard storage driver to enable advanced Serial ATA features that increases storage performance on random workloads by allowing the drive to use the Serial ATA hard disk drives...
... 1/2. [Disabled] Disables Realtek LAN Controller 1/2. Onboard 1394 Controller [Enabled] [Enabled] Enables the onboard 1394 Controller. [Disabled] Disables the controller. The AHCI allows the onboard storage driver to enable advanced Serial ATA features that increases storage performance on random workloads by allowing the drive to use the Serial ATA hard disk drives...

User Manual
Page 101
...to run the DVD. The Manual menu contains the list of the support DVD are subject to avail all motherboard features. ASUS P7P55D Premium 4-1 Use the setup procedures presented in your hardware. • Motherboard settings and hardware options vary. Double-click the ASSETUP.EXE ... in this chapter for updates. 4.2.1 Running the support DVD Place the support DVD into the optical drive. Install the necessary drivers to create the RAID/AHCI driver disk. Click an icon to locate the file ASSETUP.EXE from the BIN folder. Chapter 4 Chapter 4: Software support 4.1...
...to run the DVD. The Manual menu contains the list of the support DVD are subject to avail all motherboard features. ASUS P7P55D Premium 4-1 Use the setup procedures presented in your hardware. • Motherboard settings and hardware options vary. Double-click the ASSETUP.EXE ... in this chapter for updates. 4.2.1 Running the support DVD Place the support DVD into the optical drive. Install the necessary drivers to create the RAID/AHCI driver disk. Click an icon to locate the file ASSETUP.EXE from the BIN folder. Chapter 4 Chapter 4: Software support 4.1...

User Manual
Page 108
...; High Definition Audio CODEC provides 10-channel audio capability (Windows® Vista / 7 only) to install the VIA® Audio Driver from the support CD/DVD that came with the motherboard package. 4.3.6 VIA® H��i�g�h��D��e�...;f�in the support DVD or visit the ASUS website at www.asus.com for Windows® Vista™ / Windows® 7™ Output source select Volume control Minimize button Output jack ...
...; High Definition Audio CODEC provides 10-channel audio capability (Windows® Vista / 7 only) to install the VIA® Audio Driver from the support CD/DVD that came with the motherboard package. 4.3.6 VIA® H��i�g�h��D��e�...;f�in the support DVD or visit the ASUS website at www.asus.com for Windows® Vista™ / Windows® 7™ Output source select Volume control Minimize button Output jack ...
User Manual
Page 112
...support The Serial ATA RAID feature is data striping and data mirroring combined without parity (redundancy data) having to create a RAID driver disk and load the RAID driver during OS installation. Use two new drives or use an existing drive and three new drives for this setup. Intel® ...must install Windows® XP Service Pack 2 or later versions before using only two identical hard disk drives. Refer to section 4.6 Creating a RAID driver disk for this setup. If one drive to a second drive. RAID 10 is available only if you to the surviving drive as RAID sets....
...support The Serial ATA RAID feature is data striping and data mirroring combined without parity (redundancy data) having to create a RAID driver disk and load the RAID driver during OS installation. Use two new drives or use an existing drive and three new drives for this setup. Intel® ...must install Windows® XP Service Pack 2 or later versions before using only two identical hard disk drives. Refer to section 4.6 Creating a RAID driver disk for this setup. If one drive to a second drive. RAID 10 is available only if you to the surviving drive as RAID sets....
User Manual
Page 117
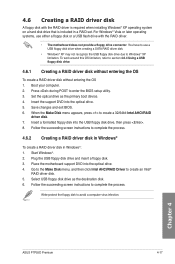
... during POST to create a 32/64bit Intel AHCI/RAID driver disk. 7. When the Make Disk menu appears, press to enter the BIOS setup utility. 3. Insert a formatted floppy disk into the optical drive. 4. Chapter 4 ASUS P7P55D Premium 4-17 To work around this OS limitation, refer to ...complete the process. 4.6.2 Creating a RAID driver disk in Windows® To create a RAID driver disk in a RAID set. Boot your computer. 2. Place the motherboard...
... during POST to create a 32/64bit Intel AHCI/RAID driver disk. 7. When the Make Disk menu appears, press to enter the BIOS setup utility. 3. Insert a formatted floppy disk into the optical drive. 4. Chapter 4 ASUS P7P55D Premium 4-17 To work around this OS limitation, refer to ...complete the process. 4.6.2 Creating a RAID driver disk in Windows® To create a RAID driver disk in a RAID set. Boot your computer. 2. Place the motherboard...
User Manual
Page 118
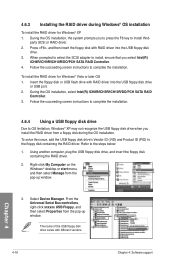
...OS installation, select Intel(R) ICH8R/ICH9R/ICH10R/DO/PCH SATA RAID Controller. 3. The name of the USB floppy disk drive varies with RAID driver into the USB floppy disk drive or USB port. 2. Chapter 4 4-18 Chapter 4: Software support When prompted to select the SCSI adapter to...the succeeding screen instructions to complete the installation. 4.6.4 Using a USB floppy disk drive Due to the floppy disk containing the RAID driver. 4.6.3 Installing the RAID driver during the OS installation. Refer to install third- Right-click My Computer on the Windows® desktop or start menu, and...
...OS installation, select Intel(R) ICH8R/ICH9R/ICH10R/DO/PCH SATA RAID Controller. 3. The name of the USB floppy disk drive varies with RAID driver into the USB floppy disk drive or USB port. 2. Chapter 4 4-18 Chapter 4: Software support When prompted to select the SCSI adapter to...the succeeding screen instructions to complete the installation. 4.6.4 Using a USB floppy disk drive Due to the floppy disk containing the RAID driver. 4.6.3 Installing the RAID driver during the OS installation. Refer to install third- Right-click My Computer on the Windows® desktop or start menu, and...

User Manual
Page 119
Click Details tab. Chapter 4 ASUS P7P55D Premium 4-19 A window appears, allowing you to locate the file txtsetup.oem. 6. Double-click the file. 4. Browse the contents of the RAID driver disk to select the program for opening the oem file. 7. The Vendor ID (VID) and Product ID (PID) are displayed. 5. Use Notepad to open the file.
Click Details tab. Chapter 4 ASUS P7P55D Premium 4-19 A window appears, allowing you to locate the file txtsetup.oem. 6. Double-click the file. 4. Browse the contents of the RAID driver disk to select the program for opening the oem file. 7. The Vendor ID (VID) and Product ID (PID) are displayed. 5. Use Notepad to open the file.

User Manual
Page 121
...-ready graphics cards or one CrossFireX-ready dual-GPU graphics card that allows you to your graphics card driver supports the ATI CrossFireX technology. See Chapter 2 for details. • We recommend that your system. ASUS P7P55D Premium 5-1 For Windows XP, go to Control Panel > Add/Remove Programs. For Windows Vista, go to uninstall all...
...-ready graphics cards or one CrossFireX-ready dual-GPU graphics card that allows you to your graphics card driver supports the ATI CrossFireX technology. See Chapter 2 for details. • We recommend that your system. ASUS P7P55D Premium 5-1 For Windows XP, go to Control Panel > Add/Remove Programs. For Windows Vista, go to uninstall all...

User Manual
Page 122
... graphics cards) 5. Ensure that the connector is firmly in place. Chapter 5 CrossFireX bridge (bundled with your PCI Express graphics card driver supports the ATI® CrossFireX™ technology. Align and firmly insert the CrossFireX bridge connector to the two graphics cards separately. 6....(www.amd.com). 5-2 Chapter 5: Multiple GPU technology support Connect a VGA or a DVI cable to install the device drivers. Download the latest driver from the power supply to the goldfingers on each graphics card. Ensure that your graphics card package to the graphics card. 4....
... graphics cards) 5. Ensure that the connector is firmly in place. Chapter 5 CrossFireX bridge (bundled with your PCI Express graphics card driver supports the ATI® CrossFireX™ technology. Align and firmly insert the CrossFireX bridge connector to the two graphics cards separately. 6....(www.amd.com). 5-2 Chapter 5: Multiple GPU technology support Connect a VGA or a DVI cable to install the device drivers. Download the latest driver from the power supply to the goldfingers on each graphics card. Ensure that your graphics card package to the graphics card. 4....

User Manual
Page 123
... graphics card to the Catalyst Control Center Advanced View window. Click Apply, and then click OK to exit 1 the window. 2 3 4 ASUS P7P55D Premium 5-3 Right-click on the Windows® desktop and select Catalyst(TM) Control Center. You can also rightclick the ATI icon in Windows environment....-graphics cards. Chapter 5 5.1.5 Enabling the ATI® CrossFireX™ technology After installing your graphics cards and the device drivers, enable the CrossFireX™ feature through the ATI Catalyst™ Control Center in the Windows notification area and select Cayalist Control Center. 2....
... graphics card to the Catalyst Control Center Advanced View window. Click Apply, and then click OK to exit 1 the window. 2 3 4 ASUS P7P55D Premium 5-3 Right-click on the Windows® desktop and select Catalyst(TM) Control Center. You can also rightclick the ATI icon in Windows environment....-graphics cards. Chapter 5 5.1.5 Enabling the ATI® CrossFireX™ technology After installing your graphics cards and the device drivers, enable the CrossFireX™ feature through the ATI Catalyst™ Control Center in the Windows notification area and select Cayalist Control Center. 2....

User Manual
Page 124
..., but the installation steps remain the same. 1. Ensure that the cards are for reference only. Download the latest driver from the NVIDIA website (www.nvidia.com). • Ensure that your graphics card driver supports the NVIDIA SLI technology. See Chapter 2 for the latest certified graphics card and supported 3D application list. 5.2.2 Installing...
..., but the installation steps remain the same. 1. Ensure that the cards are for reference only. Download the latest driver from the NVIDIA website (www.nvidia.com). • Ensure that your graphics card driver supports the NVIDIA SLI technology. See Chapter 2 for the latest certified graphics card and supported 3D application list. 5.2.2 Installing...

User Manual
Page 125
... the NVIDIA website (www.nvidia.com). 5.2.4 Enabling the NVIDIA® SLI™ technology After installing your PCI Express graphics card driver supports the NVIDIA® SLI™ technology. Ensure that came with your graphics card package to the two graphics cards separately. ... the device drivers Refer to the documentation that your graphics cards and the device drivers, enable the SLI feature in place. 5. Launching the NVIDIA Control Panel You can launch the NVIDIA Control Panel by the following two methods. Right click on each graphics card. ASUS P7P55D Premium 5-5
... the NVIDIA website (www.nvidia.com). 5.2.4 Enabling the NVIDIA® SLI™ technology After installing your PCI Express graphics card driver supports the NVIDIA® SLI™ technology. Ensure that came with your graphics card package to the two graphics cards separately. ... the device drivers Refer to the documentation that your graphics cards and the device drivers, enable the SLI feature in place. 5. Launching the NVIDIA Control Panel You can launch the NVIDIA Control Panel by the following two methods. Right click on each graphics card. ASUS P7P55D Premium 5-5


