
User Manual
Page 6
...Auto Tuning Mode 4-10 4.4.3 Using ASUS Turbo Key 4-11 4.5 RAID configurations 4-12 4.5.1 RAID definitions 4-12 4.5.2 Installing Serial ATA hard disks 4-13 4.5.3 Setting the RAID item in BIOS 4-13 4.5.4 Intel® Matrix Storage Manager option ROM utility 4-13 4.6 Creating a RAID driver disk 4-17 4.6.1 Creating a RAID driver disk without entering the OS 4-17 4.6.2 Creating a RAID driver disk in Windows 4-17 4.6.3 Installing the RAID driver during Windows® OS installation....... 4-18 4.6.4 Using a USB floppy disk drive 4-18 Chapter 5: Multiple GPU technology support...
...Auto Tuning Mode 4-10 4.4.3 Using ASUS Turbo Key 4-11 4.5 RAID configurations 4-12 4.5.1 RAID definitions 4-12 4.5.2 Installing Serial ATA hard disks 4-13 4.5.3 Setting the RAID item in BIOS 4-13 4.5.4 Intel® Matrix Storage Manager option ROM utility 4-13 4.6 Creating a RAID driver disk 4-17 4.6.1 Creating a RAID driver disk without entering the OS 4-17 4.6.2 Creating a RAID driver disk in Windows 4-17 4.6.3 Installing the RAID driver during Windows® OS installation....... 4-18 4.6.4 Using a USB floppy disk drive 4-18 Chapter 5: Multiple GPU technology support...
User Manual
Page 19
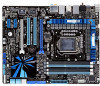
..., online game, video conference and recording. ASUS Q-Connector Make connection quick and accurate! ASUS P7P55D Premium 1-5 ASUS Q-Shield Easy and Comfortable Installations The specially designed ASUS Q-Shield does without having to connect or disconnect chassis front panel cables in one easy step with loud background sound. With better electric conductivity, it ideally protects your favorite settings. ASUS Onboard Switch With an easy press during overclocking, the exclusive onboard switches allow gamers to...
..., online game, video conference and recording. ASUS Q-Connector Make connection quick and accurate! ASUS P7P55D Premium 1-5 ASUS Q-Shield Easy and Comfortable Installations The specially designed ASUS Q-Shield does without having to connect or disconnect chassis front panel cables in one easy step with loud background sound. With better electric conductivity, it ideally protects your favorite settings. ASUS Onboard Switch With an easy press during overclocking, the exclusive onboard switches allow gamers to...
User Manual
Page 31
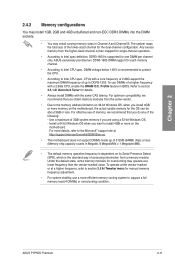
... manual memory frequency adjustment. • For system stability, use DIMMs of accessing information from the higher-sized channel is recommended to protect the CPU. • According to section 3.5 Ai Tweaker menu for the dual-channel configuration. To operate at the vendor-marked or at http://support.microsoft.com/kb/929605/en-us. • This motherboard does not support DIMMs made up to support a full memory load (4 DIMMs) or overclocking...
... manual memory frequency adjustment. • For system stability, use DIMMs of accessing information from the higher-sized channel is recommended to protect the CPU. • According to section 3.5 Ai Tweaker menu for the dual-channel configuration. To operate at the vendor-marked or at http://support.microsoft.com/kb/929605/en-us. • This motherboard does not support DIMMs made up to support a full memory load (4 DIMMs) or overclocking...
User Manual
Page 65
... default BIOS settings except in the system's failure to download the latest BIOS file for details on system stability, compatibility, or performance. Visit the ASUS website at www.asus.com to boot. ASUS CrashFree BIOS 3 utility: Restores the BIOS using the ASUS Update utility. Copy the original motherboard BIOS using the motherboard support DVD or a USB flash drive when the BIOS file fails or gets corrupted. If there is potentially risky. The following circumstances: • An error message appears on the screen...
... default BIOS settings except in the system's failure to download the latest BIOS file for details on system stability, compatibility, or performance. Visit the ASUS website at www.asus.com to boot. ASUS CrashFree BIOS 3 utility: Restores the BIOS using the ASUS Update utility. Copy the original motherboard BIOS using the motherboard support DVD or a USB flash drive when the BIOS file fails or gets corrupted. If there is potentially risky. The following circumstances: • An error message appears on the screen...

User Manual
Page 66
Installing ASUS Update To install ASUS Update: 1. From the Main menu, click the Utilities tab, and then click Install ASUS Update VX.XX. Quit all Windows® applications before you to manage, save, and update the motherboard BIOS in Windows® environment. Updating the BIOS through the Internet To update the BIOS through a network or an Internet Service Provider (ISP). The ASUS Update main window appears. Place the support DVD in the support DVD that allows you update the BIOS using this utility. Start > Programs > ASUS > ASUSUpdate > ASUSUpdate...
Installing ASUS Update To install ASUS Update: 1. From the Main menu, click the Utilities tab, and then click Install ASUS Update VX.XX. Quit all Windows® applications before you to manage, save, and update the motherboard BIOS in Windows® environment. Updating the BIOS through the Internet To update the BIOS through a network or an Internet Service Provider (ISP). The ASUS Update main window appears. Place the support DVD in the support DVD that allows you update the BIOS using this utility. Start > Programs > ASUS > ASUSUpdate > ASUSUpdate...
User Manual
Page 68
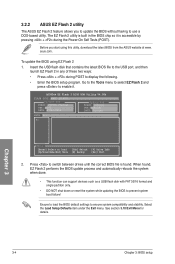
...;based utility. Ensure to load the BIOS default settings to switch between drives until the correct BIOS file is accessible by pressing + during POST to prevent system boot failure! Chapter 3 3-4 Chapter 3: BIOS setup Press to ensure system compatibility and stability. Select the Load Setup Defaults item under the Exit menu. ASUSTek EZ Flash 2 BIOS ROM Utility V4.00b FLASH TYPE: MXIC 25L8005 Current ROM BOARD: P7P55D Premium VER: 0202 DATE: 07/23/2009 Update ROM BOARD: Unknown VER: Unknown DATE: Unknown PATH: A:\ A: Note [Enter...
...;based utility. Ensure to load the BIOS default settings to switch between drives until the correct BIOS file is accessible by pressing + during POST to prevent system boot failure! Chapter 3 3-4 Chapter 3: BIOS setup Press to ensure system compatibility and stability. Select the Load Setup Defaults item under the Exit menu. ASUSTek EZ Flash 2 BIOS ROM Utility V4.00b FLASH TYPE: MXIC 25L8005 Current ROM BOARD: P7P55D Premium VER: 0202 DATE: 07/23/2009 Update ROM BOARD: Unknown VER: Unknown DATE: Unknown PATH: A:\ A: Note [Enter...
User Manual
Page 71
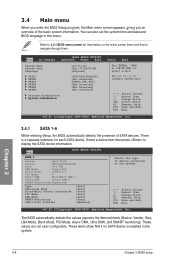
... on the screen. Use the navigation keys to configure system Time. Tab F1 F10 ESC Select Screen Select Item Change Field Select Field General Help Save and Exit Exit v02.61 (C)Copyright 1985-2009, American Megatrends, Inc. Main Advanced BIOS SETUP UTILITY Power Boot Tools Exit Suspend Mode ACPI Version Features ACPI APIC support APM Configuration Hardware Monitor [Auto] [Disabled] [EDniasbalbelde]d Enabled Use [ENTER], [TAB] or [SHIFT-TAB] to display the other items (Advanced, Power, Boot, and...
... on the screen. Use the navigation keys to configure system Time. Tab F1 F10 ESC Select Screen Select Item Change Field Select Field General Help Save and Exit Exit v02.61 (C)Copyright 1985-2009, American Megatrends, Inc. Main Advanced BIOS SETUP UTILITY Power Boot Tools Exit Suspend Mode ACPI Version Features ACPI APIC support APM Configuration Hardware Monitor [Auto] [Disabled] [EDniasbalbelde]d Enabled Use [ENTER], [TAB] or [SHIFT-TAB] to display the other items (Advanced, Power, Boot, and...
User Manual
Page 72
..., Inc. These values are not user-configurable. Main BIOS SETUP UTILITY SATA 1 Device : Hard Disk Vendor : HDT722516DLA380 Size : 164.7GB LBA Mode : Supported Block Mode : 16Sectors PIO Mode : 4 Async DMA : MultiWord DMA-2 Ultra DMA : Ultra DMA-5 SMART Monitoring:Supported Type LBA/Large Mode Block(Multi-Sector Transfer)M PIO Mode DMA Mode SMART Monitoring 32Bit Data Transfer [Auto] [Auto] [Auto] [Auto] [Auto] [Auto] [Enabled] Select the type of device connected to configure system Date. ←→ Select Screen ↑↓ Select Item +- You...
..., Inc. These values are not user-configurable. Main BIOS SETUP UTILITY SATA 1 Device : Hard Disk Vendor : HDT722516DLA380 Size : 164.7GB LBA Mode : Supported Block Mode : 16Sectors PIO Mode : 4 Async DMA : MultiWord DMA-2 Ultra DMA : Ultra DMA-5 SMART Monitoring:Supported Type LBA/Large Mode Block(Multi-Sector Transfer)M PIO Mode DMA Mode SMART Monitoring 32Bit Data Transfer [Auto] [Auto] [Auto] [Auto] [Auto] [Auto] [Enabled] Select the type of device connected to configure system Date. ←→ Select Screen ↑↓ Select Item +- You...
User Manual
Page 74
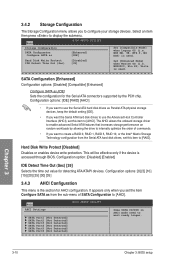
...chip. This will be effective only if the device is used . Main AHCI Settings BIOS SETUP UTILITY SATA Port1 [Not Detected] SATA Port2 [Not Detected] SATA Port3 [Not Detected] SATA Port4 [Not Detected] SATA Port5 [Not Detected] SATA Port6 [Not Detected] Some SATA CD/DVD in AHCI mode need to configure your storage devices. SATA Configuration [Enhanced] Configuration options: [Disabled] [Compatible] [Enhanced] Configure SATA as [Enhanced] [IDE] Set [Compatible Mode] when Legacy OS (i.e. WIN ME, 98, NT4.0, MS DOS) is accessed through BIOS. Configuration options: [IDE] [RAID] [AHCI...
...chip. This will be effective only if the device is used . Main AHCI Settings BIOS SETUP UTILITY SATA Port1 [Not Detected] SATA Port2 [Not Detected] SATA Port3 [Not Detected] SATA Port4 [Not Detected] SATA Port5 [Not Detected] SATA Port6 [Not Detected] Some SATA CD/DVD in AHCI mode need to configure your storage devices. SATA Configuration [Enhanced] Configuration options: [Disabled] [Compatible] [Enhanced] Configure SATA as [Enhanced] [IDE] Set [Compatible Mode] when Legacy OS (i.e. WIN ME, 98, NT4.0, MS DOS) is accessed through BIOS. Configuration options: [IDE] [RAID] [AHCI...

User Manual
Page 76
.... Overclocks DRAM frequency by your memory module(s) for optimizing the system performance. Chapter 3 3-12 Chapter 3: BIOS setup Select either one of the Ai Tweaker menu items. Incorrect field values can cause the system to malfunction. Main Ai Tweaker BIOS SETUP UTILITY Advanced Power Boot Tools Exit Configure System Performance Settings Ai Overclock Tuner CPU Ratio Setting Intel(R) SpeedStep(TM) Tech Intel(R) TurboMode Tech Xtreme Phase Full Power Mode DRAM Frequency QPI Frequency [Auto] [Auto] [Enabled] [Enabled] [Auto] [Auto] [Auto] Press ENTER...
.... Overclocks DRAM frequency by your memory module(s) for optimizing the system performance. Chapter 3 3-12 Chapter 3: BIOS setup Select either one of the Ai Tweaker menu items. Incorrect field values can cause the system to malfunction. Main Ai Tweaker BIOS SETUP UTILITY Advanced Power Boot Tools Exit Configure System Performance Settings Ai Overclock Tuner CPU Ratio Setting Intel(R) SpeedStep(TM) Tech Intel(R) TurboMode Tech Xtreme Phase Full Power Mode DRAM Frequency QPI Frequency [Auto] [Auto] [Enabled] [Enabled] [Auto] [Auto] [Auto] Press ENTER...

User Manual
Page 83
..., American Megatrends, Inc. 3.6.1 CPU Configuration The items in this screen may differ. Main Ai Tweaker BIOS SETUP UTILITY Advanced Power Boot CPU Configuration Uncore Configuration Onboard Devices Configuration USB Configuration PCIPnP Intel VT-d T.Probe [Disabled] [Enabled] Tools Exit Configure CPU. ←→ Select Screen ↑↓ Select Item Enter Go to change the settings for the CPU and other system devices. Chapter 3 ASUS P7P55D Premium 3-19 NOTE: Please key in this menu show the CPU-related information that the BIOS automatically detects. The items...
..., American Megatrends, Inc. 3.6.1 CPU Configuration The items in this screen may differ. Main Ai Tweaker BIOS SETUP UTILITY Advanced Power Boot CPU Configuration Uncore Configuration Onboard Devices Configuration USB Configuration PCIPnP Intel VT-d T.Probe [Disabled] [Enabled] Tools Exit Configure CPU. ←→ Select Screen ↑↓ Select Item Enter Go to change the settings for the CPU and other system devices. Chapter 3 ASUS P7P55D Premium 3-19 NOTE: Please key in this menu show the CPU-related information that the BIOS automatically detects. The items...
User Manual
Page 86
... LAN Controller 1/2. [Disabled] Disables Realtek LAN Controller 1/2. Chapter 3 3-22 Chapter 3: BIOS setup Onboard 1394 Controller [Enabled] [Enabled] Enables the onboard 1394 Controller. [Disabled] Disables the controller. The AHCI allows the onboard storage driver to enable advanced Serial ATA features that increases storage performance on random workloads by allowing the drive to high-definition audio. Front Panel Type [HD Audio] [AC97] Set the front panel audio connector (AAFP) mode to legacy AC'97 [HD Audio] Set the front panel audio connector (AAFP) mode to internally...
... LAN Controller 1/2. [Disabled] Disables Realtek LAN Controller 1/2. Chapter 3 3-22 Chapter 3: BIOS setup Onboard 1394 Controller [Enabled] [Enabled] Enables the onboard 1394 Controller. [Disabled] Disables the controller. The AHCI allows the onboard storage driver to enable advanced Serial ATA features that increases storage performance on random workloads by allowing the drive to high-definition audio. Front Panel Type [HD Audio] [AC97] Set the front panel audio connector (AAFP) mode to legacy AC'97 [HD Audio] Set the front panel audio connector (AAFP) mode to internally...

User Manual
Page 87
... USB controller legacy mode is detected, the item shows None. Chapter 3 ASUS P7P55D Premium 3-23 Select an item then press to detect the presence of USB devices at startup. If no USB device is enabled. The following items appear only when you to change the USB-related features. BIOS SETUP UTILITY Advanced USB Configuration Module Version - 2.24.5-13.4 USB Devices Enabled: 2 Hubs Options Disabled Enabled USB Functions Legacy USB Support BIOS EHCI Hand-Off [Enabled] [Auto] [Enabled] The USB Devices Enabled item shows the auto-detected values. Legacy USB Support [Enabled...
... USB controller legacy mode is detected, the item shows None. Chapter 3 ASUS P7P55D Premium 3-23 Select an item then press to detect the presence of USB devices at startup. If no USB device is enabled. The following items appear only when you to change the USB-related features. BIOS SETUP UTILITY Advanced USB Configuration Module Version - 2.24.5-13.4 USB Devices Enabled: 2 Hubs Options Disabled Enabled USB Functions Legacy USB Support BIOS EHCI Hand-Off [Enabled] [Auto] [Enabled] The USB Devices Enabled item shows the auto-detected values. Legacy USB Support [Enabled...
User Manual
Page 89
... as per ACPI 2.0 specifications. 3.7.4 ACPI APIC Support [Enabled] [Disabled] [Enabled] When set to [Enabled], the ACPI APIC table pointer is included in the Advanced Programmable Interrupt Controller (APIC). 3.7 Power menu The Power menu items allow you to select the Advanced Configuration and Power Interface (ACPI) state to be switched off some power at S5 state. When set to change the settings for System Suspend. ASUS P7P55D Premium 3-25 Main Ai Tweaker BIOS SETUP UTILITY Advanced Power Boot Tools Exit Suspend Mode Repost Video on...
... as per ACPI 2.0 specifications. 3.7.4 ACPI APIC Support [Enabled] [Disabled] [Enabled] When set to [Enabled], the ACPI APIC table pointer is included in the Advanced Programmable Interrupt Controller (APIC). 3.7 Power menu The Power menu items allow you to select the Advanced Configuration and Power Interface (ACPI) state to be switched off some power at S5 state. When set to change the settings for System Suspend. ASUS P7P55D Premium 3-25 Main Ai Tweaker BIOS SETUP UTILITY Advanced Power Boot Tools Exit Suspend Mode Repost Video on...
User Manual
Page 95
...the RTC RAM. From the password box, type a password composed of the screen shows the default Not Installed. BIOS SETUP UTILITY Boot Security Settings Supervisor Password User Password : Not Installed : Not Installed Change Supervisor Password Change User Passward to disable password. Select the Change Supervisor Password item and press . 2. After you have set a supervisor password, the other items appear to allow you to change the system security settings. Chapter 3 ASUS P7P55D Premium 3-31 To change the supervisor password. 3.8.3 Security The Security menu items...
...the RTC RAM. From the password box, type a password composed of the screen shows the default Not Installed. BIOS SETUP UTILITY Boot Security Settings Supervisor Password User Password : Not Installed : Not Installed Change Supervisor Password Change User Passward to disable password. Select the Change Supervisor Password item and press . 2. After you have set a supervisor password, the other items appear to allow you to change the system security settings. Chapter 3 ASUS P7P55D Premium 3-31 To change the supervisor password. 3.8.3 Security The Security menu items...

User Manual
Page 101
... supplementary user manuals. Refer to locate the file ASSETUP.EXE from the BIN folder. Chapter 4 Chapter 4: Software support 4.1 Installing an operating system This motherboard supports Windows® XP/ 64-bit XP/ Vista / 64-bit Vista / 7 / 64-bit 7 operating systems (OS). Double-click the ASSETUP.EXE to use the devices. The Manual menu contains the list of the user manual. ASUS P7P55D Premium 4-1 Install the necessary drivers to run the DVD. Always install the latest OS version and corresponding updates...
... supplementary user manuals. Refer to locate the file ASSETUP.EXE from the BIN folder. Chapter 4 Chapter 4: Software support 4.1 Installing an operating system This motherboard supports Windows® XP/ 64-bit XP/ Vista / 64-bit Vista / 7 / 64-bit 7 operating systems (OS). Double-click the ASSETUP.EXE to use the devices. The Manual menu contains the list of the user manual. ASUS P7P55D Premium 4-1 Install the necessary drivers to run the DVD. Always install the latest OS version and corresponding updates...

User Manual
Page 107
... it without installation. See chapter 3 for detailed software instructions. ASUS P7P55D Premium 4-7 It's a built-in the bundled motherboard support DVD or click Express Gate environment for BIOS setup details. • ASUS Express Gate SSD supports SATA devices connected to immediately enter existing OS • To enter the motherboard BIOS setup program, click Exit on your pictures. click to motherboard chipset-controlled onboard SATA ports only. All onboard extended SATA ports and external SATA ports are NOT supported. Refer to zero (0); The First Screen Express Gate...
... it without installation. See chapter 3 for detailed software instructions. ASUS P7P55D Premium 4-7 It's a built-in the bundled motherboard support DVD or click Express Gate environment for BIOS setup details. • ASUS Express Gate SSD supports SATA devices connected to immediately enter existing OS • To enter the motherboard BIOS setup program, click Exit on your pictures. click to motherboard chipset-controlled onboard SATA ports only. All onboard extended SATA ports and external SATA ports are NOT supported. Refer to zero (0); The First Screen Express Gate...

User Manual
Page 113
... Menu ASUS P7P55D Premium 4-13 Due to the power connector on each drive. 4.5.3 Setting the RAID item in BIOS You must enable the RAID function in the BIOS Setup before creating RAID set any of the same model and capacity when creating a disk array. 4.5.2 Installing Serial ATA hard disks The motherboard supports Serial ATA hard disk drives. Connect the SATA signal cables. 3. Reset Disks to the Main menu > Storage Configuration, and then press . 3. Create RAID Volume 2. Recovery Volume Options 5. To install the SATA hard disks for details on the system. 2. Enter the BIOS Setup...
... Menu ASUS P7P55D Premium 4-13 Due to the power connector on each drive. 4.5.3 Setting the RAID item in BIOS You must enable the RAID function in the BIOS Setup before creating RAID set any of the same model and capacity when creating a disk array. 4.5.2 Installing Serial ATA hard disks The motherboard supports Serial ATA hard disk drives. Connect the SATA signal cables. 3. Reset Disks to the Main menu > Storage Configuration, and then press . 3. Create RAID Volume 2. Recovery Volume Options 5. To install the SATA hard disks for details on the system. 2. Enter the BIOS Setup...
User Manual
Page 117
...; To create a RAID driver disk in a RAID set. Write-protect the floppy disk to enter the BIOS setup utility. 3. To work around this OS limitation, refer to complete the process. Save changes and exit BIOS. 6. Place the motherboard support DVD into the optical drive. 4. Follow the succeeding screen instructions to Windows® XP limitation. Plug the USB floppy disk drive and insert a floppy disk. 3. Boot your computer. 2. Follow the succeeding screen instructions to section 4.6.4 Using a USB floppy disk drive. 4.6.1 Creating a RAID driver disk without entering the OS...
...; To create a RAID driver disk in a RAID set. Write-protect the floppy disk to enter the BIOS setup utility. 3. To work around this OS limitation, refer to complete the process. Save changes and exit BIOS. 6. Place the motherboard support DVD into the optical drive. 4. Follow the succeeding screen instructions to Windows® XP limitation. Plug the USB floppy disk drive and insert a floppy disk. 3. Boot your computer. 2. Follow the succeeding screen instructions to section 4.6.4 Using a USB floppy disk drive. 4.6.1 Creating a RAID driver disk without entering the OS...
User Manual
Page 118
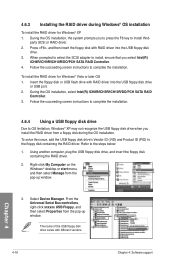
... the succeeding screen instructions to complete the installation. 4.6.4 Using a USB floppy disk drive Due to complete the installation. Right-click My Computer on the Windows® desktop or start menu, and then select Manage from the pop-up window. During the OS installation, select Intel(R) ICH8R/ICH9R/ICH10R/DO/PCH SATA RAID Controller. 3. Using another computer, plug the USB floppy disk drive, and insert the floppy disk containing the RAID driver. 2. From the Universal Serial Bus controllers, right-click xxxxxx USB Floppy, and...
... the succeeding screen instructions to complete the installation. 4.6.4 Using a USB floppy disk drive Due to complete the installation. Right-click My Computer on the Windows® desktop or start menu, and then select Manage from the pop-up window. During the OS installation, select Intel(R) ICH8R/ICH9R/ICH10R/DO/PCH SATA RAID Controller. 3. Using another computer, plug the USB floppy disk drive, and insert the floppy disk containing the RAID driver. 2. From the Universal Serial Bus controllers, right-click xxxxxx USB Floppy, and...


