

User Manual
Page 1
P7P55D LE Motherboard
P7P55D LE Motherboard
User Manual
Page 3
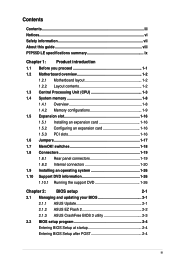
Contents Contents...iii Notices...vi Safety information vii About this guide viii P7P55D LE specifications summary ix Chapter 1: Product introduction 1.1 Before you proceed 1-1 1.2 Motherboard overview 1-2 1.2.1 Motherboard layout 1-2 1.2.2 Layout contents 1-2 1.3 Central Processing Unit (CPU 1-3 1.4 System memory 1-8 1.4.1 Overview...26 Chapter 2: BIOS setup 2-1 2.1 Managing and updating your BIOS 2-1 2.1.1 ASUS Update 2-1 2.1.2 ASUS EZ Flash 2 2-2 2.1.3 ASUS CrashFree BIOS 3 utility 2-3 2.2 BIOS setup program 2-4 Entering BIOS Setup at startup 2-4 Entering BIOS Setup after ...
Contents Contents...iii Notices...vi Safety information vii About this guide viii P7P55D LE specifications summary ix Chapter 1: Product introduction 1.1 Before you proceed 1-1 1.2 Motherboard overview 1-2 1.2.1 Motherboard layout 1-2 1.2.2 Layout contents 1-2 1.3 Central Processing Unit (CPU 1-3 1.4 System memory 1-8 1.4.1 Overview...26 Chapter 2: BIOS setup 2-1 2.1 Managing and updating your BIOS 2-1 2.1.1 ASUS Update 2-1 2.1.2 ASUS EZ Flash 2 2-2 2.1.3 ASUS CrashFree BIOS 3 utility 2-3 2.2 BIOS setup program 2-4 Entering BIOS Setup at startup 2-4 Entering BIOS Setup after ...
User Manual
Page 6
...Rules. This product has been designed to provide reasonable protection against harmful interference in a residential installation. DO NOT throw the motherboard in municipal waste. Check local regulations for compliance could void the user's authority to which the receiver is no guarantee ..., Evaluation, Authorisation, and Restriction of Chemicals) regulatory framework, we published the chemical substances in our products at ASUS REACH website at http://green.asus.com/english/REACH.htm. However, there is connected. • Consult the dealer or an experienced radio/TV technician...
...Rules. This product has been designed to provide reasonable protection against harmful interference in a residential installation. DO NOT throw the motherboard in municipal waste. Check local regulations for compliance could void the user's authority to which the receiver is no guarantee ..., Evaluation, Authorisation, and Restriction of Chemicals) regulatory framework, we published the chemical substances in our products at ASUS REACH website at http://green.asus.com/english/REACH.htm. However, there is connected. • Consult the dealer or an experienced radio/TV technician...
User Manual
Page 7
...your local power company. • If the power supply is set to the correct voltage in fire. Operation safety • Before installing the motherboard and adding devices on a stable surface. • If you are unplugged. • Seek professional assistance before using , contact your retailer. Do... not place the product in your motherboard) and is an optional component (may or may become wet. • Place the product on it may not be included in any damage,...
...your local power company. • If the power supply is set to the correct voltage in fire. Operation safety • Before installing the motherboard and adding devices on a stable surface. • If you are unplugged. • Seek professional assistance before using , contact your retailer. Do... not place the product in your motherboard) and is an optional component (may or may become wet. • Place the product on it may not be included in any damage,...
User Manual
Page 8
...of the BIOS parameters are also provided. Conventions used throughout this guide This user guide contains the information you MUST follow to the ASUS contact information. 2. Typography Bold text Italics ++ Indicates a menu or an item to the following symbols used in the less-...than and greater-than sign means that you need when installing and configuring the motherboard. These documents are linked with a plus sign (+). IMPORTANT: Instructions that you must press the enclosed key. Example: ++ viii How...
...of the BIOS parameters are also provided. Conventions used throughout this guide This user guide contains the information you MUST follow to the ASUS contact information. 2. Typography Bold text Italics ++ Indicates a menu or an item to the following symbols used in the less-...than and greater-than sign means that you need when installing and configuring the motherboard. These documents are linked with a plus sign (+). IMPORTANT: Instructions that you must press the enclosed key. Example: ++ viii How...
User Manual
Page 13
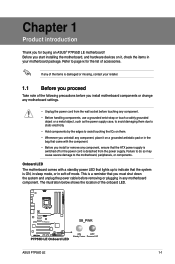
...avoid damaging them due to static electricity. • Hold components by the edges to page ix for buying an ASUS® P7P55D LE motherboard! Before you start installing the motherboard, and hardware devices on a grounded antistatic pad or in the bag that came with a standby power LED that ... or plugging in your retailer. 1.1 Before you proceed Take note of the following precautions before touching any motherboard component. Chapter 1 Product introduction Thank you for the list of accessories. The illustration below shows the location of the onboard LED. ASUS P7P55D LE 1-1
...avoid damaging them due to static electricity. • Hold components by the edges to page ix for buying an ASUS® P7P55D LE motherboard! Before you start installing the motherboard, and hardware devices on a grounded antistatic pad or in the bag that came with a standby power LED that ... or plugging in your retailer. 1.1 Before you proceed Take note of the following precautions before touching any motherboard component. Chapter 1 Product introduction Thank you for the list of accessories. The illustration below shows the location of the onboard LED. ASUS P7P55D LE 1-1

User Manual
Page 14
... the holes indicated by circles to secure the motherboard to the chassis. DO NOT overtighten the screws! USB connectors (10-1 pin USB910, USB1112, USB1314) 1-23 4. Front panel audio connector (10-1 pin AAFP) 1-21 7. System ...; P55 Serial ATA connectors (7-pin SATA 1-6) 1-21 * Optional 1-2 Chapter 1: Product introduction Place this side towards the rear of the chassis. Doing so can damage the motherboard. Optical drive audio connector (4-pin CD) 1-24 6. The edge with external ports goes to the rear part of the chassis. 1.2.2 Place six screws into the...
... the holes indicated by circles to secure the motherboard to the chassis. DO NOT overtighten the screws! USB connectors (10-1 pin USB910, USB1112, USB1314) 1-23 4. Front panel audio connector (10-1 pin AAFP) 1-21 7. System ...; P55 Serial ATA connectors (7-pin SATA 1-6) 1-21 * Optional 1-2 Chapter 1: Product introduction Place this side towards the rear of the chassis. Doing so can damage the motherboard. Optical drive audio connector (4-pin CD) 1-24 6. The edge with external ports goes to the rear part of the chassis. 1.2.2 Place six screws into the...
User Manual
Page 15
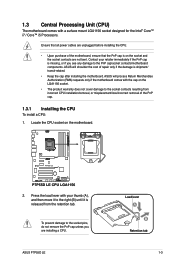
... on the motherboard. 2. ASUS P7P55D LE Load lever A B Retention tab 1-3 ASUS will process Return Merchandise Authorization (RMA) requests only if the motherboard comes with the cap on the LGA1156 socket. • The product warranty does not cover damage to the PnP cap/socket contacts/motherboard components. Locate... immediately if the PnP cap is shipment/ transit-related. • Keep the cap after installing the motherboard. ASUS will shoulder the cost of the motherboard, ensure that all power cables are unplugged before installing the CPU. • Upon purchase of repair only...
... on the motherboard. 2. ASUS P7P55D LE Load lever A B Retention tab 1-3 ASUS will process Return Merchandise Authorization (RMA) requests only if the motherboard comes with the cap on the LGA1156 socket. • The product warranty does not cover damage to the PnP cap/socket contacts/motherboard components. Locate... immediately if the PnP cap is shipment/ transit-related. • Keep the cap after installing the motherboard. ASUS will shoulder the cost of the motherboard, ensure that all power cables are unplugged before installing the CPU. • Upon purchase of repair only...

User Manual
Page 18
... LGA1156 processor requires a specially designed heatsink and fan assembly to the CPU fan connector. 1-6 Chapter 1: Product introduction Ensure that you have installed the motherboard to the CPU heatsink or CPU before you install the CPU fan and heatsink assembly. A B A A B 1 B A 1 Orient the .... If you buy a boxed Intel® processor, the package includes the CPU fan and heatsink assembly. Place the heatsink on the motherboard. 2. If you buy a CPU separately, ensure that the CPU fan cable is closest to ensure optimum thermal condition and performance. &#...
... LGA1156 processor requires a specially designed heatsink and fan assembly to the CPU fan connector. 1-6 Chapter 1: Product introduction Ensure that you have installed the motherboard to the CPU heatsink or CPU before you install the CPU fan and heatsink assembly. A B A A B 1 B A 1 Orient the .... If you buy a boxed Intel® processor, the package includes the CPU fan and heatsink assembly. Place the heatsink on the motherboard. 2. If you buy a CPU separately, ensure that the CPU fan cable is closest to ensure optimum thermal condition and performance. &#...
User Manual
Page 19
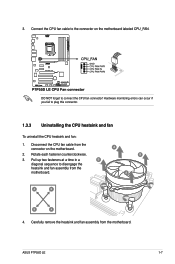
Hardware monitoring errors can occur if you fail to disengage the heatsink and fan assembly from the motherboard. Rotate each fastener counterclockwise. 3. ASUS P7P55D LE 1-7 3. Pull up two fasteners at a time in a B diagonal sequence to plug this connector. 1.3.3 Uninstalling the CPU heatsink and fan To uninstall the CPU heatsink and ...
Hardware monitoring errors can occur if you fail to disengage the heatsink and fan assembly from the motherboard. Rotate each fastener counterclockwise. 3. ASUS P7P55D LE 1-7 3. Pull up two fasteners at a time in a B diagonal sequence to plug this connector. 1.3.3 Uninstalling the CPU heatsink and fan To uninstall the CPU heatsink and ...
User Manual
Page 20
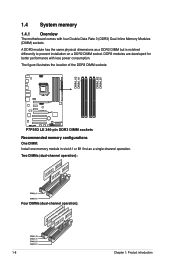
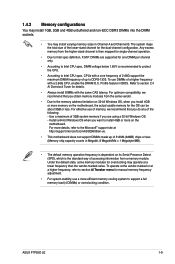
...-channel operation. DDR3 modules are developed for better performance with four Double Data Rate 3 (DDR3) Dual Inline Memory Modules (DIMM) sockets. 1.4 System memory 1.4.1 Overview The motherboard comes with less power consumption. The figure illustrates the location of the DDR3 DIMM sockets: Recommended memory configurations One DIMM: Install one memory module in...
...-channel operation. DDR3 modules are developed for better performance with four Double Data Rate 3 (DDR3) Dual Inline Memory Modules (DIMM) sockets. 1.4 System memory 1.4.1 Overview The motherboard comes with less power consumption. The figure illustrates the location of the DDR3 DIMM sockets: Recommended memory configurations One DIMM: Install one memory module in...
User Manual
Page 21
...on the motherboard, the actual usable memory for the OS can be about 3GB or less. For optimum compatibility, we recommend that you obtain memory modules from the higher-sized channel is then mapped for single-channel operation. • Due to Intel spec definition, X.M.P. ASUS P7P55D LE 1-9 Any...lower-sized channel for one DIMM per channel only. • According to Intel CPU spec, DIMM voltage below 1.65V is dependent on the motherboard. Use a maximum of the following: - Under the default state, some memory modules for overclocking may install varying memory sizes in BIOS. 1.4.2...
...on the motherboard, the actual usable memory for the OS can be about 3GB or less. For optimum compatibility, we recommend that you obtain memory modules from the higher-sized channel is then mapped for single-channel operation. • Due to Intel spec definition, X.M.P. ASUS P7P55D LE 1-9 Any...lower-sized channel for one DIMM per channel only. • According to Intel CPU spec, DIMM voltage below 1.65V is dependent on the motherboard. Use a maximum of the following: - Under the default state, some memory modules for overclocking may install varying memory sizes in BIOS. 1.4.2...
User Manual
Page 22
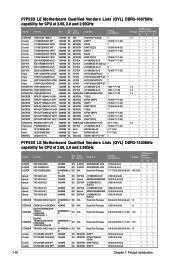
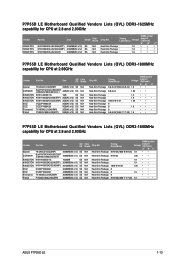
...; • • • 1.5 • • • • • • • • • • • • • • • P7P55D LE Motherboard Qualified Vendors Lists (QVL) DDR3-1333MHz capability for CPU at 2.66, 2.8 and 2.93GHz Vendor Part No. P7P55D LE Motherboard Qualified Vendors Lists (QVL) DDR3-1067MHz capability for CPU at 2.66, 2.8 and 2.93GHz Vendor Part No.
...; • • • 1.5 • • • • • • • • • • • • • • • P7P55D LE Motherboard Qualified Vendors Lists (QVL) DDR3-1333MHz capability for CPU at 2.66, 2.8 and 2.93GHz Vendor Part No. P7P55D LE Motherboard Qualified Vendors Lists (QVL) DDR3-1067MHz capability for CPU at 2.66, 2.8 and 2.93GHz Vendor Part No.
User Manual
Page 23
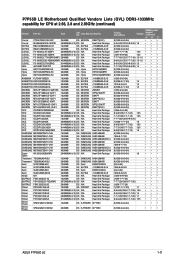
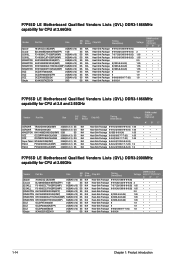
P7P55D LE Motherboard Qualified Vendors Lists (QVL) DDR3-1333MHz capability for CPU at 2.66, 2.8 and 2.93GHz (continued) Vendor Part No. Size SS/ DS Chip Brand ...CH9 SAMSUNG M378B5273BH1-CH9 Super Talent W1333UX2GB(XMP) Transcend TS128MLK64V3U Transcend TS256MLK64V3U Asint SLY3128M8-EDJ Asint SLY3128M8-EDJE Asint SLZ3128M8-EDJ Asint SLZ3128M8-EDJE ASUS N/A BUFFALO FSX1333D3G-1G BUFFALO FSH1333D3G-T3G(XMP) BUFFALO FSX1333D3G-2G Patriot PDC32G1333LLK Patriot PVT33G1333ELK Patriot PVS34G1333ELK Patriot PVS34G1333LLK Patriot PVT36G1333ELK Silicon Power ...
P7P55D LE Motherboard Qualified Vendors Lists (QVL) DDR3-1333MHz capability for CPU at 2.66, 2.8 and 2.93GHz (continued) Vendor Part No. Size SS/ DS Chip Brand ...CH9 SAMSUNG M378B5273BH1-CH9 Super Talent W1333UX2GB(XMP) Transcend TS128MLK64V3U Transcend TS256MLK64V3U Asint SLY3128M8-EDJ Asint SLY3128M8-EDJE Asint SLZ3128M8-EDJ Asint SLZ3128M8-EDJE ASUS N/A BUFFALO FSX1333D3G-1G BUFFALO FSH1333D3G-T3G(XMP) BUFFALO FSX1333D3G-2G Patriot PDC32G1333LLK Patriot PVT33G1333ELK Patriot PVS34G1333ELK Patriot PVS34G1333LLK Patriot PVT36G1333ELK Silicon Power ...
User Manual
Page 24
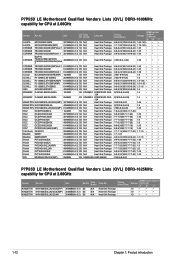
P7P55D LE Motherboard Qualified Vendors Lists (QVL) DDR3-1600MHz capability for CPU at 2.66GHz Vendor Part No. KHX13000D3LLK2/2GN(EPP) KHX13000D3LLK2/2GX(XMP) KHX13000D3LLK2/2GXN Size 2048MB(Kit ...; • 7-7-7-20(1066-7-7-7-20) 2.0 •• 9-9-9-24(1066-7-7-7-20) 1.65 •• • 9-9-9-24(1600-7-7-7-20) 1.65 •• • 1066-8-8-8-20 •• • P7P55D LE Motherboard Qualified Vendors Lists (QVL) DDR3-1625MHz capability for CPU at 2.66GHz Vendor KINGSTON KINGSTON KINGSTON Part No. Heat-Sink Package Heat-Sink Package Heat-Sink...
P7P55D LE Motherboard Qualified Vendors Lists (QVL) DDR3-1600MHz capability for CPU at 2.66GHz Vendor Part No. KHX13000D3LLK2/2GN(EPP) KHX13000D3LLK2/2GX(XMP) KHX13000D3LLK2/2GXN Size 2048MB(Kit ...; • 7-7-7-20(1066-7-7-7-20) 2.0 •• 9-9-9-24(1066-7-7-7-20) 1.65 •• • 9-9-9-24(1600-7-7-7-20) 1.65 •• • 1066-8-8-8-20 •• • P7P55D LE Motherboard Qualified Vendors Lists (QVL) DDR3-1625MHz capability for CPU at 2.66GHz Vendor KINGSTON KINGSTON KINGSTON Part No. Heat-Sink Package Heat-Sink Package Heat-Sink...
User Manual
Page 25
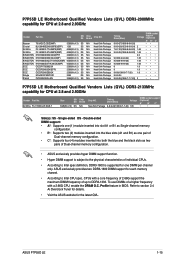
... 2GB(Kit of 2) SS N/A PVS32G1800LLKN(EPP) 2GB(Kit of 2) SS N/A Heat-Sink Package 8-8-8-20(1066-7-7-7-20) 1.9 •• ASUS P7P55D LE 1-13 Timing Dimm(Bios) Voltage support (Optional) A* B* C* Apacer 78.0AGCD-CDZ(XMP) 2048MB(Kit of 2) SS N/A Heat-Sink ...-9-9-9-27 1.65 • • 8 • 8 1.9 •• 8 •• • 8-8-8-20(1066-7-7-7-20) 1.9 •• P7P55D LE Motherboard Qualified Vendors Lists (QVL) DDR3-1800MHz capability for CPU at 2.8 and 2.93GHz Vendor KINGSTON KINGSTON KINGSTON Part No. DIMM socket Size SS/ DS Chip Brand...
... 2GB(Kit of 2) SS N/A PVS32G1800LLKN(EPP) 2GB(Kit of 2) SS N/A Heat-Sink Package 8-8-8-20(1066-7-7-7-20) 1.9 •• ASUS P7P55D LE 1-13 Timing Dimm(Bios) Voltage support (Optional) A* B* C* Apacer 78.0AGCD-CDZ(XMP) 2048MB(Kit of 2) SS N/A Heat-Sink ...-9-9-9-27 1.65 • • 8 • 8 1.9 •• 8 •• • 8-8-8-20(1066-7-7-7-20) 1.9 •• P7P55D LE Motherboard Qualified Vendors Lists (QVL) DDR3-1800MHz capability for CPU at 2.8 and 2.93GHz Vendor KINGSTON KINGSTON KINGSTON Part No. DIMM socket Size SS/ DS Chip Brand...
User Manual
Page 26
...; • • • • • • • • • • • • • • P7P55D LE Motherboard Qualified Vendors Lists (QVL) DDR3-2000MHz capability for CPU at 2.8 and 2.93GHz Vendor Part No. Timing Dimm(Bios) SS N/A SS N/A DS N/A DS ...1066-8-7-7-20) 9-9-9-24 Voltage 2 1.65 1.65 2.0 1.65 1.65 1.65 1.9 1.9 1.8 DIMM socket support (Optional) A* B* C P7P55D LE Motherboard Qualified Vendors Lists (QVL) DDR3-1866MHz capability for CPU at 2.66GHz Vendor Part No. Timing Dimm(Bios) DIMM socket Voltage support (Optional)...
...; • • • • • • • • • • • • • • P7P55D LE Motherboard Qualified Vendors Lists (QVL) DDR3-2000MHz capability for CPU at 2.8 and 2.93GHz Vendor Part No. Timing Dimm(Bios) SS N/A SS N/A DS N/A DS ...1066-8-7-7-20) 9-9-9-24 Voltage 2 1.65 1.65 2.0 1.65 1.65 1.65 1.9 1.9 1.8 DIMM socket support (Optional) A* B* C P7P55D LE Motherboard Qualified Vendors Lists (QVL) DDR3-1866MHz capability for CPU at 2.66GHz Vendor Part No. Timing Dimm(Bios) DIMM socket Voltage support (Optional)...
User Manual
Page 27
...P7P55D LE Motherboard Qualified Vendors Lists (QVL) DDR3-2000MHz capability for the latest QVL. Double-sided DIMM support: • A*: Supports one (1) module inserted into slot A1 or B1 as Single-channel memory configuration. • B*: Supports two (2) modules inserted into both the blue and the black slots as one DIMM per channel only. ASUS P7P55D LE...8226;•• 9-9-9-24 ••• 9-9-9-24(1066-7-7-7-20) 2 •• P7P55D LE Motherboard Qualified Vendors Lists (QVL) DDR3-2133MHz capability for one pair of Dual-channel memory configuration. ...
...P7P55D LE Motherboard Qualified Vendors Lists (QVL) DDR3-2000MHz capability for the latest QVL. Double-sided DIMM support: • A*: Supports one (1) module inserted into slot A1 or B1 as Single-channel memory configuration. • B*: Supports two (2) modules inserted into both the blue and the black slots as one DIMM per channel only. ASUS P7P55D LE...8226;•• 9-9-9-24 ••• 9-9-9-24(1066-7-7-7-20) 2 •• P7P55D LE Motherboard Qualified Vendors Lists (QVL) DDR3-2133MHz capability for one pair of Dual-channel memory configuration. ...
User Manual
Page 28
...cards that you may cause you provide sufficient power when running CrossFireX™ mode. • Connect a chassis fan to the motherboard connector labeled CHA_FAN1/2 when using multiple graphics cards for information on the system and change the necessary BIOS settings, if any. ... . Keep the screw for a PCI Express x16 graphics card to get better performance. • We recommend that you physical injury and damage motherboard components. 1.5.1 Installing an expansion card To install an expansion card: 1. 1.5 Expansion slot In the future, you intend to use . 4. ...
...cards that you may cause you provide sufficient power when running CrossFireX™ mode. • Connect a chassis fan to the motherboard connector labeled CHA_FAN1/2 when using multiple graphics cards for information on the system and change the necessary BIOS settings, if any. ... . Keep the screw for a PCI Express x16 graphics card to get better performance. • We recommend that you physical injury and damage motherboard components. 1.5.1 Installing an expansion card To install an expansion card: 1. 1.5 Expansion slot In the future, you intend to use . 4. ...
User Manual
Page 30
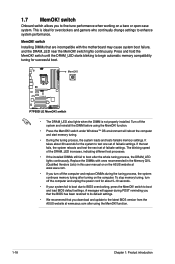
switch Onboard switch allows you to enhance system performance. switch Installing DIMMs that you download and update to the latest BIOS version from the ASUS website at www.asus.com. • If you that the BIOS has been restored to BIOS overclocking, press the MemOK! function. • Press the ...computer and unplog the power cord for about 30 seconds for the system to boot and load BIOS default settings. Replace the DIMMs with the motherboard may cause system boot failure, and the DRAM_LED near the MemOK! A messgae will reboot the computer and start memory tuning. • During...
switch Onboard switch allows you to enhance system performance. switch Installing DIMMs that you download and update to the latest BIOS version from the ASUS website at www.asus.com. • If you that the BIOS has been restored to BIOS overclocking, press the MemOK! function. • Press the ...computer and unplog the power cord for about 30 seconds for the system to boot and load BIOS default settings. Replace the DIMMs with the motherboard may cause system boot failure, and the DRAM_LED near the MemOK! A messgae will reboot the computer and start memory tuning. • During...


