User Guide
Page 17
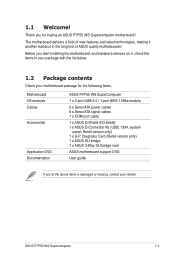
... , check the items in the long line of the above items is damaged or missing, contact your motherboard package for buying an ASUS P7P55 WS Supercomputer motherboard! Before you for the following items. Motherboard ASUS P7P55 WS SuperComputer I/O modules 1 x 2-port USB 2.0 / 1-port IEEE 1394a module Cables 2 x Serial ATA power cables 6 x Serial ATA signal cables 1 x COM port cable Accessories...
... , check the items in the long line of the above items is damaged or missing, contact your motherboard package for buying an ASUS P7P55 WS Supercomputer motherboard! Before you for the following items. Motherboard ASUS P7P55 WS SuperComputer I/O modules 1 x 2-port USB 2.0 / 1-port IEEE 1394a module Cables 2 x Serial ATA power cables 6 x Serial ATA signal cables 1 x COM port cable Accessories...

User Guide
Page 19
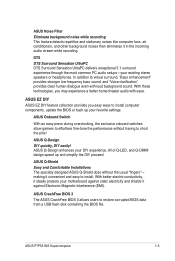
...Memory controller inside CPU can dramatically improve your system up . Memory compatibility is the fastest memory booting solution today. ASUS P7P55 WS Supercomputer 1-3 beginners can achieve extreme yet stable overclocking results with the Best Quality Component for Best Performance The groundbreaking 16+3... phase VRM design is brought to the Internet and key applications before entering the Windows® OS. 1.3.5 ASUS Exclusive Features MemOK! This feature optimizes the power phase functions, allowing components to effectively enhance the overclocking capability. Instant ...
...Memory controller inside CPU can dramatically improve your system up . Memory compatibility is the fastest memory booting solution today. ASUS P7P55 WS Supercomputer 1-3 beginners can achieve extreme yet stable overclocking results with the Best Quality Component for Best Performance The groundbreaking 16+3... phase VRM design is brought to the Internet and key applications before entering the Windows® OS. 1.3.5 ASUS Exclusive Features MemOK! This feature optimizes the power phase functions, allowing components to effectively enhance the overclocking capability. Instant ...
User Guide
Page 21
...without the usual "fingers"- ASUS P7P55 WS Supercomputer 1-5 ASUS EZ DIY ASUS EZ DIY feature collection provides you may experience a better home-theater audio with loud background sound. With better electric conductivity, it ideally protects your favorite settings. ASUS Q-Design enhances your existing... motherboard against Electronic Magnetic Interference (EMI). ASUS CrashFree BIOS 3 The ASUS CrashFree BIOS 3 allows users to install computer components, update the BIOS or back up and simplify the DIY process! ASUS Noise Filter Eliminate background noise while recording This...
...without the usual "fingers"- ASUS P7P55 WS Supercomputer 1-5 ASUS EZ DIY ASUS EZ DIY feature collection provides you may experience a better home-theater audio with loud background sound. With better electric conductivity, it ideally protects your favorite settings. ASUS Q-Design enhances your existing... motherboard against Electronic Magnetic Interference (EMI). ASUS CrashFree BIOS 3 The ASUS CrashFree BIOS 3 allows users to install computer components, update the BIOS or back up and simplify the DIY process! ASUS Noise Filter Eliminate background noise while recording This...

User Guide
Page 24
Chapter summary 2 2.1 Before you proceed 2-1 2.2 Motherboard overview 2-6 2.3 Central Processing Unit (CPU 2-9 2.4 System memory 2-15 2.5 Expansion slots 2-25 2.6 Jumper 2-29 2.7 Connectors 2-30 2.8 Starting up for the first time 2-47 2.9 Turning off the computer 2-48 ASUS P7P55 WS Supercomputer
Chapter summary 2 2.1 Before you proceed 2-1 2.2 Motherboard overview 2-6 2.3 Central Processing Unit (CPU 2-9 2.4 System memory 2-15 2.5 Expansion slots 2-25 2.6 Jumper 2-29 2.7 Connectors 2-30 2.8 Starting up for the first time 2-47 2.9 Turning off the computer 2-48 ASUS P7P55 WS Supercomputer

User Guide
Page 25
..., such as the power supply case, before you install motherboard components or change any motherboard settings. • Unplug the power cord from the power supply. ASUS P7P55 WS Supercomputer 2-1 2.1 Before you proceed Take note of the following precautions before handling components to avoid damaging them due to static electricity. • Hold components by the...
..., such as the power supply case, before you install motherboard components or change any motherboard settings. • Unplug the power cord from the power supply. ASUS P7P55 WS Supercomputer 2-1 2.1 Before you proceed Take note of the following precautions before handling components to avoid damaging them due to static electricity. • Hold components by the...

User Guide
Page 27
... Connectors/Jumpers/Switches/Slots 1. Standby Power LED 10. OV_IMC; Clear RTC RAM (3-pin CLRTC) 12. Serial port connector (10-1 pin COM1) 6. switch 7. LGA1156 CPU Socket 3. ASUS P7P55 WS Supercomputer 2-3 DDR3 DIMM slots 5.
... Connectors/Jumpers/Switches/Slots 1. Standby Power LED 10. OV_IMC; Clear RTC RAM (3-pin CLRTC) 12. Serial port connector (10-1 pin COM1) 6. switch 7. LGA1156 CPU Socket 3. ASUS P7P55 WS Supercomputer 2-3 DDR3 DIMM slots 5.

User Guide
Page 29
... the cost of the PnP cap. ASUS P7P55 WS Supercomputer 2-5 ASUS will process Return Merchandise Authorization (RMA) requests only if the motherboard comes with a surface mount LGA1156 socket designed for the Intel® Core™ i5/...
... the cost of the PnP cap. ASUS P7P55 WS Supercomputer 2-5 ASUS will process Return Merchandise Authorization (RMA) requests only if the motherboard comes with a surface mount LGA1156 socket designed for the Intel® Core™ i5/...

User Guide
Page 31
... will be in contact with pre-applied thermal interface material. If so, skip this step. Remove the PnP cap from the CPU socket. PnP cap 5. ASUS P7P55 WS Supercomputer CPU notches 2-7 The Thermal Interface Material is spread in only one correct orientation. DO NOT force the CPU into your eyes or touches your skin...
... will be in contact with pre-applied thermal interface material. If so, skip this step. Remove the PnP cap from the CPU socket. PnP cap 5. ASUS P7P55 WS Supercomputer CPU notches 2-7 The Thermal Interface Material is spread in only one correct orientation. DO NOT force the CPU into your eyes or touches your skin...

User Guide
Page 33
... installed the motherboard to secure the heatsink and fan assembly in a diagonal sequence to the chassis before you install the CPU fan and heatsink assembly. ASUS P7P55 WS Supercomputer 2-9 Place the heatsink on the motherboard. Push down two fasteners at a time in place. To install the CPU heatsink and fan: 1. B 2. If you buy a CPU...
... installed the motherboard to secure the heatsink and fan assembly in a diagonal sequence to the chassis before you install the CPU fan and heatsink assembly. ASUS P7P55 WS Supercomputer 2-9 Place the heatsink on the motherboard. Push down two fasteners at a time in place. To install the CPU heatsink and fan: 1. B 2. If you buy a CPU...

User Guide
Page 35
... slots as a DDR2 DIMM but is notched differently to prevent installation on a DDR2 DIMM socket. Two DIMMs (dual-channel operation): Four DIMMs (dual-channel operation): ASUS P7P55 WS Supercomputer 2-11 A DDR3 module has the same physical dimensions as a single-channel operation. DDR3 modules are developed for better performance with four Double Data Rate 3 (DDR3...
... slots as a DDR2 DIMM but is notched differently to prevent installation on a DDR2 DIMM socket. Two DIMMs (dual-channel operation): Four DIMMs (dual-channel operation): ASUS P7P55 WS Supercomputer 2-11 A DDR3 module has the same physical dimensions as a single-channel operation. DDR3 modules are developed for better performance with four Double Data Rate 3 (DDR3...
User Guide
Page 37
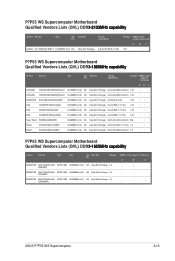
... Heat-Sink Package 1.9 2GXN(XMP) DIMM socket support (Optional) A* B* C* • • • • • • • ASUS P7P55 WS Supercomputer 2-13 DS G.SKILL F3-17066CL9T-6GB-T 6144MB(Kit of 3) DS Heat-Sink Package Timing Lable(Bios) 9-9-9-24(1066-8-7-7-20) Voltage DIMM socket support (Optional...65533;��a��b���i�l�i�ty� Vendor Part No. P7P55 WS Supercomputer Motherboard Qualified Vendors Lists (QVL) DDR�3��-�2��1��3�3�...
... Heat-Sink Package 1.9 2GXN(XMP) DIMM socket support (Optional) A* B* C* • • • • • • • ASUS P7P55 WS Supercomputer 2-13 DS G.SKILL F3-17066CL9T-6GB-T 6144MB(Kit of 3) DS Heat-Sink Package Timing Lable(Bios) 9-9-9-24(1066-8-7-7-20) Voltage DIMM socket support (Optional...65533;��a��b���i�l�i�ty� Vendor Part No. P7P55 WS Supercomputer Motherboard Qualified Vendors Lists (QVL) DDR�3��-�2��1��3�3�...
User Guide
Page 39
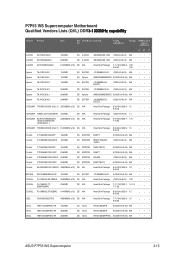
P7P55 WS Supercomputer Motherboard Qualified Vendors Lists (QVL) DDR�3��-�1��3��3�3��M��H���z��c�&#...;• Hynix HMT125U6BFR8C-H9 2048MB DS Hynix H5TQ1G83BFR 9(1333-9-9-9-24) N/A ••• Hynix HMT125U6BFR8C-H9 2048MB DS Hynix H5TQ1G83BFRH9C 9(1333-9-9-9-24) N/A ••• ASUS P7P55 WS Supercomputer 2-15 Size SS/ Chip Brand Chip NO.
P7P55 WS Supercomputer Motherboard Qualified Vendors Lists (QVL) DDR�3��-�1��3��3�3��M��H���z��c�&#...;• Hynix HMT125U6BFR8C-H9 2048MB DS Hynix H5TQ1G83BFR 9(1333-9-9-9-24) N/A ••• Hynix HMT125U6BFR8C-H9 2048MB DS Hynix H5TQ1G83BFRH9C 9(1333-9-9-9-24) N/A ••• ASUS P7P55 WS Supercomputer 2-15 Size SS/ Chip Brand Chip NO.

User Guide
Page 41
... a DIMM into the socket until the retaining clip snaps back in only one direction. Failure to do so may cause severe damage to remove a DIMM. 2 1. ASUS P7P55 WS Supercomputer 2-17 Firmly insert the DIMM into a socket to unplug the power supply before adding or removing DIMMs or other system components.
... a DIMM into the socket until the retaining clip snaps back in only one direction. Failure to do so may cause severe damage to remove a DIMM. 2 1. ASUS P7P55 WS Supercomputer 2-17 Firmly insert the DIMM into a socket to unplug the power supply before adding or removing DIMMs or other system components.

User Guide
Page 43
... LAN1 (8112L) - - - USB 2.0 controller 2 shared - - - - 1394 controller - - F G H - - - - - - - - - - - - - - - - - - - - - - - - - - - - - - - - HD Audio - - - - - IRQ assignments for the location of the slot. SATA controller 1 - - shared - - shared - PCIEX16_4 shared - - - - ASUS P7P55 WS Supercomputer 2-19 PCIEX16_2 shared - - - - shared - - Refer to IRQ#9 4 12 Communications Port (COM1)* 5 13 IRQ Holder for PCI Steering* 6 14 Reserved 7 15 Reserved 8 3 System CMOS/Real Time ...
... LAN1 (8112L) - - - USB 2.0 controller 2 shared - - - - 1394 controller - - F G H - - - - - - - - - - - - - - - - - - - - - - - - - - - - - - - - HD Audio - - - - - IRQ assignments for the location of the slot. SATA controller 1 - - shared - - shared - PCIEX16_4 shared - - - - ASUS P7P55 WS Supercomputer 2-19 PCIEX16_2 shared - - - - shared - - Refer to IRQ#9 4 12 Communications Port (COM1)* 5 13 IRQ Holder for PCI Steering* 6 14 Reserved 7 15 Reserved 8 3 System CMOS/Real Time ...

User Guide
Page 45
... overclocking. For system failure due to clear the Real Time Clock (RTC) RAM in CMOS, which include system setup information such as system passwords. function. ASUS P7P55 WS Supercomputer 2-21 Hold down and reboot the system so the BIOS can clear the CMOS memory of date, time, and system setup parameters by erasing the...
... overclocking. For system failure due to clear the Real Time Clock (RTC) RAM in CMOS, which include system setup information such as system passwords. function. ASUS P7P55 WS Supercomputer 2-21 Hold down and reboot the system so the BIOS can clear the CMOS memory of date, time, and system setup parameters by erasing the...

User Guide
Page 47
... - - - 8-channel Line In Front Speaker Out Mic In Center/Subwoofer Rear Speaker Out Side Speaker Out 2.7.2 Audio I/O connections Audio I/O ports Connect to Headphone and Mic ASUS P7P55 WS Supercomputer 2-23 ** LAN port LED indications Activity/Link Speed LED OFF OFF Yellow Blinking OFF Yellow Blinking ORANGE Description Soft-off Mode Activity/ Speed Link LED...
... - - - 8-channel Line In Front Speaker Out Mic In Center/Subwoofer Rear Speaker Out Side Speaker Out 2.7.2 Audio I/O connections Audio I/O ports Connect to Headphone and Mic ASUS P7P55 WS Supercomputer 2-23 ** LAN port LED indications Activity/Link Speed LED OFF OFF Yellow Blinking OFF Yellow Blinking ORANGE Description Soft-off Mode Activity/ Speed Link LED...

User Guide
Page 49
Connect to 5.1 channel Speakers Connect to 7.1 channel Speakers ASUS P7P55 WS Supercomputer 2-25
Connect to 5.1 channel Speakers Connect to 7.1 channel Speakers ASUS P7P55 WS Supercomputer 2-25

User Guide
Page 51
... back of the system chassis. Doing so will damage the motherboard! You can connect the USB cable to ASUS Q-Connector (USB, blue) first, and then install the Q-Connector (USB) to the USB connectors. ASUS P7P55 WS Supercomputer 2-27 These USB connectors comply with USB 2.0 specification that supports up to a slot opening at the back of...
... back of the system chassis. Doing so will damage the motherboard! You can connect the USB cable to ASUS Q-Connector (USB, blue) first, and then install the Q-Connector (USB) to the USB connectors. ASUS P7P55 WS Supercomputer 2-27 These USB connectors comply with USB 2.0 specification that supports up to a slot opening at the back of...
User Guide
Page 53
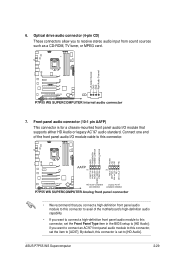
... recommend that supports either HD Audio or legacy AC`97 audio standard. Front panel audio connector (10-1 pin AAFP) This connector is set to [AC97]. ASUS P7P55 WS Supercomputer 2-29 Connect one end of the motherboard's high-definition audio capability. • If you want to connect an AC'97 front panel audio module to...
... recommend that supports either HD Audio or legacy AC`97 audio standard. Front panel audio connector (10-1 pin AAFP) This connector is set to [AC97]. ASUS P7P55 WS Supercomputer 2-29 Connect one end of the motherboard's high-definition audio capability. • If you want to connect an AC'97 front panel audio module to...

User Guide
Page 55
... that you are uncertain about the minimum power supply requirement for your system, refer to connect the 8-pin EATX12 V power plug; ASUS P7P55 WS Supercomputer 2-31 The system may become unstable or may not boot up if the power is recommended when configuring a system with ATX 12 ... later version) and provides a minimum power of 600 W. • Do not forget to the Recommended Power Supply Wattage Calculator at http://support.asus.com/PowerSupplyCalculator/PSCalculator. The power supply plugs are for details. 10. otherwise, the system will not boot. • Use of a PSU with...
... that you are uncertain about the minimum power supply requirement for your system, refer to connect the 8-pin EATX12 V power plug; ASUS P7P55 WS Supercomputer 2-31 The system may become unstable or may not boot up if the power is recommended when configuring a system with ATX 12 ... later version) and provides a minimum power of 600 W. • Do not forget to the Recommended Power Supply Wattage Calculator at http://support.asus.com/PowerSupplyCalculator/PSCalculator. The power supply plugs are for details. 10. otherwise, the system will not boot. • Use of a PSU with...


