User Manual
Page 1
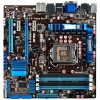
Motherboard P7H55D-M EVO
Motherboard P7H55D-M EVO
User Manual
Page 3
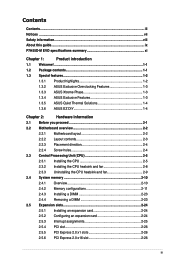
... information...viii About this guide...ix P7H55D-M EVO specifications summary xi Chapter 1: Product introduction 1.1 Welcome!...1-1 1.2 Package contents 1-1 1.3 Special features 1-2 1.3.1 Product highlights 1-2 1.3.2 ASUS Exclusive Overclocking Features 1-3 1.3.3 ASUS Xtreme Phase 1-3 1.3.4 ASUS Exclusive Features 1-3 1.3.5 ASUS Quiet Thermal Solutions 1-4 1.3.6 ASUS EZ DIY 1-4 Chapter 2: Hardware information 2.1 Before you proceed 2-1 2.2 Motherboard overview 2-2 2.2.1 Motherboard layout 2-2 2.2.2 Layout contents 2-3 2.2.3 Placement direction 2-4 2.2.4 Screw...
... information...viii About this guide...ix P7H55D-M EVO specifications summary xi Chapter 1: Product introduction 1.1 Welcome!...1-1 1.2 Package contents 1-1 1.3 Special features 1-2 1.3.1 Product highlights 1-2 1.3.2 ASUS Exclusive Overclocking Features 1-3 1.3.3 ASUS Xtreme Phase 1-3 1.3.4 ASUS Exclusive Features 1-3 1.3.5 ASUS Quiet Thermal Solutions 1-4 1.3.6 ASUS EZ DIY 1-4 Chapter 2: Hardware information 2.1 Before you proceed 2-1 2.2 Motherboard overview 2-2 2.2.1 Motherboard layout 2-2 2.2.2 Layout contents 2-3 2.2.3 Placement direction 2-4 2.2.4 Screw...
User Manual
Page 7
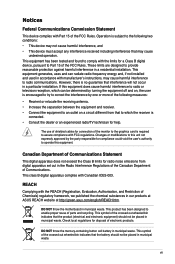
...complies with Canadian ICES-003. This equipment generates, uses and can be placed in a particular installation. DO NOT throw the motherboard in municipal waste. This product has been designed to correct the interference by the party responsible for disposal of electronic products. ...• This device may cause harmful interference to provide reasonable protection against harmful interference in our products at ASUS REACH website at http://green.asus.com/english/REACH.htm. Canadian Department of Communications Statement This digital apparatus does not exceed the Class B ...
...complies with Canadian ICES-003. This equipment generates, uses and can be placed in a particular installation. DO NOT throw the motherboard in municipal waste. This product has been designed to correct the interference by the party responsible for disposal of electronic products. ...• This device may cause harmful interference to provide reasonable protection against harmful interference in our products at ASUS REACH website at http://green.asus.com/english/REACH.htm. Canadian Department of Communications Statement This digital apparatus does not exceed the Class B ...

User Manual
Page 8
... the power cable from the electrical outlet before relocating the system. • When adding or removing devices to or from the motherboard, ensure that all power cables are unplugged. • Seek professional assistance before using an adapter or extension cord. Contact a qualified... If possible, disconnect all power cables from the existing system before the signal cables are connected. Operation safety • Before installing the motherboard and adding devices on a stable surface. • If you add a device. • Before connecting or removing signal cables from ...
... the power cable from the electrical outlet before relocating the system. • When adding or removing devices to or from the motherboard, ensure that all power cables are unplugged. • Seek professional assistance before using an adapter or extension cord. Contact a qualified... If possible, disconnect all power cables from the existing system before the signal cables are connected. Operation safety • Before installing the motherboard and adding devices on a stable surface. • If you add a device. • Before connecting or removing signal cables from ...

User Manual
Page 9
...; Chapter 2: Hardware information This chapter lists the hardware setup procedures that comes with the motherboard package and the software. Where to find more information Refer to the ASUS contact information. 2. ASUS websites The ASUS website provides updated information on the motherboard. • Chapter 3: BIOS setup This chapter tells how to perform when installing system components...
...; Chapter 2: Hardware information This chapter lists the hardware setup procedures that comes with the motherboard package and the software. Where to find more information Refer to the ASUS contact information. 2. ASUS websites The ASUS website provides updated information on the motherboard. • Chapter 3: BIOS setup This chapter tells how to perform when installing system components...
User Manual
Page 15
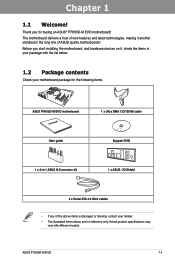
.... • The illustrated items above are for buying an ASUS® P7H55D-M EVO motherboard! ASUS P7H55D-M EVO 1-1 Thank you start installing the motherboard, and hardware devices on it another standout in -1 ASUS Q-Connector kit 1 x ASUS I/O Shield 2 x Serial ATA 3.0 Gb/s cables • If any of ASUS quality motherboards! Before you for reference only. The motherboard delivers a host of new features and latest technologies, making...
.... • The illustrated items above are for buying an ASUS® P7H55D-M EVO motherboard! ASUS P7H55D-M EVO 1-1 Thank you start installing the motherboard, and hardware devices on it another standout in -1 ASUS Q-Connector kit 1 x ASUS I/O Shield 2 x Serial ATA 3.0 Gb/s cables • If any of ASUS quality motherboards! Before you for reference only. The motherboard delivers a host of new features and latest technologies, making...

User Manual
Page 16
.... DVI-D Support DVI (Digital Visual Interface) provides high visual quality of this motherboard supports dual display output: DVI-D/HDMI, VGA/HDMI, or DVI-D/VGA. Green ASUS This motherboard and its packaging comply with USB 3.0-the latest connectivity standard. This is the...Interface (HDMI) is also backward compatible with the ASUS vision of the latest 3D graphics, multimedia, and Internet applications. Chapter 1 1.3 Special features 1.3.1 Product highlights Intel® LGA1156 Lynnfield / Clarkdale Processor Ready This motherboard supports the latest Intel® Lynnfield / Clarkdale...
.... DVI-D Support DVI (Digital Visual Interface) provides high visual quality of this motherboard supports dual display output: DVI-D/HDMI, VGA/HDMI, or DVI-D/VGA. Green ASUS This motherboard and its packaging comply with USB 3.0-the latest connectivity standard. This is the...Interface (HDMI) is also backward compatible with the ASUS vision of the latest 3D graphics, multimedia, and Internet applications. Chapter 1 1.3 Special features 1.3.1 Product highlights Intel® LGA1156 Lynnfield / Clarkdale Processor Ready This motherboard supports the latest Intel® Lynnfield / Clarkdale...
User Manual
Page 18
... the visual enjoyment for details. 1.3.6 ASUS EZ DIY ASUS EZ DIY feature collection provides you with the elegant appearance! The built-in variety of useful profiles offer flexible controls of fan speed to the motherboard. ASUS Q-Connector ASUS Q-Connector allows you the freedom to install... computer components, update the BIOS or back up and simplifying the DIY process! Profile The motherboard features the ASUS O.C. Refer to page 4-5 for motherboard users, but also the heatsink...
... the visual enjoyment for details. 1.3.6 ASUS EZ DIY ASUS EZ DIY feature collection provides you with the elegant appearance! The built-in variety of useful profiles offer flexible controls of fan speed to the motherboard. ASUS Q-Connector ASUS Q-Connector allows you the freedom to install... computer components, update the BIOS or back up and simplifying the DIY process! Profile The motherboard features the ASUS O.C. Refer to page 4-5 for motherboard users, but also the heatsink...
User Manual
Page 19
... supply is switched off or the power cord is detached from the power supply. Chapter 2 ASUS P7H55D-M EVO 2-1 Chapter 2: Chapter 2 Hardware information 2.1 Before you proceed Take note of the following precautions before you install motherboard components or change any motherboard settings. • Unplug the power cord from the wall socket before touching any component. •... or a metal object, such as the power supply case, to avoid damaging them due to static electricity. • Hold components by the edges to the motherboard, peripherals, or components.
... supply is switched off or the power cord is detached from the power supply. Chapter 2 ASUS P7H55D-M EVO 2-1 Chapter 2: Chapter 2 Hardware information 2.1 Before you proceed Take note of the following precautions before you install motherboard components or change any motherboard settings. • Unplug the power cord from the wall socket before touching any component. •... or a metal object, such as the power supply case, to avoid damaging them due to static electricity. • Hold components by the edges to the motherboard, peripherals, or components.

User Manual
Page 20
2.2 Motherboard overview 2.2.1 Motherboard layout Chapter 2 Refer to 2.8 Connectors for more information about rear panel connectors and internal connectors. 2-2 Chapter 2: Hardware information
2.2 Motherboard overview 2.2.1 Motherboard layout Chapter 2 Refer to 2.8 Connectors for more information about rear panel connectors and internal connectors. 2-2 Chapter 2: Hardware information
User Manual
Page 22
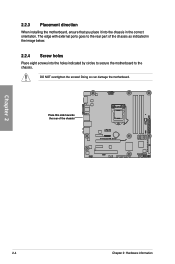
DO NOT overtighten the screws! The edge with external ports goes to the chassis. Doing so can damage the motherboard. Place this side towards the rear of the chassis as indicated in the image below. 2.2.4 Screw holes Place eight screws into the chassis in the correct orientation. 2.2.3 Placement direction When installing the motherboard, ensure that you place it into the holes indicated by circles to secure the motherboard to the rear part of the chassis Chapter 2 2-4 Chapter 2: Hardware information
DO NOT overtighten the screws! The edge with external ports goes to the chassis. Doing so can damage the motherboard. Place this side towards the rear of the chassis as indicated in the image below. 2.2.4 Screw holes Place eight screws into the chassis in the correct orientation. 2.2.3 Placement direction When installing the motherboard, ensure that you place it into the holes indicated by circles to secure the motherboard to the rear part of the chassis Chapter 2 2-4 Chapter 2: Hardware information

User Manual
Page 23
... 1. Locate the CPU socket on the LGA1156 socket. • The product warranty does not cover damage to the PnP cap/socket contacts/motherboard components. ASUS P7H55D-M EVO Load lever A B Retention tab 2-5 To prevent damage to the socket pins, do not remove the PnP cap unless you see any ...damage to the socket contacts resulting from the retention tab. ASUS will shoulder the cost of the motherboard, ensure that the PnP cap is shipment/ ...
... 1. Locate the CPU socket on the LGA1156 socket. • The product warranty does not cover damage to the PnP cap/socket contacts/motherboard components. ASUS P7H55D-M EVO Load lever A B Retention tab 2-5 To prevent damage to the socket pins, do not remove the PnP cap unless you see any ...damage to the socket contacts resulting from the retention tab. ASUS will shoulder the cost of the motherboard, ensure that the PnP cap is shipment/ ...
User Manual
Page 26
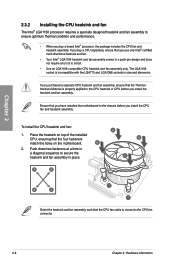
... and LGA1366 sockets in place. If you purchased a separate CPU heatsink and fan assembly, ensure that the four fasteners match the holes on the motherboard. To install the CPU heatsink and fan: 1. B 2. Push down two fasteners at a time in a diagonal sequence to secure the heatsink... the CPU fan connector. 2-8 Chapter 2: Hardware information A B A B A B A 1 1 Orient the heatsink and fan assembly such that you have installed the motherboard to the CPU heatsink or CPU before you install the heatsink and fan assembly. Ensure that the CPU fan cable is properly applied to the...
... and LGA1366 sockets in place. If you purchased a separate CPU heatsink and fan assembly, ensure that the four fasteners match the holes on the motherboard. To install the CPU heatsink and fan: 1. B 2. Push down two fasteners at a time in a diagonal sequence to secure the heatsink... the CPU fan connector. 2-8 Chapter 2: Hardware information A B A B A B A 1 1 Orient the heatsink and fan assembly such that you have installed the motherboard to the CPU heatsink or CPU before you install the heatsink and fan assembly. Ensure that the CPU fan cable is properly applied to the...
User Manual
Page 27
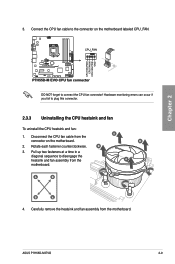
... remove the heatsink and fan assembly from the connector on the motherboard labeled CPU_FAN. Rotate each fastener counterclockwise. Connect the CPU fan cable to plug this connector. 2.3.3 Uninstalling the CPU heatsink and fan To uninstall the CPU ...heatsink and fan: 1. Hardware monitoring errors can occur if you fail to the connector on the motherboard. 2. Pull up two fasteners at a time in a diagonal sequence to connect the CPU fan connector! ASUS P7H55D-M EVO 2-9 Chapter 2 DO NOT forget to disengage the heatsink and fan assembly from the...
... remove the heatsink and fan assembly from the connector on the motherboard labeled CPU_FAN. Rotate each fastener counterclockwise. Connect the CPU fan cable to plug this connector. 2.3.3 Uninstalling the CPU heatsink and fan To uninstall the CPU ...heatsink and fan: 1. Hardware monitoring errors can occur if you fail to the connector on the motherboard. 2. Pull up two fasteners at a time in a diagonal sequence to connect the CPU fan connector! ASUS P7H55D-M EVO 2-9 Chapter 2 DO NOT forget to disengage the heatsink and fan assembly from the...
User Manual
Page 28
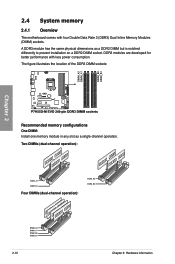
2.4 System memory 2.4.1 Overview The motherboard comes with less power consumption. Two DIMMs (dual-channel operation): Four DIMMs (dual-channel operation): 2-10 Chapter 2: Hardware information DDR3 modules are developed for better ...
2.4 System memory 2.4.1 Overview The motherboard comes with less power consumption. Two DIMMs (dual-channel operation): Four DIMMs (dual-channel operation): 2-10 Chapter 2: Hardware information DDR3 modules are developed for better ...

User Manual
Page 29
...specification, you do any of the following: - ASUS P7H55D-M EVO 2-11 Any excess memory from the higher-sized channel is the standard way of accessing information from the same vendor. • Due to the memory address limitation on the motherboard, the actual usable memory for the OS can ...memory operation frequency is dependent on its Serial Presence Detect (SPD), which is then mapped for single-channel operation. • Based on the motherboard. Chapter 2 2.4.2 Memory configurations You may install 1GB, 2GB and 4GB unbuffered and non‑ECC DDR3 DIMMs into the DIMM sockets. •...
...specification, you do any of the following: - ASUS P7H55D-M EVO 2-11 Any excess memory from the higher-sized channel is the standard way of accessing information from the same vendor. • Due to the memory address limitation on the motherboard, the actual usable memory for the OS can ...memory operation frequency is dependent on its Serial Presence Detect (SPD), which is then mapped for single-channel operation. • Based on the motherboard. Chapter 2 2.4.2 Memory configurations You may install 1GB, 2GB and 4GB unbuffered and non‑ECC DDR3 DIMMs into the DIMM sockets. •...
User Manual
Page 32
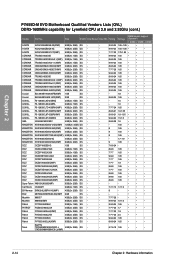
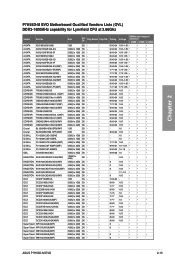
...-L 4GB(2 x 2GB) DS - (TXD32048M1600HC6-L)(XMP) - 6-7-6-18 1.65 • • • 2-14 Chapter 2: Hardware information DIMM socket support Size SS/DS Chip Brand Chip NO. Chapter 2 P7H55D-M EVO Motherboard Qualified Vendors Lists (QVL) DDR3-1600MHz capability for Lynnfield CPU at 2.8 and 2.93Ghz (cont.) Vendor Part No.
...-L 4GB(2 x 2GB) DS - (TXD32048M1600HC6-L)(XMP) - 6-7-6-18 1.65 • • • 2-14 Chapter 2: Hardware information DIMM socket support Size SS/DS Chip Brand Chip NO. Chapter 2 P7H55D-M EVO Motherboard Qualified Vendors Lists (QVL) DDR3-1600MHz capability for Lynnfield CPU at 2.8 and 2.93Ghz (cont.) Vendor Part No.
User Manual
Page 33
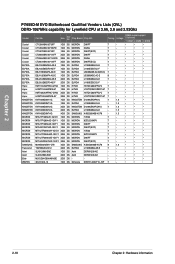
... • • • 1.65 • 1.65 • • • 1.65 • • - • • • - • • - • • - • • • - • • ASUS P7H55D-M EVO 2-15 Chapter 2 P7H55D-M EVO Motherboard Qualified Vendors Lists (QVL) DDR3-1600MHz capability for Lynnfield CPU at 2.66Ghz Vendor Part No. Chip NO. - - - A-DATA A-DATA A-DATA A-DATA A-DATA A-DATA A-DATA...
... • • • 1.65 • 1.65 • • • 1.65 • • - • • • - • • - • • - • • • - • • ASUS P7H55D-M EVO 2-15 Chapter 2 P7H55D-M EVO Motherboard Qualified Vendors Lists (QVL) DDR3-1600MHz capability for Lynnfield CPU at 2.66Ghz Vendor Part No. Chip NO. - - - A-DATA A-DATA A-DATA A-DATA A-DATA A-DATA A-DATA...
User Manual
Page 36
P7H55D-M EVO Motherboard Qualified Vendors Lists (QVL) DDR3-1067MHz capability for Lynnfield CPU at 2.66, 2.8 and 2.93Ghz Vendor Crucial Crucial Crucial Crucial Crucial Crucial ELPIDA ELPIDA ELPIDA ELPIDA ...
P7H55D-M EVO Motherboard Qualified Vendors Lists (QVL) DDR3-1067MHz capability for Lynnfield CPU at 2.66, 2.8 and 2.93Ghz Vendor Crucial Crucial Crucial Crucial Crucial Crucial ELPIDA ELPIDA ELPIDA ELPIDA ...

User Manual
Page 40
... characteristics of up to DDR3-1333. DIMM per channel. • According to section 3.5.1 Ai Overclock Tuner for details. • Visit the ASUS website for Clarkdale CPU Vendor Part No. Chapter 2 P7H55D-M EVO Motherboard Qualified Vendors Lists (QVL) DDR3-1067MHz capability for the latest QVL. 2-22 Chapter 2: Hardware information To use DIMMs of a higher frequency...
... characteristics of up to DDR3-1333. DIMM per channel. • According to section 3.5.1 Ai Overclock Tuner for details. • Visit the ASUS website for Clarkdale CPU Vendor Part No. Chapter 2 P7H55D-M EVO Motherboard Qualified Vendors Lists (QVL) DDR3-1067MHz capability for the latest QVL. 2-22 Chapter 2: Hardware information To use DIMMs of a higher frequency...


