
User Manual
Page 3
Contents Notices...v Safety information vi About this guide vi P7H55-M SI specifications summary viii Chapter 1: Product introduction 1.1 Before you proceed 1-1 1.2 Motherboard overview 1-2 1.2.1 Motherboard layout 1-2 1.2.2 Layout contents 1-2 1.3 Central Processing Unit (CPU 1-3 1.4 System memory 1-3 1.4.1 Overview 1-3 1.4.2 Memory configurations 1-4 1.5 Expansion slots 1-7 1.5.1 ...Chapter 2: BIOS information 2.1 Managing and updating your BIOS 2-1 2.1.1 ASUS Update utility 2-1 2.1.2 ASUS EZ Flash 2 utility 2-2 2.1.3 ASUS BIOS Updater 2-3 2.1.4 ASUS CrashFree BIOS 2-6 iii
Contents Notices...v Safety information vi About this guide vi P7H55-M SI specifications summary viii Chapter 1: Product introduction 1.1 Before you proceed 1-1 1.2 Motherboard overview 1-2 1.2.1 Motherboard layout 1-2 1.2.2 Layout contents 1-2 1.3 Central Processing Unit (CPU 1-3 1.4 System memory 1-3 1.4.1 Overview 1-3 1.4.2 Memory configurations 1-4 1.5 Expansion slots 1-7 1.5.1 ...Chapter 2: BIOS information 2.1 Managing and updating your BIOS 2-1 2.1.1 ASUS Update utility 2-1 2.1.2 ASUS EZ Flash 2 utility 2-2 2.1.3 ASUS BIOS Updater 2-3 2.1.4 ASUS CrashFree BIOS 2-6 iii

User Manual
Page 5
... assure compliance with Part 15 of Communications Statement This digital apparatus does not exceed the Class B limits for help. Changes or modifications to this unit not expressly approved by one or more of the following measures: • Reorient or relocate the receiving antenna. • Increase the separation between... has been tested and found to enable proper reuse of Chemicals) regulatory framework, we published the chemical substances in our products at ASUS REACH website at http://green.asus.com/english/REACH.htm DO NOT throw the motherboard in a residential installation.
... assure compliance with Part 15 of Communications Statement This digital apparatus does not exceed the Class B limits for help. Changes or modifications to this unit not expressly approved by one or more of the following measures: • Reorient or relocate the receiving antenna. • Increase the separation between... has been tested and found to enable proper reuse of Chemicals) regulatory framework, we published the chemical substances in our products at ASUS REACH website at http://green.asus.com/english/REACH.htm DO NOT throw the motherboard in a residential installation.
User Manual
Page 13
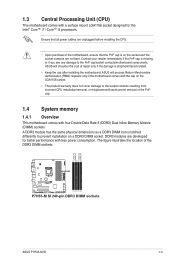
...Unit (CPU) This motherboard comes with less power consumption. Contact your retailer immediately if the PnP cap is on the socket and the socket contacts are not bent. DDR3 modules are unplugged before installing the CPU. • Upon purchase of the DDR3 DIMM sockets: P7H55-M SI P7H55-M SI... 240-pin DDR3 DIMM sockets DIMM_A2 DIMM_A1 DIMM_B2 DIMM_B1 ASUS P7H55-M SI 1-3 ASUS will process Return Merchandise Authorization (RMA) requests only if the motherboard comes with four...
...Unit (CPU) This motherboard comes with less power consumption. Contact your retailer immediately if the PnP cap is on the socket and the socket contacts are not bent. DDR3 modules are unplugged before installing the CPU. • Upon purchase of the DDR3 DIMM sockets: P7H55-M SI P7H55-M SI... 240-pin DDR3 DIMM sockets DIMM_A2 DIMM_A1 DIMM_B2 DIMM_B1 ASUS P7H55-M SI 1-3 ASUS will process Return Merchandise Authorization (RMA) requests only if the motherboard comes with four...
User Manual
Page 23
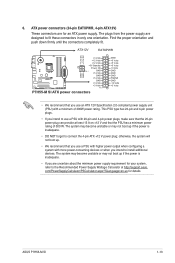
...the Recommended Power Supply Wattage Calculator at least 15 A on +12 V and that the 20-pin power plug can provide at http://support.asus. Find the proper orientation and push down firmly until the connectors completely fit. otherwise, the system will not boot up if the power is... . • We recommend that you use an ATX 12V Specification 2.0‑compliant power supply unit (PSU) with more power-consuming devices or when you intend to install additional devices. ATX12V EATXPWR +12V DC +12V DC P7H55-M SI GND GND +3 Volts +12 Volts +12 Volts +5V Standby Power OK PIN 1 GND ...
...the Recommended Power Supply Wattage Calculator at least 15 A on +12 V and that the 20-pin power plug can provide at http://support.asus. Find the proper orientation and push down firmly until the connectors completely fit. otherwise, the system will not boot up if the power is... . • We recommend that you use an ATX 12V Specification 2.0‑compliant power supply unit (PSU) with more power-consuming devices or when you intend to install additional devices. ATX12V EATXPWR +12V DC +12V DC P7H55-M SI GND GND +3 Volts +12 Volts +12 Volts +5V Standby Power OK PIN 1 GND ...


