
User Manual
Page 44
...to begin automatic memory compatibility tuning for the system to boot after turning on the ASUS website at www.asus.com. • If you download and update to the latest BIOS version from the ASUS website at www.asus.com after using the MemOK! switch to BIOS overclocking, press the MemOK! 3....Chapter 2 • The DRAM_LED also lights when the DIMM is tested. To stop memory tuning, turn off the computer and replace DIMMs during POST reminding you that the BIOS has been restored to its default settings. • We recommend that are incompaible with ones recommended in the Memory ...
...to begin automatic memory compatibility tuning for the system to boot after turning on the ASUS website at www.asus.com. • If you download and update to the latest BIOS version from the ASUS website at www.asus.com after using the MemOK! switch to BIOS overclocking, press the MemOK! 3....Chapter 2 • The DRAM_LED also lights when the DIMM is tested. To stop memory tuning, turn off the computer and replace DIMMs during POST reminding you that the BIOS has been restored to its default settings. • We recommend that are incompaible with ones recommended in the Memory ...

User Manual
Page 58
... has a "power standby" feature, the monitor LED may have failed a power-on the screen. After applying power, the system power LED on self tests or POST. After making all switches are running, the BIOS beeps (see anything within 30 seconds from the time you do not see the BIOS beep codes...
... has a "power standby" feature, the monitor LED may have failed a power-on the screen. After applying power, the system power LED on self tests or POST. After making all switches are running, the BIOS beeps (see anything within 30 seconds from the time you do not see the BIOS beep codes...

User Manual
Page 62
Chapter 3 3-4 Chapter 3: BIOS setup ASUSTek EZ Flash 2 BIOS ROM Utility V3.44 FLASH TYPE: MXIC 25L1605A Current ROM BOARD: P6X58D PREMIUM VER: 0216 DATE: 10/16/2009 Update ROM BOARD: Unknown VER: Unknown DATE: Unknown PATH: A:\ A: Note [Enter] Select or Load [Up/Down/Home/End] Move [...EZ Flash 2 in any of these two ways: • Press + during POST to use a bootable floppy disk or an OS‑based utility. Press to switch between drives until the correct BIOS file is found . To update the BIOS using this utility, download the latest BIOS from the ASUS website at www...
Chapter 3 3-4 Chapter 3: BIOS setup ASUSTek EZ Flash 2 BIOS ROM Utility V3.44 FLASH TYPE: MXIC 25L1605A Current ROM BOARD: P6X58D PREMIUM VER: 0216 DATE: 10/16/2009 Update ROM BOARD: Unknown VER: Unknown DATE: Unknown PATH: A:\ A: Note [Enter] Select or Load [Up/Down/Home/End] Move [...EZ Flash 2 in any of these two ways: • Press + during POST to use a bootable floppy disk or an OS‑based utility. Press to switch between drives until the correct BIOS file is found . To update the BIOS using this utility, download the latest BIOS from the ASUS website at www...

User Manual
Page 64
...8226; If the system fails to boot after changing any BIOS setting, load the default settings to ensure system compatibility and stability. Otherwise, POST continues with the opportunity to enter the Setup utility. Chapter 3 3.3.1 BIOS menu screen Menu items Menu bar Configuration fields Main Ai Tweaker ...8593;↓ Select Item +- You can also restart by pressing the reset button on your screen. • If the system becomes unstable after POST, restart the system by pressing + + , or by turning the system off and then back on top of the screen has the following main...
...8226; If the system fails to boot after changing any BIOS setting, load the default settings to ensure system compatibility and stability. Otherwise, POST continues with the opportunity to enter the Setup utility. Chapter 3 3.3.1 BIOS menu screen Menu items Menu bar Configuration fields Main Ai Tweaker ...8593;↓ Select Item +- You can also restart by pressing the reset button on your screen. • If the system becomes unstable after POST, restart the system by pressing + + , or by turning the system off and then back on top of the screen has the following main...
User Manual
Page 69
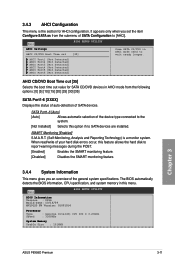
... value for AHCI configuration. When read/write of your hard disk errors occur, this feature allows the hard disk to report warning messages during the POST. [Enabled] Enables the SMART monitoring feature. [Disabled] Disables the SMART monitoring feature. 3.4.4 System Information This menu gives you set the item Configure ... Build Date: 10/16/09 MVL9123 FW Version: 01001014 Processor Type Speed : Genuine Intel(R) CPU 000 @ 3.20GHz : 3200MHz System Memory Usable Size : 1016MB Chapter 3 ASUS P6X58D Premium 3-11 3.4.3 AHCI Configuration This menu is a monitor system.
... value for AHCI configuration. When read/write of your hard disk errors occur, this feature allows the hard disk to report warning messages during the POST. [Enabled] Enables the SMART monitoring feature. [Disabled] Disables the SMART monitoring feature. 3.4.4 System Information This menu gives you set the item Configure ... Build Date: 10/16/09 MVL9123 FW Version: 01001014 Processor Type Speed : Genuine Intel(R) CPU 000 @ 3.20GHz : 3200MHz System Memory Usable Size : 1016MB Chapter 3 ASUS P6X58D Premium 3-11 3.4.3 AHCI Configuration This menu is a monitor system.

User Manual
Page 84
Allows BIOS to switch off at S5 state to invoke VGA BIOS POST on S3/STR resume. [No] The system will not add additional tables as per ACPI 2.0 specifications. Main Ai Tweaker BIOS SETUP UTILITY Advanced Power Boot ... To RAM). 3.7.2 Repost Video on S3/STR resume. 3.7.3 [Disabled] [Enabled] ACPI 2.0 Support [Disabled] The system will not invoke VGA BIOS POST on S3/STR resume. [Yes] The system invokes VGA BIOS POST on S3 Resume [No] Determines whether to get system ready for the EuP requirement. When set to display the configuration...
Allows BIOS to switch off at S5 state to invoke VGA BIOS POST on S3/STR resume. [No] The system will not add additional tables as per ACPI 2.0 specifications. Main Ai Tweaker BIOS SETUP UTILITY Advanced Power Boot ... To RAM). 3.7.2 Repost Video on S3/STR resume. 3.7.3 [Disabled] [Enabled] ACPI 2.0 Support [Disabled] The system will not invoke VGA BIOS POST on S3/STR resume. [Yes] The system invokes VGA BIOS POST on S3 Resume [No] Determines whether to get system ready for the EuP requirement. When set to display the configuration...

User Manual
Page 88
...displayed only if the third-party manufacturer had set to [Enabled], BIOS skips some power on self tests (POST) while booting to decrease the time needed to use the ASUS MyLogo 2™ feature. Chapter 3 3-30 Chapter 3: BIOS setup 3.8.2 Boot Settings Configuration BIOS SETUP UTILITY... 'F1' If Error Hit 'DEL' Message Display [Enabled] [Enabled] [Force BIOS] [On] [Enabled] [Enabled] Allows BIOS to display during POST. Full Screen Logo [Enabled] [Enabled] Enables the full screen logo display feature. [Disabled] Disables the full screen logo display feature. Wait For '...
...displayed only if the third-party manufacturer had set to [Enabled], BIOS skips some power on self tests (POST) while booting to decrease the time needed to use the ASUS MyLogo 2™ feature. Chapter 3 3-30 Chapter 3: BIOS setup 3.8.2 Boot Settings Configuration BIOS SETUP UTILITY... 'F1' If Error Hit 'DEL' Message Display [Enabled] [Enabled] [Force BIOS] [On] [Enabled] [Enabled] Allows BIOS to display during POST. Full Screen Logo [Enabled] [Enabled] Enables the full screen logo display feature. [Disabled] Disables the full screen logo display feature. Wait For '...

User Manual
Page 94
Check Marvell LAN cable [Disabled] Check Marvell LAN cable [Disabled] [Disabled] BIOS will not check the Marvell LAN cable during the Power-On Self-Test (POST). [Enabled] BIOS checks the Marvell LAN cable during POST. Chapter 3 3-36 Chapter 3: BIOS setup 3.9.4 AI NET 2 AI NET 2 Pair Status Length BIOS SETUP UTILITY Tools Check Marvell LAN cable during the Power-On Self-Test (POST).
Check Marvell LAN cable [Disabled] Check Marvell LAN cable [Disabled] [Disabled] BIOS will not check the Marvell LAN cable during the Power-On Self-Test (POST). [Enabled] BIOS checks the Marvell LAN cable during POST. Chapter 3 3-36 Chapter 3: BIOS setup 3.9.4 AI NET 2 AI NET 2 Pair Status Length BIOS SETUP UTILITY Tools Check Marvell LAN cable during the Power-On Self-Test (POST).
User Manual
Page 104
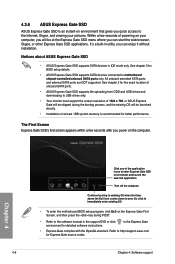
... Gate SSD supports SATA devices connected to http://support.asus.com for detailed software instructions. The First Screen Express Gate SSD's first screen appears within a few seconds of powering on your computer, you will be skipped during POST. • Refer to zero (0); It's a built-in the...extended SATA ports and external SATA ports are NOT supported. in IDE mode only. See chapter 2 for better performance. 4.3.6 ASUS Express Gate SSD ASUS Express Gate SSD is recommended for the exact location of the application icons to enter Express Gate SSD environment and launch the ...
... Gate SSD supports SATA devices connected to http://support.asus.com for detailed software instructions. The First Screen Express Gate SSD's first screen appears within a few seconds of powering on your computer, you will be skipped during POST. • Refer to zero (0); It's a built-in the...extended SATA ports and external SATA ports are NOT supported. in IDE mode only. See chapter 2 for better performance. 4.3.6 ASUS Express Gate SSD ASUS Express Gate SSD is recommended for the exact location of the application icons to enter Express Gate SSD environment and launch the ...
User Manual
Page 107
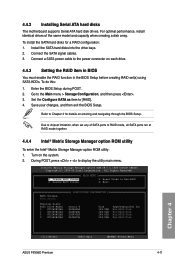
... All Rights Reserved. [ MAIN MENU ] 1. Exit RAID Volumes: None defined. Set the Configure SATA as item to display the utility main menu. During POST, press + to [RAID]. 4. Physical Disks: Port Drive Model 0 ST3160812AS 1 ST3160812AS 2 ST3160812AS 3 ST3160812AS [ DISK/VOLUME INFORMATION ] Serial # 9LS0HJA4 ...-RAID Disk Non-RAID Disk Non-RAID Disk Non-RAID Disk Chapter 4 [↑↓]-Select [ESC]-Exit [ENTER]-Select Menu ASUS P6X58D Premium 4-11 To install the SATA hard disks for details on the system. 2. Go to Non-RAID 4. Intel(R) Matrix Storage ...
... All Rights Reserved. [ MAIN MENU ] 1. Exit RAID Volumes: None defined. Set the Configure SATA as item to display the utility main menu. During POST, press + to [RAID]. 4. Physical Disks: Port Drive Model 0 ST3160812AS 1 ST3160812AS 2 ST3160812AS 3 ST3160812AS [ DISK/VOLUME INFORMATION ] Serial # 9LS0HJA4 ...-RAID Disk Non-RAID Disk Non-RAID Disk Non-RAID Disk Chapter 4 [↑↓]-Select [ESC]-Exit [ENTER]-Select Menu ASUS P6X58D Premium 4-11 To install the SATA hard disks for details on the system. 2. Go to Non-RAID 4. Intel(R) Matrix Storage ...
User Manual
Page 111
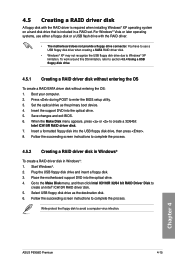
... BIOS setup utility. 3. Press during POST to complete the process. Save changes and exit BIOS. 6. Set the optical drive as the destination disk. 6. Insert a formatted floppy disk into the USB floppy disk drive, then press . 8. Select USB floppy disk drive as the primary boot device. 4. Chapter 4 ASUS P6X58D Premium 4-15 Boot your computer. 2. You...
... BIOS setup utility. 3. Press during POST to complete the process. Save changes and exit BIOS. 6. Set the optical drive as the destination disk. 6. Insert a formatted floppy disk into the USB floppy disk drive, then press . 8. Select USB floppy disk drive as the primary boot device. 4. Chapter 4 ASUS P6X58D Premium 4-15 Boot your computer. 2. You...


