User Manual
Page 4
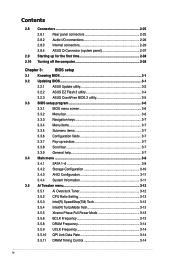
... Turning off the computer 2-38 Chapter 3: BIOS setup 3.1 Knowing BIOS 3-1 3.2 Updating BIOS 3-1 3.2.1 ASUS Update utility 3-2 3.2.2 ASUS EZ Flash 2 utility 3-4 3.2.3 ASUS CrashFree BIOS 3 utility 3-5 3.3 BIOS setup program 3-6 3.3.1 BIOS menu screen 3-6 3.3.2 Menu bar 3-6 3.3.3 Navigation keys 3-7 3.3.4 Menu items 3-7 3.3.5 Submenu items 3-7 3.3.6 Configuration fields 3-7 3.3.7 Pop-up window 3-7 3.3.8 Scroll bar 3-7 3.3.9 General help 3-7 3.4 Main menu 3-8 3.4.1 SATA 1-6 3-8 3.4.2 Storage Configuration 3-10 3.4.3 AHCI Configuration...
... Turning off the computer 2-38 Chapter 3: BIOS setup 3.1 Knowing BIOS 3-1 3.2 Updating BIOS 3-1 3.2.1 ASUS Update utility 3-2 3.2.2 ASUS EZ Flash 2 utility 3-4 3.2.3 ASUS CrashFree BIOS 3 utility 3-5 3.3 BIOS setup program 3-6 3.3.1 BIOS menu screen 3-6 3.3.2 Menu bar 3-6 3.3.3 Navigation keys 3-7 3.3.4 Menu items 3-7 3.3.5 Submenu items 3-7 3.3.6 Configuration fields 3-7 3.3.7 Pop-up window 3-7 3.3.8 Scroll bar 3-7 3.3.9 General help 3-7 3.4 Main menu 3-8 3.4.1 SATA 1-6 3-8 3.4.2 Storage Configuration 3-10 3.4.3 AHCI Configuration...
User Manual
Page 6
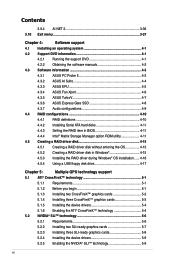
...Running the support DVD 4-1 4.2.2 Obtaining the software manuals 4-2 4.3 Software information 4-3 4.3.1 ASUS PC Probe II 4-3 4.3.2 ASUS AI Suite 4-4 4.3.3 ASUS EPU 4-5 4.3.4 ASUS Fan Xpert 4-6 4.3.5 ASUS TurboV 4-7 4.3.6 ASUS Express Gate SSD 4-8 4.3.7 Audio configurations 4-9 4.4 RAID configurations 4-10 4.4.1 RAID definitions 4-...a RAID driver disk without entering the OS 4-15 4.5.2 Creating a RAID driver disk in Windows 4-15 4.5.3 Installing the RAID driver during Windows® OS installation....... 4-16 4.5.4 Using a USB floppy disk drive 4-17 Chapter 5: ...
...Running the support DVD 4-1 4.2.2 Obtaining the software manuals 4-2 4.3 Software information 4-3 4.3.1 ASUS PC Probe II 4-3 4.3.2 ASUS AI Suite 4-4 4.3.3 ASUS EPU 4-5 4.3.4 ASUS Fan Xpert 4-6 4.3.5 ASUS TurboV 4-7 4.3.6 ASUS Express Gate SSD 4-8 4.3.7 Audio configurations 4-9 4.4 RAID configurations 4-10 4.4.1 RAID definitions 4-...a RAID driver disk without entering the OS 4-15 4.5.2 Creating a RAID driver disk in Windows 4-15 4.5.3 Installing the RAID driver during Windows® OS installation....... 4-16 4.5.4 Using a USB floppy disk drive 4-17 Chapter 5: ...
User Manual
Page 17
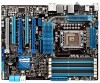
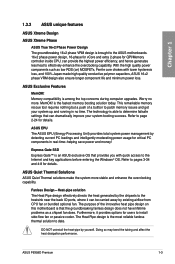
...pipe design on ) MOSFETs, Ferrite core chokes with quick access to the Internet and key applications before entering the Windows® OS. ASUS EPU The ASUS EPU (Energy Processing Unit) provides total system power management by yourself. Fanless Design-Heat-pipe solution The Heat Pipe...in real-time-helping save power and money! Doing so may bend the tubing and affect the heat dissipation performance. ASUS P6X58D Premium 1-3 ASUS Quiet Thermal Solutions ASUS Quiet Thermal solutions make the system more . Worry no time. The technology is able to date. Refer to install...
...pipe design on ) MOSFETs, Ferrite core chokes with quick access to the Internet and key applications before entering the Windows® OS. ASUS EPU The ASUS EPU (Energy Processing Unit) provides total system power management by yourself. Fanless Design-Heat-pipe solution The Heat Pipe...in real-time-helping save power and money! Doing so may bend the tubing and affect the heat dissipation performance. ASUS P6X58D Premium 1-3 ASUS Quiet Thermal Solutions ASUS Quiet Thermal solutions make the system more . Worry no time. The technology is able to date. Refer to install...
User Manual
Page 31
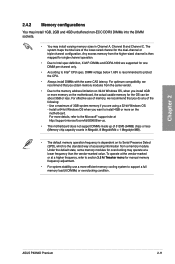
...; Due to Intel spec definition, X.M.P. Any excess memory from the same vendor. • Due to the memory address limitation on 32-bit Windows OS, when you want to install 4GB or more on the motherboard. To operate at the vendor-marked or at a lower frequency than the... counts in Channel A, Channel B and Channel C. Use a maximum of 3GB system memory if you do any of accessing information from a memory module. ASUS P6X58D Premium 2-11 Chapter 2 2.4.2 Memory configurations You may install 1GB, 2GB and 4GB unbuffered non‑ECC DDR3 DIMMs into the DIMM sockets. • You ...
...; Due to Intel spec definition, X.M.P. Any excess memory from the same vendor. • Due to the memory address limitation on 32-bit Windows OS, when you want to install 4GB or more on the motherboard. To operate at the vendor-marked or at a lower frequency than the... counts in Channel A, Channel B and Channel C. Use a maximum of 3GB system memory if you do any of accessing information from a memory module. ASUS P6X58D Premium 2-11 Chapter 2 2.4.2 Memory configurations You may install 1GB, 2GB and 4GB unbuffered non‑ECC DDR3 DIMMs into the DIMM sockets. • You ...

User Manual
Page 44
... the MemOK! It takes about 5-10 seconds. • If your system fail to boot due to the latest BIOS version from the ASUS website at www.asus.com. • If you download and update to BIOS overclocking, press the MemOK! If the installed DIMMs still fail to memory tuning ...memory tuning, turn off the computer and replace DIMMs during the tuning process, the system continues memory tuning after using the MemOK! switch under Windows® OS environment will appear during POST reminding you that the BIOS has been restored to its default settings. • We recommend that are...
... the MemOK! It takes about 5-10 seconds. • If your system fail to boot due to the latest BIOS version from the ASUS website at www.asus.com. • If you download and update to BIOS overclocking, press the MemOK! If the installed DIMMs still fail to memory tuning ...memory tuning, turn off the computer and replace DIMMs during the tuning process, the system continues memory tuning after using the MemOK! switch under Windows® OS environment will appear during POST reminding you that the BIOS has been restored to its default settings. • We recommend that are...
User Manual
Page 49
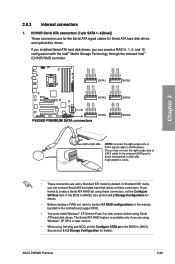
In Standard IDE mode, you are using Windows® XP SP 2 or later version. • When using hot-plug and NCQ, set the Configure SATA as item in the BIOS to create a Serial ... support DVD. • You must install Windows® XP Service Pack 2 or later version before using these connectors. If you can connect Serial ATA boot/data hard disk drives to these connectors, set to section 4.4 RAID configurations or the manual bundled in the BIOS to [AHCI]. ASUS P6X58D Premium 2-29 Chapter 2 • These connectors...
In Standard IDE mode, you are using Windows® XP SP 2 or later version. • When using hot-plug and NCQ, set the Configure SATA as item in the BIOS to create a Serial ... support DVD. • You must install Windows® XP Service Pack 2 or later version before using these connectors. If you can connect Serial ATA boot/data hard disk drives to these connectors, set to section 4.4 RAID configurations or the manual bundled in the BIOS to [AHCI]. ASUS P6X58D Premium 2-29 Chapter 2 • These connectors...
User Manual
Page 50
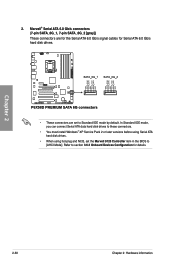
... 6.0 Gb/s signal cables for details. In Standard IDE mode, you can connect Serial ATA data hard disk drives to these connectors. • You must install Windows® XP Service Pack 2 or later versions before using Serial ATA hard disk drives. • When using hot-plug and NCQ, set to section 3.6.3 Onboard...
... 6.0 Gb/s signal cables for details. In Standard IDE mode, you can connect Serial ATA data hard disk drives to these connectors. • You must install Windows® XP Service Pack 2 or later versions before using Serial ATA hard disk drives. • When using hot-plug and NCQ, set to section 3.6.3 Onboard...
User Manual
Page 59
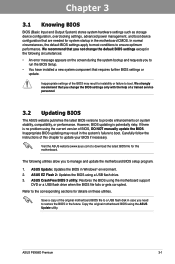
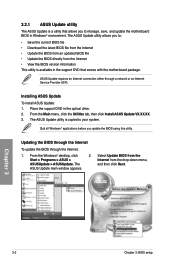
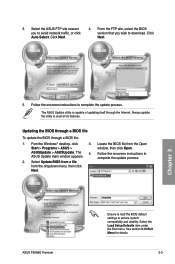
... recommend that you change the BIOS settings only with the help of a trained service personnel. 3.2 Updating BIOS The ASUS website publishes the latest BIOS versions to provide enhancements on the screen during the system bootup and requests you not change...or gets corrupted. Carefully follow the instructions of the original motherboard BIOS file to boot. Chapter 3 ASUS P6X58D Premium 3-1 Copy the original motherboard BIOS using the current version of the BIOS may result in Windows® environment. 2. Chapter 3: Chapter 3 BIOS setup 3.1 Knowing BIOS BIOS (Basic Input and ...
... recommend that you change the BIOS settings only with the help of a trained service personnel. 3.2 Updating BIOS The ASUS website publishes the latest BIOS versions to provide enhancements on the screen during the system bootup and requests you not change...or gets corrupted. Carefully follow the instructions of the original motherboard BIOS file to boot. Chapter 3 ASUS P6X58D Premium 3-1 Copy the original motherboard BIOS using the current version of the BIOS may result in Windows® environment. 2. Chapter 3: Chapter 3 BIOS setup 3.1 Knowing BIOS BIOS (Basic Input and ...
User Manual
Page 60
... This utility is a utility that comes with the motherboard package. Installing ASUS Update To install ASUS Update: 1. From the Windows® desktop, click 2. Chapter 3 3-2 Chapter 3: BIOS setup 3.2.1 ASUS Update utility The ASUS Update is available in the support DVD that allows you to manage, save..., and update the motherboard BIOS in Windows® environment. The ASUS Update utility allows you update the BIOS using this utility. ASUS Update requires an Internet connection either through the Internet: 1. Place the support DVD ...
... This utility is a utility that comes with the motherboard package. Installing ASUS Update To install ASUS Update: 1. From the Windows® desktop, click 2. Chapter 3 3-2 Chapter 3: BIOS setup 3.2.1 ASUS Update utility The ASUS Update is available in the support DVD that allows you to manage, save..., and update the motherboard BIOS in Windows® environment. The ASUS Update utility allows you update the BIOS using this utility. ASUS Update requires an Internet connection either through the Internet: 1. Place the support DVD ...
User Manual
Page 61
...Auto Select. Click Next. Chapter 3 5. The ASUS Update main window appears. 2. Follow the onscreen instructions to complete the update process. Fom the Windows® desktop, click Start > Programs > ASUS > ASUSUpdate > ASUSUpdate. Select the Load Setup...window, then click Open. 4. Follow the onscreen instructions to complete the update process. The ASUS Update utility is capable of updating itself through a BIOS file: 1. See section 3.10 Exit Menu for details. 3-3 3. Always update the utility to ensure system compatibility and stability. P6X58DPM.ROM ASUS P6X58D Premium...
...Auto Select. Click Next. Chapter 3 5. The ASUS Update main window appears. 2. Follow the onscreen instructions to complete the update process. Fom the Windows® desktop, click Start > Programs > ASUS > ASUSUpdate > ASUSUpdate. Select the Load Setup...window, then click Open. 4. Follow the onscreen instructions to complete the update process. The ASUS Update utility is capable of updating itself through a BIOS file: 1. See section 3.10 Exit Menu for details. 3-3 3. Always update the utility to ensure system compatibility and stability. P6X58DPM.ROM ASUS P6X58D Premium...
User Manual
Page 65
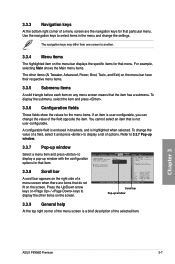
...display a list of a menu screen are items that do not fit on the screen. Use the navigation keys to display a pop-up window with the configuration options for that item. 3.3.8 Scroll bar A scroll bar appears on the screen. To display the submenu, select the item...up window. 3.3.7 Pop-up window 3.3.9 General help At the top right corner of the menu screen is enclosed in the menu and change the value of the selected item. Use [+] or [-] to select a field. A configurable field is a brief description of the field opposite the item. Chapter 3 ASUS P6X58D Premium ...
...display a list of a menu screen are items that do not fit on the screen. Use the navigation keys to display a pop-up window with the configuration options for that item. 3.3.8 Scroll bar A scroll bar appears on the screen. To display the submenu, select the item...up window. 3.3.7 Pop-up window 3.3.9 General help At the top right corner of the menu screen is enclosed in the menu and change the value of the selected item. Use [+] or [-] to select a field. A configurable field is a brief description of the field opposite the item. Chapter 3 ASUS P6X58D Premium ...

User Manual
Page 92
The ASUS Express Gate feature is useful in the rare case where corrupt settings prevent the Express Gate environment from launching properly. [... Express Gate [Auto] Allows you enter the Express Gate environment after clearing its settings. Choose [Prompt User] to enable or disable the ASUS Express Gate feature. This is a unique instant-on environment that provides quick access to disable the Reset User Data function when entering the Express...duration that the user data will run again when you to stay at the Express Gate's first screen before starting Windows or other installed OS.
The ASUS Express Gate feature is useful in the rare case where corrupt settings prevent the Express Gate environment from launching properly. [... Express Gate [Auto] Allows you enter the Express Gate environment after clearing its settings. Choose [Prompt User] to enable or disable the ASUS Express Gate feature. This is a unique instant-on environment that provides quick access to disable the Reset User Data function when entering the Express...duration that the user data will run again when you to stay at the Express Gate's first screen before starting Windows or other installed OS.

User Manual
Page 95
... Exit & Discard Changes Discard Changes Load Setup Defaults Tools Exit Exit system setup after saving the changes. After selecting this menu. When you press , a confirmation window appears. Pressing does not immediately exit this option, a confirmation appears. 3.10 Exit menu The Exit menu items allow you to load the optimal or failsafe... Exit v02.61 (C)Copyright 1985-2009, American Megatrends, Inc. If you made and restore the previously saved values. Exit & Discard Changes Select this option, a confirmation window appears. Chapter 3 ASUS P6X58D Premium 3-37
... Exit & Discard Changes Discard Changes Load Setup Defaults Tools Exit Exit system setup after saving the changes. After selecting this menu. When you press , a confirmation window appears. Pressing does not immediately exit this option, a confirmation appears. 3.10 Exit menu The Exit menu items allow you to load the optimal or failsafe... Exit v02.61 (C)Copyright 1985-2009, American Megatrends, Inc. If you made and restore the previously saved values. Exit & Discard Changes Select this option, a confirmation window appears. Chapter 3 ASUS P6X58D Premium 3-37
User Manual
Page 97
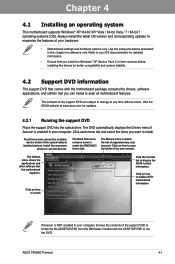
... information Chapter 4 If Autorun is enabled in your OS documentation for detailed information. • Ensure that you install the Windows® XP Service Pack 2 or later versions before installing the drivers for updates. 4.2.1 Running the support DVD Place the...that comes with the motherboard package contains the drivers, software applications, and utilities that the motherboard supports. ASUS P6X58D Premium 4-1 Chapter 4: Chapter 4 Software support 4.1 Installing an operating system This motherboard supports Windows® XP/ 64-bit XP/ Vista / 64-bit Vista / 7 / 64-bit 7 ...
... information Chapter 4 If Autorun is enabled in your OS documentation for detailed information. • Ensure that you install the Windows® XP Service Pack 2 or later versions before installing the drivers for updates. 4.2.1 Running the support DVD Place the...that comes with the motherboard package contains the drivers, software applications, and utilities that the motherboard supports. ASUS P6X58D Premium 4-1 Chapter 4: Chapter 4 Software support 4.1 Installing an operating system This motherboard supports Windows® XP/ 64-bit XP/ Vista / 64-bit Vista / 7 / 64-bit 7 ...

User Manual
Page 99
... voltages, among others. Launching PC Probe II 1. The PC Probe II main window appears. 3. Click this utility, you are assured that your computer the moment you through the installation. Install PC Probe II from the motherboard support DVD. 2. ASUS P6X58D Premium 4-3 Because PC Probe II is software-based, you can start monitoring your computer...
... voltages, among others. Launching PC Probe II 1. The PC Probe II main window appears. 3. Click this utility, you are assured that your computer the moment you through the installation. Install PC Probe II from the motherboard support DVD. 2. ASUS P6X58D Premium 4-3 Because PC Probe II is software-based, you can start monitoring your computer...

User Manual
Page 100
...launch each utility button to launch the utility, or click the Normal button to launch several ASUS utilities easily. 4.3.2 ASUS AI Suite ASUS AI Suite allows you minimize the application main window, click this section are for detailed software configuration. 4-4 Chapter 4: Software support Install AI ...Using AI Suite Click each utility • The screenshots in the support DVD or visit the ASUS website at www.asus.com for reference only. Click to open the monitor window that displays system information such as CPU temperature, CPU voltage, fan speed, and CPU/FSB ...
...launch each utility button to launch the utility, or click the Normal button to launch several ASUS utilities easily. 4.3.2 ASUS AI Suite ASUS AI Suite allows you minimize the application main window, click this section are for detailed software configuration. 4-4 Chapter 4: Software support Install AI ...Using AI Suite Click each utility • The screenshots in the support DVD or visit the ASUS website at www.asus.com for reference only. Click to open the monitor window that displays system information such as CPU temperature, CPU voltage, fan speed, and CPU/FSB ...

User Manual
Page 102
... according to avoid noise caused by double- clicking the AI Suite tray icon and then clicking the Fan Xpert button on the AI Suite main window. 4.3.4 ASUS Fan Xpert Asus Fan Xpert allows you to achieve a quiet and cool system environment. Using Fan Xpert Click to open the Calibration... window Click to select a fan Click to select a fan profile Click to display the current CPU temperature and the fan speed ratio Chapter 4 Click to apply ...
... according to avoid noise caused by double- clicking the AI Suite tray icon and then clicking the Fan Xpert button on the AI Suite main window. 4.3.4 ASUS Fan Xpert Asus Fan Xpert allows you to achieve a quiet and cool system environment. Using Fan Xpert Click to open the Calibration... window Click to select a fan Click to select a fan profile Click to display the current CPU temperature and the fan speed ratio Chapter 4 Click to apply ...
User Manual
Page 103
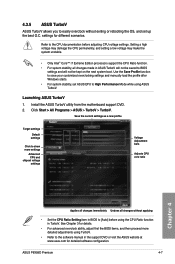
... settings as a new profile Target settings Default settings Click to the CPU documentation before using the CPU Ratio function in TurboV. ASUS P6X58D Premium 4-7 Install the ASUS TurboV utility from the motherboard support DVD. 2. settings for details. • For advanced overclock ability, adjust first the BIOS ...manual in ASUS TurboV will not be kept on the next system boot. See Chapter 3 for different scenarios. Use the Save Profile function to BIOS settings and will not be saved to save your customized overclocking settings and manually load the profile after Windows starts....
... settings as a new profile Target settings Default settings Click to the CPU documentation before using the CPU Ratio function in TurboV. ASUS P6X58D Premium 4-7 Install the ASUS TurboV utility from the motherboard support DVD. 2. settings for details. • For advanced overclock ability, adjust first the BIOS ...manual in ASUS TurboV will not be kept on the next system boot. See Chapter 3 for different scenarios. Use the Save Profile function to BIOS settings and will not be saved to save your customized overclocking settings and manually load the profile after Windows starts....
User Manual
Page 105
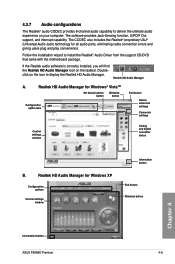
... on your computer. The CODEC also includes the Realtek® proprietary UAJ® (Universal Audio Jack) technology for Windows® Vista™ Set default device button Minimize button Configuration option tabs Exit button Device advanced settings Connector settings Control settings... HD Audio Manager icon on the icon to display the Realtek HD Audio Manager. Realtek HD Audio Manager for Windows XP Configuration options Control settings window Information button Exit button Minimize button Chapter 4 Information button ASUS P6X58D Premium 4-9 Doubleclick on the taskbar.
... on your computer. The CODEC also includes the Realtek® proprietary UAJ® (Universal Audio Jack) technology for Windows® Vista™ Set default device button Minimize button Configuration option tabs Exit button Device advanced settings Connector settings Control settings... HD Audio Manager icon on the icon to display the Realtek HD Audio Manager. Realtek HD Audio Manager for Windows XP Configuration options Control settings window Information button Exit button Minimize button Chapter 4 Information button ASUS P6X58D Premium 4-9 Doubleclick on the taskbar.
User Manual
Page 106
...of a single disk alone, thus improving data access and storage. The new drive must install Windows® XP Service Pack 2 or later versions before using Windows® XP SP2 or later versions. • Due to Windows® XP / Vista limitation, a RAID array with the Intel® ICH10R Southbridge controller that...: RAID 0, RAID 1, RAID 10 and RAID 5. • You must be set as a data disk only. • If you want to install a Windows® operating system to a hard disk drive included in a RAID set can also combine two RAID sets to get all applications to be created by...
...of a single disk alone, thus improving data access and storage. The new drive must install Windows® XP Service Pack 2 or later versions before using Windows® XP SP2 or later versions. • Due to Windows® XP / Vista limitation, a RAID array with the Intel® ICH10R Southbridge controller that...: RAID 0, RAID 1, RAID 10 and RAID 5. • You must be set as a data disk only. • If you want to install a Windows® operating system to a hard disk drive included in a RAID set can also combine two RAID sets to get all applications to be created by...


