User Guide
Page 3
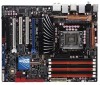
Contents Contents...iii Notices...viii Safety information ix About this guide x P6T Deluxe V2 specifications summary xii Chapter 1: Product introduction 1.1 Welcome 1-1 1.2 Package contents 1-1 1.3 Special features 1-2 1.3.1 Product highlights 1-2 1.3.2 ASUS Unique features 1-3 Chapter 2: Hardware information 2.1 Before you proceed 2-1 2.2 Motherboard overview 2-2 2.2.1 Motherboard layout 2-2 2.2.2 Layout contents 2-3 2.2.3 Placement direction 2-4 2.2.4 Screw holes 2-4 2.3 Central Processing Unit (CPU 2-5 2.3.1 Installing the CPU 2-6 2.3.2 Installing the CPU ...
Contents Contents...iii Notices...viii Safety information ix About this guide x P6T Deluxe V2 specifications summary xii Chapter 1: Product introduction 1.1 Welcome 1-1 1.2 Package contents 1-1 1.3 Special features 1-2 1.3.1 Product highlights 1-2 1.3.2 ASUS Unique features 1-3 Chapter 2: Hardware information 2.1 Before you proceed 2-1 2.2 Motherboard overview 2-2 2.2.1 Motherboard layout 2-2 2.2.2 Layout contents 2-3 2.2.3 Placement direction 2-4 2.2.4 Screw holes 2-4 2.3 Central Processing Unit (CPU 2-5 2.3.1 Installing the CPU 2-6 2.3.2 Installing the CPU ...
User Guide
Page 9
... Seek professional assistance before the signal cables are unplugged before using an adpater or extension cord. Operation safety • Before installing the motherboard and adding devices on a stable surface. • If you encounter technical problems with the package. • Before using the product,... not sure about the voltage of the electrical outlet you add a device. • Before connecting or removing signal cables from the motherboard, ensure that came with the product, contact a qualified service technician or your dealer immediately. • To avoid short circuits, keep...
... Seek professional assistance before the signal cables are unplugged before using an adpater or extension cord. Operation safety • Before installing the motherboard and adding devices on a stable surface. • If you encounter technical problems with the package. • Before using the product,... not sure about the voltage of the electrical outlet you add a device. • Before connecting or removing signal cables from the motherboard, ensure that came with the product, contact a qualified service technician or your dealer immediately. • To avoid short circuits, keep...
User Guide
Page 10
...describes the features of the switches, jumpers, and connectors on ASUS hardware and software products. Detailed descriptions of the BIOS parameters are not part of the support DVD that comes with the motherboard package and the software. • Chapter 5: Multiple GPU technology...system settings through the BIOS Setup menus. Optional documentation Your product package may have to the ASUS contact information. 2. ASUS websites The ASUS website provides updated information on the motherboard. • Chapter 3: BIOS setup This chapter tells how to install and configure multiple ...
...describes the features of the switches, jumpers, and connectors on ASUS hardware and software products. Detailed descriptions of the BIOS parameters are not part of the support DVD that comes with the motherboard package and the software. • Chapter 5: Multiple GPU technology...system settings through the BIOS Setup menus. Optional documentation Your product package may have to the ASUS contact information. 2. ASUS websites The ASUS website provides updated information on the motherboard. • Chapter 3: BIOS setup This chapter tells how to install and configure multiple ...

User Guide
Page 15
Chapter 1: 1Product introduction This chapter describes the motherboard features and the new technologies it supports.
Chapter 1: 1Product introduction This chapter describes the motherboard features and the new technologies it supports.
User Guide
Page 17
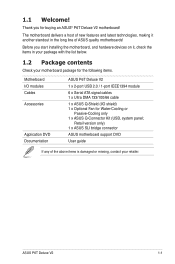
... Accessories Application DVD Documentation ASUS P6T Deluxe V2 1 x 2-port USB 2.0 / 1-port IEEE1394 module 6 x Serial ATA signal cables 1 x Ultra DMA 133/100/66 cable 1 x ASUS Q-Shield (I/O shield) 1 x Optional Fan for buying an ASUS® P6T Deluxe V2 motherboard! Retail version only) 1 x ASUS SLI bridge connector ASUS motherboard support DVD User guide If any of ASUS quality motherboards! Thank you start installing the motherboard, and hardware devices on...
... Accessories Application DVD Documentation ASUS P6T Deluxe V2 1 x 2-port USB 2.0 / 1-port IEEE1394 module 6 x Serial ATA signal cables 1 x Ultra DMA 133/100/66 cable 1 x ASUS Q-Shield (I/O shield) 1 x Optional Fan for buying an ASUS® P6T Deluxe V2 motherboard! Retail version only) 1 x ASUS SLI bridge connector ASUS motherboard support DVD User guide If any of ASUS quality motherboards! Thank you start installing the motherboard, and hardware devices on...
User Guide
Page 18
...(OC)*/1866(OC)*/1800(OC)*/ 1600(O.C.)/1333/1066 support The motherboard supports DDR3 memory that features data transfer rates of 2000(OC)/1866(OC)/1800(OC)/1600(OC)/1333/1066 MHz to boost system performance. P6T Deluxe V2 supports 2-Way SLI or Quad-GPU SLI only. 1-2 Chapter... energy efficient CPUs in the world. See page 2-12 for details. 1.3 Special features 1.3.1 Product highlights Green ASUS This motherboard and its packaging comply with the ASUS vision of creating environment-friendly and recyclable products/packagings to safeguard consumers' health while minimizing the impact on the ...
...(OC)*/1866(OC)*/1800(OC)*/ 1600(O.C.)/1333/1066 support The motherboard supports DDR3 memory that features data transfer rates of 2000(OC)/1866(OC)/1800(OC)/1600(OC)/1333/1066 MHz to boost system performance. P6T Deluxe V2 supports 2-Way SLI or Quad-GPU SLI only. 1-2 Chapter... energy efficient CPUs in the world. See page 2-12 for details. 1.3 Special features 1.3.1 Product highlights Green ASUS This motherboard and its packaging comply with the ASUS vision of creating environment-friendly and recyclable products/packagings to safeguard consumers' health while minimizing the impact on the ...

User Guide
Page 19
... help to instant fun! It's a unique motherboard built-in OS. What's more temperature compared to vDRAM/QPI controller inside CPU) can utilize the most popular Instant Messengers (IM) like MSN, Skype, Google talk, QQ, and Yahoo! ASUS P6T Deluxe V2 1-3 The actual boot time depends on ) ...MOSFETs, Ferrite core chokes with the ASUS TurboV. You can reach high power efficiency, dispel heat generated by VRM module effectively, and lower...
... help to instant fun! It's a unique motherboard built-in OS. What's more temperature compared to vDRAM/QPI controller inside CPU) can utilize the most popular Instant Messengers (IM) like MSN, Skype, Google talk, QQ, and Yahoo! ASUS P6T Deluxe V2 1-3 The actual boot time depends on ) ...MOSFETs, Ferrite core chokes with the ASUS TurboV. You can reach high power efficiency, dispel heat generated by VRM module effectively, and lower...

User Guide
Page 20
...effectively manages the airflow of critical heat generating components. ASUS EPU-6 Engine The new ASUS EPU-the world's first power saving engine, has been upgraded to lower overall system temperature and prolong system lifespans. The motherboard uses a special design on the printed circuit board...the system and return to dissipate heat these critical components generate. ASUS Quiet Thermal Solution ASUS Quiet Thermal solution makes system more stable and enhances the overclocking capability. Fanless Design - Stack Cool 2 ASUS Stack Cool 2 is a fan-less and zero-noise cooling ...
...effectively manages the airflow of critical heat generating components. ASUS EPU-6 Engine The new ASUS EPU-the world's first power saving engine, has been upgraded to lower overall system temperature and prolong system lifespans. The motherboard uses a special design on the printed circuit board...the system and return to dissipate heat these critical components generate. ASUS Quiet Thermal Solution ASUS Quiet Thermal solution makes system more stable and enhances the overclocking capability. Fanless Design - Stack Cool 2 ASUS Stack Cool 2 is a fan-less and zero-noise cooling ...

User Guide
Page 21
...motherboard supports the Trusted Platform Module (TPM), which is caused by different climate conditions in different geographic regions and system loading. See page 2-29 for details. Noise Filter This feature detects repetitive and stationary noises (non-voice signals) like Skype, online game, video conference and recording. ASUS P6T Deluxe V2 1-5 ASUS... you easy ways to achieve a quiet and cool environment. See page 4-21 for details. ASUS EZ DIY ASUS EZ DIY feature collection provides you with enhanced data protection via high-level encryption/decryption and ensures platform integrity....
...motherboard supports the Trusted Platform Module (TPM), which is caused by different climate conditions in different geographic regions and system loading. See page 2-29 for details. Noise Filter This feature detects repetitive and stationary noises (non-voice signals) like Skype, online game, video conference and recording. ASUS P6T Deluxe V2 1-5 ASUS... you easy ways to achieve a quiet and cool environment. See page 4-21 for details. ASUS EZ DIY ASUS EZ DIY feature collection provides you with enhanced data protection via high-level encryption/decryption and ensures platform integrity....

User Guide
Page 22
... BIOS settings can be stored in the CMOS or a separate file, giving users freedom to the motherboard. See page 3-8 for details. ASUS Q-Connector ASUS Q-Connector allows you to easily connect or disconnect the chassis front panel cables to share and distribute ... or load multiple BIOS settings. See page 3-4 for details. See page 2-26 for details. 1-6 Chapter 1: Product Introduction Profile The motherboard features the ASUS O.C. ASUS Onboard Switch With an easy press during overclock, this new design is a user-friendly BIOS update utility. Without the usual "fingers" present...
... BIOS settings can be stored in the CMOS or a separate file, giving users freedom to the motherboard. See page 3-8 for details. ASUS Q-Connector ASUS Q-Connector allows you to easily connect or disconnect the chassis front panel cables to share and distribute ... or load multiple BIOS settings. See page 3-4 for details. See page 2-26 for details. 1-6 Chapter 1: Product Introduction Profile The motherboard features the ASUS O.C. ASUS Onboard Switch With an easy press during overclock, this new design is a user-friendly BIOS update utility. Without the usual "fingers" present...

User Guide
Page 25
It Chapter 2: includes description of the jumpers and connectors on the motherboard. 2 Hardware information This chapter lists the hardware setup procedures that you have to perform when installing system components.
It Chapter 2: includes description of the jumpers and connectors on the motherboard. 2 Hardware information This chapter lists the hardware setup procedures that you have to perform when installing system components.

User Guide
Page 26
Chapter summary 2 2.1 Before you proceed 2-1 2.2 Motherboard overview 2-2 2.3 Central Processing Unit (CPU 2-5 2.4 System memory 2-12 2.5 Expansion slots 2-20 2.6 Jumpers 2-24 2.7 Onboard switches 2-26 2.8 Connectors 2-27 2.9 Installing the additional heatsink fan 2-40 2.10 Starting up for the first time 2-41 2.11 Turning off the computer 2-42 ASUS P6T Deluxe V2
Chapter summary 2 2.1 Before you proceed 2-1 2.2 Motherboard overview 2-2 2.3 Central Processing Unit (CPU 2-5 2.4 System memory 2-12 2.5 Expansion slots 2-20 2.6 Jumpers 2-24 2.7 Onboard switches 2-26 2.8 Connectors 2-27 2.9 Installing the additional heatsink fan 2-40 2.10 Starting up for the first time 2-41 2.11 Turning off the computer 2-42 ASUS P6T Deluxe V2

User Guide
Page 27
ASUS P6T Deluxe V2 2-1 2.1 Before you proceed Take note of the following precautions before you install motherboard components or change any motherboard settings. • Unplug the power cord from the wall socket before touching any component. • Use a grounded wrist strap or touch a safely ... the power supply case, before handling components to avoid damaging them due to static electricity. • Hold components by the edges to the motherboard, peripherals, and/or components. Failure to do so may cause severe damage to avoid touching the ICs on them. • Whenever you uninstall...
ASUS P6T Deluxe V2 2-1 2.1 Before you proceed Take note of the following precautions before you install motherboard components or change any motherboard settings. • Unplug the power cord from the wall socket before touching any component. • Use a grounded wrist strap or touch a safely ... the power supply case, before handling components to avoid damaging them due to static electricity. • Hold components by the edges to the motherboard, peripherals, and/or components. Failure to do so may cause severe damage to avoid touching the ICs on them. • Whenever you uninstall...
User Guide
Page 28
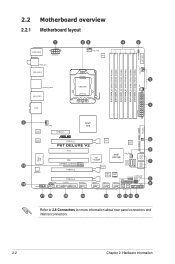
2.2 Motherboard overview 2.2.1 Motherboard layout Refer to 2.8 Connectors for more information about rear panel connectors and internal connectors. 2-2 Chapter 2: Hardware information
2.2 Motherboard overview 2.2.1 Motherboard layout Refer to 2.8 Connectors for more information about rear panel connectors and internal connectors. 2-2 Chapter 2: Hardware information

User Guide
Page 30
2.2.3 Placement direction When installing the motherboard, make sure that you place it into the holes indicated by circles to secure the motherboard to the rear part of the chassis 2-4 Chapter 2: Hardware information Doing so can damage the motherboard. Place this side towards the rear of the chassis as indicated in the image below. 2.2.4 Screw holes Place nine (9) screws into the chassis in the correct orientation. The edge with external ports goes to the chassis. DO NOT overtighten the screws!
2.2.3 Placement direction When installing the motherboard, make sure that you place it into the holes indicated by circles to secure the motherboard to the rear part of the chassis 2-4 Chapter 2: Hardware information Doing so can damage the motherboard. Place this side towards the rear of the chassis as indicated in the image below. 2.2.4 Screw holes Place nine (9) screws into the chassis in the correct orientation. The edge with external ports goes to the chassis. DO NOT overtighten the screws!

User Guide
Page 31
... incorrect CPU installation/removal, or misplacement/loss/ incorrect removal of the PnP cap. ASUS P6T Deluxe V2 2-5 ASUS will shoulder the cost of the motherboard, make sure that all power cables are not bent. ASUS will process Return Merchandise Authorization (RMA) requests only if the motherboard comes with a surface mount LGA1366 socket designed for the Intel® Core...
... incorrect CPU installation/removal, or misplacement/loss/ incorrect removal of the PnP cap. ASUS P6T Deluxe V2 2-5 ASUS will shoulder the cost of the motherboard, make sure that all power cables are not bent. ASUS will process Return Merchandise Authorization (RMA) requests only if the motherboard comes with a surface mount LGA1366 socket designed for the Intel® Core...

User Guide
Page 32
... to the left . 2. Load plate 4 3 2-6 Chapter 2: Hardware information Retention tab A B Load lever 3. Press the load lever with your thumb (A), then move it is on the motherboard. 2.3.1 Installing the CPU To install a CPU: 1.
... to the left . 2. Load plate 4 3 2-6 Chapter 2: Hardware information Retention tab A B Load lever 3. Press the load lever with your thumb (A), then move it is on the motherboard. 2.3.1 Installing the CPU To install a CPU: 1.

User Guide
Page 35
Make sure that the four fasteners match the holes on the motherboard. If you buy a boxed Intel® processor, the package includes the CPU fan and heatsink assembly. If you purchased a separate CPU heatsink and fan ... the heatsink and fan assembly. ASUS P6T Deluxe V2 2-9 2.3.2 Installing the CPU heatsink and fan The Intel® LGA1366 processor requires a specially designed heatsink and fan assembly to ensure optimum thermal condition and performance. • When you buy a CPU separately, make sure that you have installed the motherboard to the chassis before you install...
Make sure that the four fasteners match the holes on the motherboard. If you buy a boxed Intel® processor, the package includes the CPU fan and heatsink assembly. If you purchased a separate CPU heatsink and fan ... the heatsink and fan assembly. ASUS P6T Deluxe V2 2-9 2.3.2 Installing the CPU heatsink and fan The Intel® LGA1366 processor requires a specially designed heatsink and fan assembly to ensure optimum thermal condition and performance. • When you buy a CPU separately, make sure that you have installed the motherboard to the chassis before you install...

User Guide
Page 36
... up two fasteners at a time in a diagonal sequence to the connector on the motherboard. 2. Carefully remove the heatsink and fan assembly from the motherboard. Rotate each fastener counterclockwise. Disconnect the CPU fan cable from the connector on the motherboard labeled CPU_FAN. 3. Hardware monitoring errors can occur if you fail to connect the CPU...
... up two fasteners at a time in a diagonal sequence to the connector on the motherboard. 2. Carefully remove the heatsink and fan assembly from the motherboard. Rotate each fastener counterclockwise. Disconnect the CPU fan cable from the connector on the motherboard labeled CPU_FAN. 3. Hardware monitoring errors can occur if you fail to connect the CPU...

User Guide
Page 37
... of the heatsink. 3. Installing the optional fan with an active CPU cooler will interfere with the airflow and destabilize the system. 1. ASUS P6T Deluxe V2 2-11 Fit the fan to the fan and motherboard components. Position the fan above the pipe and heatsink assembly. 2. 2.3.4 Installing the optional fans Install the optional fan only if you...
... of the heatsink. 3. Installing the optional fan with an active CPU cooler will interfere with the airflow and destabilize the system. 1. ASUS P6T Deluxe V2 2-11 Fit the fan to the fan and motherboard components. Position the fan above the pipe and heatsink assembly. 2. 2.3.4 Installing the optional fans Install the optional fan only if you...


