Motherboard Installation Guide
Page 4
... 3-2 Chapter 4: BIOS setup 4.1 Managing and updating your BIOS 4-1 4.1.1 ASUS Update utility 4-1 4.1.2 Creating a bootable floppy disk 4-4 4.1.3 ASUS EZ Flash 2 utility 4-5 4.1.4 AFUDOS utility 4-6 4.1.5 ASUS CrashFree BIOS 3 utility 4-9 4.2 BIOS setup program 4-11 4.2.1 BIOS menu... screen 4-12 4.2.2 Menu bar 4-12 4.2.3 Navigation keys 4-12 4.2.4 Menu items 4-13 4.2.5 Sub-menu items 4-13 4.2.6 Configuration fields 4-13 4.2.7 Pop-up window...
... 3-2 Chapter 4: BIOS setup 4.1 Managing and updating your BIOS 4-1 4.1.1 ASUS Update utility 4-1 4.1.2 Creating a bootable floppy disk 4-4 4.1.3 ASUS EZ Flash 2 utility 4-5 4.1.4 AFUDOS utility 4-6 4.1.5 ASUS CrashFree BIOS 3 utility 4-9 4.2 BIOS setup program 4-11 4.2.1 BIOS menu... screen 4-12 4.2.2 Menu bar 4-12 4.2.3 Navigation keys 4-12 4.2.4 Menu items 4-13 4.2.5 Sub-menu items 4-13 4.2.6 Configuration fields 4-13 4.2.7 Pop-up window...

Motherboard Installation Guide
Page 33
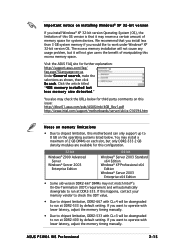
... licensing support list Intel Dual-Core CPU support P e n t i u m® P r o c e s s o r E x t r e m e Edition (supports Hyper-Threading T e c h n o l o g y) Windows® 2000 Professional Windows® 2000 Advanced Server Windows® 2000 Advanced Server Windows® XP Home Windows® XP Home Windows® XP Professional Windows® XP Professional Windows® Server 2003 - ASUS P5W64 WS Professional 2-7 This motherboard also supports the Intel® Pentium® Processor Extreme Edition, the latest...
... licensing support list Intel Dual-Core CPU support P e n t i u m® P r o c e s s o r E x t r e m e Edition (supports Hyper-Threading T e c h n o l o g y) Windows® 2000 Professional Windows® 2000 Advanced Server Windows® 2000 Advanced Server Windows® XP Home Windows® XP Home Windows® XP Professional Windows® XP Professional Windows® Server 2003 - ASUS P5W64 WS Professional 2-7 This motherboard also supports the Intel® Pentium® Processor Extreme Edition, the latest...

Motherboard Installation Guide
Page 35
...; Pentium® 4 LGA775 processors with your thumb and forefinger to a 100º angle (A), then push the PnP cap from the load plate window to the Appendix for more information on the bottom-left corner of the socket. Gold triangle mark The CPU fits in only one correct orientation...(B). Lift the load plate with the Intel® Enhanced Memory 64 Technology (EM64T), Enhanced Intel SpeedStep® Technology (EIST), and Hyper-Threading Technology. ASUS P5W64 WS Professional 2-9 4. Position the CPU over the socket, making sure that the gold triangle is on these CPU features.
...; Pentium® 4 LGA775 processors with your thumb and forefinger to a 100º angle (A), then push the PnP cap from the load plate window to the Appendix for more information on the bottom-left corner of the socket. Gold triangle mark The CPU fits in only one correct orientation...(B). Lift the load plate with the Intel® Enhanced Memory 64 Technology (EM64T), Enhanced Intel SpeedStep® Technology (EIST), and Hyper-Threading Technology. ASUS P5W64 WS Professional 2-9 4. Position the CPU over the socket, making sure that the gold triangle is on these CPU features.
Motherboard Installation Guide
Page 41
...downgraded to run at DDR2-533 by default setting. If this excess memory space. If you install Windows® XP 32-bit version Operating System (OS), the limitation of memory space for system devices. ASUS P5W64 WS Professional 2-15 b i t v e r s i o n If you want to operate with ... reserve a certain amount of this configuration. 32-bit Windows® 2000 Advanced Server Windows® Server 2003 Enterprise Edition 64-bit Windows® Server 2003 Standard x64 Edition Windows® XP Professional x64 Edition Windows® Server 2003 Enterprise x64 Edition • Some old...
...downgraded to run at DDR2-533 by default setting. If this excess memory space. If you install Windows® XP 32-bit version Operating System (OS), the limitation of memory space for system devices. ASUS P5W64 WS Professional 2-15 b i t v e r s i o n If you want to operate with ... reserve a certain amount of this configuration. 32-bit Windows® 2000 Advanced Server Windows® Server 2003 Enterprise Edition 64-bit Windows® Server 2003 Standard x64 Edition Windows® XP Professional x64 Edition Windows® Server 2003 Enterprise x64 Edition • Some old...
Motherboard Installation Guide
Page 59
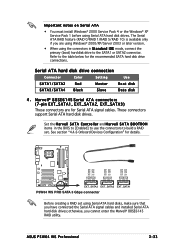
... GND RSATA_RX_1_DN RSATA_RX_1_DP GND GND RSATA_TX_2_DP RSATA_TX_2_DN GND RSATA_RX_2_DN RSATA_RX_2_DP GND EXT_SATA3 EXT_SATA2 EXT_SATA1 P5W64 WS PRO SATA 3 Gbps connector Before creating a RAID set . M a r v e l l® 8 8 S E 6 1 4 5 Serial ATA connectors (7-pin EXT_SATA1, EXT_SATA2, EXT_SATA3) These connectors are using Windows® 2000/XP/Server 2003 or later version. • When using the... a RAID set using Serial ATA hard disk drives. See section "4.4.6 Onboard Devices Configuration" for the recommended SATA hard disk drive connections. ASUS P5W64 WS Professional 2-33
... GND RSATA_RX_1_DN RSATA_RX_1_DP GND GND RSATA_TX_2_DP RSATA_TX_2_DN GND RSATA_RX_2_DN RSATA_RX_2_DP GND EXT_SATA3 EXT_SATA2 EXT_SATA1 P5W64 WS PRO SATA 3 Gbps connector Before creating a RAID set . M a r v e l l® 8 8 S E 6 1 4 5 Serial ATA connectors (7-pin EXT_SATA1, EXT_SATA2, EXT_SATA3) These connectors are using Windows® 2000/XP/Server 2003 or later version. • When using the... a RAID set using Serial ATA hard disk drives. See section "4.4.6 Onboard Devices Configuration" for the recommended SATA hard disk drive connections. ASUS P5W64 WS Professional 2-33

Motherboard Installation Guide
Page 72
..., pressing the power switch for more than four seconds puts the system to sleep mode or to shut down the computer. 3. If you are using Windows® 2000: 1. Click the S t a r t button then select T u r n O f f C o m p u t e r . 2. Refer to shut down the computer. 3. Click the T u r n O f f button to ... less than four seconds lets the system enter the soft-off mode regardless of the BIOS setting. The power supply should turn off after Windows® shuts down. 3.2.2 Using the dual function power switch While the system is selected, then click the O K button to section ...
..., pressing the power switch for more than four seconds puts the system to sleep mode or to shut down the computer. 3. If you are using Windows® 2000: 1. Click the S t a r t button then select T u r n O f f C o m p u t e r . 2. Refer to shut down the computer. 3. Click the T u r n O f f button to ... less than four seconds lets the system enter the soft-off mode regardless of the BIOS setting. The power supply should turn off after Windows® shuts down. 3.2.2 Using the dual function power switch While the system is selected, then click the O K button to section ...
Motherboard Installation Guide
Page 75
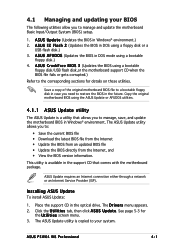
...e (Updates the BIOS in DOS mode using the ASUS Update or AFUDOS utilities. 4.1.1 ASUS Update utility The ASUS Update is a utility that comes with the motherboard package. A S U S A F U D O S (Updates the BIOS in Windows® environment.) 2. Save a copy of the ...original motherboard BIOS file to a bootable floppy disk in case you to manage, save, and update the motherboard BIOS in the future. Copy the original motherboard BIOS using a bootable floppy disk.) 4. The D r i v e r s menu appears. 2. ASUS P5W64 WS Professional...
...e (Updates the BIOS in DOS mode using the ASUS Update or AFUDOS utilities. 4.1.1 ASUS Update utility The ASUS Update is a utility that comes with the motherboard package. A S U S A F U D O S (Updates the BIOS in Windows® environment.) 2. Save a copy of the ...original motherboard BIOS file to a bootable floppy disk in case you to manage, save, and update the motherboard BIOS in the future. Copy the original motherboard BIOS using a bootable floppy disk.) 4. The D r i v e r s menu appears. 2. ASUS P5W64 WS Professional...

Motherboard Installation Guide
Page 76
... utility from the nearest you update the BIOS using this utility. N e x t. The ASUS Update main window appears. 2. Click N e x t. 4-2 Chapter 4: BIOS setup Updating the BIOS through the Internet To update the BIOS through the Internet: 1. Select the ASUS FTP site t h e I O S f r o m 3. Quit all Windows® applications before you to avoid network drop-down menu, then click...
... utility from the nearest you update the BIOS using this utility. N e x t. The ASUS Update main window appears. 2. Click N e x t. 4-2 Chapter 4: BIOS setup Updating the BIOS through the Internet To update the BIOS through the Internet: 1. Select the ASUS FTP site t h e I O S f r o m 3. Quit all Windows® applications before you to avoid network drop-down menu, then click...

Motherboard Installation Guide
Page 77
... the drop-down menu, then click N e x t. 3. Follow the screen instructions to download. ASUS P5W64 WS Professional 4-3 4. The ASUS Update utility is capable of all its features. The ASUS Update main window appears. 2. Select U p d a t e B I O S f r o m a f i l e option from the Windows® desktop by clicking S t a r t > P r o g r a m s > A S U S > A S U S U p d a t e > A S U S U p d a t e. Locate the BIOS file from the O p e n window, then click S a v e. 4. Updating the BIOS through a BIOS file To update the...
... the drop-down menu, then click N e x t. 3. Follow the screen instructions to download. ASUS P5W64 WS Professional 4-3 4. The ASUS Update utility is capable of all its features. The ASUS Update main window appears. 2. Select U p d a t e B I O S f r o m a f i l e option from the Windows® desktop by clicking S t a r t > P r o g r a m s > A S U S > A S U S U p d a t e > A S U S U p d a t e. Locate the BIOS file from the O p e n window, then click S a v e. 4. Updating the BIOS through a BIOS file To update the...

Motherboard Installation Guide
Page 78
.... In the O p e n field, type D:\bootdisk\makeboot a: assuming that D is your optical drive letter. Press , then follow screen instructions to the floppy disk drive. Windows® XP environment a. b. D O S s t a r t u p d i s k from the Windows® desktop, then select M y C o m p u t e r. b. c. Click S t a r t, then select R u n. e. d. At the DOS prompt, type format A:/S then press . c. 4.1.2 Creating a bootable floppy disk 1. DOS environment a. Insert...
.... In the O p e n field, type D:\bootdisk\makeboot a: assuming that D is your optical drive letter. Press , then follow screen instructions to the floppy disk drive. Windows® XP environment a. b. D O S s t a r t u p d i s k from the Windows® desktop, then select M y C o m p u t e r. b. c. Click S t a r t, then select R u n. e. d. At the DOS prompt, type format A:/S then press . c. 4.1.2 Creating a bootable floppy disk 1. DOS environment a. Insert...

Motherboard Installation Guide
Page 87
... a menu item then press to display a pop-up window Scroll bar ASUS P5W64 WS Professional 4-13 To change the value of the selected item. Advanced Chipset settings WARNING: Setting wrong values in ] [SHIFT-TAB] to configure Main menu items... A solid triangle before each item on any menu screen means that menu. Primary IDE Master [ST320413A] Primary IDE Slave [ASUS CD-S520/A] Third ...
... a menu item then press to display a pop-up window Scroll bar ASUS P5W64 WS Professional 4-13 To change the value of the selected item. Advanced Chipset settings WARNING: Setting wrong values in ] [SHIFT-TAB] to configure Main menu items... A solid triangle before each item on any menu screen means that menu. Primary IDE Master [ST320413A] Primary IDE Slave [ASUS CD-S520/A] Third ...

Motherboard Installation Guide
Page 91
... install any Serial ATA device. The C o m b i n e d M o d e O p t i o n item appears when you set to any of these options and encounter problems, revert to [Standard IDE]. ASUS P5W64 WS Professional 4-17 Configuration options: [Primary P-ATA +S-ATA] [S-ATA only] [P-ATA only] The [S-ATA only] and [P-ATA only] options are using a Serial ATA optical drive, set the...), set this item is set to [RAID] or [AHCI] The O n b o a r d I D E O p e r a t e M o d e to [Compatible Mode] before creating a boot disk using OS supporting native mode, including Windows® 2000/XP. A T A.
... install any Serial ATA device. The C o m b i n e d M o d e O p t i o n item appears when you set to any of these options and encounter problems, revert to [Standard IDE]. ASUS P5W64 WS Professional 4-17 Configuration options: [Primary P-ATA +S-ATA] [S-ATA only] [P-ATA only] The [S-ATA only] and [P-ATA only] options are using a Serial ATA optical drive, set the...), set this item is set to [RAID] or [AHCI] The O n b o a r d I D E O p e r a t e M o d e to [Compatible Mode] before creating a boot disk using OS supporting native mode, including Windows® 2000/XP. A T A.

Motherboard Installation Guide
Page 121
...Exit menu to ensure the values you selected are finished making your selections, choose this menu. After selecting this option, a confirmation window appears. Pressing does not immediately exit this option from the legend bar to discard any changes and load the previously saved values. ...asking if you want to save the changes that you made to discard the selections you made changes to save the changes and exit. ASUS P5W64 WS Professional 4-47 4.8 Exit menu The Exit menu items allow you to load the optimal or failsafe default values for a confirmation before exiting. ...
...Exit menu to ensure the values you selected are finished making your selections, choose this menu. After selecting this option, a confirmation window appears. Pressing does not immediately exit this option from the legend bar to discard any changes and load the previously saved values. ...asking if you want to save the changes that you made to discard the selections you made changes to save the changes and exit. ASUS P5W64 WS Professional 4-47 4.8 Exit menu The Exit menu items allow you to load the optimal or failsafe default values for a confirmation before exiting. ...

Motherboard Installation Guide
Page 122
Load Setup Defaults Allows you press , a confirmation window appears. Select E x i t & S a v e C h a n g e s or make other changes before saving the values to load default values. When you select this option or if you to load the default values for each of the parameters on the Setup menus. Select O k to the non-volatile RAM. 4-48 Chapter 4: BIOS setup
Load Setup Defaults Allows you press , a confirmation window appears. Select E x i t & S a v e C h a n g e s or make other changes before saving the values to load default values. When you select this option or if you to load the default values for each of the parameters on the Setup menus. Select O k to the non-volatile RAM. 4-48 Chapter 4: BIOS setup
Motherboard Installation Guide
Page 125
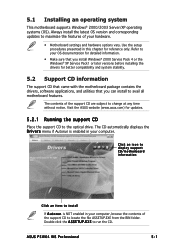
... drive. Double-click the A S S E T U P . ASUS P5W64 WS Professional 5-1 Use the setup procedures presented in this chapter for better compatibility and system stability. 5.2 Support CD information The support CD that came with the motherboard package contains the drivers, software applications, and utilities that you install Windows® 2000 Service Pack 4 or the Windows® XP Service Pack1...
... drive. Double-click the A S S E T U P . ASUS P5W64 WS Professional 5-1 Use the setup procedures presented in this chapter for better compatibility and system stability. 5.2 Support CD information The support CD that came with the motherboard package contains the drivers, software applications, and utilities that you install Windows® 2000 Service Pack 4 or the Windows® XP Service Pack1...
Motherboard Installation Guide
Page 127
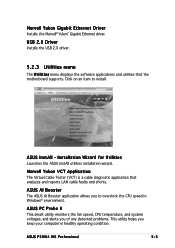
...VCT Application The Virtual Cable Tester (VCT) is a cable diagnostic application that the motherboard supports. ASUS PC Probe II This smart utility monitors the fan speed, CPU temperature, and system voltages, ...ASUS InstAll utilities installation wizard. ASUS InstAll - ASUS AI Booster The ASUS AI Booster application allows you keep your computer in Windows® environment. Marvell Yukon Gigabit Ethernet Driver Installs the Marvell® Yukon™ Gigabit Ethernet driver. Click on an item to overclock the CPU speed in healthy operating condition. ASUS P5W64 WS Professional...
...VCT Application The Virtual Cable Tester (VCT) is a cable diagnostic application that the motherboard supports. ASUS PC Probe II This smart utility monitors the fan speed, CPU temperature, and system voltages, ...ASUS InstAll utilities installation wizard. ASUS InstAll - ASUS AI Booster The ASUS AI Booster application allows you keep your computer in Windows® environment. Marvell Yukon Gigabit Ethernet Driver Installs the Marvell® Yukon™ Gigabit Ethernet driver. Click on an item to overclock the CPU speed in healthy operating condition. ASUS P5W64 WS Professional...

Motherboard Installation Guide
Page 128
... Nap Installs the ASUS AI Nap application. ADOBE Acrobat Reader V7.0 The Adobe Acrobat® Reader V7.0 is a multimedia technology that allows you can enjoy watching TV and movies, capturing videos, or playing games in Windows® environment. This utility requires an Internet connection either through a network or an Internet Service Provider...
... Nap Installs the ASUS AI Nap application. ADOBE Acrobat Reader V7.0 The Adobe Acrobat® Reader V7.0 is a multimedia technology that allows you can enjoy watching TV and movies, capturing videos, or playing games in Windows® environment. This utility requires an Internet connection either through a network or an Internet Service Provider...
Motherboard Installation Guide
Page 129
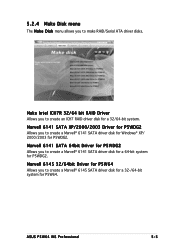
... create a Marvell® 6141 SATA driver disk for Windows® XP/ 2000/2003 for P5WDG2. Marvell 6141 SATA XP/2000/2003 Driver for P5WDG2 Allows you to create an ICH7 RAID driver disk for a 32/64-bit system. ASUS P5W64 WS Professional 5-5 Marvell 6145 32/64bit Driver for P5W64 Allows you to create a Marvell® 6141.../Serial ATA driver disks. 5.2.4 Make Disk menu The M a k e D i s k menu allows you to create a Marvell® 6145 SATA driver disk for a 32-/64-bit system for P5W64.
... create a Marvell® 6141 SATA driver disk for Windows® XP/ 2000/2003 for P5WDG2. Marvell 6141 SATA XP/2000/2003 Driver for P5WDG2 Allows you to create an ICH7 RAID driver disk for a 32/64-bit system. ASUS P5W64 WS Professional 5-5 Marvell 6145 32/64bit Driver for P5W64 Allows you to create a Marvell® 6141.../Serial ATA driver disks. 5.2.4 Make Disk menu The M a k e D i s k menu allows you to create a Marvell® 6145 SATA driver disk for a 32-/64-bit system for P5W64.

Motherboard Installation Guide
Page 133
... s t e m b o o t l o g o b e f o r e f l a s h i n g B I O S f r o m a f i l e from the drop down menu, then click N e x t. 5. Select U p d a t e B I O S, then click N e x t. 4. ASUS P5W64 WS Professional 5-9 5.3 Software information Most of your boot logo. To launch the ASUS MyLogo2™: 1. The ASUS MyLogo2™ is set to [Enabled] if you wish to use the AFUDOS utility to section...ASUS Update utility" for details. • Before using the ASUS MyLogo2™, use ASUS MyLogo3. Select O p t i o n s from the drop down menu, then click N e x t. 3. The ASUS MyLogo2 window...
... s t e m b o o t l o g o b e f o r e f l a s h i n g B I O S f r o m a f i l e from the drop down menu, then click N e x t. 5. Select U p d a t e B I O S, then click N e x t. 4. ASUS P5W64 WS Professional 5-9 5.3 Software information Most of your boot logo. To launch the ASUS MyLogo2™: 1. The ASUS MyLogo2™ is set to [Enabled] if you wish to use the AFUDOS utility to section...ASUS Update utility" for details. • Before using the ASUS MyLogo2™, use ASUS MyLogo3. Select O p t i o n s from the drop down menu, then click N e x t. 3. The ASUS MyLogo2 window...

Motherboard Installation Guide
Page 134
When the screen returns to the ASUS Update utility, flash the original BIOS to display the new boot logo during POST. 5-10 Chapter 5: Software support When the logo images appear on the right window pane, select an image to your desired size by clicking on the R a t i o box. 9. Adjust the boot image to enlarge by selecting a value on it. 8. After flashing the BIOS, restart the computer to load the new boot logo. 10. 7.
When the screen returns to the ASUS Update utility, flash the original BIOS to display the new boot logo during POST. 5-10 Chapter 5: Software support When the logo images appear on the right window pane, select an image to your desired size by clicking on the R a t i o box. 9. Adjust the boot image to enlarge by selecting a value on it. 8. After flashing the BIOS, restart the computer to load the new boot logo. 10. 7.


