User Manual
Page 9
... cord. Contact a qualified service technician or your area. If you add a device. • Before connecting or removing signal cables from the motherboard, ensure that all cables are correctly connected and the power cables are unplugged. • Seek professional assistance before using , contact your retailer. ...the grounding circuit. • Make sure that your power supply is broken, do not try to fix it , carefully read all the manuals that came with the product, contact a qualified service technician or your local power company. • If the power supply is set to...
... cord. Contact a qualified service technician or your area. If you add a device. • Before connecting or removing signal cables from the motherboard, ensure that all cables are correctly connected and the power cables are unplugged. • Seek professional assistance before using , contact your retailer. ...the grounding circuit. • Make sure that your power supply is broken, do not try to fix it , carefully read all the manuals that came with the product, contact a qualified service technician or your local power company. • If the power supply is set to...
User Manual
Page 38
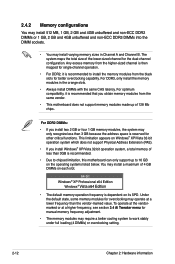
...the black slots for better overclocking capability. For DDR3, only install the memory modules in Channel A and Channel B. For optimum compatibility, it is reserved for manual memory frequency adjustment. • The memory modules may operate at a lower frequency than the vendor-marked value. To operate at the vendormarked or at a ... recommended to work stably under full loading (4 DIMMs) or overclocking setting. 2-12 Chapter 2: Hardware information Any excess memory from the same vendor. • This motherboard does not support memory modules made up to chipset limitation, this...
...the black slots for better overclocking capability. For DDR3, only install the memory modules in Channel A and Channel B. For optimum compatibility, it is reserved for manual memory frequency adjustment. • The memory modules may operate at a lower frequency than the vendor-marked value. To operate at the vendormarked or at a ... recommended to work stably under full loading (4 DIMMs) or overclocking setting. 2-12 Chapter 2: Hardware information Any excess memory from the same vendor. • This motherboard does not support memory modules made up to chipset limitation, this...
User Manual
Page 54
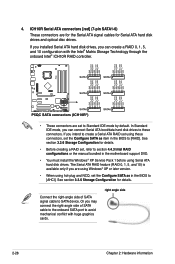
ICH10R Serial ATA connectors [red] (7-pin SATA1-6) These connectors are set , refer to section 4.4.3 Intel RAID configurations or the manual bundled in the BIOS to Standard IDE mode by default. See section 3.3.6 Storage Configuration for details. • Before creating a RAID set to [... hard disk drives. If you can connect Serial ATA boot/data hard disk drives to these connectors, set the Configure SATA as item in the motherboard support DVD. • You must install the Windows® XP Service Pack 1 before using these connectors. The Serial ATA RAID feature (RAID 0, 1, 5, ...
ICH10R Serial ATA connectors [red] (7-pin SATA1-6) These connectors are set , refer to section 4.4.3 Intel RAID configurations or the manual bundled in the BIOS to Standard IDE mode by default. See section 3.3.6 Storage Configuration for details. • Before creating a RAID set to [... hard disk drives. If you can connect Serial ATA boot/data hard disk drives to these connectors, set the Configure SATA as item in the motherboard support DVD. • You must install the Windows® XP Service Pack 1 before using these connectors. The Serial ATA RAID feature (RAID 0, 1, 5, ...
User Manual
Page 84
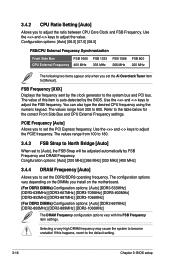
...when you to set the Ai Overclock Tuner item to the default setting. 3-16 Chapter 3: BIOS setup The value of this happens, revert to [Manual]. You can also type the desired CPU frequency using the numeric keypad. Refer to adjust the value. Congifuration options: [Auto] [200 MHz] ... for the correct Front Side Bus and CPU External Frequency settings. Use the and keys to 800. PCIE Frequency [Auto] Allows you install on the motherboard. (For DDR3 DIMMs) Configuration options: [Auto] [DDR3-533MHz] [DDR3-639MHz] [DDR3-667MHz] [DDR3-709MHz] [DDR3-800MHz] [DDR3-852MHz] [DDR3-887MHz] [DDR3...
...when you to set the Ai Overclock Tuner item to the default setting. 3-16 Chapter 3: BIOS setup The value of this happens, revert to [Manual]. You can also type the desired CPU frequency using the numeric keypad. Refer to adjust the value. Congifuration options: [Auto] [200 MHz] ... for the correct Front Side Bus and CPU External Frequency settings. Use the and keys to 800. PCIE Frequency [Auto] Allows you install on the motherboard. (For DDR3 DIMMs) Configuration options: [Auto] [DDR3-533MHz] [DDR3-639MHz] [DDR3-667MHz] [DDR3-709MHz] [DDR3-800MHz] [DDR3-852MHz] [DDR3-887MHz] [DDR3...
User Manual
Page 85
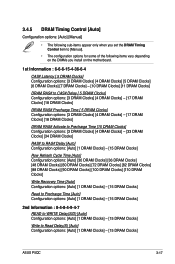
...; The following sub-items appear only when you set the DRAM Timing Control item to [Manual]. • The configuration options for some of the following items vary depending on the DIMMs you install on the motherboard. 1st Information : 6-6-6-15-4-36-6-4 CAS# Latency [ 5 DRAM Clocks] Configuration options: [3 DRAM Clocks] [4 DRAM Clocks] [5 DRAM Clocks... to WRITE Delay(S/D) [Auto] Configuration options: [Auto] [1 DRAM Clocks] - [15 DRAM Clocks] Write to Read Delay(S) [Auto] Configuration options: [Auto] [1 DRAM Clocks] - [15 DRAM Clocks] ASUS P5QC 3-17
...; The following sub-items appear only when you set the DRAM Timing Control item to [Manual]. • The configuration options for some of the following items vary depending on the DIMMs you install on the motherboard. 1st Information : 6-6-6-15-4-36-6-4 CAS# Latency [ 5 DRAM Clocks] Configuration options: [3 DRAM Clocks] [4 DRAM Clocks] [5 DRAM Clocks... to WRITE Delay(S/D) [Auto] Configuration options: [Auto] [1 DRAM Clocks] - [15 DRAM Clocks] Write to Read Delay(S) [Auto] Configuration options: [Auto] [1 DRAM Clocks] - [15 DRAM Clocks] ASUS P5QC 3-17


