
User Manual
Page 4
... 1-40 Chapter 2: BIOS setup 2.1 Managing and updating your BIOS 2-2 2.1.1 ASUS Update utility 2-2 2.1.2 Creating a bootable floppy disk 2-5 2.1.3 ASUS EZ Flash 2 utility 2-6 2.1.4 AFUDOS utility 2-7 2.1.5 ASUS CrashFree BIOS 3 utility 2-9 2.2 BIOS setup program 2-10 2.2.1 BIOS menu ...screen 2-11 2.2.2 Menu bar 2-11 2.2.3 Navigation keys 2-11 2.2.4 Menu items 2-12 2.2.5 Sub-menu items 2-12 2.2.6 Configuration fields 2-12 2.2.7 Pop-up window ...
... 1-40 Chapter 2: BIOS setup 2.1 Managing and updating your BIOS 2-2 2.1.1 ASUS Update utility 2-2 2.1.2 Creating a bootable floppy disk 2-5 2.1.3 ASUS EZ Flash 2 utility 2-6 2.1.4 AFUDOS utility 2-7 2.1.5 ASUS CrashFree BIOS 3 utility 2-9 2.2 BIOS setup program 2-10 2.2.1 BIOS menu ...screen 2-11 2.2.2 Menu bar 2-11 2.2.3 Navigation keys 2-11 2.2.4 Menu items 2-12 2.2.5 Sub-menu items 2-12 2.2.6 Configuration fields 2-12 2.2.7 Pop-up window ...

User Manual
Page 11
... devices ASUS Power Saving Solution: - ASUS AI Nap ASUS Exclusive Feature: - ASUS Q-Connector - ASUS CrashFree BIOS 3 - Profile - ASUS EPU-4 Engine - Optical S/PDIF out port at back I/O - ASUS Fan Xpert - P5Q SE Plus specifications summary CPU Chipset System Bus Memory Expansion Slots Storage ASUS Unique ..., 8-channel High-Definition Audio CODEC - ASUS Fanless Design: Heatsink Solution ASUS EZ DIY: - ASUS O.C. ASUS Noise Filtering (continued on the next page) xi Hence, a total installed memory of 4GB capacity or more, Windows® 32-bit operation system may only...
... devices ASUS Power Saving Solution: - ASUS AI Nap ASUS Exclusive Feature: - ASUS Q-Connector - ASUS CrashFree BIOS 3 - Profile - ASUS EPU-4 Engine - Optical S/PDIF out port at back I/O - ASUS Fan Xpert - P5Q SE Plus specifications summary CPU Chipset System Bus Memory Expansion Slots Storage ASUS Unique ..., 8-channel High-Definition Audio CODEC - ASUS Fanless Design: Heatsink Solution ASUS EZ DIY: - ASUS O.C. ASUS Noise Filtering (continued on the next page) xi Hence, a total installed memory of 4GB capacity or more, Windows® 32-bit operation system may only...

User Manual
Page 16
...efficiency operation to keep in touch with friends, or quickly check on the weather and e-mails just before leaving your pictures without entering Windows at anytime! • The actual boot time depends on ) MOSFETs for the CPU, VGA card, hard drives, CPU fan, ...PC loadings and intelligently moderating power in OS. ASUS Power Saving Solution ASUS Power Saving solution intelligently and automatically provides balanced computing power and energy consumption. It's a unique motherboard built-in real-time. ASUS EPU-4 Engine The new ASUS EPU - Messenger to generate less heat than ...
...efficiency operation to keep in touch with friends, or quickly check on the weather and e-mails just before leaving your pictures without entering Windows at anytime! • The actual boot time depends on ) MOSFETs for the CPU, VGA card, hard drives, CPU fan, ...PC loadings and intelligently moderating power in OS. ASUS Power Saving Solution ASUS Power Saving solution intelligently and automatically provides balanced computing power and energy consumption. It's a unique motherboard built-in real-time. ASUS EPU-4 Engine The new ASUS EPU - Messenger to generate less heat than ...

User Manual
Page 18
... introduction eliminates the need to overclocking, C.P.R. feature of the motherboard BIOS allows automatic re-setting to the BIOS default settings in Windows environment without the hassle of booting the BIOS. C.P.R. (CPU Parameter Recall) The C.P.R. See pages 2-6 and 2-37 for details. 1.3.3 ASUS Stylish features ASUS MyLogo2™ This feature allows you to fine tune the...
... introduction eliminates the need to overclocking, C.P.R. feature of the motherboard BIOS allows automatic re-setting to the BIOS default settings in Windows environment without the hassle of booting the BIOS. C.P.R. (CPU Parameter Recall) The C.P.R. See pages 2-6 and 2-37 for details. 1.3.3 ASUS Stylish features ASUS MyLogo2™ This feature allows you to fine tune the...

User Manual
Page 23
...cap unless you and the load lever is released from the 4A load plate window to the left . 2. To prevent damage to a 135º angle. Lift the load plate with your thumb (A), then move it is on the motherboard. Retention tab A B Load lever PnP cap Load plate 4. Locate the... CPU socket on your thumb 4B and forefinger to a 100º angle (4A), then push the PnP cap from the retention tab. Press the load lever with your left (B) until it to remove (4B). 3 ASUS P5Q SE Plus 1-11...
...cap unless you and the load lever is released from the 4A load plate window to the left . 2. To prevent damage to a 135º angle. Lift the load plate with your thumb (A), then move it is on the motherboard. Retention tab A B Load lever PnP cap Load plate 4. Locate the... CPU socket on your thumb 4B and forefinger to a 100º angle (4A), then push the PnP cap from the retention tab. Press the load lever with your left (B) until it to remove (4B). 3 ASUS P5Q SE Plus 1-11...

User Manual
Page 29
...and Channel B. Any excess memory from the yellow slots for the dual-channel configuration. ASUS P5Q SE Plus 1-17 For optimum compatibility, it is recommended that you install 4GB or more memory installed on the motherboard. • This motherboard does not support memory modules made up of the lower-sized channel for better overclocking capability...the total size of 128 Mb chips. • The default memory operation frequency is recommended to the memory address limitation on 32-bit Windows OS, when you install a 64-bit Windows OS when having 4GB or more memory on its SPD.
...and Channel B. Any excess memory from the yellow slots for the dual-channel configuration. ASUS P5Q SE Plus 1-17 For optimum compatibility, it is recommended that you install 4GB or more memory installed on the motherboard. • This motherboard does not support memory modules made up of the lower-sized channel for better overclocking capability...the total size of 128 Mb chips. • The default memory operation frequency is recommended to the memory address limitation on 32-bit Windows OS, when you install a 64-bit Windows OS when having 4GB or more memory on its SPD.

User Manual
Page 52
...3. Click the Start button then select ShutDown. 2. 1.12 Turning off the computer 1.12.1 Using the OS shut down function If you are using Windows® Vista: 1. Pressing the power switch for less than four seconds lets the system enter the soft-off mode regardless of the BIOS setting. ...Turn Off Computer. 2. The power supply should turn off mode, depending on the BIOS setting. If you are using Windows® XP: 1. The power supply should turn off after Windows® shuts down . 1.12.2 Using the dual function power switch While the system is ON, pressing the power ...
...3. Click the Start button then select ShutDown. 2. 1.12 Turning off the computer 1.12.1 Using the OS shut down function If you are using Windows® Vista: 1. Pressing the power switch for less than four seconds lets the system enter the soft-off mode regardless of the BIOS setting. ...Turn Off Computer. 2. The power supply should turn off mode, depending on the BIOS setting. If you are using Windows® XP: 1. The power supply should turn off after Windows® shuts down . 1.12.2 Using the dual function power switch While the system is ON, pressing the power ...

User Manual
Page 54
... you to manage, save, and update the motherboard BIOS in Windows® environment. 2. Place the support DVD in the future. The ASUS Update utility is copied to your BIOS The following utilities allow you need to manage and update the motherboard Basic Input/Output System (BIOS) setup. 1. ASUS AFUDOS: Updates the BIOS using a bootable floppy...
... you to manage, save, and update the motherboard BIOS in Windows® environment. 2. Place the support DVD in the future. The ASUS Update utility is copied to your BIOS The following utilities allow you need to manage and update the motherboard Basic Input/Output System (BIOS) setup. 1. ASUS AFUDOS: Updates the BIOS using a bootable floppy...

User Manual
Page 55
Select Update BIOS from the drop‑down you update the BIOS using this utility. Quit all Windows® applications before you to avoid network traffic, or menu, then click Next. Select the ASUS FTP site nearest Internet option from the 3. ASUS P5Q SE Plus 2-3 click Auto Select. Updating the BIOS through the Internet To update the BIOS through the Internet: 1. Launch the ASUS Update utility from the Windows® desktop by clicking Start > Programs > ASUS > ASUSUpdate > ASUSUpdate. Click Next. The ASUS Update main window appears. 2.
Select Update BIOS from the drop‑down you update the BIOS using this utility. Quit all Windows® applications before you to avoid network traffic, or menu, then click Next. Select the ASUS FTP site nearest Internet option from the 3. ASUS P5Q SE Plus 2-3 click Auto Select. Updating the BIOS through the Internet To update the BIOS through the Internet: 1. Launch the ASUS Update utility from the Windows® desktop by clicking Start > Programs > ASUS > ASUSUpdate > ASUSUpdate. Click Next. The ASUS Update main window appears. 2.

User Manual
Page 56
...the BIOS through the Internet. Select Update BIOS from a file option from the Open window, then click Open. 4. Always update the utility to complete the update process. The ASUS Update main window appears. 2. Locate the BIOS file from the drop‑down menu, then click...2-4 Chapter 2: BIOS setup Follow the screen instructions to download. The ASUS Update utility is capable of updating itself through a BIOS file: 1. Launch the ASUS Update utility from the Windows® desktop by clicking Start > Programs > ASUS > ASUSUpdate > ASUSUpdate. From the FTP site, select the BIOS...
...the BIOS through the Internet. Select Update BIOS from a file option from the Open window, then click Open. 4. Always update the utility to complete the update process. The ASUS Update main window appears. 2. Locate the BIOS file from the drop‑down menu, then click...2-4 Chapter 2: BIOS setup Follow the screen instructions to download. The ASUS Update utility is capable of updating itself through a BIOS file: 1. Launch the ASUS Update utility from the Windows® desktop by clicking Start > Programs > ASUS > ASUSUpdate > ASUSUpdate. From the FTP site, select the BIOS...
User Manual
Page 57
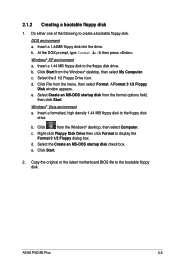
...drive. Select the 3 1/2 Floppy Drive icon. Click File from the Windows® desktop, then select My Computer. e. b. Click Start. 2. ASUS P5Q SE Plus 2-5 DOS environment a. b. Click Start from the menu, then select... Format. Click from the format options field, then click Start. Windows® Vista environment a. e. c. Right-click Floppy Disk Drive then click Format to create a bootable floppy disk. Windows® XP environment a. Copy the original or the latest motherboard...
...drive. Select the 3 1/2 Floppy Drive icon. Click File from the Windows® desktop, then select My Computer. e. b. Click Start. 2. ASUS P5Q SE Plus 2-5 DOS environment a. b. Click Start from the menu, then select... Format. Click from the format options field, then click Start. Windows® Vista environment a. e. c. Right-click Floppy Disk Drive then click Format to create a bootable floppy disk. Windows® XP environment a. Copy the original or the latest motherboard...

User Manual
Page 64
...12 Chapter 2: BIOS setup You cannot select an item that the iteam has a sub-menu. Refer to "2.2.7 Pop-up window." 2.2.7 Pop-up window Select a menu item then press to display a pop-up window menu screen when there are items that menu. Use [+] or [-] to display a list of the field opposite the item... Time System Date Legacy Diskette A [06:22:54] [Tue 09/02/2008] [1.44M, 3.5 in brackets, and is a brief description of a Pop-up window with the configuration options for the menu items. If an item is not user-configurable. Press the Scroll bar Up/Down arrow keys or / keys...
...12 Chapter 2: BIOS setup You cannot select an item that the iteam has a sub-menu. Refer to "2.2.7 Pop-up window." 2.2.7 Pop-up window Select a menu item then press to display a pop-up window menu screen when there are items that menu. Use [+] or [-] to display a list of the field opposite the item... Time System Date Legacy Diskette A [06:22:54] [Tue 09/02/2008] [1.44M, 3.5 in brackets, and is a brief description of a Pop-up window with the configuration options for the menu items. If an item is not user-configurable. Press the Scroll bar Up/Down arrow keys or / keys...

User Manual
Page 76
... Intel® CPU Thermal Monitor (TM) function, a CPU overheating protection function. When set this item to [Disabled] if you can function as Windows NT4.0. (Default: Disabled) Configuration options: [Disabled] [Enabled] Intel(R) Virtualization Tech [Enabled] Allows you to use the Enhanced Intel® SpeedStepTM ...Technology. Configuration options: [Disabled] [Enabled] Max CPUID Value Limit [Disabled] Allows you to [Enabled] for Windows XP operating system; set to [Enabled], you do not want to use the EIST. Set this item to enable or disable Inter...
... Intel® CPU Thermal Monitor (TM) function, a CPU overheating protection function. When set this item to [Disabled] if you can function as Windows NT4.0. (Default: Disabled) Configuration options: [Disabled] [Enabled] Intel(R) Virtualization Tech [Enabled] Allows you to use the Enhanced Intel® SpeedStepTM ...Technology. Configuration options: [Disabled] [Enabled] Max CPUID Value Limit [Disabled] Allows you to [Enabled] for Windows XP operating system; set to [Enabled], you do not want to use the EIST. Set this item to enable or disable Inter...

User Manual
Page 90
.... Configuration options: [Disabled] [Enabled] 2-38 Chapter 2: BIOS setup When set the countdown duration that the system waits at the Express Gate's first screen before starting Windows or other installed OS. 2.8.2 Express Gate [Enabled] Allows you to Express Gate.
.... Configuration options: [Disabled] [Enabled] 2-38 Chapter 2: BIOS setup When set the countdown duration that the system waits at the Express Gate's first screen before starting Windows or other installed OS. 2.8.2 Express Gate [Enabled] Allows you to Express Gate.

User Manual
Page 92
...Once you are saved to load the optimal or failsafe default values for the BIOS items, and save the changes that you press , a confirmation window appears. Select OK to discard any changes and load the previously saved values. Select Exit & Save Changes or make other than System Date, ... the values you to the CMOS RAM. After selecting this menu. Select OK to the Setup program. When you select this option, a confirmation window appears. When you want to save or discard your changes, the program prompts you with a message asking if you select this option or if...
...Once you are saved to load the optimal or failsafe default values for the BIOS items, and save the changes that you press , a confirmation window appears. Select OK to discard any changes and load the previously saved values. Select Exit & Save Changes or make other than System Date, ... the values you to the CMOS RAM. After selecting this menu. Select OK to the Setup program. When you select this option, a confirmation window appears. When you want to save or discard your changes, the program prompts you with a message asking if you select this option or if...
User Manual
Page 94
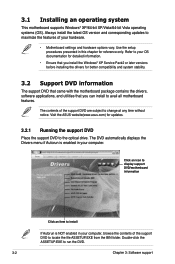
...(www.asus.com) for reference only. The contents of the support DVD to avail all motherboard features. The DVD automatically displays the Drivers menu if Autorun is NOT enabled in your OS documentation for detailed information. • Ensure that you install the Windows® XP Service ...at any time without notice. Refer to install If Autorun is enabled in your hardware. • Motherboard settings and hardware options vary. 3.1 Installing an operating system This motherboard supports Windows® XP/64-bit XP/Vista/64-bit Vista operating systems (OS). Click an icon to ...
...(www.asus.com) for reference only. The contents of the support DVD to avail all motherboard features. The DVD automatically displays the Drivers menu if Autorun is NOT enabled in your OS documentation for detailed information. • Ensure that you install the Windows® XP Service ...at any time without notice. Refer to install If Autorun is enabled in your hardware. • Motherboard settings and hardware options vary. 3.1 Installing an operating system This motherboard supports Windows® XP/64-bit XP/Vista/64-bit Vista operating systems (OS). Click an icon to ...

User Manual
Page 96
ASUS Update The ASUS Update utility allows you to the previous page ASUS InstAll-Installation Wizard for Utilities Installs all of the utilities through a network or an Internet Service Provider (ISP). 3-4 Chapter 3: Software support This utility requires an Internet connection either through the Installation Wizard. 3.2.3 Utilities menu The Utilities menu shows the applications and other software that the motherboard supports. Click to display the next page Click to return to update the motherboard BIOS in Windows® environment.
ASUS Update The ASUS Update utility allows you to the previous page ASUS InstAll-Installation Wizard for Utilities Installs all of the utilities through a network or an Internet Service Provider (ISP). 3-4 Chapter 3: Software support This utility requires an Internet connection either through the Installation Wizard. 3.2.3 Utilities menu The Utilities menu shows the applications and other software that the motherboard supports. Click to display the next page Click to return to update the motherboard BIOS in Windows® environment.


