User Manual
Page 2
... ONLY, AND ARE SUBJECT TO CHANGE AT ANY TIME WITHOUT NOTICE, AND SHOULD NOT BE CONSTRUED AS A COMMITMENT BY ASUS. Products and corporate names appearing in this manual, including the products and software described in it, may not be extended if: (1) the product is repaired, modified or... are used only for backup purposes, without intent to infringe. ASUS ASSUMES NO RESPONSIBILITY OR LIABILITY FOR ANY ERRORS OR INACCURACIES THAT MAY APPEAR IN THIS MANUAL, INCLUDING THE PRODUCTS AND SOFTWARE DESCRIBED IN IT. ASUS PROVIDES THIS MANUAL "AS IS" WITHOUT WARRANTY OF ANY KIND, EITHER EXPRESS OR...
... ONLY, AND ARE SUBJECT TO CHANGE AT ANY TIME WITHOUT NOTICE, AND SHOULD NOT BE CONSTRUED AS A COMMITMENT BY ASUS. Products and corporate names appearing in this manual, including the products and software described in it, may not be extended if: (1) the product is repaired, modified or... are used only for backup purposes, without intent to infringe. ASUS ASSUMES NO RESPONSIBILITY OR LIABILITY FOR ANY ERRORS OR INACCURACIES THAT MAY APPEAR IN THIS MANUAL, INCLUDING THE PRODUCTS AND SOFTWARE DESCRIBED IN IT. ASUS PROVIDES THIS MANUAL "AS IS" WITHOUT WARRANTY OF ANY KIND, EITHER EXPRESS OR...
User Manual
Page 7
... power cables for the devices are unplugged before the signal cables are unplugged. • Seek professional assistance before using the product, make sure all the manuals that your power supply is broken, do not try to fix it by yourself. If possible, disconnect all power cables are connected. If you are...
... power cables for the devices are unplugged before the signal cables are unplugged. • Seek professional assistance before using the product, make sure all the manuals that your power supply is broken, do not try to fix it by yourself. If possible, disconnect all power cables are connected. If you are...

User Manual
Page 8
...n c e i n f o r m a t i o n This appendix includes additional information that you may refer to when configuring the motherboard. How this guide is organized This manual contains the following sources for additional information and for this guide This user guide contains the information you have been added by your dealer. Where... This chapter describes the features of the standard package. Optional documentation Your product package may have to the ASUS contact information. 2. These documents are also provided. • Chapter 5: RAID support Provides information on RAID...
...n c e i n f o r m a t i o n This appendix includes additional information that you may refer to when configuring the motherboard. How this guide is organized This manual contains the following sources for additional information and for this guide This user guide contains the information you have been added by your dealer. Where... This chapter describes the features of the standard package. Optional documentation Your product package may have to the ASUS contact information. 2. These documents are also provided. • Chapter 5: RAID support Provides information on RAID...
User Manual
Page 9
...-than and greater-than sign means that you must type the command exactly as shown, then supply the required item or value enclosed in this manual. Conventions used throughout this guide To make sure that you must press the enclosed key. Example: At the DOS prompt, type the command line: afudos...
...-than and greater-than sign means that you must type the command exactly as shown, then supply the required item or value enclosed in this manual. Conventions used throughout this guide To make sure that you must press the enclosed key. Example: At the DOS prompt, type the command line: afudos...
User Manual
Page 83
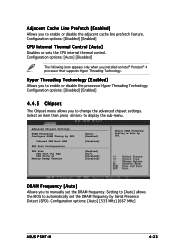
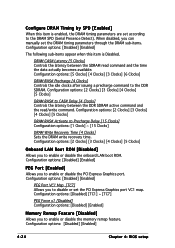
DRAM Frequency [Auto] Allows you to manually set the DRAM frequency by SPD. Configuration options: [Auto] [533 MHz] [667 MHz] ASUS P5MT-M 4-23 Configuration options: [Disabled] [Enabled] 4.4.5 Chipset The Chipset menu allows you to change the advanced chipset settings. Advanced Chipset ... PEG Port PEG Port VC1 Map PEG Force x1 Memory Remap Feature [Auto] [Enabled] [Disabled] [Enabled] [TC7] [Disabled] [Disabled] Manual DRAM Frequency Setting or Auto by Serial Presence Detect (SPD). Setting to [Auto] allows the BIOS to enable or disable the processor Hyper Threading ...
DRAM Frequency [Auto] Allows you to manually set the DRAM frequency by SPD. Configuration options: [Auto] [533 MHz] [667 MHz] ASUS P5MT-M 4-23 Configuration options: [Disabled] [Enabled] 4.4.5 Chipset The Chipset menu allows you to change the advanced chipset settings. Advanced Chipset ... PEG Port PEG Port VC1 Map PEG Force x1 Memory Remap Feature [Auto] [Enabled] [Disabled] [Enabled] [TC7] [Disabled] [Disabled] Manual DRAM Frequency Setting or Auto by Serial Presence Detect (SPD). Setting to [Auto] allows the BIOS to enable or disable the processor Hyper Threading ...
User Manual
Page 84
.... Configuration options: [2 Clocks] [3 Clocks] [4 Clocks] [5 Clocks] DRAM RAS# Activate to the DDR SDRAM. Configuration options: [Disabled] [Enabled] PEG Port VC1 Map [TC7] Allows you can manually set the DRAM timing parameters through the DRAM sub-items. Configuration options: [Disabled] [Enabled] The following sub-items appear when this item is Disabled. When...
.... Configuration options: [2 Clocks] [3 Clocks] [4 Clocks] [5 Clocks] DRAM RAS# Activate to the DDR SDRAM. Configuration options: [Disabled] [Enabled] PEG Port VC1 Map [TC7] Allows you can manually set the DRAM timing parameters through the DRAM sub-items. Configuration options: [Disabled] [Enabled] The following sub-items appear when this item is Disabled. When...
User Manual
Page 112
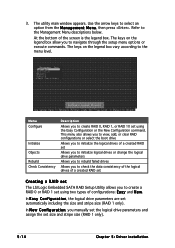
... RAID 0, RAID 1, or RAID 10 set using the Easy Configuration or the New Configuration command. Menu Configure Initialize Objects Rebuild Check Consistency Description Allows you manually set the logical drive parameters and assign the set automatically including the size and stripe size (RAID 1 only). In N e w C o n f i g u r a t i o n, you to the Management Menu descriptions...
... RAID 0, RAID 1, or RAID 10 set using the Easy Configuration or the New Configuration command. Menu Configure Initialize Objects Rebuild Check Consistency Description Allows you manually set the logical drive parameters and assign the set automatically including the size and stripe size (RAID 1 only). In N e w C o n f i g u r a t i o n, you to the Management Menu descriptions...
User Manual
Page 126
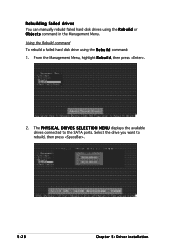
Select the drive you want to the SATA ports. The P H Y S I C A L D R I V E S S E L E C T I O N M E N U displays the available drives connected to rebuild, then press . 5-28 Chapter 5: Driver installation From the Management Menu, highlight R e b u i l d, then press . 2. Using the Rebuild command To rebuild a failed hard disk drive using the R e b u i l d or O b j e c t s command in the Management Menu. Rebuilding failed drives You can manually rebuild failed hard disk drives using the R e b u i l d command: 1.
Select the drive you want to the SATA ports. The P H Y S I C A L D R I V E S S E L E C T I O N M E N U displays the available drives connected to rebuild, then press . 5-28 Chapter 5: Driver installation From the Management Menu, highlight R e b u i l d, then press . 2. Using the Rebuild command To rebuild a failed hard disk drive using the R e b u i l d or O b j e c t s command in the Management Menu. Rebuilding failed drives You can manually rebuild failed hard disk drives using the R e b u i l d command: 1.
User Manual
Page 145
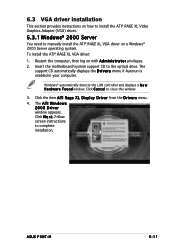
Insert the motherboard/system support CD to complete installation. The A T I W i n d o w s 2000 Driver window appears. Click N e x t. ASUS P5MT-M 6-11 Windows® automatically detects the LAN controller and displays a N e w H a r d w a r e F o u n d window. Click the item ATI Rage XL Display... Follow screen instructions to the optical drive. To install the ATI® RAGE XL VGA driver: 1. Click C a n c e l to manually install the ATI® RAGE XL VGA driver on a Windows® 2000 Server operating system. 6.3 VGA driver installation This section provides instructions on ...
Insert the motherboard/system support CD to complete installation. The A T I W i n d o w s 2000 Driver window appears. Click N e x t. ASUS P5MT-M 6-11 Windows® automatically detects the LAN controller and displays a N e w H a r d w a r e F o u n d window. Click the item ATI Rage XL Display... Follow screen instructions to the optical drive. To install the ATI® RAGE XL VGA driver: 1. Click C a n c e l to manually install the ATI® RAGE XL VGA driver on a Windows® 2000 Server operating system. 6.3 VGA driver installation This section provides instructions on ...


