User Guide
Page 2
... or may be reproduced, transmitted, transcribed, stored in a retrieval system, or translated into any means, except documentation kept by ASUS; ASUS PROVIDES THIS MANUAL "AS IS" WITHOUT WARRANTY OF ANY KIND, EITHER EXPRESS OR IMPLIED, INCLUDING BUT NOT LIMITED TO THE IMPLIED WARRANTIES OR CONDITIONS...OR DATA, INTERRUPTION OF BUSINESS AND THE LIKE), EVEN IF ASUS HAS BEEN ADVISED OF THE POSSIBILITY OF SUCH DAMAGES ARISING FROM ANY DEFECT OR ERROR IN THIS MANUAL OR PRODUCT. SPECIFICATIONS AND INFORMATION CONTAINED IN THIS MANUAL ARE FURNISHED FOR INFORMATIONAL USE ONLY, AND ARE SUBJECT TO CHANGE...
... or may be reproduced, transmitted, transcribed, stored in a retrieval system, or translated into any means, except documentation kept by ASUS; ASUS PROVIDES THIS MANUAL "AS IS" WITHOUT WARRANTY OF ANY KIND, EITHER EXPRESS OR IMPLIED, INCLUDING BUT NOT LIMITED TO THE IMPLIED WARRANTIES OR CONDITIONS...OR DATA, INTERRUPTION OF BUSINESS AND THE LIKE), EVEN IF ASUS HAS BEEN ADVISED OF THE POSSIBILITY OF SUCH DAMAGES ARISING FROM ANY DEFECT OR ERROR IN THIS MANUAL OR PRODUCT. SPECIFICATIONS AND INFORMATION CONTAINED IN THIS MANUAL ARE FURNISHED FOR INFORMATIONAL USE ONLY, AND ARE SUBJECT TO CHANGE...
User Guide
Page 8
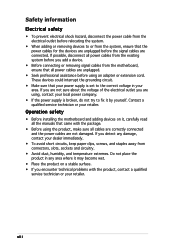
... technician or your retailer. Do not place the product in your power supply is broken, do not try to fix it , carefully read all the manuals that your area. Operation safety • Before installing the motherboard and adding devices on a stable surface. • If you add a device. • Before connecting or...
... technician or your retailer. Do not place the product in your power supply is broken, do not try to fix it , carefully read all the manuals that your area. Operation safety • Before installing the motherboard and adding devices on a stable surface. • If you add a device. • Before connecting or...
User Guide
Page 10
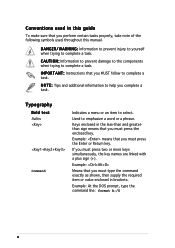
... properly, take note of the following symbols used throughout this guide To make sure that you must press the enclosed key. Conventions used in this manual.
... properly, take note of the following symbols used throughout this guide To make sure that you must press the enclosed key. Conventions used in this manual.
User Guide
Page 81
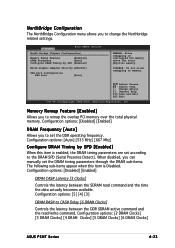
... Port Configuration PEG Port [Auto] ENABLE: Allow remapping of memory. Configuration options: [2 DRAM Clocks] [3 DRAM Clocks] [4 DRAM Clocks] [5 DRAM Clocks] [6 DRAM Clocks] ASUS P5MT Series 4-23 When disabled, you can manually set the DRAM timing parameters through the DRAM sub-items. The following sub-items appear when this item is Disabled. Advanced BIOS...
... Port Configuration PEG Port [Auto] ENABLE: Allow remapping of memory. Configuration options: [2 DRAM Clocks] [3 DRAM Clocks] [4 DRAM Clocks] [5 DRAM Clocks] [6 DRAM Clocks] ASUS P5MT Series 4-23 When disabled, you can manually set the DRAM timing parameters through the DRAM sub-items. The following sub-items appear when this item is Disabled. Advanced BIOS...
User Guide
Page 105
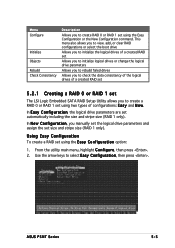
... including the size and stripe size (RAID 1 only). Use the arrow keys to select Easy Configuration, then press . ASUS P5MT Series 5-5 This menu also allows you to view, add, or clear RAID configurations or select the boot drive Allows you...Rebuild Check Consistency Description Allows you to create RAID 0 or RAID 1 set size and stripe size (RAID 1 only). In N e w C o n f i g u r a t i o n, you manually set the logical drive parameters and assign the set using the Easy Configuration or the New Configuration command. In E a s y C o n f i g u r a t i o n, the logical drive parameters...
... including the size and stripe size (RAID 1 only). Use the arrow keys to select Easy Configuration, then press . ASUS P5MT Series 5-5 This menu also allows you to view, add, or clear RAID configurations or select the boot drive Allows you...Rebuild Check Consistency Description Allows you to create RAID 0 or RAID 1 set size and stripe size (RAID 1 only). In N e w C o n f i g u r a t i o n, you manually set the logical drive parameters and assign the set using the Easy Configuration or the New Configuration command. In E a s y C o n f i g u r a t i o n, the logical drive parameters...
User Guide
Page 123
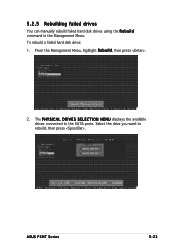
To rebuild a failed hard disk drive: 1. Select the drive you want to the SATA ports. ASUS P5MT Series 5-23 5.2.5 Rebuilding failed drives You can manually rebuild failed hard disk drives using the R e b u i l d command in the Management Menu. From the Management Menu, highlight R e b u i l d, then press . 2. The P H Y S I C A L D R I V E S S E L E C T I O N M E N U displays the available drives connected to rebuild, then press .
To rebuild a failed hard disk drive: 1. Select the drive you want to the SATA ports. ASUS P5MT Series 5-23 5.2.5 Rebuilding failed drives You can manually rebuild failed hard disk drives using the R e b u i l d command in the Management Menu. From the Management Menu, highlight R e b u i l d, then press . 2. The P H Y S I C A L D R I V E S S E L E C T I O N M E N U displays the available drives connected to rebuild, then press .

User Guide
Page 165
... window appears. Windows® automatically detects the LAN controller and displays a N e w H a r d w a r e F o u n d window. ASUS P5MT Series 6-13 The support CD automatically displays the D r i v e r s menu if Autorun is enabled in your computer. Click N e x t. Click C a n c e l to the optical drive. Follow screen instructions to manually install the ATI® RAGE XL VGA driver on a Windows® 2000...
... window appears. Windows® automatically detects the LAN controller and displays a N e w H a r d w a r e F o u n d window. ASUS P5MT Series 6-13 The support CD automatically displays the D r i v e r s menu if Autorun is enabled in your computer. Click N e x t. Click C a n c e l to the optical drive. Follow screen instructions to manually install the ATI® RAGE XL VGA driver on a Windows® 2000...


