
User Manual
Page 2
...TIME WITHOUT NOTICE, AND SHOULD NOT BE CONSTRUED AS A COMMITMENT BY ASUS. Products and corporate names appearing in this manual, including the products and software described in any form or by any means, except documentation kept by ASUS; E3037 Revised Edition V2 April 2007 Copyright © 2007 ASUSTeK COMPUTER ... LOSS OF USE OR DATA, INTERRUPTION OF BUSINESS AND THE LIKE), EVEN IF ASUS HAS BEEN ADVISED OF THE POSSIBILITY OF SUCH DAMAGES ARISING FROM ANY DEFECT OR ERROR IN THIS MANUAL OR PRODUCT. ASUS ASSUMES NO RESPONSIBILITY OR LIABILITY FOR ANY ERRORS OR INACCURACIES THAT MAY APPEAR IN ...
...TIME WITHOUT NOTICE, AND SHOULD NOT BE CONSTRUED AS A COMMITMENT BY ASUS. Products and corporate names appearing in this manual, including the products and software described in any form or by any means, except documentation kept by ASUS; E3037 Revised Edition V2 April 2007 Copyright © 2007 ASUSTeK COMPUTER ... LOSS OF USE OR DATA, INTERRUPTION OF BUSINESS AND THE LIKE), EVEN IF ASUS HAS BEEN ADVISED OF THE POSSIBILITY OF SUCH DAMAGES ARISING FROM ANY DEFECT OR ERROR IN THIS MANUAL OR PRODUCT. ASUS ASSUMES NO RESPONSIBILITY OR LIABILITY FOR ANY ERRORS OR INACCURACIES THAT MAY APPEAR IN ...
User Manual
Page 8
... connected. Operation safety • Before installing the motherboard and adding devices on a stable surface. • If you are using the product, make sure all the manuals that came with the product, contact a qualified service technician or your power supply is broken, do not try to fix it , carefully read all cables...
... connected. Operation safety • Before installing the motherboard and adding devices on a stable surface. • If you are using the product, make sure all the manuals that came with the product, contact a qualified service technician or your power supply is broken, do not try to fix it , carefully read all cables...
User Manual
Page 9
... This user guide contains the information you need when installing and configuring the motherboard. About this guide is organized This manual contains the following sources for additional information and for this motherboard. • Appendix: Reference information This appendix includes additional... ix It includes description of shutting down the system. • Chapter 4: BIOS setup Tells how to the ASUS contact information. 2. ASUS websites The ASUS website provides updated information on the motherboard. • Chapter 3: Powering up This chapter describes the power up sequence...
... This user guide contains the information you need when installing and configuring the motherboard. About this guide is organized This manual contains the following sources for additional information and for this motherboard. • Appendix: Reference information This appendix includes additional... ix It includes description of shutting down the system. • Chapter 4: BIOS setup Tells how to the ASUS contact information. 2. ASUS websites The ASUS website provides updated information on the motherboard. • Chapter 3: Powering up This chapter describes the power up sequence...

User Manual
Page 10
... Indicates a menu or an item to help you complete a task. Used to complete a task. If you must press the enclosed key. Conventions used throughout this manual. Keys enclosed in brackets. Example: + + Means that you must press two or more keys simultaneously, the key names are linked with a plus sign (+). DANGER/WARNING...
... Indicates a menu or an item to help you complete a task. Used to complete a task. If you must press the enclosed key. Conventions used throughout this manual. Keys enclosed in brackets. Example: + + Means that you must press two or more keys simultaneously, the key names are linked with a plus sign (+). DANGER/WARNING...
User Manual
Page 89
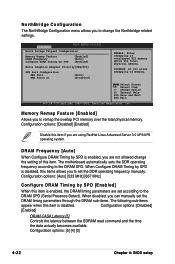
...are not allowed change the Northbridge related settings. Memory Remap Feature [Enabled] Allows you to the DRAM SPD. When disabled, you can manually set the DRAM timing parameters through the DRAM sub-items. The following sub-items appear when this item. DRAM Frequency [Auto] When ...options: [Auto] [533 MHz] [667 MHz] Configure DRAM Timing by SPD is disabled, this item if you are set the DDR operating frequency manually. Configuration options: [Disabled] [Enabled] DRAM CAS# Latency [5] Controls the latency between the SDRAM read command and the time the data actually becomes ...
...are not allowed change the Northbridge related settings. Memory Remap Feature [Enabled] Allows you to the DRAM SPD. When disabled, you can manually set the DRAM timing parameters through the DRAM sub-items. The following sub-items appear when this item. DRAM Frequency [Auto] When ...options: [Auto] [533 MHz] [667 MHz] Configure DRAM Timing by SPD is disabled, this item if you are set the DDR operating frequency manually. Configuration options: [Disabled] [Enabled] DRAM CAS# Latency [5] Controls the latency between the SDRAM read command and the time the data actually becomes ...
User Manual
Page 115
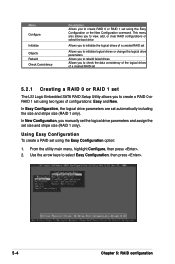
... Configuration or the New Configuration command. In Easy Configuration, the logical drive parameters are set size and stripe size (RAID 1 only). In New Configuration, you manually set the logical drive parameters and assign the set automatically including the size and stripe size (RAID 1 only). From the utility main menu, highlight Configure...
... Configuration or the New Configuration command. In Easy Configuration, the logical drive parameters are set size and stripe size (RAID 1 only). In New Configuration, you manually set the logical drive parameters and assign the set automatically including the size and stripe size (RAID 1 only). From the utility main menu, highlight Configure...

User Manual
Page 133
The PHYSICAL DRIVES SELECTION MENU displays the available drives connected to rebuild, then press . 5-22 Chapter 5: RAID configuration Select the drive you want to the SATA ports. From the Management Menu, highlight Rebuild, then press . 2. 5.2.5 Rebuilding failed drives You can manually rebuild failed hard disk drives using the Rebuild command in the Management Menu. To rebuild a failed hard disk drive: 1.
The PHYSICAL DRIVES SELECTION MENU displays the available drives connected to rebuild, then press . 5-22 Chapter 5: RAID configuration Select the drive you want to the SATA ports. From the Management Menu, highlight Rebuild, then press . 2. 5.2.5 Rebuilding failed drives You can manually rebuild failed hard disk drives using the Rebuild command in the Management Menu. To rebuild a failed hard disk drive: 1.
User Manual
Page 155
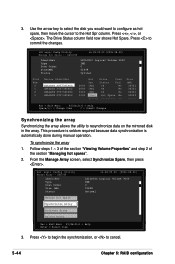
... Logic Config Utility v6.08.05.00 (2006.08.02) Manage Hot Spare -- This procedure is seldom required because data synchronization is automatically done during manual operation. From the Manage Array screen, select Synchronize Spare, then press . Follow steps 1 ~ 3 of the section "Viewing Volume Properties" and step 2 of the section "Managing...
... Logic Config Utility v6.08.05.00 (2006.08.02) Manage Hot Spare -- This procedure is seldom required because data synchronization is automatically done during manual operation. From the Manage Array screen, select Synchronize Spare, then press . Follow steps 1 ~ 3 of the section "Viewing Volume Properties" and step 2 of the section "Managing...

User Manual
Page 179
... ATI® ES1000 Video Graphics Adapter (VGA) driver. 6.3.1 Windows 2000/Server 2003 You need to the optical drive. Insert the motherboard/system support CD to manually install the ATI® ES1000 VGA driver on with Administrator privileges. 2. The Drivers menu if Autorun is enabled in your computer.
... ATI® ES1000 Video Graphics Adapter (VGA) driver. 6.3.1 Windows 2000/Server 2003 You need to the optical drive. Insert the motherboard/system support CD to manually install the ATI® ES1000 VGA driver on with Administrator privileges. 2. The Drivers menu if Autorun is enabled in your computer.
