User Manual
Page 3
Contents Notices...v Safety information vi About this guide vi P5KPL-AM IN/GB specifications summary viii Chapter 1: Product introduction 1.1 Before you proceed 1-1 1.2 Motherboard overview 1-2 ... 1.8 Software support 1-15 1.8.1 Installing an operating system 1-15 1.8.2 Support CD information 1-15 Chapter 2: BIOS information 2.1 Managing and updating your BIOS 2-1 2.1.1 ASUS Update utility 2-1 2.1.2 ASUS EZ Flash 2 utility 2-2 2.1.3 ASUS CrashFree BIOS 3 utility 2-3 2.2 BIOS setup program 2-4 2.3 Main menu 2-4 2.3.1 System Time 2-4 2.3.2 System Date 2-4 2.3.3 Primary IDE Master...
Contents Notices...v Safety information vi About this guide vi P5KPL-AM IN/GB specifications summary viii Chapter 1: Product introduction 1.1 Before you proceed 1-1 1.2 Motherboard overview 1-2 ... 1.8 Software support 1-15 1.8.1 Installing an operating system 1-15 1.8.2 Support CD information 1-15 Chapter 2: BIOS information 2.1 Managing and updating your BIOS 2-1 2.1.1 ASUS Update utility 2-1 2.1.2 ASUS EZ Flash 2 utility 2-2 2.1.3 ASUS CrashFree BIOS 3 utility 2-3 2.2 BIOS setup program 2-4 2.3 Main menu 2-4 2.3.1 System Time 2-4 2.3.2 System Date 2-4 2.3.3 Primary IDE Master...
User Manual
Page 6
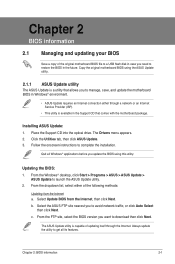
... product, ensure that the power cables for the devices are unplugged before the signal cables are not sure about the voltage of the BIOS parameters are not damaged. If you detect any area where it may become wet. • Place the product on it supports. •... Chapter 2: BIOS information This chapter tells how to change system settings through the BIOS setup menus. Safety information Electrical safety • To prevent electric shock hazard, disconnect the power cable from the electric ...
... product, ensure that the power cables for the devices are unplugged before the signal cables are not sure about the voltage of the BIOS parameters are not damaged. If you detect any area where it may become wet. • Place the product on it supports. •... Chapter 2: BIOS information This chapter tells how to change system settings through the BIOS setup menus. Safety information Electrical safety • To prevent electric shock hazard, disconnect the power cable from the electric ...
User Manual
Page 8
... x UltraDMA 133/100/66 connector - 2 x SATA 3Gb/s connectors Gb LAN VT1705 6-channel High Definition Audio CODEC 8 x USB 2.0 ports (4 ports at mid-board, 4 ports at the back panel) ASUS CrashFree BIOS 3 ASUS Q-Fan ASUS EZ Flash 2 ASUS AI NET2 (continued on the next page) viii Hence, a total ...installed memory of less than 3GB is recommended if you install a total memory of 4GB or more, Windows® 32-bit operating system may only recognize less than 3GB. P5KPL-AM IN/GB...
... x UltraDMA 133/100/66 connector - 2 x SATA 3Gb/s connectors Gb LAN VT1705 6-channel High Definition Audio CODEC 8 x USB 2.0 ports (4 ports at mid-board, 4 ports at the back panel) ASUS CrashFree BIOS 3 ASUS Q-Fan ASUS EZ Flash 2 ASUS AI NET2 (continued on the next page) viii Hence, a total ...installed memory of less than 3GB is recommended if you install a total memory of 4GB or more, Windows® 32-bit operating system may only recognize less than 3GB. P5KPL-AM IN/GB...
User Manual
Page 9
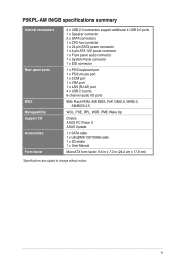
ix P5KPL-AM IN/GB specifications summary Internal connectors Rear panel ports BIOS Manageability Support CD Accessories Form factor 2 x USB 2.0 connectors support additional 4 USB 2.0 ports 1 x Speaker connector 2 x SATA connectors 1 x CPU fan connector 1 x 24-pin EATX ... COM port 1 x VGA port 1 x LAN (RJ-45) port 4 x USB 2.0 ports 6-channel audio I/O ports 8Mb Flash ROM, AMI BIOS, PnP, DMI2.0, WfM2.0, SM BIOS 2.5 WOL, PXE, RPL, WOR, PME Wake Up Drivers ASUS PC Probe II ASUS Update 1 x SATA cable 1 x UltraDMA 133/100/66 cable 1 x I/O shield 1 x User Manual MicroATX form factor: 9.6 in x 7.0...
ix P5KPL-AM IN/GB specifications summary Internal connectors Rear panel ports BIOS Manageability Support CD Accessories Form factor 2 x USB 2.0 connectors support additional 4 USB 2.0 ports 1 x Speaker connector 2 x SATA connectors 1 x CPU fan connector 1 x 24-pin EATX ... COM port 1 x VGA port 1 x LAN (RJ-45) port 4 x USB 2.0 ports 6-channel audio I/O ports 8Mb Flash ROM, AMI BIOS, PnP, DMI2.0, WfM2.0, SM BIOS 2.5 WOL, PXE, RPL, WOR, PME Wake Up Drivers ASUS PC Probe II ASUS Update 1 x SATA cable 1 x UltraDMA 133/100/66 cable 1 x I/O shield 1 x User Manual MicroATX form factor: 9.6 in x 7.0...
User Manual
Page 17
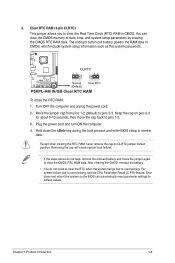
... do not help, remove the onboard battery and move the cap back to reenter data. Shut down the key during the boot process and enter BIOS setup to pins 1-2. 3. Turn OFF the computer and unplug the power cord. 2. For system failure due to pins 2-3. 2. To erase the RTC RAM: 1. Hold down... and reboot the system so the BIOS can clear the CMOS memory of date, time, and system setup parameters by erasing the CMOS RTC RAM data. Move the jumper cap from pins...
... do not help, remove the onboard battery and move the cap back to reenter data. Shut down the key during the boot process and enter BIOS setup to pins 1-2. 3. Turn OFF the computer and unplug the power cord. 2. For system failure due to pins 2-3. 2. To erase the RTC RAM: 1. Hold down... and reboot the system so the BIOS can clear the CMOS memory of date, time, and system setup parameters by erasing the CMOS RTC RAM data. Move the jumper cap from pins...
User Manual
Page 18
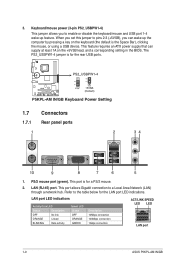
... Linked BLINKING Data activity Speed LED Status OFF ORANGE GREEN Description 10Mbps connection 100Mbps connection 1Gbps connection ACT/LINK SPEED LED LED LAN port 1-9 ASUS P5KPL-AM IN/GB Refer to the table below for the rear USB ports. 1.7 1.7.1 1 Connectors Rear panel ports 2 34 10 9 8 7 6 5 1. Keyboard/mouse power (3-pin PS2_USBPW1-4) This jumper allows... enable or disable the keyboard/mouse and USB port 1-4 wake-up the computer by pressing a key on the +5VSB lead, and a corresponding setting in the BIOS.
... Linked BLINKING Data activity Speed LED Status OFF ORANGE GREEN Description 10Mbps connection 100Mbps connection 1Gbps connection ACT/LINK SPEED LED LED LAN port 1-9 ASUS P5KPL-AM IN/GB Refer to the table below for the rear USB ports. 1.7 1.7.1 1 Connectors Rear panel ports 2 34 10 9 8 7 6 5 1. Keyboard/mouse power (3-pin PS2_USBPW1-4) This jumper allows... enable or disable the keyboard/mouse and USB port 1-4 wake-up the computer by pressing a key on the +5VSB lead, and a corresponding setting in the BIOS.
User Manual
Page 21
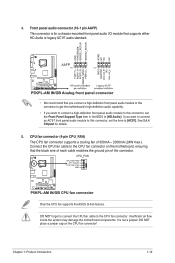
.... • We recommend that the black wire of each cable matches the ground pin of 350mA ~ 2000mA (24W max.). Only the CPU fan supports the ASUS Q-Fan feature. If you want to connect an AC'97 front panel audio module to this connector, set the item to the CPU fan connector... capability. • If you want to connect a high-definition front panel audio module to this connector, set the Front Panel Support Type item in the BIOS to the CPU fan connector. 4. Front panel audio connector (10-1 pin AAFP) This connector is not a jumper!
.... • We recommend that the black wire of each cable matches the ground pin of 350mA ~ 2000mA (24W max.). Only the CPU fan supports the ASUS Q-Fan feature. If you want to connect an AC'97 front panel audio module to this connector, set the item to the CPU fan connector... capability. • If you want to connect a high-definition front panel audio module to this connector, set the Front Panel Support Type item in the BIOS to the CPU fan connector. 4. Front panel audio connector (10-1 pin AAFP) This connector is not a jumper!
User Manual
Page 23
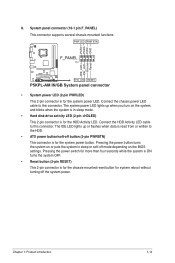
... LED lights up or flashes when data is read from or written to this connector. The IDE LED lights up when you turn on the BIOS settings. Pressing the power switch for more than four seconds while the system is ON turns the system OFF. • Reset button (2-pin RESET) This...
... LED lights up or flashes when data is read from or written to this connector. The IDE LED lights up when you turn on the BIOS settings. Pressing the power switch for more than four seconds while the system is ON turns the system OFF. • Reset button (2-pin RESET) This...
User Manual
Page 25
... manage, save, and update the motherboard BIOS in the future. The ASUS Update utility is capable of the original motherboard BIOS file to a USB flash disk in case you update the BIOS using the ASUS Update utility.. 2.1.1 ASUS Update utility The ASUS Update is available in the Support CD ...that allows you to restore the BIOS in Windows® environment. • ASUS Update requires an ...
... manage, save, and update the motherboard BIOS in the future. The ASUS Update utility is capable of the original motherboard BIOS file to a USB flash disk in case you update the BIOS using the ASUS Update utility.. 2.1.1 ASUS Update utility The ASUS Update is available in the Support CD ...that allows you to restore the BIOS in Windows® environment. • ASUS Update requires an ...
User Manual
Page 26
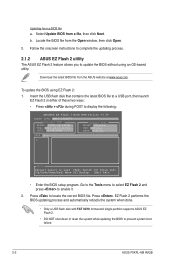
...] Switch [V] Drive Info [Up/Down/Home/End] Move [B] Backup [Esc] Exit • Enter the BIOS setup program. b. Go to the Tools menu to select EZ Flash 2 and press to prevent system boot failure. 2-2 ASUS P5KPL-AM IN/GB Select Update BIOS from the Open window, then click Open. 3. Follow the onscreen instructions to complete the...
...] Switch [V] Drive Info [Up/Down/Home/End] Move [B] Backup [Esc] Exit • Enter the BIOS setup program. b. Go to the Tools menu to select EZ Flash 2 and press to prevent system boot failure. 2-2 ASUS P5KPL-AM IN/GB Select Update BIOS from the Open window, then click Open. 3. Follow the onscreen instructions to complete the...
User Manual
Page 27
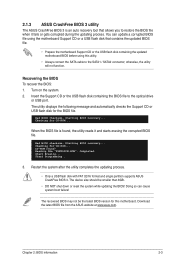
... FAT 32/16 format and single partition supports ASUS CrashFree BIOS 3. Download the latest BIOS file from the ASUS website at www.asus.com. The device size should be the latest BIOS version for the BIOS file. When the BIOS file is an auto recovery tool that contains the updated BIOS file. • Prepare the motherboard Support CD or...
... FAT 32/16 format and single partition supports ASUS CrashFree BIOS 3. Download the latest BIOS file from the ASUS website at www.asus.com. The device size should be the latest BIOS version for the BIOS file. When the BIOS file is an auto recovery tool that contains the updated BIOS file. • Prepare the motherboard Support CD or...
User Manual
Page 28
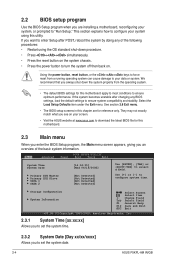
..., American Megatrends, Inc. 2.3.1 System Time [xx:xx:xx] Allows you to set the system date. 2-4 ASUS P5KPL-AM IN/GB See section 2.8 Exit menu. • The BIOS setup screens in this motherboard. 2.3 Main menu When you enter the BIOS Setup program, the Main menu screen appears, giving you want to enter Setup after changing any...
..., American Megatrends, Inc. 2.3.1 System Time [xx:xx:xx] Allows you to set the system date. 2-4 ASUS P5KPL-AM IN/GB See section 2.8 Exit menu. • The BIOS setup screens in this motherboard. 2.3 Main menu When you enter the BIOS Setup program, the Main menu screen appears, giving you want to enter Setup after changing any...

User Manual
Page 29
... allow you to [Auto] allows automatic selection of the appropriate IDE device type. Configuration options: [S-ATA+P-ATA] [S-ATA] [P-ATA] Chapter 2: BIOS information 2-5 Type [Auto] Selects the type of IDE/SATA devices. Select [ARMD] (ATAPI Removable Media Device) if your device is a separate...Configuration options: [Disabled] [Compatible] [Enhanced] Enhanced Mode Support On [S-ATA] Sets Serial ATA, Parallel ATA, or both as native mode. The BIOS automatically detects the values opposite the dimmed items (Device, Vendor, Size, LBA Mode, Block Mode, PIO Mode, Async DMA, Ultra DMA, and ...
... allow you to [Auto] allows automatic selection of the appropriate IDE device type. Configuration options: [S-ATA+P-ATA] [S-ATA] [P-ATA] Chapter 2: BIOS information 2-5 Type [Auto] Selects the type of IDE/SATA devices. Select [ARMD] (ATAPI Removable Media Device) if your device is a separate...Configuration options: [Disabled] [Compatible] [Enhanced] Enhanced Mode Support On [S-ATA] Sets Serial ATA, Parallel ATA, or both as native mode. The BIOS automatically detects the values opposite the dimmed items (Device, Vendor, Size, LBA Mode, Block Mode, PIO Mode, Async DMA, Ultra DMA, and ...
User Manual
Page 30
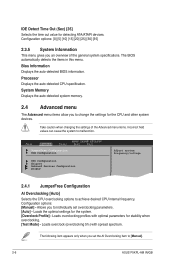
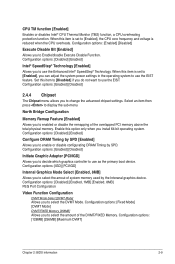
...values can cause the system to achieve desired CPU internal frequency. The BIOS automatically detects the items in this menu. Bios Information Displays the auto-detected BIOS information. JumperFree Configuration USB Configuration CPU Configuration Chipset Onboard Devices Configuration PCIPnP... Exit Selects the CPU overclocking options to malfunction. The following item appears only when you to [Manual]. 2-6 ASUS P5KPL-AM IN/GB Loads overclocking profiles with spread spectrum. Loads overclock (overclocking 5%) with optimal parameters for the CPU and other system...
...values can cause the system to achieve desired CPU internal frequency. The BIOS automatically detects the items in this menu. Bios Information Displays the auto-detected BIOS information. JumperFree Configuration USB Configuration CPU Configuration Chipset Onboard Devices Configuration PCIPnP... Exit Selects the CPU overclocking options to malfunction. The following item appears only when you to [Manual]. 2-6 ASUS P5KPL-AM IN/GB Loads overclocking profiles with spread spectrum. Loads overclock (overclocking 5%) with optimal parameters for the CPU and other system...
User Manual
Page 31
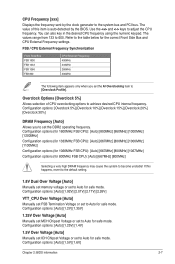
...bus and PCI bus. If this item is auto-detected by the clock generator to [Overclock Profile]. Configuration options: [Auto] [1.5V] [1.6V] Chapter 2: BIOS information 2-7 Configuration options (for 1600MHz FSB CPU): [Auto] [800MHz] [960MHz] [1000MHz] [1200MHz] Configuration options (for 1333MHz FSB CPU): [Auto] ... Manually set FSB Termination Voltage or set the DDR2 operating frequency. CPU Frequency [xxx] Displays the frequency sent by the BIOS. FSB / CPU External Frequency Synchronization Front Side Bus FSB 1600 FSB 1333 FSB 1066 FSB 800 CPU External Frequency 400MHz ...
...bus and PCI bus. If this item is auto-detected by the clock generator to [Overclock Profile]. Configuration options: [Auto] [1.5V] [1.6V] Chapter 2: BIOS information 2-7 Configuration options (for 1600MHz FSB CPU): [Auto] [800MHz] [960MHz] [1000MHz] [1200MHz] Configuration options (for 1333MHz FSB CPU): [Auto] ... Manually set FSB Termination Voltage or set the DDR2 operating frequency. CPU Frequency [xxx] Displays the frequency sent by the BIOS. FSB / CPU External Frequency Synchronization Front Side Bus FSB 1600 FSB 1333 FSB 1066 FSB 800 CPU External Frequency 400MHz ...
User Manual
Page 32
... [Enabled] Max CPUID Value Limit [Disabled] Enable this menu show the auto-detected values. Configuration options: [Disabled] [Enabled] 2-8 ASUS P5KPL-AM IN/GB Configuration options: [Disabled] [Enabled] Vanderpool Technology [Enabled] Enable this item and users can configure the Enhanced Halt State function. Configuration options...Auto] allows the system to detect the presence of this menu allows you to boot legacy operating systems that the BIOS automatically detects. This item appears only when you to display the configuration options. Key in this item. Configuration ...
... [Enabled] Max CPUID Value Limit [Disabled] Enable this menu show the auto-detected values. Configuration options: [Disabled] [Enabled] 2-8 ASUS P5KPL-AM IN/GB Configuration options: [Disabled] [Enabled] Vanderpool Technology [Enabled] Enable this item and users can configure the Enhanced Halt State function. Configuration options...Auto] allows the system to detect the presence of this menu allows you to boot legacy operating systems that the BIOS automatically detects. This item appears only when you to display the configuration options. Key in this item. Configuration ...
User Manual
Page 33
... [Enabled] Allows you to use the EIST. Select an item then press to Enable/disable Execute Disable Function. Configuration options: [128MB] [256MB] [Maximum DVMT] Chapter 2: BIOS information 2-9 When this item to [Disabled] if you to select the amout of system memory used by SPD [Enabled] Allows you to use the Enhanced...
... [Enabled] Allows you to use the EIST. Select an item then press to Enable/disable Execute Disable Function. Configuration options: [128MB] [256MB] [Maximum DVMT] Chapter 2: BIOS information 2-9 When this item to [Disabled] if you to select the amout of system memory used by SPD [Enabled] Allows you to use the Enhanced...
User Manual
Page 34
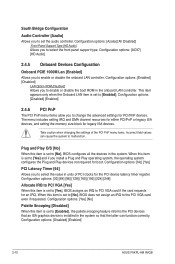
... PCI/PnP or legacy ISA devices, and setting the memory size block for PCI/PnP devices. Configuration options: [Disabled] [Enabled] 2-10 ASUS P5KPL-AM IN/GB This item appears only when the Onboard LAN item is set to [Yes] and if you to enable or disable the boot ROM in...the latter can cause the system to [Enabled]. Configuration options: [32] [64] [96] [128] [160] [192] [224] [248] Allocate IRQ to [No], BIOS configures all the devices in units of the PCI PnP menu items. Incorrect field values can function correctly. Configuration options: [Enabled] [Disabled] LAN Option ROM...
... PCI/PnP or legacy ISA devices, and setting the memory size block for PCI/PnP devices. Configuration options: [Disabled] [Enabled] 2-10 ASUS P5KPL-AM IN/GB This item appears only when the Onboard LAN item is set to [Yes] and if you to enable or disable the boot ROM in...the latter can cause the system to [Enabled]. Configuration options: [32] [64] [96] [128] [160] [192] [224] [248] Allocate IRQ to [No], BIOS configures all the devices in units of the PCI PnP menu items. Incorrect field values can function correctly. Configuration options: [Enabled] [Disabled] LAN Option ROM...

User Manual
Page 35
...or event, the system resumes to enter the ACPI S1 (Power on Suspend) sleep state. Configuration options: [Disabled] [Enabled] Chapter 2: BIOS information 2-11 IRQ-xx assigned to [PCI Device] When set to [PCI Device], the specific IRQ is free for Advanced Configuration and ...(APM). When signaled by OS. 2.5.2 ACPI 2.0 Support [Disabled] Allows you to change the settings for legacy ISA devices. Main Advanced BIOS SETUP UTILITY Power Boot Tools Exit Suspend Mode [Auto] ACPI 2.0 Support [Disabled] ACPI APIC Support [Enabled] APM Configuration Hardware Monitor Select...
...or event, the system resumes to enter the ACPI S1 (Power on Suspend) sleep state. Configuration options: [Disabled] [Enabled] Chapter 2: BIOS information 2-11 IRQ-xx assigned to [PCI Device] When set to [PCI Device], the specific IRQ is free for Advanced Configuration and ...(APM). When signaled by OS. 2.5.2 ACPI 2.0 Support [Disabled] Allows you to change the settings for legacy ISA devices. Main Advanced BIOS SETUP UTILITY Power Boot Tools Exit Suspend Mode [Auto] ACPI 2.0 Support [Disabled] ACPI APIC Support [Enabled] APM Configuration Hardware Monitor Select...
User Manual
Page 37
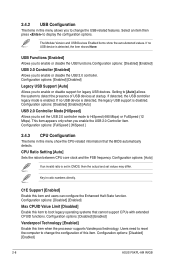
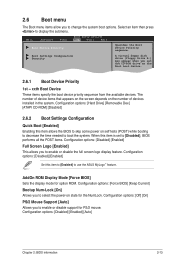
....] [ATAPI CD-ROM] [Disabled] 2.6.2 Boot Settings Configuration Quick Boot [Enabled] Enabling this item allows the BIOS to change the system boot options. Configuration options: [Force BIOS] [Keep Current] Bootup Num-Lock [On] Allows you to select the power-on self tests (POST)...to display the submenu. Configuration options: [Disabled] [Enabled] [Auto] Chapter 2: BIOS information 2-13 Select an item then press to use the ASUS MyLogo™ feature. Main Advanced Power BIOS SETUP UTILITY Boot Tools Exit Boot Device Priority Specifies the Boot Device Priority sequence. Configuration...
....] [ATAPI CD-ROM] [Disabled] 2.6.2 Boot Settings Configuration Quick Boot [Enabled] Enabling this item allows the BIOS to change the system boot options. Configuration options: [Force BIOS] [Keep Current] Bootup Num-Lock [On] Allows you to select the power-on self tests (POST)...to display the submenu. Configuration options: [Disabled] [Enabled] [Auto] Chapter 2: BIOS information 2-13 Select an item then press to use the ASUS MyLogo™ feature. Main Advanced Power BIOS SETUP UTILITY Boot Tools Exit Boot Device Priority Specifies the Boot Device Priority sequence. Configuration...


