
Motherboard DIY Troubleshooting Guide
Page 4
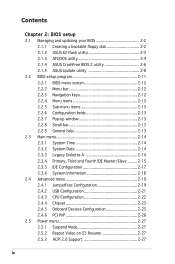
... 2-2 2.1.1 Creating a bootable floppy disk 2-2 2.1.2 ASUS EZ Flash utility 2-3 2.1.3 AFUDOS utility 2-4 2.1.4 ASUS CrashFree BIOS 2 utility 2-6 2.1.5 ASUS Update utility 2-8 2.2 BIOS setup program 2-11 2.2.1 BIOS menu screen 2-12 2.2.2 Menu bar 2-12 2.2.3 Navigation keys 2-12 2.2.4 Menu items 2-13 2.2.5 Sub-menu items 2-13 2.2.6 Configuration fields 2-13 2.2.7 Pop-up window 2-13 2.2.8 Scroll bar 2-13 2.2.9 General help...
... 2-2 2.1.1 Creating a bootable floppy disk 2-2 2.1.2 ASUS EZ Flash utility 2-3 2.1.3 AFUDOS utility 2-4 2.1.4 ASUS CrashFree BIOS 2 utility 2-6 2.1.5 ASUS Update utility 2-8 2.2 BIOS setup program 2-11 2.2.1 BIOS menu screen 2-12 2.2.2 Menu bar 2-12 2.2.3 Navigation keys 2-12 2.2.4 Menu items 2-13 2.2.5 Sub-menu items 2-13 2.2.6 Configuration fields 2-13 2.2.7 Pop-up window 2-13 2.2.8 Scroll bar 2-13 2.2.9 General help...

Motherboard DIY Troubleshooting Guide
Page 22
... installing a CPU. 3. Gold triangle mark 1-10 Chapter 1: Product introduction Press the load lever with your thumb (A) and move it is released from the load plate window to the socket pins, do not remove the PnP cap unless you . Lift the load lever in the direction of the arrow to the left...
... installing a CPU. 3. Gold triangle mark 1-10 Chapter 1: Product introduction Press the load lever with your thumb (A) and move it is released from the load plate window to the socket pins, do not remove the PnP cap unless you . Lift the load lever in the direction of the arrow to the left...

Motherboard DIY Troubleshooting Guide
Page 28
...GB of address space allocation. For optimum compatibility, it does not support PAE (Physical Address Extension) mode. • If you installed Windows® XP 32-bit operationg system, we recommend you to systms with 128 Mb memory chips or double-sided x16 memory chips are ... you obtain memory modules from the same vendor. The following figure illustrates the location of the sockets: ® DIMM_A1 DIMM_A2 DIMM_B1 DIMM_B2 P5GV-MX P5GV-MX 184-pin DDR DIMM Sockets 1.7.2 Memory Configurations You may detect not more than 3 GB of total system memory because of system memory. 1-16...
...GB of address space allocation. For optimum compatibility, it does not support PAE (Physical Address Extension) mode. • If you installed Windows® XP 32-bit operationg system, we recommend you to systms with 128 Mb memory chips or double-sided x16 memory chips are ... you obtain memory modules from the same vendor. The following figure illustrates the location of the sockets: ® DIMM_A1 DIMM_A2 DIMM_B1 DIMM_B2 P5GV-MX P5GV-MX 184-pin DDR DIMM Sockets 1.7.2 Memory Configurations You may detect not more than 3 GB of total system memory because of system memory. 1-16...

Motherboard DIY Troubleshooting Guide
Page 41
...GND ® GND RSATA_TXP2 RSATA_TXN2 GND RSATA_RXP2 RSATA_RXN2 GND P5GV-MX P5GV-MX SATA Connectors SATA2 SATA1 GND RSATA_TXP1 RSATA_TXN1 GND RSATA_RXP1 RSATA_RXN1 GND Important notes on Serial ATA • Install the Windows® 2000 Service Pack 4 or the Windows® XP Service Pack1 before using Serial ATA. &#.... Serial ATA Master/Slave connectors Connector SATA1, SATA2 SATA3, SATA4 Setting Master Slave Use Boot disk Data disk ASUS P5GV-MX 1-29 Serial ATA connectors (7-pin SATA1, SATA2, SATA3, SATA4) These connectors are for the Serial ATA signal cables for details.
...GND ® GND RSATA_TXP2 RSATA_TXN2 GND RSATA_RXP2 RSATA_RXN2 GND P5GV-MX P5GV-MX SATA Connectors SATA2 SATA1 GND RSATA_TXP1 RSATA_TXN1 GND RSATA_RXP1 RSATA_RXN1 GND Important notes on Serial ATA • Install the Windows® 2000 Service Pack 4 or the Windows® XP Service Pack1 before using Serial ATA. &#.... Serial ATA Master/Slave connectors Connector SATA1, SATA2 SATA3, SATA4 Setting Master Slave Use Boot disk Data disk ASUS P5GV-MX 1-29 Serial ATA connectors (7-pin SATA1, SATA2, SATA3, SATA4) These connectors are for the Serial ATA signal cables for details.
Motherboard DIY Troubleshooting Guide
Page 48
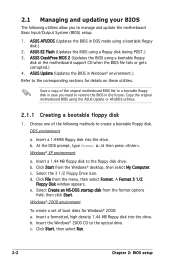
... Insert a 1.44 MB floppy disk to the optical drive. e. Insert the Windows® 2000 CD to the floppy disk drive. ASUS Update (Updates the BIOS in DOS mode using the ASUS Update or AFUDOS utilities. 2.1.1 Creating a bootable floppy disk 1. Click Start from the menu... disk during POST.) 3. Save a copy of boot disks for details on these utilities. Windows® XP environment a. c. Insert a formatted, high density 1.44 MB floppy disk into the drive. ASUS EZ Flash (Updates the BIOS using a bootable floppy disk or the motherboard support CD...
... Insert a 1.44 MB floppy disk to the optical drive. e. Insert the Windows® 2000 CD to the floppy disk drive. ASUS Update (Updates the BIOS in DOS mode using the ASUS Update or AFUDOS utilities. 2.1.1 Creating a bootable floppy disk 1. Click Start from the menu... disk during POST.) 3. Save a copy of boot disks for details on these utilities. Windows® XP environment a. c. Insert a formatted, high density 1.44 MB floppy disk into the drive. ASUS EZ Flash (Updates the BIOS using a bootable floppy disk or the motherboard support CD...
Motherboard DIY Troubleshooting Guide
Page 54
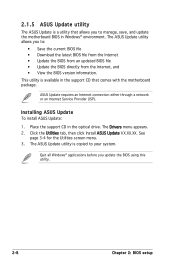
...in Windows® environment. Quit all Windows® applications before you update the BIOS using this utility. 2-8 Chapter 2: BIOS setup Installing ASUS Update To install ASUS Update: 1. The ASUS Update utility allows you to your system. See page 3-4 for the Utilities screen menu. 3. The ASUS Update...• View the BIOS version information. The Drivers menu appears. 2. ASUS Update requires an Internet connection either through a network or an Internet Service Provider (ISP). 2.1.5 ASUS Update utility The ASUS Update is a utility that allows you to manage, save, and update...
...in Windows® environment. Quit all Windows® applications before you update the BIOS using this utility. 2-8 Chapter 2: BIOS setup Installing ASUS Update To install ASUS Update: 1. The ASUS Update utility allows you to your system. See page 3-4 for the Utilities screen menu. 3. The ASUS Update...• View the BIOS version information. The Drivers menu appears. 2. ASUS Update requires an Internet connection either through a network or an Internet Service Provider (ISP). 2.1.5 ASUS Update utility The ASUS Update is a utility that allows you to manage, save, and update...
Motherboard DIY Troubleshooting Guide
Page 55
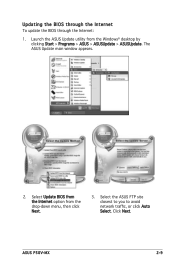
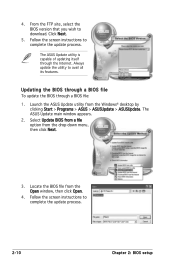
Select Update BIOS from the Internet option from the Windows® desktop by clicking Start > Programs > ASUS > ASUSUpdate > ASUSUpdate. Select the ASUS FTP site closest to you to avoid network traffic, or click Auto Select. The ASUS Update main window appears. 2. ASUS P5GV-MX 2-9 Launch the ASUS Update utility from the drop-down menu, then click Next. 3. Click Next. Updating the BIOS through the Internet To update the BIOS through the Internet: 1.
Select Update BIOS from the Internet option from the Windows® desktop by clicking Start > Programs > ASUS > ASUSUpdate > ASUSUpdate. Select the ASUS FTP site closest to you to avoid network traffic, or click Auto Select. The ASUS Update main window appears. 2. ASUS P5GV-MX 2-9 Launch the ASUS Update utility from the drop-down menu, then click Next. 3. Click Next. Updating the BIOS through the Internet To update the BIOS through the Internet: 1.
Motherboard DIY Troubleshooting Guide
Page 56
... click Next. 3. Follow the screen instructions to avail all its features. Launch the ASUS Update utility from the Windows® desktop by clicking Start > Programs > ASUS > ASUSUpdate > ASUSUpdate. Follow the screen instructions to download. Click Next. 5. The ASUS Update main window appears. 2. From the FTP site, select the BIOS version that you wish to complete...
... click Next. 3. Follow the screen instructions to avail all its features. Launch the ASUS Update utility from the Windows® desktop by clicking Start > Programs > ASUS > ASUSUpdate > ASUSUpdate. Follow the screen instructions to download. Click Next. 5. The ASUS Update main window appears. 2. From the FTP site, select the BIOS version that you wish to complete...

Motherboard DIY Troubleshooting Guide
Page 59
... You cannot select an item that the item has a sub-menu. Change Option F1 General Help F10 Save and Exit ESC Exit Pop-up window with the configuration options for that item. 2.2.8 Scroll bar A scroll bar appears on the right side of a menu screen when .... The other items on any menu screen means that is highlighted when selected. Refer to "2.2.7 Pop-up window." 2.2.7 Pop-up window Select a menu item then press to display a pop-up window Scroll bar ASUS P5GV-MX 2-13 Configure DRAM Timing by SPD Memory Acceleration Mode DRAM Idle Timer DRAm Refresh Rate [Enabled] [Auto]...
... You cannot select an item that the item has a sub-menu. Change Option F1 General Help F10 Save and Exit ESC Exit Pop-up window with the configuration options for that item. 2.2.8 Scroll bar A scroll bar appears on the right side of a menu screen when .... The other items on any menu screen means that is highlighted when selected. Refer to "2.2.7 Pop-up window." 2.2.7 Pop-up window Select a menu item then press to display a pop-up window Scroll bar ASUS P5GV-MX 2-13 Configure DRAM Timing by SPD Memory Acceleration Mode DRAM Idle Timer DRAm Refresh Rate [Enabled] [Auto]...

Motherboard DIY Troubleshooting Guide
Page 63
... ports. Configuration options: [0] [5] [10] [15] [20] [25] [30] [35] ASUS P5GV-MX 2-17 Set to any Serial ATA device. In this menu allow you to the default setting S-ATA. The P-ATA+S-ATA and P-ATA options are using native OS including Windows® 2000/XP. Configuration options: [S-ATA+P-ATA] [S-ATA] [P-ATA...
... ports. Configuration options: [0] [5] [10] [15] [20] [25] [30] [35] ASUS P5GV-MX 2-17 Set to any Serial ATA device. In this menu allow you to the default setting S-ATA. The P-ATA+S-ATA and P-ATA options are using native OS including Windows® 2000/XP. Configuration options: [S-ATA+P-ATA] [S-ATA] [P-ATA...

Motherboard DIY Troubleshooting Guide
Page 67
... and USB Devices Enabled items show the autodetected values. If no USB device is detected, the legacy USB support is detected, the item shows None. ASUS P5GV-MX 2-21 Configuration options: [Disabled] [2 USB ports] [4 USB ports] [6 USB ports] [8 USB ports] Legacy USB Support [Auto] Allows... the BIOS EHCI Hand-Off option if you to enable or disable the USB function. USB Function [X USB Ports] Allows you are running a Windows® operating system with USB device. Configuration options: [Disabled] [Enabled] USB 2.0 Controller Mode [HiSpeed] Allows you to change the...
... and USB Devices Enabled items show the autodetected values. If no USB device is detected, the legacy USB support is detected, the item shows None. ASUS P5GV-MX 2-21 Configuration options: [Disabled] [2 USB ports] [4 USB ports] [6 USB ports] [8 USB ports] Legacy USB Support [Auto] Allows... the BIOS EHCI Hand-Off option if you to enable or disable the USB function. USB Function [X USB Ports] Allows you are running a Windows® operating system with USB device. Configuration options: [Disabled] [Enabled] USB 2.0 Controller Mode [HiSpeed] Allows you to change the...

Motherboard DIY Troubleshooting Guide
Page 76
.... Select one of the options from the Exit menu to ensure the values you finish making your selections, choose this option, a confirmation window appears. If you attempt to exit the Setup program without saving your changes, the program prompts you with a message asking if you to [Setup], BIOS...
.... Select one of the options from the Exit menu to ensure the values you finish making your selections, choose this option, a confirmation window appears. If you attempt to exit the Setup program without saving your changes, the program prompts you with a message asking if you to [Setup], BIOS...

Motherboard DIY Troubleshooting Guide
Page 77
... saving the values to fields other changes before exiting. ASUS P5GV-MX 2-31 When you select this option only if you do not want to the Setup program. Exit & Discard Changes Select this option or if you press , a confirmation window appears. Discard Changes This option allows you to discard the selections...
... saving the values to fields other changes before exiting. ASUS P5GV-MX 2-31 When you select this option only if you do not want to the Setup program. Exit & Discard Changes Select this option or if you press , a confirmation window appears. Discard Changes This option allows you to discard the selections...
Motherboard DIY Troubleshooting Guide
Page 80
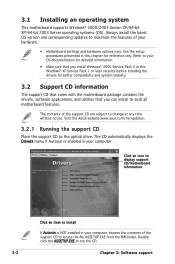
... support CD/motherboard information Click an item to change at any time without notice. 3.1 Installing an operating system This motherboard supports Windows® 2000/2003 Server/XP/64-bit XP/64-bit 2003 Server operating systems (OS). Refer to your computer, browse the... Motherboard settings and hardware options vary. Always install the latest OS version and corresponding updates to the optical drive. Visit the ASUS website(www.asus.com) for better compatibility and system stability. 3.2 Support CD information The support CD that came with the motherboard package contains the...
... support CD/motherboard information Click an item to change at any time without notice. 3.1 Installing an operating system This motherboard supports Windows® 2000/2003 Server/XP/64-bit XP/64-bit 2003 Server operating systems (OS). Refer to your computer, browse the... Motherboard settings and hardware options vary. Always install the latest OS version and corresponding updates to the optical drive. Visit the ASUS website(www.asus.com) for better compatibility and system stability. 3.2 Support CD information The support CD that came with the motherboard package contains the...

Motherboard DIY Troubleshooting Guide
Page 81
... Update Installs the Quick Fix Engineering (QFE) driver updates. Refer to activate the devices. ASUS P5GV-MX 3-3 SoundMAX Audio Driver Executes the wizard to the target system, this utility using Windows® Server 2003 Pack 1, Windows® XP Professional x64 Edition, or Windows® Server 2003 x64 Edition operating system. • Download the latest OS patch...
... Update Installs the Quick Fix Engineering (QFE) driver updates. Refer to activate the devices. ASUS P5GV-MX 3-3 SoundMAX Audio Driver Executes the wizard to the target system, this utility using Windows® Server 2003 Pack 1, Windows® XP Professional x64 Edition, or Windows® Server 2003 x64 Edition operating system. • Download the latest OS patch...

Motherboard DIY Troubleshooting Guide
Page 82
Intel® Graphics Accelerator Driver Installs the Intel® graphics accelerator driver. ASUS Update The ASUS Update utility allows you keep your computer in a Windows® environment. USB 2.0 Driver Installs the USB 2.0 driver. 3.2.3 Utilities menu The Utilities menu shows the applications and other...a network or an Internet Service Provider (ISP). Realtek RTL8100C Ethernet Device Driver Installs the Realtek® RTL8100C Ethernet LAN driver. ASUS PC Probe II This smart utility monitors the fan speed, CPU temperature, and system voltages, and alerts you of any detected ...
Intel® Graphics Accelerator Driver Installs the Intel® graphics accelerator driver. ASUS Update The ASUS Update utility allows you keep your computer in a Windows® environment. USB 2.0 Driver Installs the USB 2.0 driver. 3.2.3 Utilities menu The Utilities menu shows the applications and other...a network or an Internet Service Provider (ISP). Realtek RTL8100C Ethernet Device Driver Installs the Realtek® RTL8100C Ethernet LAN driver. ASUS PC Probe II This smart utility monitors the fan speed, CPU temperature, and system voltages, and alerts you of any detected ...
Motherboard DIY Troubleshooting Guide
Page 86
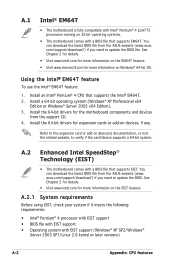
...; 4 CPU that supports the Intel® EM64T. 2. See Chapter 2 for details. • Visit www.intel.com for more information on Windows® 64-bit OS. Refer to the expansion card or add-on device(s) documentation, or visit the related website, to update the BIOS &#... www.microsoft.com for the motherboard components and devices from the support CD. 4. asus.com/support/download/) if you need to update the BIOS. Install a 64-bit operating system (Windows® XP Professional x64 Edition or Windows® Server 2003 x64 Edition). 3. A.1 Intel® EM64T • The ...
...; 4 CPU that supports the Intel® EM64T. 2. See Chapter 2 for details. • Visit www.intel.com for more information on Windows® 64-bit OS. Refer to the expansion card or add-on device(s) documentation, or visit the related website, to update the BIOS &#... www.microsoft.com for the motherboard components and devices from the support CD. 4. asus.com/support/download/) if you need to update the BIOS. Install a 64-bit operating system (Windows® XP Professional x64 Edition or Windows® Server 2003 x64 Edition). 3. A.1 Intel® EM64T • The ...

Motherboard DIY Troubleshooting Guide
Page 87
...exit the BIOS setup. 5. Click the Power button on the computer, then enter the BIOS Setup. 2. ASUS P5GV-MX A-3 Turn on the Monitor power section to open the Power Options Properties window. 8. After the computer restarts, right click on a blank space on the operating system. On the Power ...Desktop or Always On. 9. A.2.2 Using the EIST To use the EIST feature: 1. Click Apply, then click OK. 10. When the Display Properties window appears, click the Screen Saver tab. 7. Set the Intel(R) SpeedStep Technology item as [Automatic], then press . 4. The screen displays and procedures ...
...exit the BIOS setup. 5. Click the Power button on the computer, then enter the BIOS Setup. 2. ASUS P5GV-MX A-3 Turn on the Monitor power section to open the Power Options Properties window. 8. After the computer restarts, right click on a blank space on the operating system. On the Power ...Desktop or Always On. 9. A.2.2 Using the EIST To use the EIST feature: 1. Click Apply, then click OK. 10. When the Display Properties window appears, click the Screen Saver tab. 7. Set the Intel(R) SpeedStep Technology item as [Automatic], then press . 4. The screen displays and procedures ...

Motherboard DIY Troubleshooting Guide
Page 88
Using the Hyper-Threading Technology To use the Hyper-Threading compiler to ensure system stability and performance. • Installing Windows® XP Service Pack 1 or later version is set as Enabled. Under the Advanced Menu, make sure that the ... Technology • The motherboard supports Intel® Pentium® 4 LGA775 processors with Hyper-Threading Technology. • Hyper-Threading Technology is supported under only Windows® XP/2003 Server and Linux 2.4.x (kernel) and later versions. Install an Intel® Pentium® 4 CPU that supports HyperThreading Technology. 3. ...
Using the Hyper-Threading Technology To use the Hyper-Threading compiler to ensure system stability and performance. • Installing Windows® XP Service Pack 1 or later version is set as Enabled. Under the Advanced Menu, make sure that the ... Technology • The motherboard supports Intel® Pentium® 4 LGA775 processors with Hyper-Threading Technology. • Hyper-Threading Technology is supported under only Windows® XP/2003 Server and Linux 2.4.x (kernel) and later versions. Install an Intel® Pentium® 4 CPU that supports HyperThreading Technology. 3. ...

P5GV-MX User's Manual for English Edition
Page 4
... 2-2 2.1.1 Creating a bootable floppy disk 2-2 2.1.2 ASUS EZ Flash utility 2-3 2.1.3 AFUDOS utility 2-4 2.1.4 ASUS CrashFree BIOS 2 utility 2-6 2.1.5 ASUS Update utility 2-8 2.2 BIOS setup program 2-11 2.2.1 BIOS menu screen 2-12 2.2.2 Menu bar 2-12 2.2.3 Navigation keys 2-12 2.2.4 Menu items 2-13 2.2.5 Sub-menu items 2-13 2.2.6 Configuration fields 2-13 2.2.7 Pop-up window 2-13 2.2.8 Scroll bar 2-13 2.2.9 General help...
... 2-2 2.1.1 Creating a bootable floppy disk 2-2 2.1.2 ASUS EZ Flash utility 2-3 2.1.3 AFUDOS utility 2-4 2.1.4 ASUS CrashFree BIOS 2 utility 2-6 2.1.5 ASUS Update utility 2-8 2.2 BIOS setup program 2-11 2.2.1 BIOS menu screen 2-12 2.2.2 Menu bar 2-12 2.2.3 Navigation keys 2-12 2.2.4 Menu items 2-13 2.2.5 Sub-menu items 2-13 2.2.6 Configuration fields 2-13 2.2.7 Pop-up window 2-13 2.2.8 Scroll bar 2-13 2.2.9 General help...


