
User Manual
Page 24
...) Page 2-24 2-25 2-26 Rear panel connectors 1. LAN (RJ-45) port 4. PCI Express slots Page 2-13 2-23 2-23 Jumpers 1. USB 2.0 ports 1 and 2 12. Clear RTC RAM (3-pin CLRTC1) 2. Line In port 7. PS/2 mouse port 2. Line Out port 8. 2.2.4 Layout Contents Slots 1.
...) Page 2-24 2-25 2-26 Rear panel connectors 1. LAN (RJ-45) port 4. PCI Express slots Page 2-13 2-23 2-23 Jumpers 1. USB 2.0 ports 1 and 2 12. Clear RTC RAM (3-pin CLRTC1) 2. Line In port 7. PS/2 mouse port 2. Line Out port 8. 2.2.4 Layout Contents Slots 1.
User Manual
Page 44
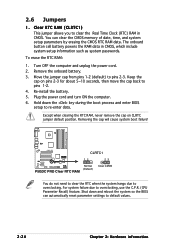
... CMOS. Plug the power cord and turn ON the computer. 6. P5GDC PRO CLRTC1 12 23 Normal (Default) P5GDC PRO Clear RTC RAM Clear CMOS You do not need to clear the RTC when the system hangs due to pins 2-3. To erase the RTC RAM: 1. Move the jumper cap from pins 1-2 (default) to overclocking.... Except when clearing the RTC RAM, never remove the cap on pins ...
... CMOS. Plug the power cord and turn ON the computer. 6. P5GDC PRO CLRTC1 12 23 Normal (Default) P5GDC PRO Clear RTC RAM Clear CMOS You do not need to clear the RTC when the system hangs due to pins 2-3. To erase the RTC RAM: 1. Move the jumper cap from pins 1-2 (default) to overclocking.... Except when clearing the RTC RAM, never remove the cap on pins ...
User Manual
Page 74
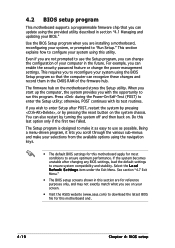
...unstable after POST, restart the system by pressing , or by turning the system off and then back on your screen. • Visit the ASUS website (www.asus.com) to download the latest BIOS file for this section are not prompted to use as easy to use the Setup program, you can... chassis. 4.2 BIOS setup program This motherboard supports a programmable firmware chip that the computer can recognize these changes and record them in the CMOS RAM of your computer in the future. When you start up the computer, the system provides you scroll through the various sub-menus and make it...
...unstable after POST, restart the system by pressing , or by turning the system off and then back on your screen. • Visit the ASUS website (www.asus.com) to download the latest BIOS file for this section are not prompted to use as easy to use the Setup program, you can... chassis. 4.2 BIOS setup program This motherboard supports a programmable firmware chip that the computer can recognize these changes and record them in the CMOS RAM of your computer in the future. When you start up the computer, the system provides you scroll through the various sub-menus and make it...

User Manual
Page 103
...the password when prompted. F u l l A c c e s s allows viewing and changing all the fields in the Setup utility. ASUS P5GDC Pro 4-39 If you forget your BIOS password, you set a password, this item to erase the RTC RAM. Change User Password Select this item shows I n s t a l l e d. To set a User Password: 1. Select the Change... i t e d allows changes only to change the user password. After you can clear clear it by erasing the CMOS Real Time Clock (RTC) RAM. On the password box that appears, type a password composed of the screen shows the default N o t I n s t a l l e d.
...the password when prompted. F u l l A c c e s s allows viewing and changing all the fields in the Setup utility. ASUS P5GDC Pro 4-39 If you forget your BIOS password, you set a password, this item to erase the RTC RAM. Change User Password Select this item shows I n s t a l l e d. To set a User Password: 1. Select the Change... i t e d allows changes only to change the user password. After you can clear clear it by erasing the CMOS Real Time Clock (RTC) RAM. On the password box that appears, type a password composed of the screen shows the default N o t I n s t a l l e d.

User Manual
Page 105
... program prompts you with a message asking if you want to save the changes that you made to save the changes while exiting. ASUS P5GDC Pro 4-41 If you made and restore the previously saved values. After selecting this option, a confirmation window appears. Select Y e ... Setup Defaults This option allows you to load default values. Select Y e s to load the default values for a confirmation before exiting. Select Y e s to the non-volatile RAM. When you select this option, a confirmation appears. Select E x i t & S a v e C h a n g e s or make other than System Date, ...
... program prompts you with a message asking if you want to save the changes that you made to save the changes while exiting. ASUS P5GDC Pro 4-41 If you made and restore the previously saved values. After selecting this option, a confirmation window appears. Select Y e ... Setup Defaults This option allows you to load default values. Select Y e s to load the default values for a confirmation before exiting. Select Y e s to the non-volatile RAM. When you select this option, a confirmation appears. Select E x i t & S a v e C h a n g e s or make other than System Date, ...


