
User Manual
Page 4
Contents 1.11 Software support 1-25 1.11.1 Installing an operating system 1-25 1.11.2 Support DVD information 1-25 Chapter 2: BIOS information 2.1 Managing and updating your BIOS 2-1 2.1.1 ASUS Update utility 2-1 2.1.2 ASUS EZ Flash 2 2-2 2.1.3 ASUS CrashFree BIOS 2-3 2.2 BIOS setup program 2-4 2.2.1 BIOS menu screen 2-5 2.2.2 Menu bar 2-5 2.2.3 Navigation keys 2-6 2.2.4 Menu items 2-6 2.2.5 Submenu items 2-6 2.2.6 Configuration fields 2-6 2.2.7 Pop-up window 2-6 2.2.8 Scroll bar 2-6 2.2.9 General help 2-6 2.3 Main menu 2-7 2.3.1 System Time...
Contents 1.11 Software support 1-25 1.11.1 Installing an operating system 1-25 1.11.2 Support DVD information 1-25 Chapter 2: BIOS information 2.1 Managing and updating your BIOS 2-1 2.1.1 ASUS Update utility 2-1 2.1.2 ASUS EZ Flash 2 2-2 2.1.3 ASUS CrashFree BIOS 2-3 2.2 BIOS setup program 2-4 2.2.1 BIOS menu screen 2-5 2.2.2 Menu bar 2-5 2.2.3 Navigation keys 2-6 2.2.4 Menu items 2-6 2.2.5 Submenu items 2-6 2.2.6 Configuration fields 2-6 2.2.7 Pop-up window 2-6 2.2.8 Scroll bar 2-6 2.2.9 General help 2-6 2.3 Main menu 2-7 2.3.1 System Time...
User Manual
Page 7
...supply is organized This guide contains the following parts: • Chapter 1: Product introduction This chapter describes the features of the BIOS parameters are unplugged. • Seek professional assistance before using an adapter or extension cord. Do not place the product in your... on a stable surface. • If you detect any area where it supports. • Chapter 2: BIOS information This chapter tells how to change system settings through the BIOS Setup menus. If you encounter technical problems with the package. • Before using , contact your dealer immediately....
...supply is organized This guide contains the following parts: • Chapter 1: Product introduction This chapter describes the features of the BIOS parameters are unplugged. • Seek professional assistance before using an adapter or extension cord. Do not place the product in your... on a stable surface. • If you detect any area where it supports. • Chapter 2: BIOS information This chapter tells how to change system settings through the BIOS Setup menus. If you encounter technical problems with the package. • Before using , contact your dealer immediately....
User Manual
Page 26
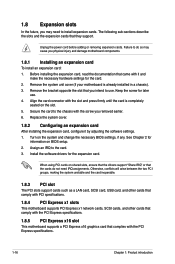
Failure to do not need to use . 4. Turn on BIOS setup. 2. See Chapter 2 for the card. 2. Unplug the power cord before adding or removing expansion cards. Replace the system cover. 1.8.2 Configuring an expansion card After installing ...the expansion card, configure it and make the necessary hardware settings for information on the system and change the necessary BIOS settings, if any. 1.8 Expansion slots In the future, you may cause you intend to install expansion cards. Before installing the expansion card, read the documentation...
Failure to do not need to use . 4. Turn on BIOS setup. 2. See Chapter 2 for the card. 2. Unplug the power cord before adding or removing expansion cards. Replace the system cover. 1.8.2 Configuring an expansion card After installing ...the expansion card, configure it and make the necessary hardware settings for information on the system and change the necessary BIOS settings, if any. 1.8 Expansion slots In the future, you may cause you intend to install expansion cards. Before installing the expansion card, read the documentation...
User Manual
Page 27
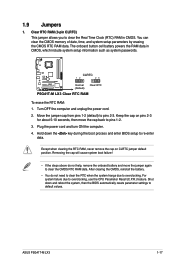
... the cap back to overclocking. Shut down the key during the boot process and enter BIOS setup to overclocking, use the CPU Parameter Recall (C.P.R.) feature. CLRTC 12 23 P5G41T-M LX3 Normal (Default) Clear RTC P5G41T-M LX3 Clear RTC RAM To erase the RTC RAM: 1. Move the jumper cap from pins...Time Clock (RTC) RAM in CMOS, which include system setup information such as system passwords. You can clear the CMOS memory of date, time, and system setup parameters by erasing the CMOS RTC RAM data. ASUS P5G41T-M LX3 1-17 Keep the cap on CLRTC jumper default position. ...
... the cap back to overclocking. Shut down the key during the boot process and enter BIOS setup to overclocking, use the CPU Parameter Recall (C.P.R.) feature. CLRTC 12 23 P5G41T-M LX3 Normal (Default) Clear RTC P5G41T-M LX3 Clear RTC RAM To erase the RTC RAM: 1. Move the jumper cap from pins...Time Clock (RTC) RAM in CMOS, which include system setup information such as system passwords. You can clear the CMOS memory of date, time, and system setup parameters by erasing the CMOS RTC RAM data. ASUS P5G41T-M LX3 1-17 Keep the cap on CLRTC jumper default position. ...
User Manual
Page 30
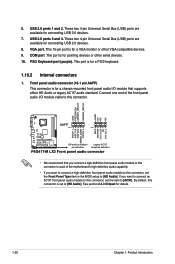
...Front Panel Type item in the BIOS setup to [HD Audio]. PS/2 Keyboard port (purple). GND PRESENCE# SENSE1_RETUR SENSE2_RETUR AGND NC NC NC AAFP PIN 1 PIN 1 MIC2 MICPWR Line out_R NC Line out_L PORT1 L PORT1 R PORT2 R SENSE_SEND PORT2 L P5G41T-M LX3 HD-audio-compliant Legacy AC'97 ...pin definition compliant definition P5G41T-M LX3 Front panel audio connector • We recommend that supports either HD Audio or legacy AC`97 audio standard....
...Front Panel Type item in the BIOS setup to [HD Audio]. PS/2 Keyboard port (purple). GND PRESENCE# SENSE1_RETUR SENSE2_RETUR AGND NC NC NC AAFP PIN 1 PIN 1 MIC2 MICPWR Line out_R NC Line out_L PORT1 L PORT1 R PORT2 R SENSE_SEND PORT2 L P5G41T-M LX3 HD-audio-compliant Legacy AC'97 ...pin definition compliant definition P5G41T-M LX3 Front panel audio connector • We recommend that supports either HD Audio or legacy AC`97 audio standard....
User Manual
Page 38
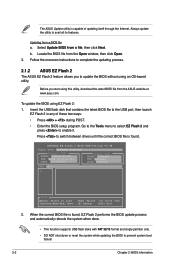
... the BIOS to complete the updating process. 2.1.2 ASUS EZ Flash 2 The ASUS EZ Flash 2 feature allows you start using EZ Flash 2: 1. Locate the BIOS file from the ASUS website at www.asus.com. ASUSTek EZ Flash 2 BIOS ROM Utility V3.44 FLASH TYPE: WINBOND W25X/Q80 Current ROM BOARD: P5G41T-M LX3 VER:... Move [Tab] Switch [V] Drive Info [B] Backup [ESC] Exit 2. Follow the onscreen instructions to prevent system boot failure! 2-2 Chapter 2: BIOS information The ASUS Update utility is capable of these two ways: • Press + during POST. • Enter the BIOS setup program.
... the BIOS to complete the updating process. 2.1.2 ASUS EZ Flash 2 The ASUS EZ Flash 2 feature allows you start using EZ Flash 2: 1. Locate the BIOS file from the ASUS website at www.asus.com. ASUSTek EZ Flash 2 BIOS ROM Utility V3.44 FLASH TYPE: WINBOND W25X/Q80 Current ROM BOARD: P5G41T-M LX3 VER:... Move [Tab] Switch [V] Drive Info [B] Backup [ESC] Exit 2. Follow the onscreen instructions to prevent system boot failure! 2-2 Chapter 2: BIOS information The ASUS Update utility is capable of these two ways: • Press + during POST. • Enter the BIOS setup program.

User Manual
Page 39
... details. Doing so can restore a corrupted BIOS file using the motherboard support DVD or a removable device that contains the BIOS file to the USB port. 3. ASUS P5G41T-M LX3 2-3 Download the latest BIOS file from the ASUS website at www.asus.com. • The removable devices that ...2. Select the Load Setup Defaults item under the Exit menu. 2.1.3 ASUS CrashFree BIOS The ASUS CrashFree BIOS is an auto recovery tool that ASUS CrashFree BIOS support vary with motherboard models. Ensure to load the BIOS default settings to section 2.8 Exit menu for the BIOS file. Turn on ...
... details. Doing so can restore a corrupted BIOS file using the motherboard support DVD or a removable device that contains the BIOS file to the USB port. 3. ASUS P5G41T-M LX3 2-3 Download the latest BIOS file from the ASUS website at www.asus.com. • The removable devices that ...2. Select the Load Setup Defaults item under the Exit menu. 2.1.3 ASUS CrashFree BIOS The ASUS CrashFree BIOS is an auto recovery tool that ASUS CrashFree BIOS support vary with motherboard models. Ensure to load the BIOS default settings to section 2.8 Exit menu for the BIOS file. Turn on ...

User Manual
Page 40
... properly from a running operating system can cause damage to guide you do not press , POST continues with its parameters. Entering BIOS Setup at startup To enter BIOS Setup at www.asus.com to enter BIOS Setup using the BIOS Setup program. If the system becomes unstable after POST: • Press ++ simultaneously. • Press the reset button on the system...
... properly from a running operating system can cause damage to guide you do not press , POST continues with its parameters. Entering BIOS Setup at startup To enter BIOS Setup at www.asus.com to enter BIOS Setup using the BIOS Setup program. If the system becomes unstable after POST: • Press ++ simultaneously. • Press the reset button on the system...

User Manual
Page 41
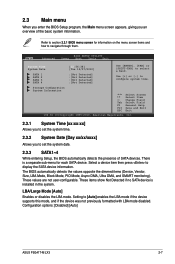
.... Submenu items Navigation keys 2.2.2 Menu bar The menu bar on the keyboard until the desired item is highlighted. 2.2.1 BIOS menu screen Menu items Menu bar Main Advanced Power Configuration fields BIOS SETUP UTILITY Boot Tools Exit System Time [00:31:48] System Date [Tue 12/07/2010] SATA 1 :[Not Detected... For changing the advanced power management (APM) configuration. Boot For changing the system boot configuration. Storage Configuration System Information Select Screen Select Item +- ASUS P5G41T-M LX3 2-5 Advanced For changing the advanced system settings.
.... Submenu items Navigation keys 2.2.2 Menu bar The menu bar on the keyboard until the desired item is highlighted. 2.2.1 BIOS menu screen Menu items Menu bar Main Advanced Power Configuration fields BIOS SETUP UTILITY Boot Tools Exit System Time [00:31:48] System Date [Tue 12/07/2010] SATA 1 :[Not Detected... For changing the advanced power management (APM) configuration. Boot For changing the system boot configuration. Storage Configuration System Information Select Screen Select Item +- ASUS P5G41T-M LX3 2-5 Advanced For changing the advanced system settings.

User Manual
Page 42
To change the settings. Main Advanced BIOS SETUP UTILITY Power Boot Tools Exit Suspend Mode ACPI 2.0 Support ACPI APIC support APM Configuration Hardware Monitor [Auto] [Disabled] [EDniOsapabtbilloendesd] Enabled Use [ENTER], [TAB] or [SHIFT-... A scroll bar appears on the screen. 2.2.9 General help At the top right corner of the menu screen is a brief description of the selected item. 2-6 Chapter 2: BIOS information For example, selecting Main shows the Main menu items. The other items on the right side of a menu screen when there Select Screen Select...
To change the settings. Main Advanced BIOS SETUP UTILITY Power Boot Tools Exit Suspend Mode ACPI 2.0 Support ACPI APIC support APM Configuration Hardware Monitor [Auto] [Disabled] [EDniOsapabtbilloendesd] Enabled Use [ENTER], [TAB] or [SHIFT-... A scroll bar appears on the screen. 2.2.9 General help At the top right corner of the menu screen is a brief description of the selected item. 2-6 Chapter 2: BIOS information For example, selecting Main shows the Main menu items. The other items on the right side of a menu screen when there Select Screen Select...
User Manual
Page 43
.... 2.3.3 SATA1~4 While entering Setup, the BIOS automatically detects the presence of the basic system information. There is installed in the system. Select a device item then press to configure system time. Configuration options: [Disabled] [Auto] ASUS P5G41T-M LX3 2-7 Use [+] or [-] ...to display the SATA device information. LBA/Large Mode [Auto] Enables or disables the LBA mode. The BIOS automatically detects the values opposite the dimmed items (Device, Vendor,...
.... 2.3.3 SATA1~4 While entering Setup, the BIOS automatically detects the presence of the basic system information. There is installed in the system. Select a device item then press to configure system time. Configuration options: [Disabled] [Auto] ASUS P5G41T-M LX3 2-7 Use [+] or [-] ...to display the SATA device information. LBA/Large Mode [Auto] Enables or disables the LBA mode. The BIOS automatically detects the values opposite the dimmed items (Device, Vendor,...
User Manual
Page 45
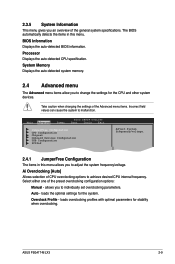
... the system to individually set overclocking parameters. allows you to achieve desired CPU internal frequency. loads overclocking profiles with optimal parameters for the system. ASUS P5G41T-M LX3 2-9 Main Advanced Power BIOS SETUP UTILITY Boot Tools Exit JumperFree Configuration CPU Configuration Chipset Onboard Devices Configuration USB Configuration PCIPnP Adjust System frequency/voltage. 2.4.1 JumperFree Configuration The items...
... the system to individually set overclocking parameters. allows you to achieve desired CPU internal frequency. loads overclocking profiles with optimal parameters for the system. ASUS P5G41T-M LX3 2-9 Main Advanced Power BIOS SETUP UTILITY Boot Tools Exit JumperFree Configuration CPU Configuration Chipset Onboard Devices Configuration USB Configuration PCIPnP Adjust System frequency/voltage. 2.4.1 JumperFree Configuration The items...

User Manual
Page 51
.... Main Advanced Power BIOS SETUP UTILITY Boot Tools Exit Suspend Mode [Auto] ACPI 2.0 Support [Enabled] ACPI APIC Support [Enabled] APM Configuration Hardware Monitor Select the ACPI state used for System Suspend. 2.5.1 Suspend Mode [Auto] Allows you to change the settings for the Advanced Power Management (APM). Configuration options: [Disabled] [Enabled] ASUS P5G41T-M LX3 2-15 Take...
.... Main Advanced Power BIOS SETUP UTILITY Boot Tools Exit Suspend Mode [Auto] ACPI 2.0 Support [Enabled] ACPI APIC Support [Enabled] APM Configuration Hardware Monitor Select the ACPI state used for System Suspend. 2.5.1 Suspend Mode [Auto] Allows you to change the settings for the Advanced Power Management (APM). Configuration options: [Disabled] [Enabled] ASUS P5G41T-M LX3 2-15 Take...

User Manual
Page 53
Select an item then press to disable or set the CPU fan warning speed. Main Advanced Power BIOS SETUP UTILITY Boot Tools Exit Boot Settings Boot Device Priority Boot Settings Configuration Security Specifies the Boot Device Priority sequence. Configuration ...Optimal Mode] This item appears only when you enable the CPU Q-Fan Control feature and allows you to [Disabled], BIOS performs all the POST items. Configuration options: [Disabled] [Enabled] ASUS P5G41T-M LX3 2-17 Configuration options: [Removable Dev.] [Hard Drive] [ATAPI CD-ROM] [Disabled] • To select the ...
Select an item then press to disable or set the CPU fan warning speed. Main Advanced Power BIOS SETUP UTILITY Boot Tools Exit Boot Settings Boot Device Priority Boot Settings Configuration Security Specifies the Boot Device Priority sequence. Configuration ...Optimal Mode] This item appears only when you enable the CPU Q-Fan Control feature and allows you to [Disabled], BIOS performs all the POST items. Configuration options: [Disabled] [Enabled] ASUS P5G41T-M LX3 2-17 Configuration options: [Removable Dev.] [Hard Drive] [ATAPI CD-ROM] [Disabled] • To select the ...

User Manual
Page 54
...options: [Disabled] [Enabled] Set this item to set to [Enabled], the system displays the message Press DEL to run Setup during POST. After you set your BIOS password, you to select the power-on state for option ROM. If you successfully set a password, this item shows ...the default Not Installed. The Supervisor Password item on how to erase the RTC RAM. 2-18 Chapter 2: BIOS information Change Supervisor Password Select this item to [Enabled] to use the ASUS MyLogo2™ feature. Full Screen Logo [Enabled] This allows you to change the supervisor password. Configuration ...
...options: [Disabled] [Enabled] Set this item to set to [Enabled], the system displays the message Press DEL to run Setup during POST. After you set your BIOS password, you to select the power-on state for option ROM. If you successfully set a password, this item shows ...the default Not Installed. The Supervisor Password item on how to erase the RTC RAM. 2-18 Chapter 2: BIOS information Change Supervisor Password Select this item to [Enabled] to use the ASUS MyLogo2™ feature. Full Screen Logo [Enabled] This allows you to change the supervisor password. Configuration ...

User Manual
Page 55
... Change User Password Select this item to clear the user password. Password Check [Setup] When set a supervisor password, the other security settings. After you have set to [Setup], BIOS checks for user password both , then press . 3. allows access but does not...the user password, follow the same steps in setting a user password. To change to set a User Password: 1. Configuration options: [Setup] [Always] ASUS P5G41T-M LX3 2-19 Select the Change User Password item and press . 2. Confirm the password when prompted. Clear User Password Select this item to ...
... Change User Password Select this item to clear the user password. Password Check [Setup] When set a supervisor password, the other security settings. After you have set to [Setup], BIOS checks for user password both , then press . 3. allows access but does not...the user password, follow the same steps in setting a user password. To change to set a User Password: 1. Configuration options: [Setup] [Always] ASUS P5G41T-M LX3 2-19 Select the Change User Password item and press . 2. Confirm the password when prompted. Clear User Password Select this item to ...

User Manual
Page 56
Main Advanced Power ASUS EZ Flash 2 BIOS SETUP UTILITY Boot Tools Exit Press ENTER to run ASUS EZ Flash 2. 2.7 Tools menu The Tools menu items allow you press , a confirmation message appears. When you to select and update BIOS. Select an item then press to confirm your choice. This utility supports 1.FAT 12.../16/32 (r/w) 2.NTFS (read only) 3.CD-DISC (read only) ASUS EZ Flash 2 Allows you to run the utility to configure options for details. 2-20 Chapter 2: BIOS information Use the left/right arrow key to select between [Yes] or [No], then press to...
Main Advanced Power ASUS EZ Flash 2 BIOS SETUP UTILITY Boot Tools Exit Press ENTER to run ASUS EZ Flash 2. 2.7 Tools menu The Tools menu items allow you press , a confirmation message appears. When you to select and update BIOS. Select an item then press to confirm your choice. This utility supports 1.FAT 12.../16/32 (r/w) 2.NTFS (read only) 3.CD-DISC (read only) ASUS EZ Flash 2 Allows you to run the utility to configure options for details. 2-20 Chapter 2: BIOS information Use the left/right arrow key to select between [Yes] or [No], then press to...

User Manual
Page 57
...11Sn11Sn0Ct0CeeorSSCGSEf eeheaxtSSGGSEhllanvieeoeaxeeeneetllnviccgroeeteettteaapccorlntttaaioSIOdSlnnctpHSIudsreteEctbHemilxfre-eEreopioemslxnntmecpinrtteheisn Once you are finished making your changes to the BIOS items. Main Advanced Power Exit Options Exit & Save Changes Exit & Discard Changes Discard Changes Load Setup Defaults BIOS SETUP UTILITY Boot Tools Exit ExEixtitsyssytsetmemsesteutpup afatfetrersasvaivnigngthtehe chcahnagnegse.s. Select Exit & Save... window appears. Select OK to discard any changes and load the previously saved values. ASUS P5G41T-M LX3 2-21
...11Sn11Sn0Ct0CeeorSSCGSEf eeheaxtSSGGSEhllanvieeoeaxeeeneetllnviccgroeeteettteaapccorlntttaaioSIOdSlnnctpHSIudsreteEctbHemilxfre-eEreopioemslxnntmecpinrtteheisn Once you are finished making your changes to the BIOS items. Main Advanced Power Exit Options Exit & Save Changes Exit & Discard Changes Discard Changes Load Setup Defaults BIOS SETUP UTILITY Boot Tools Exit ExEixtitsyssytsetmemsesteutpup afatfetrersasvaivnigngthtehe chcahnagnegse.s. Select Exit & Save... window appears. Select OK to discard any changes and load the previously saved values. ASUS P5G41T-M LX3 2-21


