
User Manual
Page 11
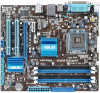
... Product introduction 1.1 Welcome! This motherboard also supports Intel® CPUs in the long line of ASUS quality motherboards! Before you for buying an ASUS® P5G41C-M LX motherboard! The motherboard delivers a host of the above items is damaged or missing, contact your ... which are excellent for the following items. Motherboard Cables Accessories Application DVD Documentation ASUS P5G41C-M LX motherboard 2 x Serial ATA cables 1 x Ultra DMA 133/100/66 cable 1 x I/O shield ASUS motherboard support DVD User Manual If any of new features and latest technologies, making...
... Product introduction 1.1 Welcome! This motherboard also supports Intel® CPUs in the long line of ASUS quality motherboards! Before you for buying an ASUS® P5G41C-M LX motherboard! The motherboard delivers a host of the above items is damaged or missing, contact your ... which are excellent for the following items. Motherboard Cables Accessories Application DVD Documentation ASUS P5G41C-M LX motherboard 2 x Serial ATA cables 1 x Ultra DMA 133/100/66 cable 1 x I/O shield ASUS motherboard support DVD User Manual If any of new features and latest technologies, making...

User Manual
Page 13
... drives with the European Union's Restriction on the system configuration. • ASUS Express Gate supports file uploading from SATA HDDs, ODDs and USB drives. ASUS AI NET2 ASUS AI NET2 remotely detects the cable connection immediately after turning on your screen. ASUS P5G41C-M LX 1-3 feature automatically restores the CPU default settings when the system hangs due...
... drives with the European Union's Restriction on the system configuration. • ASUS Express Gate supports file uploading from SATA HDDs, ODDs and USB drives. ASUS AI NET2 ASUS AI NET2 remotely detects the cable connection immediately after turning on your screen. ASUS P5G41C-M LX 1-3 feature automatically restores the CPU default settings when the system hangs due...

User Manual
Page 15
... in the image below. 1.5.2 Screw holes Place six screws into the chassis in the correct orientation. Place this side towards the rear of the chassis P5G41C-M LX ASUS P5G41C-M LX 1-5 Do not overtighten the screws! Ensure that you unplug the power cord before installing or removing the motherboard. Doing so can cause you physical injury...
... in the image below. 1.5.2 Screw holes Place six screws into the chassis in the correct orientation. Place this side towards the rear of the chassis P5G41C-M LX ASUS P5G41C-M LX 1-5 Do not overtighten the screws! Ensure that you unplug the power cord before installing or removing the motherboard. Doing so can cause you physical injury...

User Manual
Page 17
... with the Intel® Enhanced Intel SpeedStep® Technology (EIST) and Hyper-Threading Technology. 1.6.1 Installing the CPU To install a CPU: 1. P5G41C-M LX P5G41C-M LX CPU socket 775 Before installing the CPU, ensure that the PnP cap is on the LGA775 socket. • The product warranty does not cover ... damage to the socket contacts resulting from incorrect CPU installation/removal, or misplacement/loss/incorrect removal of the PnP cap. ASUS P5G41C-M LX 1-7 ASUS will shoulder the cost of repair only if the damage is missing, or if you and the load lever is on the motherboard...
... with the Intel® Enhanced Intel SpeedStep® Technology (EIST) and Hyper-Threading Technology. 1.6.1 Installing the CPU To install a CPU: 1. P5G41C-M LX P5G41C-M LX CPU socket 775 Before installing the CPU, ensure that the PnP cap is on the LGA775 socket. • The product warranty does not cover ... damage to the socket contacts resulting from incorrect CPU installation/removal, or misplacement/loss/incorrect removal of the PnP cap. ASUS P5G41C-M LX 1-7 ASUS will shoulder the cost of repair only if the damage is missing, or if you and the load lever is on the motherboard...

User Manual
Page 19
... that the heatsink will be in an even thin layer. To prevent contaminating the paste, DO NOT spread the paste with pre-applied thermal paste. B ASUS P5G41C-M LX 1-9 Close the load plate (A), then push the load lever (B) until it is spread in contact with, ensuring that it snaps into your eyes or touches...
... that the heatsink will be in an even thin layer. To prevent contaminating the paste, DO NOT spread the paste with pre-applied thermal paste. B ASUS P5G41C-M LX 1-9 Close the load plate (A), then push the load lever (B) until it is spread in contact with, ensuring that it snaps into your eyes or touches...

User Manual
Page 21
... CPU FAN IN CPU FAN PWR GND P5G41C-M LX P5G41C-M LX CPU fan connector Do not forget to disengage the heatsink and fan assembly from the connector on the motherboard labeled CPU_FAN. Pull up two fasteners at a time in a diagonal sequence to connect the CPU fan connector! A A B B B A B A ASUS P5G41C-M LX 1-11 Disconnect the CPU fan cable from...
... CPU FAN IN CPU FAN PWR GND P5G41C-M LX P5G41C-M LX CPU fan connector Do not forget to disengage the heatsink and fan assembly from the connector on the motherboard labeled CPU_FAN. Pull up two fasteners at a time in a diagonal sequence to connect the CPU fan connector! A A B B B A B A ASUS P5G41C-M LX 1-11 Disconnect the CPU fan cable from...

User Manual
Page 23
... excess memory from a memory module. Use a maximum of the lower-sized channel for single-channel operation. • Always install DIMMs with the same CAS latency. P5G41C-M LX Motherboard Qualified Vendors Lists (QVL) DDR3-1066 MHz capability Vendor Part No. Size SS/ DS Chip Brand Chip NO. The system maps the total size... 2048MB DS - - 7-7-7-20 - • • Elixir M2Y2G64CBHC9N-BE 2048MB DS Elixir - - - • • Kingtiger 2GB DIMM PC3-8500 2048MB DS Hynix H5TQ1G83AFP G7C - - • • ASUS P5G41C-M LX 1-13
... excess memory from a memory module. Use a maximum of the lower-sized channel for single-channel operation. • Always install DIMMs with the same CAS latency. P5G41C-M LX Motherboard Qualified Vendors Lists (QVL) DDR3-1066 MHz capability Vendor Part No. Size SS/ DS Chip Brand Chip NO. The system maps the total size... 2048MB DS - - 7-7-7-20 - • • Elixir M2Y2G64CBHC9N-BE 2048MB DS Elixir - - - • • Kingtiger 2GB DIMM PC3-8500 2048MB DS Hynix H5TQ1G83AFP G7C - - • • ASUS P5G41C-M LX 1-13

User Manual
Page 25
...-DJ-E - N2CB1680AN-C6 - 9 - 7-7-7-20 1.5V 8-8-8-24 1.5V 7-7-7-20 1.5V 8-8-8-24 1.5V 8-8-8-24 1.5V • • • • • • • • • • • • ASUS P5G41C-M LX 1-15 OCZ OCZ3P13334GK OCZ OCZ3P1333LV4GK OCZ OCZ OCZ OCZ OCZ OCZ PSC PSC SAMSUNG OCZ3P1333LV4GK OCZ3RPX1333EB4GK OCZ3X13334GK(XMP) OCZ3G1333LV6GK OCZ3P1333LV6GK OCZ3X1333LV6GK(XMP) AL7F8G73D-DG1 AL8F8G73D...
...-DJ-E - N2CB1680AN-C6 - 9 - 7-7-7-20 1.5V 8-8-8-24 1.5V 7-7-7-20 1.5V 8-8-8-24 1.5V 8-8-8-24 1.5V • • • • • • • • • • • • ASUS P5G41C-M LX 1-15 OCZ OCZ3P13334GK OCZ OCZ3P1333LV4GK OCZ OCZ OCZ OCZ OCZ OCZ PSC PSC SAMSUNG OCZ3P1333LV4GK OCZ3RPX1333EB4GK OCZ3X13334GK(XMP) OCZ3G1333LV6GK OCZ3P1333LV6GK OCZ3X1333LV6GK(XMP) AL7F8G73D-DG1 AL8F8G73D...

User Manual
Page 27
... 5 - • • Transced TQ243PCF8 5 - • • Elpida E1108ACBG-8E-E 5 - • • V-Data VD29608A8A-25EG20813 - - • • Samsung K4T51083QE - - • • Hynix H5PS1G83EFRS6C 852AK - - • • ASUS P5G41C-M LX 1-17 DDR2-800 MHz capability Vendor Part No.
... 5 - • • Transced TQ243PCF8 5 - • • Elpida E1108ACBG-8E-E 5 - • • V-Data VD29608A8A-25EG20813 - - • • Samsung K4T51083QE - - • • Hynix H5PS1G83EFRS6C 852AK - - • • ASUS P5G41C-M LX 1-17 DDR2-800 MHz capability Vendor Part No.

User Manual
Page 29
... damaging the DIMM. 3. Locked Retaining Clip 1.7.4 Removing a DIMM To remove a DIMM: 1. Press the retaining clips outward to both the motherboard and the components. DIMM notch ASUS P5G41C-M LX 1-19 Firmly insert the DIMM into a socket in only one direction.
... damaging the DIMM. 3. Locked Retaining Clip 1.7.4 Removing a DIMM To remove a DIMM: 1. Press the retaining clips outward to both the motherboard and the components. DIMM notch ASUS P5G41C-M LX 1-19 Firmly insert the DIMM into a socket in only one direction.

User Manual
Page 31
...system setup information such as system passwords. Clear RTC RAM (3-pin CLRTC) This jumper allows you to pins 1-2. 3. CLRTC 12 23 P5G41C-M LX Normal (Default) Clear RTC P5G41C-M LX Clear RTC RAM To erase the RTC RAM: 1. Plug the power cord and turn ON the computer. 4. Shut down the key ... the cap on pins 2-3 for about 5-10 seconds, then move the jumper again to default values. For system failure due to pins 2-3. ASUS P5G41C-M LX 1-21 Hold down and reboot the system, then the BIOS automatically resets parameter settings to clear the CMOS RTC RAM data. You can clear ...
...system setup information such as system passwords. Clear RTC RAM (3-pin CLRTC) This jumper allows you to pins 1-2. 3. CLRTC 12 23 P5G41C-M LX Normal (Default) Clear RTC P5G41C-M LX Clear RTC RAM To erase the RTC RAM: 1. Plug the power cord and turn ON the computer. 4. Shut down the key ... the cap on pins 2-3 for about 5-10 seconds, then move the jumper again to default values. For system failure due to pins 2-3. ASUS P5G41C-M LX 1-21 Hold down and reboot the system, then the BIOS automatically resets parameter settings to clear the CMOS RTC RAM data. You can clear ...

User Manual
Page 33
... port allows Gigabit connection to a headphone or a speaker. Refer to support 8-channel audio output. This port connects to a Local Area Network (LAN) through a network hub. ASUS P5G41C-M LX 1-23 LAN (RJ-45) port. Line In port (light blue). This port connects to a microphone. 1.10 Connectors 1.10.1 Rear panel connectors 1 2 3 45 11 10 9 8 7 6 1. PS...
... port allows Gigabit connection to a headphone or a speaker. Refer to support 8-channel audio output. This port connects to a Local Area Network (LAN) through a network hub. ASUS P5G41C-M LX 1-23 LAN (RJ-45) port. Line In port (light blue). This port connects to a microphone. 1.10 Connectors 1.10.1 Rear panel connectors 1 2 3 45 11 10 9 8 7 6 1. PS...

User Manual
Page 35
... IDE ribbon cable to match the covered hole on the Ultra DMA cable connector. PRI_IDE PIN1 P5G41C-M LX NOTE:Orient the red markings on each Ultra DMA 100/66/33 signal cable: blue, black, and gray. P5G41C-M LX IDE connector If any device jumper is for Ultra DMA 100/66/33 IDE devices. ASUS P5G41C-M LX 1-25
... IDE ribbon cable to match the covered hole on the Ultra DMA cable connector. PRI_IDE PIN1 P5G41C-M LX NOTE:Orient the red markings on each Ultra DMA 100/66/33 signal cable: blue, black, and gray. P5G41C-M LX IDE connector If any device jumper is for Ultra DMA 100/66/33 IDE devices. ASUS P5G41C-M LX 1-25

User Manual
Page 37
... DMA133). The Serial ATA 3Gb/s is backward compatible with USB 2.0 specification that supports up to 480 Mbps connection speed. P5G41C-M LX SATA1 SATA2 SATA3 SATA4 GND RSATA_RXN1 RSATA_RXP1 GND RSATA_TXN1 RSATA_TXP1 GND GND RSATA_RXN2 RSATA_RXP2 GND RSATA_TXN2 RSATA_TXP2 GND GND RSATA_RXN3 RSATA_RXP3 GND... 1.5Gb/s specification. Connect the USB module cable to any of these connectors, then install the module to the USB connectors. ASUS P5G41C-M LX 1-27 The data transfer rate of the system chassis. Serial ATA connectors (7-pin SATA1-4) These connectors are for Serial ATA 3Gb...
... DMA133). The Serial ATA 3Gb/s is backward compatible with USB 2.0 specification that supports up to 480 Mbps connection speed. P5G41C-M LX SATA1 SATA2 SATA3 SATA4 GND RSATA_RXN1 RSATA_RXP1 GND RSATA_TXN1 RSATA_TXP1 GND GND RSATA_RXN2 RSATA_RXP2 GND RSATA_TXN2 RSATA_TXP2 GND GND RSATA_RXN3 RSATA_RXP3 GND... 1.5Gb/s specification. Connect the USB module cable to any of these connectors, then install the module to the USB connectors. ASUS P5G41C-M LX 1-27 The data transfer rate of the system chassis. Serial ATA connectors (7-pin SATA1-4) These connectors are for Serial ATA 3Gb...

User Manual
Page 39
... connector. Speaker connector (4-pin SPEAKER) This 4-pin connector is for the chassis-mounted reset button for the system power LED. SPEAKER P5G41C-M LX PIN 1 P5G41C-M LX Speaker Out Connector +5V GND GND Speaker Out ASUS P5G41C-M LX 1-29 Connect the chassis power LED cable to the HDD. • ATX power button/soft-off the system power. 9. PLED...
... connector. Speaker connector (4-pin SPEAKER) This 4-pin connector is for the chassis-mounted reset button for the system power LED. SPEAKER P5G41C-M LX PIN 1 P5G41C-M LX Speaker Out Connector +5V GND GND Speaker Out ASUS P5G41C-M LX 1-29 Connect the chassis power LED cable to the HDD. • ATX power button/soft-off the system power. 9. PLED...

User Manual
Page 41
... the BIOS in the optical drive. The Drivers menu appears. 2. Follow the onscreen instructions to launch the ASUS Update utility. 2. From the FTP site, select the BIOS version that comes with the motherboard package. ASUS P5G41C-M LX 2-1 b. Place the support DVD in the future. Copy the original motherboard BIOS using this utility. Updating the...
... the BIOS in the optical drive. The Drivers menu appears. 2. Follow the onscreen instructions to launch the ASUS Update utility. 2. From the FTP site, select the BIOS version that comes with the motherboard package. ASUS P5G41C-M LX 2-1 b. Place the support DVD in the future. Copy the original motherboard BIOS using this utility. Updating the...

User Manual
Page 43
...Select the Load Setup Defaults item under the Exit menu. Download the latest BIOS file from the ASUS website at www.asus.com. • The removable devices that ASUS CrashFree BIOS support vary with motherboard models. Turn off the system after the utility completes the updating ... To recover the BIOS: 1. When found, the utility reads the BIOS file and starts flashing the corrupted BIOS file. 4. ASUS P5G41C-M LX 2-3 2.1.3 ASUS CrashFree BIOS The ASUS CrashFree BIOS is an auto recovery tool that allows you to section 2.8 Exit menu for the BIOS file. For motherboards without the...
...Select the Load Setup Defaults item under the Exit menu. Download the latest BIOS file from the ASUS website at www.asus.com. • The removable devices that ASUS CrashFree BIOS support vary with motherboard models. Turn off the system after the utility completes the updating ... To recover the BIOS: 1. When found, the utility reads the BIOS file and starts flashing the corrupted BIOS file. 4. ASUS P5G41C-M LX 2-3 2.1.3 ASUS CrashFree BIOS The ASUS CrashFree BIOS is an auto recovery tool that allows you to section 2.8 Exit menu for the BIOS file. For motherboards without the...

User Manual
Page 45
... bar, press the right or left arrow key on top of the screen has the following main items: Main For changing the basic system configuration. ASUS P5G41C-M LX 2-5 2.2.1 BIOS menu screen Menu items Menu bar Main Advanced Power Configuration fields BIOS SETUP UTILITY Boot Tools Exit General help System Time [00:31:48...
... bar, press the right or left arrow key on top of the screen has the following main items: Main For changing the basic system configuration. ASUS P5G41C-M LX 2-5 2.2.1 BIOS menu screen Menu items Menu bar Main Advanced Power Configuration fields BIOS SETUP UTILITY Boot Tools Exit General help System Time [00:31:48...

User Manual
Page 47
... BIOS automatically detects the values opposite the dimmed items (Device, Vendor, Size, LBA Mode, Block Mode, PIO Mode, Async DMA, Ultra DMA, and SMART monitoring). ASUS P5G41C-M LX 2-7 2.3 Main menu When you enter the BIOS Setup program, the Main menu screen appears, giving you select the SATA 1/2/3/4 devices. Refer to section 2.2.1 BIOS menu...
... BIOS automatically detects the values opposite the dimmed items (Device, Vendor, Size, LBA Mode, Block Mode, PIO Mode, Async DMA, Ultra DMA, and SMART monitoring). ASUS P5G41C-M LX 2-7 2.3 Main menu When you enter the BIOS Setup program, the Main menu screen appears, giving you select the SATA 1/2/3/4 devices. Refer to section 2.2.1 BIOS menu...

User Manual
Page 49
... items in this menu allows you an overview of the Advanced menu items. Incorrect field values can cause the system to individually set overclocking parameters. ASUS P5G41C-M LX 2-9 Processor Displays the auto-detected CPU specification. Auto - The BIOS automatically detects the items in this menu. AI Overclocking [Auto] Allows selection of the preset...
... items in this menu allows you an overview of the Advanced menu items. Incorrect field values can cause the system to individually set overclocking parameters. ASUS P5G41C-M LX 2-9 Processor Displays the auto-detected CPU specification. Auto - The BIOS automatically detects the items in this menu. AI Overclocking [Auto] Allows selection of the preset...


