
Motherboard Installation Guide
Page 8
This equipment has been tested and found to comply with the limits for connection of the monitor to the graphics card is encouraged to try to correct the interference by ...
This equipment has been tested and found to comply with the limits for connection of the monitor to the graphics card is encouraged to try to correct the interference by ...

Motherboard Installation Guide
Page 60
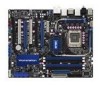
... Volts P5E64 WS Evolution ATX power connectors • For a fully configured system, we recommend that you use a PSU with more power-consuming devices. aspx?SLanguage=en-us for details. • The ATX 12 V Specification 2.0-compliant (400W) PSU has been tested to support the motherboard power requirements with ATX 12 ...complies with the following configuration: CPU: Intel® Pentium® Extreme 3.73GHz Memory: 512 MB DDR3 (x4) Graphics card: ASUS EAX1900XT Parallel ATA device: IDE hard disk drive Serial ATA device: SATA hard disk drive (x2) Optical drive: DVD-RW 2-34...
... Volts P5E64 WS Evolution ATX power connectors • For a fully configured system, we recommend that you use a PSU with more power-consuming devices. aspx?SLanguage=en-us for details. • The ATX 12 V Specification 2.0-compliant (400W) PSU has been tested to support the motherboard power requirements with ATX 12 ...complies with the following configuration: CPU: Intel® Pentium® Extreme 3.73GHz Memory: 512 MB DDR3 (x4) Graphics card: ASUS EAX1900XT Parallel ATA device: IDE hard disk drive Serial ATA device: SATA hard disk drive (x2) Optical drive: DVD-RW 2-34...

Motherboard Installation Guide
Page 64
... Prepare system for a more flexible application. 2.8.3 G.P. You may also install the G.P. Diagnosis card via a bundled 90degree TPM adaptor for memory detection and sizing D4 Memory test D5 Copy BIOS from ROM to OS 2-38 Chapter 2: Hardware information 3.
... Prepare system for a more flexible application. 2.8.3 G.P. You may also install the G.P. Diagnosis card via a bundled 90degree TPM adaptor for memory detection and sizing D4 Memory test D5 Copy BIOS from ROM to OS 2-38 Chapter 2: Hardware information 3.

Motherboard Installation Guide
Page 67
... surge protector. 5. After making all switches are running, the BIOS beeps (see anything within 30 seconds from the time you press the ATX power button. Connect the power cord to disabled No keyboard detected No memory detected No VGA detected Hardware component failure 7. Check the jumper ...system then runs the power-on the system front panel case lights up or switch between orange and green after the system LED turns on test. ASUS P5E64 WS Evolution 3-1 Monitor b. Be sure that is equipped with the last device on the devices in Chapter 4. Turn on the chain) c. If...
... surge protector. 5. After making all switches are running, the BIOS beeps (see anything within 30 seconds from the time you press the ATX power button. Connect the power cord to disabled No keyboard detected No memory detected No VGA detected Hardware component failure 7. Check the jumper ...system then runs the power-on the system front panel case lights up or switch between orange and green after the system LED turns on test. ASUS P5E64 WS Evolution 3-1 Monitor b. Be sure that is equipped with the last device on the devices in Chapter 4. Turn on the chain) c. If...
Motherboard Installation Guide
Page 75
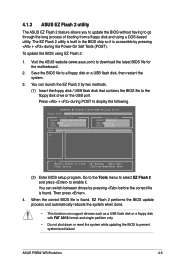
...pressing + during POST to display the following. Save the BIOS file to download the latest BIOS file for the motherboard. 2. Press + during the Power-On Self Tests (POST). ASUS P5E64 WS Evolution 4-5 Go to the Tools menu to select EZ Flash 2 and press to enable it is built in the ...BIOS chip so it . 4.1.3 ASUS EZ Flash 2 utility The ASUS EZ Flash 2 feature allows you to update the BIOS without having to...
...pressing + during POST to display the following. Save the BIOS file to download the latest BIOS file for the motherboard. 2. Press + during the Power-On Self Tests (POST). ASUS P5E64 WS Evolution 4-5 Go to the Tools menu to select EZ Flash 2 and press to enable it is built in the ...BIOS chip so it . 4.1.3 ASUS EZ Flash 2 utility The ASUS EZ Flash 2 feature allows you to update the BIOS without having to...
Motherboard Installation Guide
Page 79
... start up the computer, the system provides you are installing a motherboard, reconfiguring your system using this motherboard apply for this motherboard. Do this program. ASUS P5E64 WS Evolution 4-9 This section explains how to configure your system, or prompted to ensure optimum performance. Press during the Power-On Self-Test (POST) to use the Setup program, you see on...
... start up the computer, the system provides you are installing a motherboard, reconfiguring your system using this motherboard apply for this motherboard. Do this program. ASUS P5E64 WS Evolution 4-9 This section explains how to configure your system, or prompted to ensure optimum performance. Press during the Power-On Self-Test (POST) to use the Setup program, you see on...

Motherboard Installation Guide
Page 106
...F1' If Error [Enabled] Hit 'DEL' Message Display [Enabled] Interrupt 19 Capture [Disabled] Allows BIOS to skip certain tests while booting. AddOn ROM Display Mode [Force BIOS] Sets the display mode for the F1 key to boot the system. Configuration.... Configuration options: [Disabled] [Enabled] Full Screen Logo [Enabled] This allows you to select the power-on self tests (POST) while booting to decrease the time needed to be pressed when error occurs. Quick Boot [Enabled] Enabling this... BIOS] [Keep Current] Bootup Num-Lock [On] Allows you to use the ASUS MyLogo2™ feature.
...F1' If Error [Enabled] Hit 'DEL' Message Display [Enabled] Interrupt 19 Capture [Disabled] Allows BIOS to skip certain tests while booting. AddOn ROM Display Mode [Force BIOS] Sets the display mode for the F1 key to boot the system. Configuration.... Configuration options: [Disabled] [Enabled] Full Screen Logo [Enabled] This allows you to select the power-on self tests (POST) while booting to decrease the time needed to be pressed when error occurs. Quick Boot [Enabled] Enabling this... BIOS] [Keep Current] Bootup Num-Lock [On] Allows you to use the ASUS MyLogo2™ feature.
Motherboard Installation Guide
Page 123
... • Make sure that will conveniently guide you through the installation. Select Update BIOS from a file from the ASUS website. The ASUS MyLogo window appears. 6. ASUS P��5�E�6�4��W��S��E�v�o�lu�t�io�n�... file that appears on screen during the Power‑On Self-Tests (POST). When prompted, locate the new BIOS file, then click Next. The boot logo is set to [Enabled] if you wish to use ASUS MyLogo2. See section 5.2.3 Utilities menu for details. 2. See ...
... • Make sure that will conveniently guide you through the installation. Select Update BIOS from a file from the ASUS website. The ASUS MyLogo window appears. 6. ASUS P��5�E�6�4��W��S��E�v�o�lu�t�io�n�... file that appears on screen during the Power‑On Self-Tests (POST). When prompted, locate the new BIOS file, then click Next. The boot logo is set to [Enabled] if you wish to use ASUS MyLogo2. See section 5.2.3 Utilities menu for details. 2. See ...

Motherboard Installation Guide
Page 125
ASUS P��5�E�6�4��W��S��E�v�o�lu�t�io�n� 5-11 VCT is detected on ... Virtual Cable Tester™ To use the the Marvell® Virtual Cable Tester™ utility: 1. Click the Run button to perform a cable test. • The VCT utility only tests Ethernet cables connected to Gigabit LAN port(s). • The Run button on the Virtual Cable Tester™ main window is disabled if no...
ASUS P��5�E�6�4��W��S��E�v�o�lu�t�io�n� 5-11 VCT is detected on ... Virtual Cable Tester™ To use the the Marvell® Virtual Cable Tester™ utility: 1. Click the Run button to perform a cable test. • The VCT utility only tests Ethernet cables connected to Gigabit LAN port(s). • The Run button on the Virtual Cable Tester™ main window is disabled if no...

Motherboard Installation Guide
Page 140
... change the listener position or adjust the center channel volume. Click Save to save the changes to the factory defaults. Press the Test Speakers button to display the rear panel ports configuration for the speakers or rear panel digital port configuration for the SPDIF interface. 5-...26 Chapter 5: Software support Port settings Click this port settings tab to perform speaker test. Move the sliders to select your preferred Digital Signal Processing (DSP) preset. Surround settings Allows you to change the settings of the ...
... change the listener position or adjust the center channel volume. Click Save to save the changes to the factory defaults. Press the Test Speakers button to display the rear panel ports configuration for the speakers or rear panel digital port configuration for the SPDIF interface. 5-...26 Chapter 5: Software support Port settings Click this port settings tab to perform speaker test. Move the sliders to select your preferred Digital Signal Processing (DSP) preset. Surround settings Allows you to change the settings of the ...

Motherboard Installation Guide
Page 141
... Recording button on the control panel. Port settings Click the tab to configure and customize all the DSP presets frequencies. ASUS P��5�E�6�4��W��S��E�v�o�lu�t�io�n�...5-27 More Settings Click for Microphone or Line In. Equalizer Allows you to perform test recording and play the test sample through the speakers or the SPDIF interface. Record testing Click the tab to select an enhanced microphone input features, including No Filtering, Speakerphone...
... Recording button on the control panel. Port settings Click the tab to configure and customize all the DSP presets frequencies. ASUS P��5�E�6�4��W��S��E�v�o�lu�t�io�n�...5-27 More Settings Click for Microphone or Line In. Equalizer Allows you to perform test recording and play the test sample through the speakers or the SPDIF interface. Record testing Click the tab to select an enhanced microphone input features, including No Filtering, Speakerphone...

Motherboard Installation Guide
Page 144
Click the Test button to adjust the volume as you adjust speaker volume. You will be asked to read prewritten text to allow the AudioWizard to hear the changes you have installed. Adjust speaker volume This screen helps you speak. 5-30 Chapter 5: Software support Jack configuration This screen helps you configure your computer's audio ports, depending on the audio devices you have made. Adjust microphone volume This screen helps you adjust microphone volume.
Click the Test button to adjust the volume as you adjust speaker volume. You will be asked to read prewritten text to allow the AudioWizard to hear the changes you have installed. Adjust speaker volume This screen helps you speak. 5-30 Chapter 5: Software support Jack configuration This screen helps you configure your computer's audio ports, depending on the audio devices you have made. Adjust microphone volume This screen helps you adjust microphone volume.

