
User Manual
Page 9
... before using , contact your local power company. • If the power supply is set to fix it , carefully read all the manuals that came with the product, contact a qualified service technician or your retailer. Safety information Electrical safety • To prevent electrical shock hazard... to or from connectors, slots, sockets and circuitry. • Avoid dust, humidity, and temperature extremes. Operation safety • Before installing the motherboard and adding devices on a stable surface. • If you detect any area where it may become wet. • Place the product on...
... before using , contact your local power company. • If the power supply is set to fix it , carefully read all the manuals that came with the product, contact a qualified service technician or your retailer. Safety information Electrical safety • To prevent electrical shock hazard... to or from connectors, slots, sockets and circuitry. • Avoid dust, humidity, and temperature extremes. Operation safety • Before installing the motherboard and adding devices on a stable surface. • If you detect any area where it may become wet. • Place the product on...
User Manual
Page 51
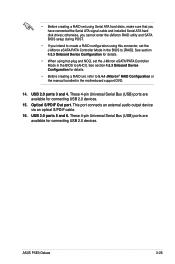
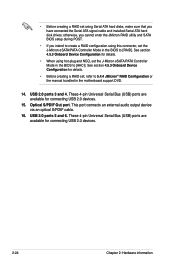
...available for details. • Before creating a RAID set the J-Micron eSATA/PATA Controller Mode in the BIOS to [AHCI]. Optical S/PDIF Out port. ASUS P5E3 Deluxe 2-25 See section 4.5.3 Onboard Device Configuration for connecting USB 2.0 devices. This port connects an external audio output device via an optical S/PDIF cable. ... you intend to create a RAID configuration using hot-plug and NCQ, set , refer to 5.4.4 JMicron® RAID Configuration or the manual bundled in the motherboard support DVD. 14. See section 4.5.3 Onboard Device Configuration for connecting USB 2.0 devices. 15.
...available for details. • Before creating a RAID set the J-Micron eSATA/PATA Controller Mode in the BIOS to [AHCI]. Optical S/PDIF Out port. ASUS P5E3 Deluxe 2-25 See section 4.5.3 Onboard Device Configuration for connecting USB 2.0 devices. This port connects an external audio output device via an optical S/PDIF cable. ... you intend to create a RAID configuration using hot-plug and NCQ, set , refer to 5.4.4 JMicron® RAID Configuration or the manual bundled in the motherboard support DVD. 14. See section 4.5.3 Onboard Device Configuration for connecting USB 2.0 devices. 15.
User Manual
Page 54
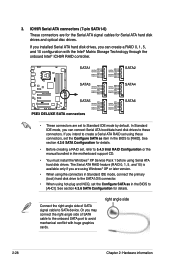
... See section 4.3.6 SATA Configuration for details. • Before creating a RAID set, refer to 5.4.3 Intel RAID Configuration or the manual bundled in the BIOS to avoid mechanical conflict with the Intel® Matrix Storage Technology through the onboard Intel® ICH9R RAID...motherboard support CD. • You must install the Windows® XP Service Pack 1 before using hot-plug and NCQ, set to SATA device. Connect the right-angle side of SATA cable to the onboard SATA port to [AHCI]. SATA1 GND RSATA_TXP1 RSATA_TXN1 GND RSATA_RXP1 RSATA_RXN1 GND ® P5E3 DELUXE...
... See section 4.3.6 SATA Configuration for details. • Before creating a RAID set, refer to 5.4.3 Intel RAID Configuration or the manual bundled in the BIOS to avoid mechanical conflict with the Intel® Matrix Storage Technology through the onboard Intel® ICH9R RAID...motherboard support CD. • You must install the Windows® XP Service Pack 1 before using hot-plug and NCQ, set to SATA device. Connect the right-angle side of SATA cable to the onboard SATA port to [AHCI]. SATA1 GND RSATA_TXP1 RSATA_TXN1 GND RSATA_RXP1 RSATA_RXN1 GND ® P5E3 DELUXE...
User Manual
Page 88
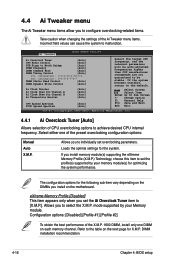
... set the profile(s) supported by your memory module(s) for the following sub-item vary depending on the DIMMs you install on the motherboard. mode supported by your Memory module. Refer to the table on each memory channel. DIMM installation recommendation. 4-16 Chapter 4: BIOS..., American Megatrends, Inc. 4.4.1 Ai Overclock Tuner [Auto] Allows selection of the preset overclocking configuration options: Manual Auto X.M.P. The configuration options for optimizing the system performance. Select Screen Select Item Enter Go to achieve desired CPU internal frequency.
... set the profile(s) supported by your memory module(s) for the following sub-item vary depending on the DIMMs you install on the motherboard. mode supported by your Memory module. Refer to the table on each memory channel. DIMM installation recommendation. 4-16 Chapter 4: BIOS..., American Megatrends, Inc. 4.4.1 Ai Overclock Tuner [Auto] Allows selection of the preset overclocking configuration options: Manual Auto X.M.P. The configuration options for optimizing the system performance. Select Screen Select Item Enter Go to achieve desired CPU internal frequency.
User Manual
Page 90
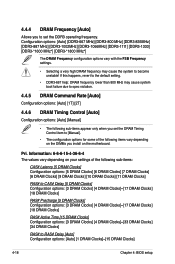
...: 6-6-6-15-4-36-6-4 The values vary depending on your settings of the following items vary depending on the DIMMs you install on the motherboard. If this happens, revert to the default setting. • DDR3-667 help: DRAM frequency lower than 800 MHz may cause the... Configuration options: [Auto] [1T] [2T] 4.4.6 DRAM Timing Control [Auto] Configuration options: [Auto] [Manual] • The following sub-items apprear only when you to set the DRAM Timing Control item to [Manual]. • The configuration options for some of the following sub-items: CAS# Latency [5 DRAM Clocks] Configuration...
...: 6-6-6-15-4-36-6-4 The values vary depending on your settings of the following items vary depending on the DIMMs you install on the motherboard. If this happens, revert to the default setting. • DDR3-667 help: DRAM frequency lower than 800 MHz may cause the... Configuration options: [Auto] [1T] [2T] 4.4.6 DRAM Timing Control [Auto] Configuration options: [Auto] [Manual] • The following sub-items apprear only when you to set the DRAM Timing Control item to [Manual]. • The configuration options for some of the following sub-items: CAS# Latency [5 DRAM Clocks] Configuration...

User Manual
Page 9
... are unplugged. • Seek professional assistance before the signal cables are connected. Operation safety • Before installing the motherboard and adding devices on a stable surface. • If you add a device. • Before connecting or removing signal cables from the...power cable from the electrical outlet before relocating the system. • When adding or removing devices to fix it , carefully read all the manuals that came with the product, contact a qualified service technician or your retailer. Contact a qualified service technician or your dealer immediately. •...
... are unplugged. • Seek professional assistance before the signal cables are connected. Operation safety • Before installing the motherboard and adding devices on a stable surface. • If you add a device. • Before connecting or removing signal cables from the...power cable from the electrical outlet before relocating the system. • When adding or removing devices to fix it , carefully read all the manuals that came with the product, contact a qualified service technician or your retailer. Contact a qualified service technician or your dealer immediately. •...
User Manual
Page 50
... BIOS to [RAID]. See section 4.5.3 Onboard Device Configuration for details. • Before creating a RAID set, refer to 5.4.4 JMicron® RAID Configuration or the manual bundled in the motherboard support DVD. 14. These 4-pin Universal Serial Bus (USB) ports are available for connecting USB 2.0 devices. 15. These 4-pin Universal Serial Bus (USB) ports...
... BIOS to [RAID]. See section 4.5.3 Onboard Device Configuration for details. • Before creating a RAID set, refer to 5.4.4 JMicron® RAID Configuration or the manual bundled in the motherboard support DVD. 14. These 4-pin Universal Serial Bus (USB) ports are available for connecting USB 2.0 devices. 15. These 4-pin Universal Serial Bus (USB) ports...

User Manual
Page 53
...P5E3 DELUXE SATA connectors GND RSATA_TXP2 RSATA_TXN2 GND RSATA_RXP2 RSATA_RXN2 GND GND RSATA_TXP4 RSATA_TXN4 GND RSATA_RXP4 RSATA_RXN4 GND GND RSATA_TXP6 RSATA_TXN6 GND RSATA_RXP6 RSATA_RXN6 GND SATA2 SATA4 SATA6 • These connectors are using Windows® XP or later version. • When using the connectors in the motherboard...connectors, set , refer to 5.4.3 Intel RAID Configuration or the manual bundled in Standard IDE mode, connect the primary (boot) hard... as item in the BIOS to [RAID]. right angle side ASUS P5E3 Deluxe 2-27 The Serial ATA RAID feature (RAID 0, 1, 5, and...
...P5E3 DELUXE SATA connectors GND RSATA_TXP2 RSATA_TXN2 GND RSATA_RXP2 RSATA_RXN2 GND GND RSATA_TXP4 RSATA_TXN4 GND RSATA_RXP4 RSATA_RXN4 GND GND RSATA_TXP6 RSATA_TXN6 GND RSATA_RXP6 RSATA_RXN6 GND SATA2 SATA4 SATA6 • These connectors are using Windows® XP or later version. • When using the connectors in the motherboard...connectors, set , refer to 5.4.3 Intel RAID Configuration or the manual bundled in Standard IDE mode, connect the primary (boot) hard... as item in the BIOS to [RAID]. right angle side ASUS P5E3 Deluxe 2-27 The Serial ATA RAID feature (RAID 0, 1, 5, and...

User Manual
Page 86
Loads the optimal settings for the following sub-item vary depending on the DIMMs you install on the motherboard. If you install memory module(s) supporting the eXtreme Memory Profile (X.M.P.) Technology, choose this item to set the profile(s) supported by... to select the X.M.P. Select Screen Select Item Enter Go to achieve desired CPU internal frequency. Select either one of the preset overclocking configuration options: Manual Auto X.M.P. Information : 6-6-6-15-4-36-6-4 Sec. Change Option F1 General Help F10 Save and Exit ESC Exit v02.61 (C)Copyright 1985-2007, American...
Loads the optimal settings for the following sub-item vary depending on the DIMMs you install on the motherboard. If you install memory module(s) supporting the eXtreme Memory Profile (X.M.P.) Technology, choose this item to set the profile(s) supported by... to select the X.M.P. Select Screen Select Item Enter Go to achieve desired CPU internal frequency. Select either one of the preset overclocking configuration options: Manual Auto X.M.P. Information : 6-6-6-15-4-36-6-4 Sec. Change Option F1 General Help F10 Save and Exit ESC Exit v02.61 (C)Copyright 1985-2007, American...

User Manual
Page 88
...setting. 4.4.5 DRAM Command Rate [Auto] Configuration options: [Auto] [1T] [2T] 4.4.6 DRAM Timing Control [Auto] Configuration options: [Auto] [Manual] • The following sub-items apprear only when you set the DDR3 operating frequency. Information: 6-6-6-15-4-36-6-4 The values vary depending on your ...[Auto] Allows you install on the DIMMs you to set the DRAM Timing Control item to [Manual]. • The configuration options for some of the following items vary depending on the motherboard. Selecting a very high DRAM frequency may cause the system to become unstable! Pri.
...setting. 4.4.5 DRAM Command Rate [Auto] Configuration options: [Auto] [1T] [2T] 4.4.6 DRAM Timing Control [Auto] Configuration options: [Auto] [Manual] • The following sub-items apprear only when you set the DDR3 operating frequency. Information: 6-6-6-15-4-36-6-4 The values vary depending on your ...[Auto] Allows you install on the DIMMs you to set the DRAM Timing Control item to [Manual]. • The configuration options for some of the following items vary depending on the motherboard. Selecting a very high DRAM frequency may cause the system to become unstable! Pri.


