
Motherboard DIY Troubleshooting Guide
Page 4
Safeguards Contents 2.2.2 2.2.3 2.2.4 2.2.5 2.2.6 2.2.7 2.2.8 2.2.9 Menu bar 2-7 Navigation keys 2-7 Menu items 2-8 Sub-menu items 2-8 Configuration fields 2-8 Pop-up window 2-8 Scroll bar 2-8 General help 2-8 2.3 Main menu 2-9 2.3.1 System Time 2-9 2.3.2 System Date 2-9 2.3.3 Legacy Diskette A, B 2-9 2.3.4 Primary/Secondary IDE Master/Slave 2-10 2.3.5 ...26 Chapter 3: Software support 3.1 Install an operating system 3-2 3.2 Support CD information 3-2 3.2.1 Running the support CD 3-2 3.2.2 Drivers menu 3-3 3.2.3 Utilities menu 3-3 3.2.4 ASUS Contact Information 3-4 iv
Safeguards Contents 2.2.2 2.2.3 2.2.4 2.2.5 2.2.6 2.2.7 2.2.8 2.2.9 Menu bar 2-7 Navigation keys 2-7 Menu items 2-8 Sub-menu items 2-8 Configuration fields 2-8 Pop-up window 2-8 Scroll bar 2-8 General help 2-8 2.3 Main menu 2-9 2.3.1 System Time 2-9 2.3.2 System Date 2-9 2.3.3 Legacy Diskette A, B 2-9 2.3.4 Primary/Secondary IDE Master/Slave 2-10 2.3.5 ...26 Chapter 3: Software support 3.1 Install an operating system 3-2 3.2 Support CD information 3-2 3.2.1 Running the support CD 3-2 3.2.2 Drivers menu 3-3 3.2.3 Utilities menu 3-3 3.2.4 ASUS Contact Information 3-4 iv

Motherboard DIY Troubleshooting Guide
Page 20
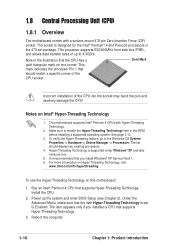
...1-10 Chapter 1: Product introduction Note in the BIOS before installing a supported operating system. Notes on this motherboard: 1. Make sure to the Windows OS System Properties -> Hardware -> Device Manager -> Processors. The list should match a specific corner of the CPU socket. To use the ... one corner. 1.8 Central Processing Unit (CPU) 1.8.1 Overview The motherboard comes with Hyper-Threading Technology. 2. The socket is supported under Windows® XP and later versions only. 5. This processor supports 533/400MHz front side bus (FSB), and allows data transfer rates of the...
...1-10 Chapter 1: Product introduction Note in the BIOS before installing a supported operating system. Notes on this motherboard: 1. Make sure to the Windows OS System Properties -> Hardware -> Device Manager -> Processors. The list should match a specific corner of the CPU socket. To use the ... one corner. 1.8 Central Processing Unit (CPU) 1.8.1 Overview The motherboard comes with Hyper-Threading Technology. 2. The socket is supported under Windows® XP and later versions only. 5. This processor supports 533/400MHz front side bus (FSB), and allows data transfer rates of the...

Motherboard DIY Troubleshooting Guide
Page 34
... a piece of the update process. 2-2 Chapter 2: BIOS information Boot the system from the Control Panel window. The screen displays the status of paper. b. Visit the ASUS website (www.asus.com) to download the latest BIOS file for this motherboard is in case you copied to type the ... utility from the support CD to the bootable floppy disk that you need to the bootable floppy disk. At the DOS prompt, type: format A:/S Windows environment a. c. Save the BIOS file to complete the process. 2. button. Copy the original (or the latest) motherboard BIOS to the bootable floppy...
... a piece of the update process. 2-2 Chapter 2: BIOS information Boot the system from the Control Panel window. The screen displays the status of paper. b. Visit the ASUS website (www.asus.com) to download the latest BIOS file for this motherboard is in case you copied to type the ... utility from the support CD to the bootable floppy disk that you need to the bootable floppy disk. At the DOS prompt, type: format A:/S Windows environment a. c. Save the BIOS file to complete the process. 2. button. Copy the original (or the latest) motherboard BIOS to the bootable floppy...
Motherboard DIY Troubleshooting Guide
Page 40
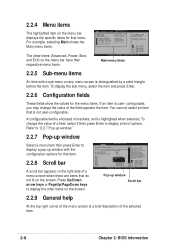
...Select Screen Select Item +- You can not select an item that menu. Press Up/Down arrow keys or PageUp/PageDown keys to display a pop-up window Scroll bar 2.2.9 General help At the top right corner of the selected item. 2-8 Chapter 2: BIOS information A configurable field is enclosed in the ...A Primary IDE Master Primary IDE Slave Secondary IDE Master Secondary IDE Slave System Information [11:10:19] [Thu 05/27/2003] [1.44M, 3.5 in] :[ST320413A] :[ASUS CD-S340] :[Not Detected] :[Not Detected] Main menu items Use [ENTER], [TAB] or [SHIFT-TAB] to PCI VGA [No] [64] [Yes] IRQ3 ...
...Select Screen Select Item +- You can not select an item that menu. Press Up/Down arrow keys or PageUp/PageDown keys to display a pop-up window Scroll bar 2.2.9 General help At the top right corner of the selected item. 2-8 Chapter 2: BIOS information A configurable field is enclosed in the ...A Primary IDE Master Primary IDE Slave Secondary IDE Master Secondary IDE Slave System Information [11:10:19] [Thu 05/27/2003] [1.44M, 3.5 in] :[ST320413A] :[ASUS CD-S340] :[Not Detected] :[Not Detected] Main menu items Use [ENTER], [TAB] or [SHIFT-TAB] to PCI VGA [No] [64] [Yes] IRQ3 ...

Motherboard DIY Troubleshooting Guide
Page 58
...[Yes] to the non-volatile RAM. 2-26 Chapter 2: BIOS information When you select this option or if you select this option, a confirmation window appears. Select Exit Saving Changes or make other than system date, system time, and password, the BIOS asks for a confirmation before exiting. When ...you press , a confirmation window appears. Select one of the parameters on even when the PC is sustained by an onboard backup battery and stays on the Setup menus. ...
...[Yes] to the non-volatile RAM. 2-26 Chapter 2: BIOS information When you select this option or if you select this option, a confirmation window appears. Select Exit Saving Changes or make other than system date, system time, and password, the BIOS asks for a confirmation before exiting. When ...you press , a confirmation window appears. Select one of the parameters on even when the PC is sustained by an onboard backup battery and stays on the Setup menus. ...

Motherboard DIY Troubleshooting Guide
Page 60
... the support CD To begin using the support CD, simply insert the CD into your CD-ROM drive. 3.1 Install an operating system This motherboard supports Windows® 98SE/ME/2000/XP operating system (OS). Refer to change at any time without notice. Always install the latest OS version and corresponding updates... icon to run the CD. 3-2 Chapter 3: Software support Because motherboard settings and hardware options vary, use the setup procedures presented in your hardware. Visit the ASUS website for general reference only.
... the support CD To begin using the support CD, simply insert the CD into your CD-ROM drive. 3.1 Install an operating system This motherboard supports Windows® 98SE/ME/2000/XP operating system (OS). Refer to change at any time without notice. Always install the latest OS version and corresponding updates... icon to run the CD. 3-2 Chapter 3: Software support Because motherboard settings and hardware options vary, use the setup procedures presented in your hardware. Visit the ASUS website for general reference only.

P4VP-MX user's manual English version E1538
Page 4
Safeguards Contents 2.2.2 2.2.3 2.2.4 2.2.5 2.2.6 2.2.7 2.2.8 2.2.9 Menu bar 2-7 Navigation keys 2-7 Menu items 2-8 Sub-menu items 2-8 Configuration fields 2-8 Pop-up window 2-8 Scroll bar 2-8 General help 2-8 2.3 Main menu 2-9 2.3.1 System Time 2-9 2.3.2 System Date 2-9 2.3.3 Legacy Diskette A, B 2-9 2.3.4 Primary/Secondary IDE Master/Slave 2-10 2.3.5 ...26 Chapter 3: Software support 3.1 Install an operating system 3-2 3.2 Support CD information 3-2 3.2.1 Running the support CD 3-2 3.2.2 Drivers menu 3-3 3.2.3 Utilities menu 3-3 3.2.4 ASUS Contact Information 3-4 iv
Safeguards Contents 2.2.2 2.2.3 2.2.4 2.2.5 2.2.6 2.2.7 2.2.8 2.2.9 Menu bar 2-7 Navigation keys 2-7 Menu items 2-8 Sub-menu items 2-8 Configuration fields 2-8 Pop-up window 2-8 Scroll bar 2-8 General help 2-8 2.3 Main menu 2-9 2.3.1 System Time 2-9 2.3.2 System Date 2-9 2.3.3 Legacy Diskette A, B 2-9 2.3.4 Primary/Secondary IDE Master/Slave 2-10 2.3.5 ...26 Chapter 3: Software support 3.1 Install an operating system 3-2 3.2 Support CD information 3-2 3.2.1 Running the support CD 3-2 3.2.2 Drivers menu 3-3 3.2.3 Utilities menu 3-3 3.2.4 ASUS Contact Information 3-4 iv
P4VP-MX user's manual English version E1538
Page 20
... on Intel® Hyper-Threading Technology 1. Install the CPU. 2. Notes on this motherboard: 1. The item appears only if you install Windows® XP Service Pack 1. 6. This processor supports 533/400MHz front side bus (FSB), and allows data transfer rates of the CPU ... verify the Hyper-Threading feature, go to Enabled. Buy an Intel® Pentium 4 CPU that the item Hyper-Threading Technology is supported under Windows® XP and later versions only. 5. 1.8 Central Processing Unit (CPU) 1.8.1 Overview The motherboard comes with Hyper-Threading Technology. 2. The list...
... on Intel® Hyper-Threading Technology 1. Install the CPU. 2. Notes on this motherboard: 1. The item appears only if you install Windows® XP Service Pack 1. 6. This processor supports 533/400MHz front side bus (FSB), and allows data transfer rates of the CPU ... verify the Hyper-Threading feature, go to Enabled. Buy an Intel® Pentium 4 CPU that the item Hyper-Threading Technology is supported under Windows® XP and later versions only. 5. 1.8 Central Processing Unit (CPU) 1.8.1 Overview The motherboard comes with Hyper-Threading Technology. 2. The list...

P4VP-MX user's manual English version E1538
Page 34
...exact BIOS file name at the prompt. 2. 2.1 Managing and updating your motherboard. At the DOS prompt, type: format A:/S Windows environment a. b. Visit the ASUS website (www.asus.com) to the bootable floppy disk that you need to a piece of paper. You need to restore the BIOS in case... floppy disk. 2.1.2 Using AFUDOS to create a bootable floppy disk. DOS environment Insert a 1.44 MB floppy disk into the drive. From your Windows desktop, click on Start, point to the bootable floppy disk. button. Do either one of the update process. 2-2 Chapter 2: BIOS information Copy...
...exact BIOS file name at the prompt. 2. 2.1 Managing and updating your motherboard. At the DOS prompt, type: format A:/S Windows environment a. b. Visit the ASUS website (www.asus.com) to the bootable floppy disk that you need to a piece of paper. You need to restore the BIOS in case... floppy disk. 2.1.2 Using AFUDOS to create a bootable floppy disk. DOS environment Insert a 1.44 MB floppy disk into the drive. From your Windows desktop, click on Start, point to the bootable floppy disk. button. Do either one of the update process. 2-2 Chapter 2: BIOS information Copy...

P4VP-MX user's manual English version E1538
Page 40
... These fields show the values for that is not user-configurable. Change Option F1 General Help F10 Save and Exit ESC Exit Pop-up window with a sub-menu on any menu screen is distinguished by a solid triangle before the item. Advanced PCI/PnP settings WARNING: Setting wrong...configurable, you may cause system to display a list of a field, select it then press Enter to malfunction. A configurable field is enclosed in ] :[ST320413A] :[ASUS CD-S340] :[Not Detected] :[Not Detected] Main menu items Use [ENTER], [TAB] or [SHIFT-TAB] to display the other items on the screen. 2.2.4 ...
... These fields show the values for that is not user-configurable. Change Option F1 General Help F10 Save and Exit ESC Exit Pop-up window with a sub-menu on any menu screen is distinguished by a solid triangle before the item. Advanced PCI/PnP settings WARNING: Setting wrong...configurable, you may cause system to display a list of a field, select it then press Enter to malfunction. A configurable field is enclosed in ] :[ST320413A] :[ASUS CD-S340] :[Not Detected] :[Not Detected] Main menu items Use [ENTER], [TAB] or [SHIFT-TAB] to display the other items on the screen. 2.2.4 ...

P4VP-MX user's manual English version E1538
Page 58
...prompts you with a message asking if you want to save the changes that you made to the Setup program. After selecting this option, a confirmation window appears. Select [Yes] to discard any changes and load the previously saved values. Select [Yes] to load default values. F10 key can be used... for this option or if you press , a confirmation window appears. If you attempt to exit the Setup program without saving your changes before exiting. Select one of the parameters on even when the PC...
...prompts you with a message asking if you want to save the changes that you made to the Setup program. After selecting this option, a confirmation window appears. Select [Yes] to discard any changes and load the previously saved values. Select [Yes] to load default values. F10 key can be used... for this option or if you press , a confirmation window appears. If you attempt to exit the Setup program without saving your changes before exiting. Select one of the parameters on even when the PC...

P4VP-MX user's manual English version E1538
Page 60
Always install the latest OS version and corresponding updates so you can maximize the features of your CD-ROM drive. Visit the ASUS website for general reference only. The CD automatically displays the Drivers menu if Autorun is NOT enabled in this chapter for updates. 3.2.1 Running the support .... 3-2 Chapter 3: Software support Because motherboard settings and hardware options vary, use the setup procedures presented in your computer. 3.1 Install an operating system This motherboard supports Windows® 98SE/ME/2000/XP operating system (OS).
Always install the latest OS version and corresponding updates so you can maximize the features of your CD-ROM drive. Visit the ASUS website for general reference only. The CD automatically displays the Drivers menu if Autorun is NOT enabled in this chapter for updates. 3.2.1 Running the support .... 3-2 Chapter 3: Software support Because motherboard settings and hardware options vary, use the setup procedures presented in your computer. 3.1 Install an operating system This motherboard supports Windows® 98SE/ME/2000/XP operating system (OS).


