
Motherboard DIY Troubleshooting Guide
Page 3
...ASUS contact information viii P4VP-MX specifications summary ix Chapter 1: Product introduction 1.1 Welcome 1-2 1.2 Package contents 1-2 1.3 Special features 1-3 1.4 Motherboard components 1-4 1.5 Motherboard layout 1-7 1.6 Before you proceed 1-8 1.7 Motherboard installation 1-9 1.7.1 Placement direction 1-9 1.7.2 Screw holes 1-9 1.8 Central Processing Unit (CPU 1-10 1.8.1 Overview 1-10 1.8.2 Installing the CPU 1-11 1.9 System memory... Using AFUDOS to update the BIOS 2-2 2.1.3 Using ASUS EZ Flash to update the BIOS 2-3 2.1.4 Recovering the BIOS with CrashFree BIOS 2 ....... 2-5...
...ASUS contact information viii P4VP-MX specifications summary ix Chapter 1: Product introduction 1.1 Welcome 1-2 1.2 Package contents 1-2 1.3 Special features 1-3 1.4 Motherboard components 1-4 1.5 Motherboard layout 1-7 1.6 Before you proceed 1-8 1.7 Motherboard installation 1-9 1.7.1 Placement direction 1-9 1.7.2 Screw holes 1-9 1.8 Central Processing Unit (CPU 1-10 1.8.1 Overview 1-10 1.8.2 Installing the CPU 1-11 1.9 System memory... Using AFUDOS to update the BIOS 2-2 2.1.3 Using ASUS EZ Flash to update the BIOS 2-3 2.1.4 Recovering the BIOS with CrashFree BIOS 2 ....... 2-5...

Motherboard DIY Troubleshooting Guide
Page 9
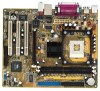
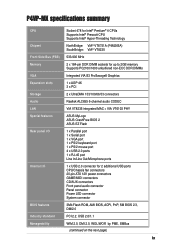
P4VP-MX specifications summary CPU Socket 478 for Intel® Pentium® 4 CPUs Supports Intel® Prescott CPU Supports Intel® Hyper-Threading Technology Chipset NorthBridge: VIA® VT8751A (P4M266A) SouthBridge: VIA® VT8235 Front Side Bus (FSB) 533/400 MHz Memory 2 x 184-pin DDR DIMM sockets for up to 2GB memory Supports PC2100/1600...
P4VP-MX specifications summary CPU Socket 478 for Intel® Pentium® 4 CPUs Supports Intel® Prescott CPU Supports Intel® Hyper-Threading Technology Chipset NorthBridge: VIA® VT8751A (P4M266A) SouthBridge: VIA® VT8235 Front Side Bus (FSB) 533/400 MHz Memory 2 x 184-pin DDR DIMM sockets for up to 2GB memory Supports PC2100/1600...
Motherboard DIY Troubleshooting Guide
Page 12
...® Prescott CPU coupled with the VIA® VT8751A and VIA® VT8235 chipsets to 2GB of system memory with the list below. 1.2 Package contents Check your P4VP-MX package for the following items. ASUS P4VP-MX motherboard ASUS P4VP-MX series support CD 1 x UltraDMA 133/100/66/33 cable 1 x Floppy disk cable I/O shield Bag of extra jumper caps...
...® Prescott CPU coupled with the VIA® VT8751A and VIA® VT8235 chipsets to 2GB of system memory with the list below. 1.2 Package contents Check your P4VP-MX package for the following items. ASUS P4VP-MX motherboard ASUS P4VP-MX series support CD 1 x UltraDMA 133/100/66/33 cable 1 x Floppy disk cable I/O shield Bag of extra jumper caps...
Motherboard DIY Troubleshooting Guide
Page 13
...BIOS even before loading the operating system. This feature includes a maximum VGA operating memory size of 32MB and a maximum AGP aperture size of 10/100 Mbps Fast Ethernet LANs. ASUS motherboards now enable users to enjoy this protection feature without the need to a... and allows up to 3.06+ GHz core frequencies for up to pay for 5.1 surround sound. See pages 1-6, 2-14. See page 1-6. ASUS P4VP-MX motherboard 1-3 USB 2.0 technology The motherboard implements the new Universal Serial Bus (USB) 2.0 specification, extending the connection speed from a floppy diskette ...
...BIOS even before loading the operating system. This feature includes a maximum VGA operating memory size of 32MB and a maximum AGP aperture size of 10/100 Mbps Fast Ethernet LANs. ASUS motherboards now enable users to enjoy this protection feature without the need to a... and allows up to 3.06+ GHz core frequencies for up to pay for 5.1 surround sound. See pages 1-6, 2-14. See page 1-6. ASUS P4VP-MX motherboard 1-3 USB 2.0 technology The motherboard implements the new Universal Serial Bus (USB) 2.0 specification, extending the connection speed from a floppy diskette ...
Motherboard DIY Troubleshooting Guide
Page 15
This 20-pin connector connects to 2GB system memory using unbuffered non-ECC PC2100/PC1600 DDR DIMMs. 5 IDE connectors. A 478-pin surface mount, Zero Insertion Force (...port and a standard compatible UART. 12 PCI slots. The VIA® VT8751A provides the processor interface with 533/400 MHz frequency, system memory interface at 266MHz operation, and 1.5V AGP interface that allows 4.2GB/s, and 3.2GB/s data transfer rates, respectively. 3 North bridge ... allows connection to turn off the system power before plugging or unplugging devices. 10 Audio CODEC. ASUS P4VP-MX motherboard 1-5
This 20-pin connector connects to 2GB system memory using unbuffered non-ECC PC2100/PC1600 DDR DIMMs. 5 IDE connectors. A 478-pin surface mount, Zero Insertion Force (...port and a standard compatible UART. 12 PCI slots. The VIA® VT8751A provides the processor interface with 533/400 MHz frequency, system memory interface at 266MHz operation, and 1.5V AGP interface that allows 4.2GB/s, and 3.2GB/s data transfer rates, respectively. 3 North bridge ... allows connection to turn off the system power before plugging or unplugging devices. 10 Audio CODEC. ASUS P4VP-MX motherboard 1-5

Motherboard DIY Troubleshooting Guide
Page 22
...to install a DIMM. These sockets support up to 2GB system memory using 184-pin unbuffered non-ECC PC2100/PC1600 DDR DIMMs. The following figure shows the location of the DDR DIMM sockets. ® P4VP-MX 104 Pins 80 Pins P4VP-MX 184-Pin DDR DIMM Sockets 1.9.1 Installing a DIMM Make sure to... unplug the power supply before adding or removing DIMMs or other system components. 1.9 System memory The motherboard comes with two Double Data Rate (DDR)...
...to install a DIMM. These sockets support up to 2GB system memory using 184-pin unbuffered non-ECC PC2100/PC1600 DDR DIMMs. The following figure shows the location of the DDR DIMM sockets. ® P4VP-MX 104 Pins 80 Pins P4VP-MX 184-Pin DDR DIMM Sockets 1.9.1 Installing a DIMM Make sure to... unplug the power supply before adding or removing DIMMs or other system components. 1.9 System memory The motherboard comes with two Double Data Rate (DDR)...
Motherboard DIY Troubleshooting Guide
Page 25
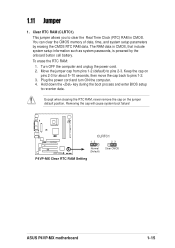
You can clear the CMOS memory of date, time, and system setup parameters by the onboard button cell battery. The RAM data in CMOS. Hold down the key during the boot ... Jumper 1. Plug the power cord and turn ON the computer. 4. Removing the cap will cause system boot failure! ® P4VP-MX CLRTC1 12 23 Normal (Default) Clear CMOS P4VP-MX Clear RTC RAM Setting ASUS P4VP-MX motherboard 1-15 Turn OFF the computer and unplug the power cord. 2. Clear RTC RAM (CLRTC1) This jumper allows you to...
You can clear the CMOS memory of date, time, and system setup parameters by the onboard button cell battery. The RAM data in CMOS. Hold down the key during the boot ... Jumper 1. Plug the power cord and turn ON the computer. 4. Removing the cap will cause system boot failure! ® P4VP-MX CLRTC1 12 23 Normal (Default) Clear CMOS P4VP-MX Clear RTC RAM Setting ASUS P4VP-MX motherboard 1-15 Turn OFF the computer and unplug the power cord. 2. Clear RTC RAM (CLRTC1) This jumper allows you to...

Motherboard DIY Troubleshooting Guide
Page 36
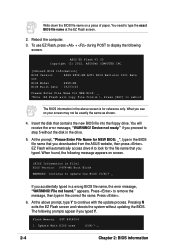
... V1.00 Copyright (C) 2002, ASUSTeK COMPUTER INC. [Onboard BIOS Information] BIOS Version : ASUS P4VP-MX ACPI BIOS Revision 1001 Beta 003 BIOS Model : P4VP-MX BIOS Built Date : 06/03/03 Please Enter File Name for the file name that contains the new BIOS file into the ... following prompts appear if you proceed to update the BIOS (Y/N)? _ If you see on your screen may not be exactly the same as shown. 4. Flash Memory: SST 49LF004 1. Update Main BIOS area (Y/N)? _ 2-4 Chapter 2: BIOS information Reboot the computer. 3. Insert the disk that you downloaded from A:\, Press [ESC] ...
... V1.00 Copyright (C) 2002, ASUSTeK COMPUTER INC. [Onboard BIOS Information] BIOS Version : ASUS P4VP-MX ACPI BIOS Revision 1001 Beta 003 BIOS Model : P4VP-MX BIOS Built Date : 06/03/03 Please Enter File Name for the file name that contains the new BIOS file into the ... following prompts appear if you proceed to update the BIOS (Y/N)? _ If you see on your screen may not be exactly the same as shown. 4. Flash Memory: SST 49LF004 1. Update Main BIOS area (Y/N)? _ 2-4 Chapter 2: BIOS information Reboot the computer. 3. Insert the disk that you downloaded from A:\, Press [ESC] ...
Motherboard DIY Troubleshooting Guide
Page 43
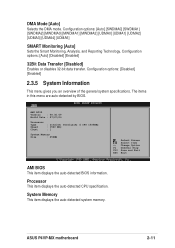
...00.09 Build Date : 07/07/03 Processor Type Speed Count : Intel(R) Pentium(R) 4 CPU 1500MHz : 1500 MHz : 1 System Memory Size : 256MB Select Screen Select Item +- Configuration options: [Disabled] [Enabled] 2.3.5 System Information This menu gives you an overview of the ...system specifications. System Memory This item displays the auto-detected system memory. Configuration options: [Auto] [Disabled] [Enabled] 32Bit Data Transfer [Disabled] Enables or disables 32-bit data transfer. Processor This item displays the auto-detected CPU specification. ASUS P4VP-MX motherboard 2-11 DMA...
...00.09 Build Date : 07/07/03 Processor Type Speed Count : Intel(R) Pentium(R) 4 CPU 1500MHz : 1500 MHz : 1 System Memory Size : 256MB Select Screen Select Item +- Configuration options: [Disabled] [Enabled] 2.3.5 System Information This menu gives you an overview of the ...system specifications. System Memory This item displays the auto-detected system memory. Configuration options: [Auto] [Disabled] [Enabled] 32Bit Data Transfer [Disabled] Enables or disables 32-bit data transfer. Processor This item displays the auto-detected CPU specification. ASUS P4VP-MX motherboard 2-11 DMA...

Motherboard DIY Troubleshooting Guide
Page 46
... 2.0 controller. Configuration options: [AGP 4X] [AGP 2X] AGP 1X] Graphics Aperture Size [64MB] Allows you to select the size of mapped memory for use or set the integrated AGP operating memory size. Configuration options: [256MB] [128MB] [64MB] [32MB] [16MB] [8MB] [4MB] Integrated AGP [Enabled/16MB] Allows you to disable or enable and...
... 2.0 controller. Configuration options: [AGP 4X] [AGP 2X] AGP 1X] Graphics Aperture Size [64MB] Allows you to select the size of mapped memory for use or set the integrated AGP operating memory size. Configuration options: [256MB] [128MB] [64MB] [32MB] [16MB] [8MB] [4MB] Integrated AGP [Enabled/16MB] Allows you to disable or enable and...
Motherboard DIY Troubleshooting Guide
Page 49
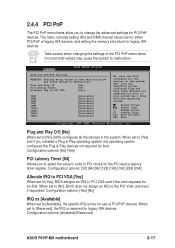
Plug and Play OS PCI Latency Timer Allocate IRQ to the PCI VGA card even if requested. Select Screen Select Item +- Configuration options: [Available] [Reserved] ASUS P4VP-MX motherboard 2-17 2.4.4 PCI PnP The PCI PnP menu items allow you installed a Plug & Play operating system, the operating system configures the Plug & Play devices not ... is reserved for an IRQ. The menu includes setting IRQ and DMA channel resources for either PCI/PnP or legacy ISA devices, and setting the memory size block for boot if your system has a Plug and Play operating system.
Plug and Play OS PCI Latency Timer Allocate IRQ to the PCI VGA card even if requested. Select Screen Select Item +- Configuration options: [Available] [Reserved] ASUS P4VP-MX motherboard 2-17 2.4.4 PCI PnP The PCI PnP menu items allow you installed a Plug & Play operating system, the operating system configures the Plug & Play devices not ... is reserved for an IRQ. The menu includes setting IRQ and DMA channel resources for either PCI/PnP or legacy ISA devices, and setting the memory size block for boot if your system has a Plug and Play operating system.
P4VP-MX user's manual English version E1538
Page 3
...ASUS contact information viii P4VP-MX specifications summary ix Chapter 1: Product introduction 1.1 Welcome 1-2 1.2 Package contents 1-2 1.3 Special features 1-3 1.4 Motherboard components 1-4 1.5 Motherboard layout 1-7 1.6 Before you proceed 1-8 1.7 Motherboard installation 1-9 1.7.1 Placement direction 1-9 1.7.2 Screw holes 1-9 1.8 Central Processing Unit (CPU 1-10 1.8.1 Overview 1-10 1.8.2 Installing the CPU 1-11 1.9 System memory... Using AFUDOS to update the BIOS 2-2 2.1.3 Using ASUS EZ Flash to update the BIOS 2-3 2.1.4 Recovering the BIOS with CrashFree BIOS 2 ....... 2-5...
...ASUS contact information viii P4VP-MX specifications summary ix Chapter 1: Product introduction 1.1 Welcome 1-2 1.2 Package contents 1-2 1.3 Special features 1-3 1.4 Motherboard components 1-4 1.5 Motherboard layout 1-7 1.6 Before you proceed 1-8 1.7 Motherboard installation 1-9 1.7.1 Placement direction 1-9 1.7.2 Screw holes 1-9 1.8 Central Processing Unit (CPU 1-10 1.8.1 Overview 1-10 1.8.2 Installing the CPU 1-11 1.9 System memory... Using AFUDOS to update the BIOS 2-2 2.1.3 Using ASUS EZ Flash to update the BIOS 2-3 2.1.4 Recovering the BIOS with CrashFree BIOS 2 ....... 2-5...
P4VP-MX user's manual English version E1538
Page 9
P4VP-MX specifications summary CPU Socket 478 for Intel® Pentium® 4 CPUs Supports Intel® Prescott CPU Supports Intel® Hyper-Threading Technology Chipset NorthBridge: VIA® VT8751A (P4M266A) SouthBridge: VIA® VT8235 Front Side Bus (FSB) 533/400 MHz Memory 2 x 184-pin DDR DIMM sockets for up to 2GB memory Supports PC2100/1600...
P4VP-MX specifications summary CPU Socket 478 for Intel® Pentium® 4 CPUs Supports Intel® Prescott CPU Supports Intel® Hyper-Threading Technology Chipset NorthBridge: VIA® VT8751A (P4M266A) SouthBridge: VIA® VT8235 Front Side Bus (FSB) 533/400 MHz Memory 2 x 184-pin DDR DIMM sockets for up to 2GB memory Supports PC2100/1600...

P4VP-MX user's manual English version E1538
Page 12
The ASUS P4VP-MX motherboard delivers a host of new features and latest technologies making it , check the items in your package with the VIA® VT8751A and VIA® VT8235 chipsets to enter the world of system memory with PC2100/PC1600 DDR SDRAM, high-resolution graphics via integrated VIA S3 ProSavage8 graphics and an AGP...
The ASUS P4VP-MX motherboard delivers a host of new features and latest technologies making it , check the items in your package with the VIA® VT8751A and VIA® VT8235 chipsets to enter the world of system memory with PC2100/PC1600 DDR SDRAM, high-resolution graphics via integrated VIA S3 ProSavage8 graphics and an AGP...

P4VP-MX user's manual English version E1538
Page 13
This feature includes a maximum VGA operating memory size of 32MB and a maximum AGP aperture size of 10/100 Mbps Fast Ethernet LANs. No need to use a DOS-based utility or boot from a floppy disk. ASUS MyLogo™ This new feature present in the motherboard allows...you can easily update the system BIOS even before loading the operating system. See page 1-5. See page 2-5. See page 2-3. See page 1-10. ASUS P4VP-MX motherboard 1-3 See pages 1-6, 2-14. See page 1-6. Integrated 10/100 LAN The VIA® VT8235 SouthBridge integrated MAC with sharp images, fast ...
This feature includes a maximum VGA operating memory size of 32MB and a maximum AGP aperture size of 10/100 Mbps Fast Ethernet LANs. No need to use a DOS-based utility or boot from a floppy disk. ASUS MyLogo™ This new feature present in the motherboard allows...you can easily update the system BIOS even before loading the operating system. See page 1-5. See page 2-5. See page 2-3. See page 1-10. ASUS P4VP-MX motherboard 1-3 See pages 1-6, 2-14. See page 1-6. Integrated 10/100 LAN The VIA® VT8235 SouthBridge integrated MAC with sharp images, fast ...

P4VP-MX user's manual English version E1538
Page 15
...memory using unbuffered non-ECC PC2100/PC1600 DDR DIMMs. 5 IDE connectors. One side of the IDE ribbon cable. 6 AGP 4X slot. This 3Mb firmware contains the programmable BIOS program. 14 PS/2 mouse port. This 25-pin port connects a parallel printer, a scanner, or other devices. 16 RJ-45 port. ASUS P4VP-MX.... These 32-bit PCI 2.2 expansion slots support bus master PCI cards like SCSI or LAN cards with 533/400 MHz frequency, system memory interface at 266MHz operation, and 1.5V AGP interface that supports AGP 2.0 specification including 4X Fast Write protocol. 4 DDR DIMM sockets. ...
...memory using unbuffered non-ECC PC2100/PC1600 DDR DIMMs. 5 IDE connectors. One side of the IDE ribbon cable. 6 AGP 4X slot. This 3Mb firmware contains the programmable BIOS program. 14 PS/2 mouse port. This 25-pin port connects a parallel printer, a scanner, or other devices. 16 RJ-45 port. ASUS P4VP-MX.... These 32-bit PCI 2.2 expansion slots support bus master PCI cards like SCSI or LAN cards with 533/400 MHz frequency, system memory interface at 266MHz operation, and 1.5V AGP interface that supports AGP 2.0 specification including 4X Fast Write protocol. 4 DDR DIMM sockets. ...

P4VP-MX user's manual English version E1538
Page 22
...Chapter 1: Product introduction These sockets support up to 2GB system memory using 184-pin unbuffered non-ECC PC2100/PC1600 DDR DIMMs. The following figure shows the location of the DDR DIMM sockets. ® P4VP-MX 104 Pins 80 Pins P4VP-MX 184-Pin DDR DIMM Sockets 1.9.1 Installing a DIMM Make ...sure to unplug the power supply before adding or removing DIMMs or other system components. 1.9 System memory The motherboard comes with two Double Data Rate (...
...Chapter 1: Product introduction These sockets support up to 2GB system memory using 184-pin unbuffered non-ECC PC2100/PC1600 DDR DIMMs. The following figure shows the location of the DDR DIMM sockets. ® P4VP-MX 104 Pins 80 Pins P4VP-MX 184-Pin DDR DIMM Sockets 1.9.1 Installing a DIMM Make ...sure to unplug the power supply before adding or removing DIMMs or other system components. 1.9 System memory The motherboard comes with two Double Data Rate (...

P4VP-MX user's manual English version E1538
Page 25
... the RTC RAM: 1. Removing the cap will cause system boot failure! ® P4VP-MX CLRTC1 12 23 Normal (Default) Clear CMOS P4VP-MX Clear RTC RAM Setting ASUS P4VP-MX motherboard 1-15 Keep the cap on the jumper default position. You can clear the CMOS memory of date, time, and system setup parameters by the onboard button cell...
... the RTC RAM: 1. Removing the cap will cause system boot failure! ® P4VP-MX CLRTC1 12 23 Normal (Default) Clear CMOS P4VP-MX Clear RTC RAM Setting ASUS P4VP-MX motherboard 1-15 Keep the cap on the jumper default position. You can clear the CMOS memory of date, time, and system setup parameters by the onboard button cell...
P4VP-MX user's manual English version E1538
Page 36
...typed. Flash Memory: SST 49LF004 1. At the above screen is for NEW BIOS: _", type in a wrong BIOS file name, the error message, "WARNING! The following screen. Pressing N exits the EZ Flash screen and reboots the system without the disk in File] BIOS Version: P4VP-MX Boot Block WARNING...on your screen may not be exactly the same as shown. 4. ASUS EZ Flash V1.00 Copyright (C) 2002, ASUSTeK COMPUTER INC. [Onboard BIOS Information] BIOS Version : ASUS P4VP-MX ACPI BIOS Revision 1001 Beta 003 BIOS Model : P4VP-MX BIOS Built Date : 06/03/03 Please Enter File Name for ...
...typed. Flash Memory: SST 49LF004 1. At the above screen is for NEW BIOS: _", type in a wrong BIOS file name, the error message, "WARNING! The following screen. Pressing N exits the EZ Flash screen and reboots the system without the disk in File] BIOS Version: P4VP-MX Boot Block WARNING...on your screen may not be exactly the same as shown. 4. ASUS EZ Flash V1.00 Copyright (C) 2002, ASUSTeK COMPUTER INC. [Onboard BIOS Information] BIOS Version : ASUS P4VP-MX ACPI BIOS Revision 1001 Beta 003 BIOS Model : P4VP-MX BIOS Built Date : 06/03/03 Please Enter File Name for ...

P4VP-MX user's manual English version E1538
Page 43
...32Bit Data Transfer [Disabled] Enables or disables 32-bit data transfer. ASUS P4VP-MX motherboard 2-11 AMI BIOS Version : 08.00.09 Build Date : 07/07/03 Processor Type Speed Count : Intel(R) Pentium(R) 4 CPU 1500MHz : 1500 MHz : 1 System Memory Size : 256MB Select Screen Select Item +- Configuration options: [Disabled... overview of the general system specifications. Processor This item displays the auto-detected CPU specification. System Memory This item displays the auto-detected system memory. DMA Mode [Auto] Selects the DMA mode. Change Option F1 General Help F10 Save and...
...32Bit Data Transfer [Disabled] Enables or disables 32-bit data transfer. ASUS P4VP-MX motherboard 2-11 AMI BIOS Version : 08.00.09 Build Date : 07/07/03 Processor Type Speed Count : Intel(R) Pentium(R) 4 CPU 1500MHz : 1500 MHz : 1 System Memory Size : 256MB Select Screen Select Item +- Configuration options: [Disabled... overview of the general system specifications. Processor This item displays the auto-detected CPU specification. System Memory This item displays the auto-detected system memory. DMA Mode [Auto] Selects the DMA mode. Change Option F1 General Help F10 Save and...


