
Motherboard DIY Troubleshooting Guide
Page 4
... window 2-8 2.2.8 Scroll bar 2-8 2.2.9 General help 2-8 2.3 Main Menu 2-9 2.4 Advanced Menu 2-12 2.4.1 JumperFree Configuration 2-12 2.4.2 USB Configuration 2-13 2.4.3 CPU Configuration 2-14 2.4.4 Chipset 2-15 2.4.5 Onboard Devices Configuration 2-18 2.4.6 PCIPnP 2-19 2.5 Power Menu 2-20 2.5.1 APM Configuration 2-21 2.5.2 Hardware Monitor 2-23 2.6 Boot Menu 2-24 2.6.1 Boot Device...
... window 2-8 2.2.8 Scroll bar 2-8 2.2.9 General help 2-8 2.3 Main Menu 2-9 2.4 Advanced Menu 2-12 2.4.1 JumperFree Configuration 2-12 2.4.2 USB Configuration 2-13 2.4.3 CPU Configuration 2-14 2.4.4 Chipset 2-15 2.4.5 Onboard Devices Configuration 2-18 2.4.6 PCIPnP 2-19 2.5 Power Menu 2-20 2.5.1 APM Configuration 2-21 2.5.2 Hardware Monitor 2-23 2.6 Boot Menu 2-24 2.6.1 Boot Device...

Motherboard DIY Troubleshooting Guide
Page 8
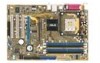
P4V800D-X Specifications Summary CPU Chipset Front Side Bus (FSB) Memory Expansion Slots Storage Audio LAN USB Special features Back panel I/O ports Internal I/O connectors Socket 478 for Intel Pentium 4/Celeron up ... to eight USB 2.0 ports Wake on Ring, LAN, USB, Keyboard & Mouse STR (Suspend-to-RAM) STD (Suspend-to-Disk) S/PDIF out interface ASUS C.P.R. (CPU Parameter Recall) ASUS MyLogo ASUS EZ Flash ASUS CrashFree BIOS 2 1 x Parallel port 1 x Serial (COM2) port 1 x PS/2 Keyboard port (purple) 1 x PS/2 Mouse port (green) 1 x Audio I/O port 1 x S/PDIF Out (Coaxial) port 1 x LAN...
P4V800D-X Specifications Summary CPU Chipset Front Side Bus (FSB) Memory Expansion Slots Storage Audio LAN USB Special features Back panel I/O ports Internal I/O connectors Socket 478 for Intel Pentium 4/Celeron up ... to eight USB 2.0 ports Wake on Ring, LAN, USB, Keyboard & Mouse STR (Suspend-to-RAM) STD (Suspend-to-Disk) S/PDIF out interface ASUS C.P.R. (CPU Parameter Recall) ASUS MyLogo ASUS EZ Flash ASUS CrashFree BIOS 2 1 x Parallel port 1 x Serial (COM2) port 1 x PS/2 Keyboard port (purple) 1 x PS/2 Mouse port (green) 1 x Audio I/O port 1 x S/PDIF Out (Coaxial) port 1 x LAN...

Motherboard DIY Troubleshooting Guide
Page 45
... the system to the default. ←→ Select Screen ↑↓ Select Item +- JumperFree Configuration USB Configuration CPU Configuration Chipset Onboard Devices Configuration PCIPnP Adjust system frequency/voltage Enter F1 F10 ESC Select Screen Select Item Go to change the settings for the...
... the system to the default. ←→ Select Screen ↑↓ Select Item +- JumperFree Configuration USB Configuration CPU Configuration Chipset Onboard Devices Configuration PCIPnP Adjust system frequency/voltage Enter F1 F10 ESC Select Screen Select Item Go to change the settings for the...

Motherboard DIY Troubleshooting Guide
Page 48
...guration Options for DRAM Enter F1 F10 ESC Select Screen Select Item Go to CMD(Trcd) [5T] DRAM BUS Selection [Auto] ASUS P4V800D-X Motherboard 2-15 DRAM Clock/Timing Configuration DRAM Frequency/Timing Configuration DRAM Frequency [Auto] Manual DRAM Frequency DRAM ... (C)Copyright 1985-2004, American Megatrends, Inc. Select an item then press to change the advanced chipset settings. 2.4.4 Chipset The Chipset menu allows you to display the sub-menu. Advanced Chipset Settings WARNING: Setting wrong vaalues in below sections may cause system to malfunction.
...guration Options for DRAM Enter F1 F10 ESC Select Screen Select Item Go to CMD(Trcd) [5T] DRAM BUS Selection [Auto] ASUS P4V800D-X Motherboard 2-15 DRAM Clock/Timing Configuration DRAM Frequency/Timing Configuration DRAM Frequency [Auto] Manual DRAM Frequency DRAM ... (C)Copyright 1985-2004, American Megatrends, Inc. Select an item then press to change the advanced chipset settings. 2.4.4 Chipset The Chipset menu allows you to display the sub-menu. Advanced Chipset Settings WARNING: Setting wrong vaalues in below sections may cause system to malfunction.

Motherboard DIY Troubleshooting Guide
Page 50
...;guration options: [Disabled] [Enabled] OnBoard SATA-IDE [RAID] Allows you to set the OnBoard SATA-IDE mode. Configuration options: [Enabled] [Disabled] ASUS P4V800D-X Motherboard 2-17 V-Link mode selection [Mode 1] Configuration options: [Auto] [Mode 0] [Mode 1] [Mode 2] [Mode 3] [Mode 4]... V-Link Data 2X Support [Disabled] Configuration options: [Disabled] [Enabled] SouthBridge VIA VT8237R Configuration VIA VT8237R South Chipset Configuration PCI Delay Transaction OnBoard SATA-IDE RAID BIOS Execute Onboard AC'97 Audio OnBoard LAN OnBoard LAN Boot ROM [Disabled] [...
...;guration options: [Disabled] [Enabled] OnBoard SATA-IDE [RAID] Allows you to set the OnBoard SATA-IDE mode. Configuration options: [Enabled] [Disabled] ASUS P4V800D-X Motherboard 2-17 V-Link mode selection [Mode 1] Configuration options: [Auto] [Mode 0] [Mode 1] [Mode 2] [Mode 3] [Mode 4]... V-Link Data 2X Support [Disabled] Configuration options: [Disabled] [Enabled] SouthBridge VIA VT8237R Configuration VIA VT8237R South Chipset Configuration PCI Delay Transaction OnBoard SATA-IDE RAID BIOS Execute Onboard AC'97 Audio OnBoard LAN OnBoard LAN Boot ROM [Disabled] [...

Motherboard DIY Troubleshooting Guide
Page 51
... Port Address [378] Allows you to set to select the Parallel Port base addresses. 2.4.5 Onboard Devices Configuration Configure Win627EHF Super IO Chipset Serial Port2 Address Parallel Port Address Parallel Port Mode ECP Mode DMA Channel Parallel Port IRQ Onboard Game/MIDI Port [2F8/IRQ3] [378] [ECP] [DMA3...
... Port Address [378] Allows you to set to select the Parallel Port base addresses. 2.4.5 Onboard Devices Configuration Configure Win627EHF Super IO Chipset Serial Port2 Address Parallel Port Address Parallel Port Mode ECP Mode DMA Channel Parallel Port IRQ Onboard Game/MIDI Port [2F8/IRQ3] [378] [ECP] [DMA3...

Motherboard DIY Troubleshooting Guide
Page 66
...disk drives. Install the SATA hard disks into the drive bays. 2. This configuration stores the same data redundantly on each drive. ASUS P4V800D-X Motherboard 3-5 RAID 1 (called Data striping) optimizes two identical hard disk drives to a second drive. If one drive to read and ... and storage. RAID 0 (called Data mirroring) copies and maintains an identical image of the data in the VIA VT8237R+ southbridge chipset. Spanning does not deliver any advantage over using separate disks independently and does not provide fault tolerance or other drive. This RAID ...
...disk drives. Install the SATA hard disks into the drive bays. 2. This configuration stores the same data redundantly on each drive. ASUS P4V800D-X Motherboard 3-5 RAID 1 (called Data striping) optimizes two identical hard disk drives to a second drive. If one drive to read and ... and storage. RAID 0 (called Data mirroring) copies and maintains an identical image of the data in the VIA VT8237R+ southbridge chipset. Spanning does not deliver any advantage over using separate disks independently and does not provide fault tolerance or other drive. This RAID ...

Motherboard DIY Troubleshooting Guide
Page 67
... integrated in the BIOS, then Set the OnBoard SATA-IDE item as Enabled. 3. VIA Tech. From the Advanced >Chipset>SouthBridge VIA VT8237R Configuration menu in the VIA VT8237R PLUS southbridge chipset. The main menu items on your changes and exit Setup. To set the necessary RAID items in this section...
... integrated in the BIOS, then Set the OnBoard SATA-IDE item as Enabled. 3. VIA Tech. From the Advanced >Chipset>SouthBridge VIA VT8237R Configuration menu in the VIA VT8237R PLUS southbridge chipset. The main menu items on your changes and exit Setup. To set the necessary RAID items in this section...

Motherboard DIY Troubleshooting Guide
Page 70
... drive. 4. Insert floppy disk to avoid computer virus infection. During the OS installation, the system prompts you to press the F6 key to \Drivers\Chipset\MakeDisk\MakeDisk for details. 3. Press then insert the floppy disk with the RAID driver is required when installing Windows® 2000/XP operating system... or RAID driver. 2. Follow succeeding screen information to complete process. 5. 3.4 Creating a RAID driver disk A floppy disk with RAID driver into the CD-ROM drive. 2. ASUS P4V800D-X Motherboard 3-9
... drive. 4. Insert floppy disk to avoid computer virus infection. During the OS installation, the system prompts you to press the F6 key to \Drivers\Chipset\MakeDisk\MakeDisk for details. 3. Press then insert the floppy disk with the RAID driver is required when installing Windows® 2000/XP operating system... or RAID driver. 2. Follow succeeding screen information to complete process. 5. 3.4 Creating a RAID driver disk A floppy disk with RAID driver into the CD-ROM drive. 2. ASUS P4V800D-X Motherboard 3-9

