
Motherboard DIY Troubleshooting Guide
Page 3
Contents Notices ...v Safety Information vi About This Guide vii P4V800D-X Specifications Summary viii Chapter 1: Product Introduction 1.1 Welcome 1-2 1.2 Package Contents 1-2 1.3 Special Features 1-2 1.3.1 Product highlights 1-2 1.3.2 Innovative ASUS features 1-4 1.4 Before You Proceed 1-5 1.5 Motherboard Overview 1-6 1.5.1 Motherboard layout 1-6... Chapter 2: BIOS Setup 2.1 Managing and Updating Your BIOS 2-2 2.1.1 Creating a bootable floppy disk 2-2 2.1.2 Using AFUDOS to copy the current BIOS 2-2 2.1.3 Using AFUDOS to update the BIOS 2-3 2.1.4 Using ASUS EZ Flash to...
Contents Notices ...v Safety Information vi About This Guide vii P4V800D-X Specifications Summary viii Chapter 1: Product Introduction 1.1 Welcome 1-2 1.2 Package Contents 1-2 1.3 Special Features 1-2 1.3.1 Product highlights 1-2 1.3.2 Innovative ASUS features 1-4 1.4 Before You Proceed 1-5 1.5 Motherboard Overview 1-6 1.5.1 Motherboard layout 1-6... Chapter 2: BIOS Setup 2.1 Managing and Updating Your BIOS 2-2 2.1.1 Creating a bootable floppy disk 2-2 2.1.2 Using AFUDOS to copy the current BIOS 2-2 2.1.3 Using AFUDOS to update the BIOS 2-3 2.1.4 Using ASUS EZ Flash to...

Motherboard DIY Troubleshooting Guide
Page 4
Contents 2.2 BIOS Setup Program 2-6 2.2.1 BIOS menu screen 2-7 2.2.2 Menu bar 2-7 2.2.3 Navigation keys 2-7 2.2.4 Menu items 2-8 2.2.5 Sub-menu items 2-8 2.2.6 Configuration fields 2-8 2.2.7 Pop-up window 2-8 2.2.8 Scroll bar 2-8 2.2.9 General help 2-8 2.3 Main Menu 2-9 2.4 ...
Contents 2.2 BIOS Setup Program 2-6 2.2.1 BIOS menu screen 2-7 2.2.2 Menu bar 2-7 2.2.3 Navigation keys 2-7 2.2.4 Menu items 2-8 2.2.5 Sub-menu items 2-8 2.2.6 Configuration fields 2-8 2.2.7 Pop-up window 2-8 2.2.8 Scroll bar 2-8 2.2.9 General help 2-8 2.3 Main Menu 2-9 2.4 ...

Motherboard DIY Troubleshooting Guide
Page 7
... are not part of the jumpers and connectors on ASUS hardware and software products. ASUS websites The ASUS websites worldwide provide updated information on the motherboard. • Chapter 2: BIOS Information This chapter tells how to complete a task. These documents are also provided. • Chapter 3: Software Support This chapter describes the contents of the support...
... are not part of the jumpers and connectors on ASUS hardware and software products. ASUS websites The ASUS websites worldwide provide updated information on the motherboard. • Chapter 2: BIOS Information This chapter tells how to complete a task. These documents are also provided. • Chapter 3: Software Support This chapter describes the contents of the support...

Motherboard DIY Troubleshooting Guide
Page 8
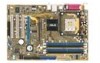
P4V800D-X Specifications Summary CPU Chipset Front Side Bus (FSB) Memory Expansion Slots Storage Audio LAN USB Special features Back panel I/O ports Internal I/O connectors Socket ... to eight USB 2.0 ports Wake on Ring, LAN, USB, Keyboard & Mouse STR (Suspend-to-RAM) STD (Suspend-to-Disk) S/PDIF out interface ASUS C.P.R. (CPU Parameter Recall) ASUS MyLogo ASUS EZ Flash ASUS CrashFree BIOS 2 1 x Parallel port 1 x Serial (COM2) port 1 x PS/2 Keyboard port (purple) 1 x PS/2 Mouse port (green) 1 x Audio I/O port 1 x S/PDIF Out (Coaxial) port 1 x LAN (RJ...
P4V800D-X Specifications Summary CPU Chipset Front Side Bus (FSB) Memory Expansion Slots Storage Audio LAN USB Special features Back panel I/O ports Internal I/O connectors Socket ... to eight USB 2.0 ports Wake on Ring, LAN, USB, Keyboard & Mouse STR (Suspend-to-RAM) STD (Suspend-to-Disk) S/PDIF out interface ASUS C.P.R. (CPU Parameter Recall) ASUS MyLogo ASUS EZ Flash ASUS CrashFree BIOS 2 1 x Parallel port 1 x Serial (COM2) port 1 x PS/2 Keyboard port (purple) 1 x PS/2 Mouse port (green) 1 x Audio I/O port 1 x S/PDIF Out (Coaxial) port 1 x LAN (RJ...

Motherboard DIY Troubleshooting Guide
Page 9
ix P4V800D-X Specifications Summary BIOS features Industry standard Manageability Power Requirement Support CD Accessary Form factor 4 Mb Flash ROM, AMI BIOS, PnP, DMI2.0, WfM2.0, SM BIOS 2.3, ACPI, ASUS EZ Flash, ASUS CrashFree BIOS 2, C.P.R. MyLogo PCI 2.2, USB 2.0/1.1 WfM 2.0, DMI 2.0, WOL by PME, WOR by PME ATX power supply (with 4-pin 12V plug) Drivers ASUS PC Probe Anti-Virus...
ix P4V800D-X Specifications Summary BIOS features Industry standard Manageability Power Requirement Support CD Accessary Form factor 4 Mb Flash ROM, AMI BIOS, PnP, DMI2.0, WfM2.0, SM BIOS 2.3, ACPI, ASUS EZ Flash, ASUS CrashFree BIOS 2, C.P.R. MyLogo PCI 2.2, USB 2.0/1.1 WfM 2.0, DMI 2.0, WOL by PME, WOR by PME ATX power supply (with 4-pin 12V plug) Drivers ASUS PC Probe Anti-Virus...

Motherboard DIY Troubleshooting Guide
Page 14
... show the previous setting and then users can reboot their system through the simple BIOS auto-recovery process. ASUS EZ Flash BIOS With ASUS EZ Flash, you to personalize and add style to clear CMOS data. See page 2-6 for an optional ROM. C.P.R. (CPU ...need to pay for details. ASUS MyLogo™ This new feature present in a support CD. 1.3.2 Innovative ASUS features ASUS CrashFree BIOS 2 The CrashFree BIOS2 feature now includes the BIOS auto-recovery function in the motherboard allows you can update BIOS before entering operating system. ASUS motherboards now enable users to enjoy...
... show the previous setting and then users can reboot their system through the simple BIOS auto-recovery process. ASUS EZ Flash BIOS With ASUS EZ Flash, you to personalize and add style to clear CMOS data. See page 2-6 for an optional ROM. C.P.R. (CPU ...need to pay for details. ASUS MyLogo™ This new feature present in a support CD. 1.3.2 Innovative ASUS features ASUS CrashFree BIOS 2 The CrashFree BIOS2 feature now includes the BIOS auto-recovery function in the motherboard allows you can update BIOS before entering operating system. ASUS motherboards now enable users to enjoy...

Motherboard DIY Troubleshooting Guide
Page 19
...; P4V800D-X 184-Pin DDR DIMM Sockets 1.7.2 Memory configurations You may install single or double-sided 64 MB, 128 MB, 256 MB, 512 MB, and 1 GB DDR DIMMs to the sockets. 1. Visit ASUS website (www.asus.com) for a list of the module are the same or set to... avoid damaging the DIMM. 4. For optimum compatibility, it fits in the BIOS are not supported. 2. DO NOT force a DIMM into a socket to [Auto] ensure system stability. 3. ASUS P4V800D-X Motherboard 1-9 Make sure the memory frequency and bus frequency setting in only one direction. DIMM_A1 DIMM_A2 ...
...; P4V800D-X 184-Pin DDR DIMM Sockets 1.7.2 Memory configurations You may install single or double-sided 64 MB, 128 MB, 256 MB, 512 MB, and 1 GB DDR DIMMs to the sockets. 1. Visit ASUS website (www.asus.com) for a list of the module are the same or set to... avoid damaging the DIMM. 4. For optimum compatibility, it fits in the BIOS are not supported. 2. DO NOT force a DIMM into a socket to [Auto] ensure system stability. 3. ASUS P4V800D-X Motherboard 1-9 Make sure the memory frequency and bus frequency setting in only one direction. DIMM_A1 DIMM_A2 ...

Motherboard DIY Troubleshooting Guide
Page 22
... expansion card, read the documentation that came with it by adjusting the software settings. 1. Remove the bracket opposite the slot that they support. Turn on BIOS setup. 2. Refer to unplug the power cord before adding or removing expansion cards. Make sure to the tables on the slot. 5. See Chapter 2 for later... is already installed in a chassis). 3. 1.8 Expansion slots In the future, you removed earlier. 6. Keep the screw for information on the system and change the necessary BIOS settings, if any.
... expansion card, read the documentation that came with it by adjusting the software settings. 1. Remove the bracket opposite the slot that they support. Turn on BIOS setup. 2. Refer to unplug the power cord before adding or removing expansion cards. Make sure to the tables on the slot. 5. See Chapter 2 for later... is already installed in a chassis). 3. 1.8 Expansion slots In the future, you removed earlier. 6. Keep the screw for information on the system and change the necessary BIOS settings, if any.

Motherboard DIY Troubleshooting Guide
Page 25
... the power cord and turn ON the computer. Hold down the key during the boot process and enter BIOS setup to pins 1-2. P4V800D-X CLRTC 12 23 ® Normal (Default) P4V800D-X Clear RTC RAM Clear CMOS ASUS P4V800D-X Motherboard 1-15 e. f. The onboard button cell battery powers the RAM data in CMOS. Keep the cap on CLRTC...
... the power cord and turn ON the computer. Hold down the key during the boot process and enter BIOS setup to pins 1-2. P4V800D-X CLRTC 12 23 ® Normal (Default) P4V800D-X Clear RTC RAM Clear CMOS ASUS P4V800D-X Motherboard 1-15 e. f. The onboard button cell battery powers the RAM data in CMOS. Keep the cap on CLRTC...

Motherboard DIY Troubleshooting Guide
Page 26
... lead, and a corresponding setting in reduced power mode). P4V800D-X KBPWR 12 23 +5V (Default) +5VSB ® P4V800D-X Keyboard power setting 1-16 Chapter 1: Product Introduction P4V800D-X USBPW1 2 1 +5V (Default) 3 2 +5VSB USBPW2 ® 12 23 P4V800D-X USB device wake up +5V (Default) +5VSB &#...8226; The USB device wake-up feature requires a power supply that you to CPU, DRAM in slow refresh, power supply in the BIOS (see...
... lead, and a corresponding setting in reduced power mode). P4V800D-X KBPWR 12 23 +5V (Default) +5VSB ® P4V800D-X Keyboard power setting 1-16 Chapter 1: Product Introduction P4V800D-X USBPW1 2 1 +5V (Default) 3 2 +5VSB USBPW2 ® 12 23 P4V800D-X USB device wake up +5V (Default) +5VSB &#...8226; The USB device wake-up feature requires a power supply that you to CPU, DRAM in slow refresh, power supply in the BIOS (see...

Motherboard DIY Troubleshooting Guide
Page 33
... without turning off the system power. • ATX power button/soft-off mode depending on the BIOS settings. The system power LED lights up or flashes when data is for the system power LED. ASUS P4V800D-X Motherboard 1-23 PLED SPEAKER PLED+ PLED+5V Ground Ground Speaker PANEL IDE_LED+ IDE_LED- 10. Pressing the...
... without turning off the system power. • ATX power button/soft-off mode depending on the BIOS settings. The system power LED lights up or flashes when data is for the system power LED. ASUS P4V800D-X Motherboard 1-23 PLED SPEAKER PLED+ PLED+5V Ground Ground Speaker PANEL IDE_LED+ IDE_LED- 10. Pressing the...

Motherboard DIY Troubleshooting Guide
Page 34
Detailed descriptions of the BIOS parameters are also provided. 2 BIOS Setup This chapter tells how to change the system settings through the BIOS Setup menus.
Detailed descriptions of the BIOS parameters are also provided. 2 BIOS Setup This chapter tells how to change the system settings through the BIOS Setup menus.
Motherboard DIY Troubleshooting Guide
Page 35
... to the system builderʼs website for details about updating the BIOS. 2.1.1 Creating a bootable floppy disk 1. AFUDOS (Updates the BIOS in the future. ASUS EZ Flash (Updates the BIOS using a bootable floppy disk or the mother board support CD. Updates the BIOS using a floppy disk during POST.) 3. Windows® XP environment a. b. c. Select...
... to the system builderʼs website for details about updating the BIOS. 2.1.1 Creating a bootable floppy disk 1. AFUDOS (Updates the BIOS in the future. ASUS EZ Flash (Updates the BIOS using a bootable floppy disk or the mother board support CD. Updates the BIOS using a floppy disk during POST.) 3. Windows® XP environment a. b. c. Select...

Motherboard DIY Troubleshooting Guide
Page 36
... to a floppy diskette. Version 1.10 Copyright (C) 2002 American Megatrends, Inc. ASUS P4V800D-X Motherboard 2-3 Reading flash ..... 0x0008CC00 (9%) 2. All rights reserved. Main filename Extension name A:\>afudos /oMYBIOS03.rom AMI Firmware Update Utility - A:\>afudos /oMYBIOS03.rom AMI Firmware Update Utility - The BIOS information on a piece of paper. What you to copy the original...
... to a floppy diskette. Version 1.10 Copyright (C) 2002 American Megatrends, Inc. ASUS P4V800D-X Motherboard 2-3 Reading flash ..... 0x0008CC00 (9%) 2. All rights reserved. Main filename Extension name A:\>afudos /oMYBIOS03.rom AMI Firmware Update Utility - A:\>afudos /oMYBIOS03.rom AMI Firmware Update Utility - The BIOS information on a piece of paper. What you to copy the original...

Motherboard DIY Troubleshooting Guide
Page 37
...Utility - Version 1.10 Copyright (C) 2002 American Megatrends, Inc. done Writing flash .... 0x0008CC00 (9%) DO NOT shut down or reset the system while updating the BIOS! Version 1.10 Copyright (C) 2002 American Megatrends, Inc. All rights reserved. Reading file ..... done Erasing flash .... done A:\> 6. 4. What you ...the DOS prompt, type the command line: afudos /i[filename.rom] where [filename.rom] means the latest (or original) BIOS file that you see on the screen is complete, the utility returns to the bootable floppy disk. 5. Press . The...
...Utility - Version 1.10 Copyright (C) 2002 American Megatrends, Inc. done Writing flash .... 0x0008CC00 (9%) DO NOT shut down or reset the system while updating the BIOS! Version 1.10 Copyright (C) 2002 American Megatrends, Inc. All rights reserved. Reading file ..... done Erasing flash .... done A:\> 6. 4. What you ...the DOS prompt, type the command line: afudos /i[filename.rom] where [filename.rom] means the latest (or original) BIOS file that you see on the screen is complete, the utility returns to the bootable floppy disk. 5. Press . The...
Motherboard DIY Troubleshooting Guide
Page 38
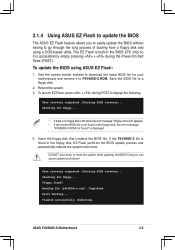
... long process of booting from a floppy disk and using ASUS EZ Flash: 1. ASUS P4V800D-X Motherboard 2-5 Completed. Start flashing... Save the BIOS file to display the following. Starting BIOS recovery... The EZ Flash is built-in the floppy disk, EZ Flash performs the BIOS update process and automatically reboots the system when done. To update...
... long process of booting from a floppy disk and using ASUS EZ Flash: 1. ASUS P4V800D-X Motherboard 2-5 Completed. Start flashing... Save the BIOS file to display the following. Starting BIOS recovery... The EZ Flash is built-in the floppy disk, EZ Flash performs the BIOS update process and automatically reboots the system when done. To update...

Motherboard DIY Troubleshooting Guide
Page 39
... the various sub-menus and make changes to use the Setup program, you can also restart by pressing the reset button on your BIOS." Use the BIOS Setup program when you see on the system chassis. This section explains how to use as easy to the power management settings. The... purposes only, and may not exactly match what you are not prompted to configure your selections among the predetermined choices. 2-6 Chapter 2: BIOS Information To enter Setup after POST, restart the system by pressing , or by turning the system off and then back on the motherboard stores the...
... the various sub-menus and make changes to use the Setup program, you can also restart by pressing the reset button on your BIOS." Use the BIOS Setup program when you see on the system chassis. This section explains how to use as easy to the power management settings. The... purposes only, and may not exactly match what you are not prompted to configure your selections among the predetermined choices. 2-6 Chapter 2: BIOS Information To enter Setup after POST, restart the system by pressing , or by turning the system off and then back on the motherboard stores the...

Motherboard DIY Troubleshooting Guide
Page 40
... keys for that particular menu. Use the navigation keys to select items in .] [Disabled] [ST340014A] [Not Detected] [ASUS CD-S500/A] [Not Detected] Use [ENTER], [TAB] or [SHIFT-TAB] to select a field. ASUS P4V800D-X Motherboard 2-7 2.2.1 BIOS menu screen Menu items Menu bar Configuration fields General help System Time System Date Legacy...
... keys for that particular menu. Use the navigation keys to select items in .] [Disabled] [ST340014A] [Not Detected] [ASUS CD-S500/A] [Not Detected] Use [ENTER], [TAB] or [SHIFT-TAB] to select a field. ASUS P4V800D-X Motherboard 2-7 2.2.1 BIOS menu screen Menu items Menu bar Configuration fields General help System Time System Date Legacy...

Motherboard DIY Troubleshooting Guide
Page 41
... the right side of a menu screen when there are items that the item has a sub-menu. To change the value of the selected item. 2-8 Chapter 2: BIOS Information For example, selecting Main shows the Main menu items. The other items on the screen.
... the right side of a menu screen when there are items that the item has a sub-menu. To change the value of the selected item. 2-8 Chapter 2: BIOS Information For example, selecting Main shows the Main menu items. The other items on the screen.

Motherboard DIY Troubleshooting Guide
Page 42
... system information. Configuration options: [Disabled] [360K, 5.25 in.] [1.2M , 5.25 in.] [720K , 3.5 in.] [1.44M, 3.5 in.] [2.88M, 3.5 in .] ASUS P4V800D-X Motherboard 2-9 Change Field Tab Select Field F1 General Help F10 Save and Exit ESC Exit v02.58 (C)Copyright 1985-2004, American Megatrends, Inc. 2.3.1 System Time...or [SHIFT-TAB] to configure System Time. ←→ Select Screen ↑↓ Select Item +- Refer to section "2.2.1 BIOS menu screen" for information on the menu screen items and how to set the system time. 2.3.2 System Date [Day xx/xx/xxxx] ...
... system information. Configuration options: [Disabled] [360K, 5.25 in.] [1.2M , 5.25 in.] [720K , 3.5 in.] [1.44M, 3.5 in.] [2.88M, 3.5 in .] ASUS P4V800D-X Motherboard 2-9 Change Field Tab Select Field F1 General Help F10 Save and Exit ESC Exit v02.58 (C)Copyright 1985-2004, American Megatrends, Inc. 2.3.1 System Time...or [SHIFT-TAB] to configure System Time. ←→ Select Screen ↑↓ Select Item +- Refer to section "2.2.1 BIOS menu screen" for information on the menu screen items and how to set the system time. 2.3.2 System Date [Day xx/xx/xxxx] ...


