
Motherboard DIY Troubleshooting Guide
Page 12
...providing 100% software compatibility. System bottlenecks are eliminated with the list below. 1.2 Package contents Check your motherboard package for the following items. Motherboard ASUS P4V800D-X motherboard Cables 1 x Ultra 133/100/66 DMA cable 1 x Serial ATA cable 1 x Serial ATA power cable 1 x Floppy Disk Drive cable...line of the above items is the next generation ATA specification that provides scalable performance for buying an ASUS® P4V800D-X motherboard! 1.1 Welcome! See page 1-9 for details. 1-2 Chapter 1: Product Introduction See page 1-19 for details.
...providing 100% software compatibility. System bottlenecks are eliminated with the list below. 1.2 Package contents Check your motherboard package for the following items. Motherboard ASUS P4V800D-X motherboard Cables 1 x Ultra 133/100/66 DMA cable 1 x Serial ATA cable 1 x Serial ATA power cable 1 x Floppy Disk Drive cable...line of the above items is the next generation ATA specification that provides scalable performance for buying an ASUS® P4V800D-X motherboard! 1.1 Welcome! See page 1-9 for details. 1-2 Chapter 1: Product Introduction See page 1-19 for details.

Motherboard DIY Troubleshooting Guide
Page 13
... GB/s. it allows to transfer digital audio without converting to external home theater audio systems via an coaxial S/PDIF-out (SONY-PHILIPS Digital Interface) jack. ASUS P4V800D-X Motherboard 1-3 PCI Express features point-to-point serial interconnections between devices and allows higher clockspeeds by carrying data in this motherboard to give you a fast...
... GB/s. it allows to transfer digital audio without converting to external home theater audio systems via an coaxial S/PDIF-out (SONY-PHILIPS Digital Interface) jack. ASUS P4V800D-X Motherboard 1-3 PCI Express features point-to-point serial interconnections between devices and allows higher clockspeeds by carrying data in this motherboard to give you a fast...

Motherboard DIY Troubleshooting Guide
Page 15
... plugging in the bag that came with a standby power LED that lights up to the motherboard, peripherals, and/or components. P4V800D-X ® SB_PWR P4V800D-X Onboard LED ON Standby Power OFF Powered Off ASUS P4V800D-X Motherboard 1-5 1.4 Before you proceed Take note of the onboard LED. This is detached from the wall socket before touching any...
... plugging in the bag that came with a standby power LED that lights up to the motherboard, peripherals, and/or components. P4V800D-X ® SB_PWR P4V800D-X Onboard LED ON Standby Power OFF Powered Off ASUS P4V800D-X Motherboard 1-5 1.4 Before you proceed Take note of the onboard LED. This is detached from the wall socket before touching any...

Motherboard DIY Troubleshooting Guide
Page 17
Do not overtighten the screws! Doing so can damage the motherboard. Place this side towards-the rear of the chassis as indicated in the correct orientation. The edge with external ports goes to the chassis. 1.5.2 Placement direction When installing the motherboard, make sure that you place it into the chassis in the image below. 1.5.3 Screw holes Place six screws into the holes indicated by circles to secure the motherboard to the rear part of the chassis P4V800D-X ® ASUS P4V800D-X Motherboard 1-7
Do not overtighten the screws! Doing so can damage the motherboard. Place this side towards-the rear of the chassis as indicated in the correct orientation. The edge with external ports goes to the chassis. 1.5.2 Placement direction When installing the motherboard, make sure that you place it into the chassis in the image below. 1.5.3 Screw holes Place six screws into the holes indicated by circles to secure the motherboard to the rear part of the chassis P4V800D-X ® ASUS P4V800D-X Motherboard 1-7

Motherboard DIY Troubleshooting Guide
Page 19
...in only one direction. A DDR DIMM is recommended that support up to 4 GB unbuffered non-ECC DDR400/333/266 DDR SDRAM DIMMs. P4V800D-X ® P4V800D-X 184-Pin DDR DIMM Sockets 1.7.2 Memory configurations You may install single or double-sided 64 MB, 128 MB, 256 MB...to the sockets. 1. DO NOT force a DIMM into a socket to [Auto] ensure system stability. 3. ASUS P4V800D-X Motherboard 1-9 For optimum compatibility, it fits in the BIOS are not supported. 2. Visit ASUS website (www.asus.com) for a list of the module are the same or set to avoid damaging the DIMM. 4.
...in only one direction. A DDR DIMM is recommended that support up to 4 GB unbuffered non-ECC DDR400/333/266 DDR SDRAM DIMMs. P4V800D-X ® P4V800D-X 184-Pin DDR DIMM Sockets 1.7.2 Memory configurations You may install single or double-sided 64 MB, 128 MB, 256 MB...to the sockets. 1. DO NOT force a DIMM into a socket to [Auto] ensure system stability. 3. ASUS P4V800D-X Motherboard 1-9 For optimum compatibility, it fits in the BIOS are not supported. 2. Visit ASUS website (www.asus.com) for a list of the module are the same or set to avoid damaging the DIMM. 4.

Motherboard DIY Troubleshooting Guide
Page 21
... with extra force. 2. Failure to do so may cause severe damage to unplug the power supply before adding or removing DIMMs or other system components. ASUS P4V800D-X Motherboard 1-11 Unlock a DIMM socket by pressing the retaining clips outward. 3. The DIMM might get damaged when it fits in the motherboard. 1.7.3 Installing a DIMM...
... with extra force. 2. Failure to do so may cause severe damage to unplug the power supply before adding or removing DIMMs or other system components. ASUS P4V800D-X Motherboard 1-11 Unlock a DIMM socket by pressing the retaining clips outward. 3. The DIMM might get damaged when it fits in the motherboard. 1.7.3 Installing a DIMM...

Motherboard DIY Troubleshooting Guide
Page 23
shared - - - - - - - - - - - - - otherwise, conflicts will arise between the two PCI groups, making the system unstable and the card inoperable. used - - - - - - - - ASUS P4V800D-X Motherboard 1-13 shared - - - - - Standard interrupt assignments IRQ Priority Standard Function 0 1 1 2 2 N/A 3 11 4 12 5 13 6 14 7 15 8 3 9 4 10 5 11 6 12 7 13 8 14 9 15 10 System Timer Key ...
shared - - - - - - - - - - - - - otherwise, conflicts will arise between the two PCI groups, making the system unstable and the card inoperable. used - - - - - - - - ASUS P4V800D-X Motherboard 1-13 shared - - - - - Standard interrupt assignments IRQ Priority Standard Function 0 1 1 2 2 N/A 3 11 4 12 5 13 6 14 7 15 8 3 9 4 10 5 11 6 12 7 13 8 14 9 15 10 System Timer Key ...

Motherboard DIY Troubleshooting Guide
Page 25
... cap on CLRTC jumper default position. Hold down the key during the boot process and enter BIOS setup to pins 1-2. P4V800D-X CLRTC 12 23 ® Normal (Default) P4V800D-X Clear RTC RAM Clear CMOS ASUS P4V800D-X Motherboard 1-15 You can clear the CMOS memory of date, time, and system setup parameters by erasing the CMOS...
... cap on CLRTC jumper default position. Hold down the key during the boot process and enter BIOS setup to pins 1-2. P4V800D-X CLRTC 12 23 ® Normal (Default) P4V800D-X Clear RTC RAM Clear CMOS ASUS P4V800D-X Motherboard 1-15 You can clear the CMOS memory of date, time, and system setup parameters by erasing the CMOS...

Motherboard DIY Troubleshooting Guide
Page 27
... of this port becomes Front Speaker Out. 6. LAN (RJ-45) port. This port connects a headphone or a speaker. The functions of this port becomes Bass/Center. ASUS P4V800D-X Motherboard 1-17 In 4/6-channel mode, the function of this port becomes Surround (Rear Speaker) Out. 5. Line Out port (lime). This port is for connecting USB...
... of this port becomes Front Speaker Out. 6. LAN (RJ-45) port. This port connects a headphone or a speaker. The functions of this port becomes Bass/Center. ASUS P4V800D-X Motherboard 1-17 In 4/6-channel mode, the function of this port becomes Surround (Rear Speaker) Out. 5. Line Out port (lime). This port is for connecting USB...

Motherboard DIY Troubleshooting Guide
Page 29
Connect the fan cables to the fan connectors. SATA2 GND RSATA_TXP2 RSATA_TXN2 GND RSATA_RXP2 RSATA_RXN2 GND P4V800D-X ® SATA1 GND RSATA_TXP1 RSATA_TXN1 GND RSATA_RXP1 RSATA_RXN1 GND P4V800D-X SATA connectors Important notes on the motherboard, making sure that the black wire of each cable...are for the Serial ATA signal cables for Serial ATA hard disk drives. P4V800D-X CPU_FAN GND +12V Rotation ® PWR_FAN CHA_FAN GND +12V Rotation GND +12V Rotation P4V800D-X Fan connectors ASUS P4V800D-X Motherboard 1-19 Serial ATA connectors (7-pin SATA1, SATA2) These connectors ...
Connect the fan cables to the fan connectors. SATA2 GND RSATA_TXP2 RSATA_TXN2 GND RSATA_RXP2 RSATA_RXN2 GND P4V800D-X ® SATA1 GND RSATA_TXP1 RSATA_TXN1 GND RSATA_RXP1 RSATA_RXN1 GND P4V800D-X SATA connectors Important notes on the motherboard, making sure that the black wire of each cable...are for the Serial ATA signal cables for Serial ATA hard disk drives. P4V800D-X CPU_FAN GND +12V Rotation ® PWR_FAN CHA_FAN GND +12V Rotation GND +12V Rotation P4V800D-X Fan connectors ASUS P4V800D-X Motherboard 1-19 Serial ATA connectors (7-pin SATA1, SATA2) These connectors ...

Motherboard DIY Troubleshooting Guide
Page 31
... minimum recommended wattage is for an ATX power supply. P4V800D-X ® FP_AUDIO BLINE_OUT_L BLINE_OUT_R +5VA AGND Line out_L NC Line out_R MICPWR MIC2 P4V800D-X Front Panel Audio Connector 8. ATX12V ATXPWR P4V800D-X ® +12V DC GND P4V800D-X ATX power connector +12V DC +3 Volts GND +12... power connectors (24-pin EATXPWR, 4-pin ATX12V) These connectors are designed to replace the power supply in only one orientation. ASUS P4V800D-X Motherboard 1-21 The plugs from the power supply are for the front panel audio cable. The system may become unstable and ...
... minimum recommended wattage is for an ATX power supply. P4V800D-X ® FP_AUDIO BLINE_OUT_L BLINE_OUT_R +5VA AGND Line out_L NC Line out_R MICPWR MIC2 P4V800D-X Front Panel Audio Connector 8. ATX12V ATXPWR P4V800D-X ® +12V DC GND P4V800D-X ATX power connector +12V DC +3 Volts GND +12... power connectors (24-pin EATXPWR, 4-pin ATX12V) These connectors are designed to replace the power supply in only one orientation. ASUS P4V800D-X Motherboard 1-21 The plugs from the power supply are for the front panel audio cable. The system may become unstable and ...

Motherboard DIY Troubleshooting Guide
Page 33
...for the chassis-mounted system warning speaker. 10. System panel connector (20-pin PANEL) This connector supports several chassis-mounted functions. ASUS P4V800D-X Motherboard 1-23 When in sleep or soft-off button (2-pin PWRBTN) This connector is for system reboot without turning off the ... Activity LED. Pressing the power button turns the system on the BIOS settings. PWR Ground Reset Ground P4V800D-X RESET ® IDE_LED PWRSW * Requires an ATX power supply. P4V800D-X System Panel connector • System power LED (3-1 pin PLED) This connector is for the system ...
...for the chassis-mounted system warning speaker. 10. System panel connector (20-pin PANEL) This connector supports several chassis-mounted functions. ASUS P4V800D-X Motherboard 1-23 When in sleep or soft-off button (2-pin PWRBTN) This connector is for system reboot without turning off the ... Activity LED. Pressing the power button turns the system on the BIOS settings. PWR Ground Reset Ground P4V800D-X RESET ® IDE_LED PWRSW * Requires an ATX power supply. P4V800D-X System Panel connector • System power LED (3-1 pin PLED) This connector is for the system ...

Motherboard DIY Troubleshooting Guide
Page 36
... of paper. Version 1.10 Copyright (C) 2002 American Megatrends, Inc. Reading flash ..... 0x0008CC00 (9%) 2. Reading flash ..... To update the BIOS using a bootable floppy diskette. ASUS P4V800D-X Motherboard 2-3
... of paper. Version 1.10 Copyright (C) 2002 American Megatrends, Inc. Reading flash ..... 0x0008CC00 (9%) 2. Reading flash ..... To update the BIOS using a bootable floppy diskette. ASUS P4V800D-X Motherboard 2-3
Motherboard DIY Troubleshooting Guide
Page 38
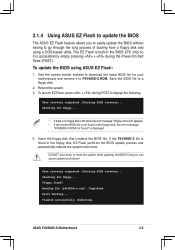
... to download the latest BIOS file for floppy... Insert the floppy disk that contains the BIOS file. ASUS P4V800D-X Motherboard 2-5 Starting BIOS recovery... Reading file "p4v800d-x.rom". Save the BIOS file to a floppy disk. 2. Checking for your motherboard and rename it ...while updating the BIOS! Start flashing... If the P4V800D-X file is accessible by simply pressing + during POST to display the following. Rebooting. 2.1.4 Using ASUS EZ Flash to update the BIOS The ASUS EZ Flash feature allows you to easily update the BIOS without...
... to download the latest BIOS file for floppy... Insert the floppy disk that contains the BIOS file. ASUS P4V800D-X Motherboard 2-5 Starting BIOS recovery... Reading file "p4v800d-x.rom". Save the BIOS file to a floppy disk. 2. Checking for your motherboard and rename it ...while updating the BIOS! Start flashing... If the P4V800D-X file is accessible by simply pressing + during POST to display the following. Rebooting. 2.1.4 Using ASUS EZ Flash to update the BIOS The ASUS EZ Flash feature allows you to easily update the BIOS without...

Motherboard DIY Troubleshooting Guide
Page 40
.... Change Field Tab Select Field F1 General Help F10 Save and Exit ESC Exit v02.58 (C)Copyright 1985-2004, American Megatrends, Inc. ASUS P4V800D-X Motherboard 2-7 Sub-menu items Navigation keys 2.2.2 Menu bar The menu bar on top of the screen has the following main items: Main... 2.2.3 Navigation keys At the bottom right corner of the navigation keys differ from one screen to select items in .] [Disabled] [ST340014A] [Not Detected] [ASUS CD-S500/A] [Not Detected] Use [ENTER], [TAB] or [SHIFT-TAB] to configure System Time. ←→ Select Screen ↑↓...
.... Change Field Tab Select Field F1 General Help F10 Save and Exit ESC Exit v02.58 (C)Copyright 1985-2004, American Megatrends, Inc. ASUS P4V800D-X Motherboard 2-7 Sub-menu items Navigation keys 2.2.2 Menu bar The menu bar on top of the screen has the following main items: Main... 2.2.3 Navigation keys At the bottom right corner of the navigation keys differ from one screen to select items in .] [Disabled] [ST340014A] [Not Detected] [ASUS CD-S500/A] [Not Detected] Use [ENTER], [TAB] or [SHIFT-TAB] to configure System Time. ←→ Select Screen ↑↓...

Motherboard DIY Troubleshooting Guide
Page 42
... Configuration options: [Disabled] [360K, 5.25 in.] [1.2M , 5.25 in.] [720K , 3.5 in.] [1.44M, 3.5 in.] [2.88M, 3.5 in .] ASUS P4V800D-X Motherboard 2-9 System Time System Date Legacy Diskette A Legacy Diskette B Primary IDE Master Primary IDE Slave Secondary IDE Master Secondary IDE Slave System Information [17:08...Day xx/xx/xxxx] Allows you to set the system date. 2.3.3 Legacy Diskette A [1.44M, 3.5 in .] [Disabled] [ST340014A] [Not Detected] [ASUS CD-S500/A] [Not Detected] Use [ENTER], [TAB] or [SHIFT-TAB] to configure System Time. ←→ Select Screen ↑↓...
... Configuration options: [Disabled] [360K, 5.25 in.] [1.2M , 5.25 in.] [720K , 3.5 in.] [1.44M, 3.5 in.] [2.88M, 3.5 in .] ASUS P4V800D-X Motherboard 2-9 System Time System Date Legacy Diskette A Legacy Diskette B Primary IDE Master Primary IDE Slave Secondary IDE Master Secondary IDE Slave System Information [17:08...Day xx/xx/xxxx] Allows you to set the system date. 2.3.3 Legacy Diskette A [1.44M, 3.5 in .] [Disabled] [ST340014A] [Not Detected] [ASUS CD-S500/A] [Not Detected] Use [ENTER], [TAB] or [SHIFT-TAB] to configure System Time. ←→ Select Screen ↑↓...

Motherboard DIY Troubleshooting Guide
Page 44
...] [UDMA4] [UDMA5] [UDMA6] SMART Monitoring [Auto] Sets the Smart Monitoring, Analysis, and Reporting Technology. The items in this menu are auto-detected by the BIOS. ASUS P4V800D-X Motherboard 2-11
...] [UDMA4] [UDMA5] [UDMA6] SMART Monitoring [Auto] Sets the Smart Monitoring, Analysis, and Reporting Technology. The items in this menu are auto-detected by the BIOS. ASUS P4V800D-X Motherboard 2-11

Motherboard DIY Troubleshooting Guide
Page 46
... 2.0 ports. USB 1.1 Ports Configuration [USB 8 Ports] Allows you use a USB mass storage device, a USB mass storage device configuration option will display. ASUS P4V800D-X Motherboard 2-13
... 2.0 ports. USB 1.1 Ports Configuration [USB 8 Ports] Allows you use a USB mass storage device, a USB mass storage device configuration option will display. ASUS P4V800D-X Motherboard 2-13

Motherboard DIY Troubleshooting Guide
Page 48
... [2.5] SPD. Active to Precharge(Tras) [20T] Active to display the sub-menu. Select an item then press to CMD(Trcd) [5T] DRAM BUS Selection [Auto] ASUS P4V800D-X Motherboard 2-15 NorthBridge VIA PT880Ultra Configuration SouthBridge VIA VT8237R Configuration Options for VIA PT880U NorthBridge VIA PT880Ultra Configuration NorthBridge...
... [2.5] SPD. Active to Precharge(Tras) [20T] Active to display the sub-menu. Select an item then press to CMD(Trcd) [5T] DRAM BUS Selection [Auto] ASUS P4V800D-X Motherboard 2-15 NorthBridge VIA PT880Ultra Configuration SouthBridge VIA VT8237R Configuration Options for VIA PT880U NorthBridge VIA PT880Ultra Configuration NorthBridge...

Motherboard DIY Troubleshooting Guide
Page 50
... to enable or disable the onboard LAN Boot ROM. If an audio device is detected, the onboard audio controller is disabled. Configuration options: [Enabled] [Disabled] ASUS P4V800D-X Motherboard 2-17 Configuration options: [Disabled] [SATA] [RAID] RAID BIOS Execute [Enabled] Configuration options: [Disabled] [Enabled] OnBoard ACʼ97 Audio [Enabled...
... to enable or disable the onboard LAN Boot ROM. If an audio device is detected, the onboard audio controller is disabled. Configuration options: [Enabled] [Disabled] ASUS P4V800D-X Motherboard 2-17 Configuration options: [Disabled] [SATA] [RAID] RAID BIOS Execute [Enabled] Configuration options: [Disabled] [Enabled] OnBoard ACʼ97 Audio [Enabled...


