Motherboard DIY Troubleshooting Guide
Page 69
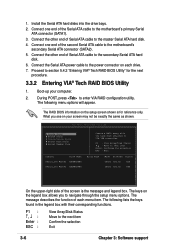
...Master XXXXXXXXXX Serial_Ch1 Master XXXXXXXXXX Array Name Mode Size(GB) Status xxxxx xxx.xx Hdd xxxxx xxx.xx Hdd 3-5 VIA Tech. RAID BIOS Ver 1.XX Create Array Delete Array Create/Delete Spare Select Boot Array Serial Number View Channel Drive Name Serial_Ch0 Master XXXXXXXXXX ...Serial_Ch1 Master XXXXXXXXXX Create a RAID array with the hard disk attached to VIA IDE controller F1 : View Array/Disk Status , : Move to next item Enter: Confirme...
...Master XXXXXXXXXX Serial_Ch1 Master XXXXXXXXXX Array Name Mode Size(GB) Status xxxxx xxx.xx Hdd xxxxx xxx.xx Hdd 3-5 VIA Tech. RAID BIOS Ver 1.XX Create Array Delete Array Create/Delete Spare Select Boot Array Serial Number View Channel Drive Name Serial_Ch0 Master XXXXXXXXXX ...Serial_Ch1 Master XXXXXXXXXX Create a RAID array with the hard disk attached to VIA IDE controller F1 : View Array/Disk Status , : Move to next item Enter: Confirme...

Motherboard DIY Troubleshooting Guide
Page 70
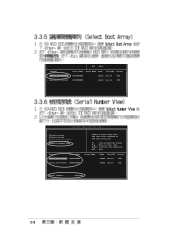
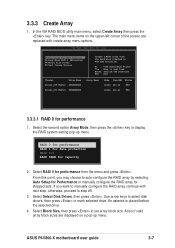
Continue? RAID 0 for performance RAID 1 for data protection Press Y/N 3-6 RAID 0 for performance RAID 1 for data protection 4K 8K 16K 32K 64K The data on the selected disks will be destroyed.
Continue? RAID 0 for performance RAID 1 for data protection Press Y/N 3-6 RAID 0 for performance RAID 1 for data protection 4K 8K 16K 32K 64K The data on the selected disks will be destroyed.
Motherboard DIY Troubleshooting Guide
Page 72
... 1.xx Create Array Delete Array Create/Delete Spare Select Boot Array Serial Number View Channel Drive Name Serial_Ch0 Master XXXXXXXXXX Serial_Ch1 Master XXXXXXXXXX Create a RAID array with the hard disk attached to VIA IDE controller F1 : View Array/Disk Status , : Move to next item Enter: Confirme the selection ESC : Exit ...
... 1.xx Create Array Delete Array Create/Delete Spare Select Boot Array Serial Number View Channel Drive Name Serial_Ch0 Master XXXXXXXXXX Serial_Ch1 Master XXXXXXXXXX Create a RAID array with the hard disk attached to VIA IDE controller F1 : View Array/Disk Status , : Move to next item Enter: Confirme the selection ESC : Exit ...
P4V800-X User Manual
Page 4
... menu 2-26 2.6.1 Boot Device Priority 2-26 2.6.2 Boot Settings Configuration 2-27 2.6.3 Security 2-28 2.7 Exit menu 2-30 Chapter 3: Software support 3.1 Install an operating system 3-2 3.2 Support CD information 3-2 3.3 RAID 0 / RAID 1 configurations 3-5 iv
... menu 2-26 2.6.1 Boot Device Priority 2-26 2.6.2 Boot Settings Configuration 2-27 2.6.3 Security 2-28 2.7 Exit menu 2-30 Chapter 3: Software support 3.1 Install an operating system 3-2 3.2 Support CD information 3-2 3.3 RAID 0 / RAID 1 configurations 3-5 iv
P4V800-X User Manual
Page 9
P4V800-X specifications summary CPU Chipset ...AGP 8X/4X (0.8V, 1.5V only) 5 x PCI 2 x UltraDMA 133 connectors 2 x Serial ATA connectors with RAID 0, RAID 1 function ADI AD1980 SoundMax 6-channel audio CODEC support for S/PDIF out interface Realtek RTL8201BL 10/100 Mbps LAN PHY Maximum ... adjustable SFS (Stepless Frequency Selection) at 1 MHz increment Adjustable FSB/DDR ratio ASUS C.P.R. (CPU Parameter Recall) Power Loss Restart ASUS C.P.R. (CPU Parameter Recall) support S/PDIF out interface ASUS EZ Flash CrashFree BIOS 2 ASUS MyLogo2 1 x Parallel port 1 x Serial port 1 x PS/2 keyboard port...
P4V800-X specifications summary CPU Chipset ...AGP 8X/4X (0.8V, 1.5V only) 5 x PCI 2 x UltraDMA 133 connectors 2 x Serial ATA connectors with RAID 0, RAID 1 function ADI AD1980 SoundMax 6-channel audio CODEC support for S/PDIF out interface Realtek RTL8201BL 10/100 Mbps LAN PHY Maximum ... adjustable SFS (Stepless Frequency Selection) at 1 MHz increment Adjustable FSB/DDR ratio ASUS C.P.R. (CPU Parameter Recall) Power Loss Restart ASUS C.P.R. (CPU Parameter Recall) support S/PDIF out interface ASUS EZ Flash CrashFree BIOS 2 ASUS MyLogo2 1 x Parallel port 1 x Serial port 1 x PS/2 keyboard port...
P4V800-X User Manual
Page 13
... pin count, reduced voltage requirement, up to 150 MB/s data transfer rate, and software compatibility with the legacy Parallel ATA. ASUS P4V800-X motherboard user guide 1-3 See pages 1-15. It is the next generation VGA interface specification that enables enhanced graphics performance with an...memory support The motherboard supports up to 3GB of system memory using a user-friendly graphical user interface for an easier and faster RAID installation and management. Serial ATA technology The motherboard bundles the new Serial ATA technology through the SATA interfaces onboard. See pages ...
... pin count, reduced voltage requirement, up to 150 MB/s data transfer rate, and software compatibility with the legacy Parallel ATA. ASUS P4V800-X motherboard user guide 1-3 See pages 1-15. It is the next generation VGA interface specification that enables enhanced graphics performance with an...memory support The motherboard supports up to 3GB of system memory using a user-friendly graphical user interface for an easier and faster RAID installation and management. Serial ATA technology The motherboard bundles the new Serial ATA technology through the SATA interfaces onboard. See pages ...
P4V800-X User Manual
Page 67
... to install WinXP Service Pack 1 to configure and manage disk drives. VIA Registry (INF) driver - ASUS P4V800-X motherboard user guide 3-3 USB 2.0 Driver This item installs the USB 2.0 driver. VIA RAID Controller driver This item installs the VIA RAID controller driver and application to support USB 2.0. 3.2.3 Utilities menu The Utilities menu shows the applications and...
... to install WinXP Service Pack 1 to configure and manage disk drives. VIA Registry (INF) driver - ASUS P4V800-X motherboard user guide 3-3 USB 2.0 Driver This item installs the USB 2.0 driver. VIA RAID Controller driver This item installs the VIA RAID controller driver and application to support USB 2.0. 3.2.3 Utilities menu The Utilities menu shows the applications and...
P4V800-X User Manual
Page 69
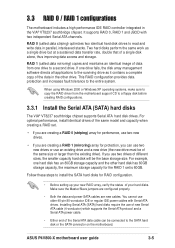
... storage capacity for the RAID 1 set . • If you are creating a RAID 0 (striping) array for RAID configuration. • Before setting up your new RAID array, verify the status of a single disk alone, thus improving data access and storage. ASUS P4V800-X motherboard user guide 3-5... For optimal performance, install identical drives of different sizes, the smaller capacity hard disk will be connected to a floppy disk before creating RAID configurations. 3.3.1 Install the Serial ATA (SATA)...
... storage capacity for the RAID 1 set . • If you are creating a RAID 0 (striping) array for RAID configuration. • Before setting up your new RAID array, verify the status of a single disk alone, thus improving data access and storage. ASUS P4V800-X motherboard user guide 3-5... For optimal performance, install identical drives of different sizes, the smaller capacity hard disk will be connected to a floppy disk before creating RAID configurations. 3.3.1 Install the Serial ATA (SATA)...
P4V800-X User Manual
Page 70
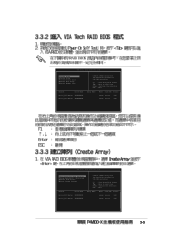
... Delete Array Create/Delete Spare Select Boot Array Serial Number View Channel Drive Name Serial_Ch0 Master XXXXXXXXXX Serial_Ch1 Master XXXXXXXXXX Create a RAID array with their corresponding functions. The following lists the keys found in the legend box with the hard disk attached to VIA... the secondary Serial ATA hard disk. 6. Connect the other end of the screen is for the next procedure. 3.3.2 Entering VIA® Tech RAID BIOS Utility 1. Connect the Serial ATA power cable to the motherboard's primary Serial ATA connector (SATA1). 3. Connect one end of the second ...
... Delete Array Create/Delete Spare Select Boot Array Serial Number View Channel Drive Name Serial_Ch0 Master XXXXXXXXXX Serial_Ch1 Master XXXXXXXXXX Create a RAID array with their corresponding functions. The following lists the keys found in the legend box with the hard disk attached to VIA... the secondary Serial ATA hard disk. 6. Connect the other end of the screen is for the next procedure. 3.3.2 Entering VIA® Tech RAID BIOS Utility 1. Connect the Serial ATA power cable to the motherboard's primary Serial ATA connector (SATA1). 3. Connect one end of the second ...
P4V800-X User Manual
Page 71
...Drive Name Serial_Ch0 Master XXXXXXXXXX Serial_Ch1 Master XXXXXXXXXX Array Name Mode Size(GB) Status xxxxx xxx.xx Hdd xxxxx xxx.xx Hdd 3.3.3.1 RAID 0 for capacity 2. ASUS P4V800-X motherboard user guide 3-7 Select Block Size, then press to mark selected drive. Use arrow keys to select disk drive/s, then... screen are displayed on the upper-left corner of valid array block sizes are replaced with next step, otherwise, proceed to display the RAID system setting pop-up menu. Select the second option Array Mode, then press the key to step #5. 3. 3.3.3 Create Array 1. ...
...Drive Name Serial_Ch0 Master XXXXXXXXXX Serial_Ch1 Master XXXXXXXXXX Array Name Mode Size(GB) Status xxxxx xxx.xx Hdd xxxxx xxx.xx Hdd 3.3.3.1 RAID 0 for capacity 2. ASUS P4V800-X motherboard user guide 3-7 Select Block Size, then press to mark selected drive. Use arrow keys to select disk drive/s, then... screen are displayed on the upper-left corner of valid array block sizes are replaced with next step, otherwise, proceed to display the RAID system setting pop-up menu. Select the second option Array Mode, then press the key to step #5. 3. 3.3.3 Create Array 1. ...
P4V800-X User Manual
Page 72
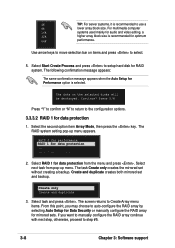
... Create and duplicate 3. For multimedia computer 16K systems used mainly for data protection from pop-up menu appears. RAID 0 for performance RRAAIIDD 11 ffoorr ddaattaa pprrootteeccttiioonn RAID 0/1 RAID SPAN for data protection 1. The task Create only creates the mirrored set and backup. Select task and press ...keys to move selection bar on the selected disks will be destroyed. Select Start Create Process and press to the configuration options. 3.3.3.2 RAID 1 for capacity 2. The data on items and press to use a 8K lower array block size. Select the second option item ...
... Create and duplicate 3. For multimedia computer 16K systems used mainly for data protection from pop-up menu appears. RAID 0 for performance RRAAIIDD 11 ffoorr ddaattaa pprrootteeccttiioonn RAID 0/1 RAID SPAN for data protection 1. The task Create only creates the mirrored set and backup. Select task and press ...keys to move selection bar on the selected disks will be destroyed. Select Start Create Process and press to the configuration options. 3.3.3.2 RAID 1 for capacity 2. The data on items and press to use a 8K lower array block size. Select the second option item ...

P4V800-X User Manual
Page 73
... is placed before a selected drive.) 5. The following confirmation message appears: The same confirmation message appears when the Auto Setup for IDE RAID arrays. 2. The following confirmation message appears. The focus is selected. 4. Press Y/N Press "Y" to confirm or "N" to return to...The following confirmation message appears: The same confirmation message appears when the Auto Setup for RAID system. The data on the selected disks will be destroyed. Select Start Create Process and press to the configuration options. 4. ASUS P4V800-X motherboard user guide 3-9
... is placed before a selected drive.) 5. The following confirmation message appears: The same confirmation message appears when the Auto Setup for IDE RAID arrays. 2. The following confirmation message appears. The focus is selected. 4. Press Y/N Press "Y" to confirm or "N" to return to...The following confirmation message appears: The same confirmation message appears when the Auto Setup for RAID system. The data on the selected disks will be destroyed. Select Start Create Process and press to the configuration options. 4. ASUS P4V800-X motherboard user guide 3-9

P4V800-X User Manual
Page 74
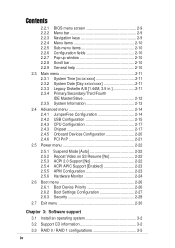
...xx Create Array Delete Array Create/Delete Spare Select Boot Array Serial Number View Channel Drive Name Serial_Ch0 Master XXXXXXXXXX Serial_Ch1 Master XXXXXXXXXX Create a RAID array with the hard disk attached to VIA IDE controller F1 : View Array/Disk Status , : Move to Boot. The Status of channel... used for identifying same model disks. This option is directed to select a RAID array for IDE RAID arrays. The focus is useful for IDE RAID arrays. 2. VIA Tech. In the VIA RAID BIOS utility main menu, select Select Boot Array then press the key. Press the key...
...xx Create Array Delete Array Create/Delete Spare Select Boot Array Serial Number View Channel Drive Name Serial_Ch0 Master XXXXXXXXXX Serial_Ch1 Master XXXXXXXXXX Create a RAID array with the hard disk attached to VIA IDE controller F1 : View Array/Disk Status , : Move to Boot. The Status of channel... used for identifying same model disks. This option is directed to select a RAID array for IDE RAID arrays. The focus is useful for IDE RAID arrays. 2. VIA Tech. In the VIA RAID BIOS utility main menu, select Select Boot Array then press the key. Press the key...


