

Motherboard DIY Troubleshooting Guide
Page 4
...About this guide iii How this guide is organized iii Conventions used in this guide iii Safety information vi FCC/CDC statements vii ASUS contact information viii Chapter 1: Product introduction 1 Welcome 1 1.1 Package contents 1 1.2 Core Specifications 2 1.3 Special Features 3 1.4... holes 7 2.2 Motherboard layout 8 2.3 Before you proceed 9 2.4 Central Processing Unit (CPU 10 2.4.1 Overview 10 2.4.2 Installing the CPU 11 2.4.3 Installing the heatsink and fan 13 2.4.4 Connecting the CPU fan cable 15 2.5 System memory 16 2.5.1 Overview 16 2.5.2 General DIMM Notes 16 2.5.3...
...About this guide iii How this guide is organized iii Conventions used in this guide iii Safety information vi FCC/CDC statements vii ASUS contact information viii Chapter 1: Product introduction 1 Welcome 1 1.1 Package contents 1 1.2 Core Specifications 2 1.3 Special Features 3 1.4... holes 7 2.2 Motherboard layout 8 2.3 Before you proceed 9 2.4 Central Processing Unit (CPU 10 2.4.1 Overview 10 2.4.2 Installing the CPU 11 2.4.3 Installing the heatsink and fan 13 2.4.4 Connecting the CPU fan cable 15 2.5 System memory 16 2.5.1 Overview 16 2.5.2 General DIMM Notes 16 2.5.3...

Motherboard DIY Troubleshooting Guide
Page 11
...: 1.1 Package contents Check your retailer. The ASUS® P4S133 motherboard is damaged or missing, contact your P4S133 package for the following items. ASUS P4S133 motherboard (ATX form factor: 12-in x 8.6-in) ASUS P4S133 support CD ASUS 2-port USB 1.1 module 80-conductor ribbon cable...; LAN Controller onboard ~ ASUS Post Reporter™ onboard ~ Two USB ports plus one header for an effective desktop platform solution. ~ CPU Thermal Protection ~ Up to ensure long-lasting, superlative performance. ASUS P4S133 motherboard user guide 1 The ASUS P4S133 motherboard delivers a host of...
...: 1.1 Package contents Check your retailer. The ASUS® P4S133 motherboard is damaged or missing, contact your P4S133 package for the following items. ASUS P4S133 motherboard (ATX form factor: 12-in x 8.6-in) ASUS P4S133 support CD ASUS 2-port USB 1.1 module 80-conductor ribbon cable...; LAN Controller onboard ~ ASUS Post Reporter™ onboard ~ Two USB ports plus one header for an effective desktop platform solution. ~ CPU Thermal Protection ~ Up to ensure long-lasting, superlative performance. ASUS P4S133 motherboard user guide 1 The ASUS P4S133 motherboard delivers a host of...
Motherboard DIY Troubleshooting Guide
Page 12
... connectors that support four IDE devices on two channels. Smart BIOS: 2Mb firmware enables Vcore and CPU/DDR SDRAM frequency adjustments, boot block write protection, and HD/SCSI/MO/ZIP/CD/Floppy boot ... 64, 128, 256, 512, or 1024MB) SDRAM up to the memory and processor. This ASUS motherboard represents the latest advances and offers users the finest componentry available today... UltraDMA/100 Support: ...panel, SMB, smart card, infrared. 1.2 Core Specifications The P4S133 motherboard is designed and assembled according to 3GB. PC133 SDRAM: Equipped with 512KB L2 cache for wireless ...
... connectors that support four IDE devices on two channels. Smart BIOS: 2Mb firmware enables Vcore and CPU/DDR SDRAM frequency adjustments, boot block write protection, and HD/SCSI/MO/ZIP/CD/Floppy boot ... 64, 128, 256, 512, or 1024MB) SDRAM up to the memory and processor. This ASUS motherboard represents the latest advances and offers users the finest componentry available today... UltraDMA/100 Support: ...panel, SMB, smart card, infrared. 1.2 Core Specifications The P4S133 motherboard is designed and assembled according to 3GB. PC133 SDRAM: Equipped with 512KB L2 cache for wireless ...
Motherboard DIY Troubleshooting Guide
Page 13
1.3 Special Features Easy Overclocking • Quickly adjust CPU frequency multiples with BIOS in JumperFree™ Mode • Adjustable FSB/MEM/PCI frequency ratio • Stepless Frequency Selection (SFS) for fine...setting. Temperature, Fan and Voltage Monitoring: CPU temperature is monitored by the ASUS ASIC through the CPU's internal thermal diode to support 10BASE-T/100BASE-TX Fast Ethernet networking. Onboard LAN (Optional): The motherboard incorporates the Realtek PHY RTL8201 chip to prevent overheating and damage. ASUS P4S133 motherboard user guide 3 Dual Function Power ...
1.3 Special Features Easy Overclocking • Quickly adjust CPU frequency multiples with BIOS in JumperFree™ Mode • Adjustable FSB/MEM/PCI frequency ratio • Stepless Frequency Selection (SFS) for fine...setting. Temperature, Fan and Voltage Monitoring: CPU temperature is monitored by the ASUS ASIC through the CPU's internal thermal diode to support 10BASE-T/100BASE-TX Fast Ethernet networking. Onboard LAN (Optional): The motherboard incorporates the Realtek PHY RTL8201 chip to prevent overheating and damage. ASUS P4S133 motherboard user guide 3 Dual Function Power ...

Motherboard DIY Troubleshooting Guide
Page 22
...micro-architecture. Incorrect installation of 3.2GB/s. The Intel Pentium 4 Processor in the illustration that should match a specific corner of the CPU socket. This socket is specifically designed for the Intel® Pentium® 4 478/Northwood Processor. Together, these attributes improve ... faster execution of integer instructions, and a data transfer rate of the CPU into the socket may bend the pins and severely damage the CPU! 10 Chapter 2: Hardware information 2.4 Central Processing Unit (CPU) 2.4.1 Overview The motherboard comes with a surface mount 478-pin Zero ...
...micro-architecture. Incorrect installation of 3.2GB/s. The Intel Pentium 4 Processor in the illustration that should match a specific corner of the CPU socket. This socket is specifically designed for the Intel® Pentium® 4 478/Northwood Processor. Together, these attributes improve ... faster execution of integer instructions, and a data transfer rate of the CPU into the socket may bend the pins and severely damage the CPU! 10 Chapter 2: Hardware information 2.4 Central Processing Unit (CPU) 2.4.1 Overview The motherboard comes with a surface mount 478-pin Zero ...

Motherboard DIY Troubleshooting Guide
Page 23
Socket Lever 90 - 100 Make sure that the socket lever is lifted up to a 90°-100° angle. ASUS P4S133 motherboard user guide 11 Unlock the socket by pressing the lever sideways, then lift it up to install a CPU. 1. Locate the 478-pin ZIF socket on the motherboard. 2. 2.4.2 Installing the CPU Follow these steps to 90°-100° angle, otherwise the CPU does not fit in completely.
Socket Lever 90 - 100 Make sure that the socket lever is lifted up to a 90°-100° angle. ASUS P4S133 motherboard user guide 11 Unlock the socket by pressing the lever sideways, then lift it up to install a CPU. 1. Locate the 478-pin ZIF socket on the motherboard. 2. 2.4.2 Installing the CPU Follow these steps to 90°-100° angle, otherwise the CPU does not fit in completely.

Motherboard DIY Troubleshooting Guide
Page 24
Gold Mark 5. When the CPU is in place, press it firmly on the side tab to indicate that its marked corner matches the base of the socket lever. 4. Position the CPU above the socket such that it fits in one correct orientation. Carefully insert the CPU into the socket to secure the CPU. The lever clicks on the socket while you push down the socket lever to prevent bending the pins and damaging the CPU! 3. DO NOT force the CPU into the socket until it is locked. 12 Chapter 2: Hardware information The CPU fits only in place.
Gold Mark 5. When the CPU is in place, press it firmly on the side tab to indicate that its marked corner matches the base of the socket lever. 4. Position the CPU above the socket such that it fits in one correct orientation. Carefully insert the CPU into the socket to secure the CPU. The lever clicks on the socket while you push down the socket lever to prevent bending the pins and damaging the CPU! 3. DO NOT force the CPU into the socket until it is locked. 12 Chapter 2: Hardware information The CPU fits only in place.

Motherboard DIY Troubleshooting Guide
Page 25
... steps to remove the retention module base when installing the CPU or installing other motherboard components. ASUS P4S133 motherboard user guide 13 Place the heatsink on top of the installed CPU, making sure that you buy a CPU separately, make sure that the heatsink fits properly on the... motherboard upon purchase. You do not match the CPU documentation, follow the latter...
... steps to remove the retention module base when installing the CPU or installing other motherboard components. ASUS P4S133 motherboard user guide 13 Place the heatsink on top of the installed CPU, making sure that you buy a CPU separately, make sure that the heatsink fits properly on the... motherboard upon purchase. You do not match the CPU documentation, follow the latter...

Motherboard DIY Troubleshooting Guide
Page 27
Hardware monitoring errors may occur if you fail to the connector on the retention mechanism to secure the heatsink and fan to connect the CPU fan connector! When secure, the retention locks should point to opposite directions. 2.4.4 Connecting the CPU fan cable When the fan, heatsink, and the retention mechanism are in place, connect the CPU fan cable to plug this connector. ASUS P4S133 motherboard user guide 15 CPU Fan Connector (CPUFAN1) Don't forget to the module base. Push down the locks on the motherboard labeled CPUFAN1. 3.
Hardware monitoring errors may occur if you fail to the connector on the retention mechanism to secure the heatsink and fan to connect the CPU fan connector! When secure, the retention locks should point to opposite directions. 2.4.4 Connecting the CPU fan cable When the fan, heatsink, and the retention mechanism are in place, connect the CPU fan cable to plug this connector. ASUS P4S133 motherboard user guide 15 CPU Fan Connector (CPUFAN1) Don't forget to the module base. Push down the locks on the motherboard labeled CPUFAN1. 3.

Motherboard DIY Troubleshooting Guide
Page 36
... Multiple equals the CPU's Internal frequency (the advertised CPU speed). DSW1 ON 12345 ON 12345 ON 12345 ON 12345 ON 12345 ON 12345 ON 12345 ON 12345 ON 12345 ON 12345 CPU 100MHz 100MHz 100MHz 100MHz 100MHz DRAM 100MHz 133MHz 150MHz 160MHz 166MHz P4S133 ® CPU 105MHz 108MHz 112MHz... 133MHz 133MHz DRAM 140MHz 144MHz 149MHz 133MHz 166MHz P4S133 CPU External Frequency Selection MHz CPU DRAM 100 100 100 133 100 150 100 ...
... Multiple equals the CPU's Internal frequency (the advertised CPU speed). DSW1 ON 12345 ON 12345 ON 12345 ON 12345 ON 12345 ON 12345 ON 12345 ON 12345 ON 12345 ON 12345 CPU 100MHz 100MHz 100MHz 100MHz 100MHz DRAM 100MHz 133MHz 150MHz 160MHz 166MHz P4S133 ® CPU 105MHz 108MHz 112MHz... 133MHz 133MHz DRAM 140MHz 144MHz 149MHz 133MHz 166MHz P4S133 CPU External Frequency Selection MHz CPU DRAM 100 100 100 133 100 150 100 ...

Motherboard DIY Troubleshooting Guide
Page 37
VEN1 12 23 CPU Rise 0.2V Normal (Default) P4S133 ® P4S133 CPU Voltage Setting 4) Keyboard Wake Up (3 pin KBWK) This allows you set in conjunction with Wake On PS2 KB/PS2 Mouse/CIR in 4.5.1 Power Up Control. ... keyboard power up function: use ) to adjust the CPU voltage. NOTE: This jumper must be set this to disable or enable the keyboard power up function. 3) CPU Voltage Setting (3 pin VEN1) This jumper is used to power up your computer. KBPWR1 P4S133 ® 2 1 +5V 3 2 +5VSB (Default) P4S133 Keyboard Power Setting ASUS P4S133 motherboard user guide 25
VEN1 12 23 CPU Rise 0.2V Normal (Default) P4S133 ® P4S133 CPU Voltage Setting 4) Keyboard Wake Up (3 pin KBWK) This allows you set in conjunction with Wake On PS2 KB/PS2 Mouse/CIR in 4.5.1 Power Up Control. ... keyboard power up function: use ) to adjust the CPU voltage. NOTE: This jumper must be set this to disable or enable the keyboard power up function. 3) CPU Voltage Setting (3 pin VEN1) This jumper is used to power up your computer. KBPWR1 P4S133 ® 2 1 +5V 3 2 +5VSB (Default) P4S133 Keyboard Power Setting ASUS P4S133 motherboard user guide 25
Motherboard DIY Troubleshooting Guide
Page 43
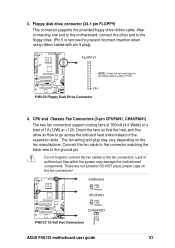
...using ribbon cables with pin 5 plug). These are not jumpers! PWRFAN1 GND +12V Rotation CPUFAN1 P4S133 GND +12V Rotation ® CHASFAN1 P4S133 12-Volt Fan Connectors Rotation +12V GND ASUS P4S133 motherboard user guide 31 The fan wiring and plug may damage the motherboard components. Orient the fans... at +12V. FLOPPY1 NOTE: Orient the red markings on the fan manufacturer. Do not forget to connect the fan cables to PIN 1. 3. CPU and Chassis Fan Connectors (3-pin CPUFAN1, CHASFAN1) The two fan connectors support cooling fans of 350mA (4.2 Watts) or a total of the expansion ...
...using ribbon cables with pin 5 plug). These are not jumpers! PWRFAN1 GND +12V Rotation CPUFAN1 P4S133 GND +12V Rotation ® CHASFAN1 P4S133 12-Volt Fan Connectors Rotation +12V GND ASUS P4S133 motherboard user guide 31 The fan wiring and plug may damage the motherboard components. Orient the fans... at +12V. FLOPPY1 NOTE: Orient the red markings on the fan manufacturer. Do not forget to connect the fan cables to PIN 1. 3. CPU and Chassis Fan Connectors (3-pin CPUFAN1, CHASFAN1) The two fan connectors support cooling fans of 350mA (4.2 Watts) or a total of the expansion ...

Motherboard DIY Troubleshooting Guide
Page 44
... ATXPWR connector, this header and mount the USB bracket to the CPU. USB2 USB1 GND USBP3+ USBP3- AUX12V1 +5.0VDC +5.0VDC -5.0VDC COM COM COM PS_ON# COM -12.0VDC +3.3VDC +12V GND GND +5V P4S133 ® ATXPWR1 Pin 1 P4S133 ATX & Auxiliary Power Connectors +12.0VDC +5VSB PWR_OK COM +5....0VDC COM +5.0VDC COM +3.3VDC +3.3VDC +12V DC COM ATX12V1 Pin 1 +12V DC COM 6. USB Power P4S133 ® 10 6 10 6 5 15 1 NC GND USBP2+ USBP2- The minimum recommended wattage is inadequate. USB Power NC GND USBP2+ USBP2- 5. The...
... ATXPWR connector, this header and mount the USB bracket to the CPU. USB2 USB1 GND USBP3+ USBP3- AUX12V1 +5.0VDC +5.0VDC -5.0VDC COM COM COM PS_ON# COM -12.0VDC +3.3VDC +12V GND GND +5V P4S133 ® ATXPWR1 Pin 1 P4S133 ATX & Auxiliary Power Connectors +12.0VDC +5VSB PWR_OK COM +5....0VDC COM +5.0VDC COM +3.3VDC +3.3VDC +12V DC COM ATX12V1 Pin 1 +12V DC COM 6. USB Power P4S133 ® 10 6 10 6 5 15 1 NC GND USBP2+ USBP2- The minimum recommended wattage is inadequate. USB Power NC GND USBP2+ USBP2- 5. The...

Motherboard DIY Troubleshooting Guide
Page 49
PWRTMP1 P4S133 ® Power Supply Thermal Sensor P4S133 Thermal Sensor Connector ASUS P4S133 motherboard user guide 37 15. Thermal Sensor CPU Connector (2 pin PWRTMP1) If the system runs a power supply with thermal monitoring, connect its thermal sensor cable to this connector.
PWRTMP1 P4S133 ® Power Supply Thermal Sensor P4S133 Thermal Sensor Connector ASUS P4S133 motherboard user guide 37 15. Thermal Sensor CPU Connector (2 pin PWRTMP1) If the system runs a power supply with thermal monitoring, connect its thermal sensor cable to this connector.

Motherboard DIY Troubleshooting Guide
Page 55
... Reporter is working Meaning No error during POST No DRAM installed or detected Video card not found or video card memory bad CPU overheated; ASUS P4S133 motherboard user guide 41 Be sure that is equipped with the last device on . Monitor b. System power (if you press the ATX power switch. For ...
... Reporter is working Meaning No error during POST No DRAM installed or detected Video card not found or video card memory bad CPU overheated; ASUS P4S133 motherboard user guide 41 Be sure that is equipped with the last device on . Monitor b. System power (if you press the ATX power switch. For ...

Motherboard DIY Troubleshooting Guide
Page 73
...ASUS P4S133 motherboard user guide 57 CPU Frequency Multiple (when CPU Speed is set to set the frequency multiple between the CPU's internal frequency (CPU speed) and external frequency. This field allows you to [Manual]) This field is for unlocked processors only. The setting of the CPU. CPU/PCI Frequency (MHz) (when CPU...™ mode, this field allows you to select the internal frequency of this field. Selecting a frequency higher than the CPU manufacturer recommends may cause the system to the system bus and PCI bus. If your processor frequency multiple is locked, you...
...ASUS P4S133 motherboard user guide 57 CPU Frequency Multiple (when CPU Speed is set to set the frequency multiple between the CPU's internal frequency (CPU speed) and external frequency. This field allows you to [Manual]) This field is for unlocked processors only. The setting of the CPU. CPU/PCI Frequency (MHz) (when CPU...™ mode, this field allows you to select the internal frequency of this field. Selecting a frequency higher than the CPU manufacturer recommends may cause the system to the system bus and PCI bus. If your processor frequency multiple is locked, you...

Motherboard DIY Troubleshooting Guide
Page 74
...the option to detect a USB device at startup. The default Vcore is enabled. The default of [Enabled] or choose [Disabled] to the CPU/PCI Frequency (MHz). When set to [Manual]. Configuration options: [Disabled] [Enabled] 58 Chapter 4: BIOS Setup If detected, the USB ...maintain the safest voltage for expansion cards. Configuration options: [Auto] [1:1] [3:4] [3:5] [4:5] (The configuration options vary depending on or off the CPU Level 1 and Level 2 built-in synchronous or asynchronous mode with installed DRAM of greater than 64MB, you set this field to detect a ...
...the option to detect a USB device at startup. The default Vcore is enabled. The default of [Enabled] or choose [Disabled] to the CPU/PCI Frequency (MHz). When set to [Manual]. Configuration options: [Disabled] [Enabled] 58 Chapter 4: BIOS Setup If detected, the USB ...maintain the safest voltage for expansion cards. Configuration options: [Auto] [1:1] [3:4] [3:5] [4:5] (The configuration options vary depending on or off the CPU Level 1 and Level 2 built-in synchronous or asynchronous mode with installed DRAM of greater than 64MB, you set this field to detect a ...

Motherboard DIY Troubleshooting Guide
Page 87
... Hardware Monitor MB Temperature [xxxC/xxxF] POWER Temperature [xxxC/xxxF] The onboard hardware monitor automatically detects the MB (motherboard) and CPU temperatures. You will then be prompted to "Press F1 to continue or DEL to the fan connectors on the motherboard, the specific...xxxxRPM] or N/A Chassis Fan Speed [xxxxRPM] or N/A The onboard hardware monitor automatically detects the CPU and chassis fan speeds in rotations per minute (RPM). Enter Power setup menu for details". ASUS P4S133 motherboard user guide 71 VCORE Voltage, +3.3V Voltage, +5V Voltage, +12V Voltage The onboard...
... Hardware Monitor MB Temperature [xxxC/xxxF] POWER Temperature [xxxC/xxxF] The onboard hardware monitor automatically detects the MB (motherboard) and CPU temperatures. You will then be prompted to "Press F1 to continue or DEL to the fan connectors on the motherboard, the specific...xxxxRPM] or N/A Chassis Fan Speed [xxxxRPM] or N/A The onboard hardware monitor automatically detects the CPU and chassis fan speeds in rotations per minute (RPM). Enter Power setup menu for details". ASUS P4S133 motherboard user guide 71 VCORE Voltage, +3.3V Voltage, +5V Voltage, +12V Voltage The onboard...
Motherboard DIY Troubleshooting Guide
Page 97
... file list and contact information. • Exit: Exits the CD installation menu. • ASUS Screen Saver: Installs a nifty ASUS screen saver. • E-Color 3Deep: Installs graphical driver and an application for tuning the... quality of color output from CRT and LCD monitors. • Show Motherboard Information: Allows you to view information about your motherboard, such as product name, BIOS version, and CPU... does not appear on the setup menu. ASUS P4S133 motherboard user guide 79
... file list and contact information. • Exit: Exits the CD installation menu. • ASUS Screen Saver: Installs a nifty ASUS screen saver. • E-Color 3Deep: Installs graphical driver and an application for tuning the... quality of color output from CRT and LCD monitors. • Show Motherboard Information: Allows you to view information about your motherboard, such as product name, BIOS version, and CPU... does not appear on the setup menu. ASUS P4S133 motherboard user guide 79

Motherboard DIY Troubleshooting Guide
Page 98
... allow you to continuously monitor your computer system's vital components, such as hard disk space, memory usage, and CPU type, CPU speed, and internal/external frequencies through the DMI Explorer. 5.4.1 Starting ASUS PC Probe When ASUS PC Probe starts, a splash screen appears allowing you review useful information about your PC. 80 Chapter 5: Software reference...
... allow you to continuously monitor your computer system's vital components, such as hard disk space, memory usage, and CPU type, CPU speed, and internal/external frequencies through the DMI Explorer. 5.4.1 Starting ASUS PC Probe When ASUS PC Probe starts, a splash screen appears allowing you review useful information about your PC. 80 Chapter 5: Software reference...


