
Motherboard DIY Troubleshooting Guide
Page 3
... Notices vi Safety information vii About this guide viii ASUS contact information x P4P800S-E Deluxe specifications summary xi Chapter 1: Product introduction 1.1 Welcome 1-1 1.2 Package contents 1-1 1.3 Special features 1-2 1.3.1 Product highlights 1-2 1.3.2 Value-added solutions 1-5 1.4 Motherboard overview 1-6 1.4.1 Major components 1-6 1.4.2 Core specifications 1-8 Chapter 2: Hardware information 2.1 Motherboard installation 2-1 2.1.1 Placement direction 2-1 2.1.2 Screw holes 2-1 2.2 Motherboard layout 2-2 2.3 Before you proceed 2-3 2.4 Central Processing Unit (CPU...
... Notices vi Safety information vii About this guide viii ASUS contact information x P4P800S-E Deluxe specifications summary xi Chapter 1: Product introduction 1.1 Welcome 1-1 1.2 Package contents 1-1 1.3 Special features 1-2 1.3.1 Product highlights 1-2 1.3.2 Value-added solutions 1-5 1.4 Motherboard overview 1-6 1.4.1 Major components 1-6 1.4.2 Core specifications 1-8 Chapter 2: Hardware information 2.1 Motherboard installation 2-1 2.1.1 Placement direction 2-1 2.1.2 Screw holes 2-1 2.2 Motherboard layout 2-2 2.3 Before you proceed 2-3 2.4 Central Processing Unit (CPU...

Motherboard DIY Troubleshooting Guide
Page 7
Operation safety • Before installing the motherboard and adding devices on it may become wet. • Place the product on a stable surface. • If you add a device. • Before connecting or removing ... to the correct voltage in any damage, contact your dealer immediately. • To avoid short circuits, keep paper clips, screws, and staples away from the motherboard, ensure that all power cables from the existing system before you encounter technical problems with the package. • Before using the product, make sure all...
Operation safety • Before installing the motherboard and adding devices on it may become wet. • Place the product on a stable surface. • If you add a device. • Before connecting or removing ... to the correct voltage in any damage, contact your dealer immediately. • To avoid short circuits, keep paper clips, screws, and staples away from the motherboard, ensure that all power cables from the existing system before you encounter technical problems with the package. • Before using the product, make sure all...

Motherboard DIY Troubleshooting Guide
Page 8
...are also provided. • Chapter 5: Software support This chapter describes the contents of the switches, jumpers, and connectors on the motherboard. • Chapter 3: Powering up This chapter describes the power up sequence and gives information on the BIOS beep codes. •...Chapter 2: Hardware information This chapter lists the hardware setup procedures that came with the motherboard package. viii It includes brief descriptions of the special attributes of the P4P800S-E Deluxe motherboard. How this guide This user guide contains the information you have to change system ...
...are also provided. • Chapter 5: Software support This chapter describes the contents of the switches, jumpers, and connectors on the motherboard. • Chapter 3: Powering up This chapter describes the power up sequence and gives information on the BIOS beep codes. •...Chapter 2: Hardware information This chapter lists the hardware setup procedures that came with the motherboard package. viii It includes brief descriptions of the special attributes of the P4P800S-E Deluxe motherboard. How this guide This user guide contains the information you have to change system ...

Motherboard DIY Troubleshooting Guide
Page 13
Chapter 1 This chapter describes the features of the motherboard and the new technology it supports. It includes brief descriptions of the special attributes of the P4P800S-E Deluxe motherboard. Product introduction
Chapter 1 This chapter describes the features of the motherboard and the new technology it supports. It includes brief descriptions of the special attributes of the P4P800S-E Deluxe motherboard. Product introduction

Motherboard DIY Troubleshooting Guide
Page 15
... a host of new features and latest technologies making it , check the items in your package with the list below. 1.2 Package contents Check your P4P800S-E Deluxe package for the following items. ASUS P4P800S-E Deluxe motherboard ASUS P4P800S series support CD 1 x UltraDMA cable 1 x IDE cable 2 x Serial ATA cables 1 x Serial ATA power cable 1 x floppy disk drive cable 1 x IEEE 1394 port module...
... a host of new features and latest technologies making it , check the items in your package with the list below. 1.2 Package contents Check your P4P800S-E Deluxe package for the following items. ASUS P4P800S-E Deluxe motherboard ASUS P4P800S series support CD 1 x UltraDMA cable 1 x IDE cable 2 x Serial ATA cables 1 x Serial ATA power cable 1 x floppy disk drive cable 1 x IEEE 1394 port module...

Motherboard DIY Troubleshooting Guide
Page 16
...I/O operations. See page 2-4. Instead of the motherboard BIOS allows automatic resetting to the BIOS previous setting in case the system hangs due to overclocking. See page 2-10. AI Overclocking The P4P800S-E Deluxe allows convenient overclocking options to overclocking failure, ...C.P.R. 1.3 Special features 1.3.1 Product highlights Latest processor technology The motherboard supports the Intel® Pentium® 4/Celeron® processor...
...I/O operations. See page 2-4. Instead of the motherboard BIOS allows automatic resetting to the BIOS previous setting in case the system hangs due to overclocking. See page 2-10. AI Overclocking The P4P800S-E Deluxe allows convenient overclocking options to overclocking failure, ...C.P.R. 1.3 Special features 1.3.1 Product highlights Latest processor technology The motherboard supports the Intel® Pentium® 4/Celeron® processor...

Motherboard DIY Troubleshooting Guide
Page 17
... ICH5R onboard, and allows RAID 0 and RAID 1 configuration. Serial ATA technology The motherboard supports the new Serial ATA technology through simple, low-cost, high-bandwidth asynchronous (real-time) data interfacing between computers, peripherals, and consumer electronic devices such as camcorders, VCRs, printers,TVs, and digital cameras. See page 2-26. ASUS P4P800S-E Deluxe motherboard user guide 1-3
... ICH5R onboard, and allows RAID 0 and RAID 1 configuration. Serial ATA technology The motherboard supports the new Serial ATA technology through simple, low-cost, high-bandwidth asynchronous (real-time) data interfacing between computers, peripherals, and consumer electronic devices such as camcorders, VCRs, printers,TVs, and digital cameras. See page 2-26. ASUS P4P800S-E Deluxe motherboard user guide 1-3

Motherboard DIY Troubleshooting Guide
Page 18
... Music Lite special function keys and enjoy the music! See page 4-32. ASUS POST Reporter™ The motherboard offers a new exciting feature called the ASUS POST Reporter™ to provide friendly voice messages and alerts during the Power-On Self-Tests (POST) informing you to restore the original BIOS data ...
... Music Lite special function keys and enjoy the music! See page 4-32. ASUS POST Reporter™ The motherboard offers a new exciting feature called the ASUS POST Reporter™ to provide friendly voice messages and alerts during the Power-On Self-Tests (POST) informing you to restore the original BIOS data ...

Motherboard DIY Troubleshooting Guide
Page 19
... chassis intrusion monitoring through a user-friendly interface. Connect to the Internet then to the ASUS FTP site nearest you install the ASUS Update utility from the available options. ASUS P4P800S-E Deluxe motherboard user guide 1-5 See page 4-4. ASUS MyLogo2 This new feature present in the Winbond Super I/O) to prevent overheating and damage. The system voltage levels are monitored...
... chassis intrusion monitoring through a user-friendly interface. Connect to the Internet then to the ASUS FTP site nearest you install the ASUS Update utility from the available options. ASUS P4P800S-E Deluxe motherboard user guide 1-5 See page 4-4. ASUS MyLogo2 This new feature present in the Winbond Super I/O) to prevent overheating and damage. The system voltage levels are monitored...

Motherboard DIY Troubleshooting Guide
Page 20
... and its physical configuration and available features to Chapter 2 for the specifications of the P4P800S-E Deluxe motherboard as pointed out in the picture on the components. 1-6 Chapter 1: Product introduction A sufficient knowledge of the motherboard specifications will also help you install the motherboard, familiarize yourself with its components. 1.4.1 Major components The following are the major components...
... and its physical configuration and available features to Chapter 2 for the specifications of the P4P800S-E Deluxe motherboard as pointed out in the picture on the components. 1-6 Chapter 1: Product introduction A sufficient knowledge of the motherboard specifications will also help you install the motherboard, familiarize yourself with its components. 1.4.1 Major components The following are the major components...

Motherboard DIY Troubleshooting Guide
Page 23
.... This CSA 82547EI Gigabit LAN controller provides faster and more reliable data transmission with 133MB/s maximum throughput. 19 Audio CODEC. ASUS P4P800S-E Deluxe motherboard user guide 1-9 This port connects IEEE 1394-compliant devices like SCSI or LAN cards with lower latency. 21 PS/2 mouse ...USB 2.0/1.1 ports, I /O Controller Hub (ICH5R) is a subsystem that allows wireless data transmission. This Winbond speech controller supports the ASUS POST Reporter™ for efficient utilization of these interfaces. 15 Standby power LED. This LED lights up to provide a fast and ...
.... This CSA 82547EI Gigabit LAN controller provides faster and more reliable data transmission with 133MB/s maximum throughput. 19 Audio CODEC. ASUS P4P800S-E Deluxe motherboard user guide 1-9 This port connects IEEE 1394-compliant devices like SCSI or LAN cards with lower latency. 21 PS/2 mouse ...USB 2.0/1.1 ports, I /O Controller Hub (ICH5R) is a subsystem that allows wireless data transmission. This Winbond speech controller supports the ASUS POST Reporter™ for efficient utilization of these interfaces. 15 Standby power LED. This LED lights up to provide a fast and ...

Motherboard DIY Troubleshooting Guide
Page 25
Hardware information It includes description of the switches, jumpers, and connectors on the motherboard. Chapter 2 This chapter lists the hardware setup procedures that you have to perform when installing system components.
Hardware information It includes description of the switches, jumpers, and connectors on the motherboard. Chapter 2 This chapter lists the hardware setup procedures that you have to perform when installing system components.

Motherboard DIY Troubleshooting Guide
Page 26
Chapter summary 2.1 Motherboard installation 2-1 2.2 Motherboard layout 2-2 2.3 Before you proceed 2-3 2.4 Central Processing Unit (CPU 2-4 2.5 System memory 2-10 2.6 Expansion slots 2-14 2.7 Jumpers 2-18 2.8 Connectors 2-21 ASUS P4P800S-E Deluxe motherboard
Chapter summary 2.1 Motherboard installation 2-1 2.2 Motherboard layout 2-2 2.3 Before you proceed 2-3 2.4 Central Processing Unit (CPU 2-4 2.5 System memory 2-10 2.6 Expansion slots 2-14 2.7 Jumpers 2-18 2.8 Connectors 2-21 ASUS P4P800S-E Deluxe motherboard

Motherboard DIY Troubleshooting Guide
Page 27
... the configuration of your chassis to the rear part of the chassis ASUS P4P800S-E motherboard user guide 2-1 Make sure to the chassis. Do not overtighten the screws! 2.1 Motherboard installation Before you place it into the chassis in the image below. 2.1.2 Screw holes Place nine (9) screws into it. Place this side towards the ...rear of the chassis as indicated in the correct orientation. Failure to do so may cause you physical injury and may damage the motherboard. The edge with external ports goes to ensure that measures 12 inches x 9.6 inches (30.5 cm x 24.5 cm). The...
... the configuration of your chassis to the rear part of the chassis ASUS P4P800S-E motherboard user guide 2-1 Make sure to the chassis. Do not overtighten the screws! 2.1 Motherboard installation Before you place it into the chassis in the image below. 2.1.2 Screw holes Place nine (9) screws into it. Place this side towards the ...rear of the chassis as indicated in the correct orientation. Failure to do so may cause you physical injury and may damage the motherboard. The edge with external ports goes to ensure that measures 12 inches x 9.6 inches (30.5 cm x 24.5 cm). The...

Motherboard DIY Troubleshooting Guide
Page 28
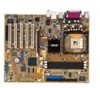
FLOPPY1 PRI_IDE1 SEC_IDE1 30.5cm (12.0in) 2.2 Motherboard layout PS/2KBMS KBPWR T: Mouse B: Keyboard SPDIF_O 24.5cm (9.6in) Socket 478 CPU_FAN PWR_FAN1 Super I/O DDR DIMM1 (64 bit,184-pin module) DDR DIMM2 (64 ...:Mic In Intel RG82848P Memory Controller Hub VIA VT6307 Chipset Intel 825471I CD1 MODEM1 AUX1 Audio Codec FP_AUDIO SPDIF_OUT Accelerated Graphics Port (AGP1) ® CHA_FAN1 P4P800S-E PCI1 SATA2 Intel ICH5R SATA1 PCI2 PCI3 USBPW56 USBPW78 SMB20 USB56 CLRTC1 USB78 4Mbit Firmware Hub PCI4 TRPWR1 CR2032 3V Lithium Cell CMOS Power PCI5...
FLOPPY1 PRI_IDE1 SEC_IDE1 30.5cm (12.0in) 2.2 Motherboard layout PS/2KBMS KBPWR T: Mouse B: Keyboard SPDIF_O 24.5cm (9.6in) Socket 478 CPU_FAN PWR_FAN1 Super I/O DDR DIMM1 (64 bit,184-pin module) DDR DIMM2 (64 ...:Mic In Intel RG82848P Memory Controller Hub VIA VT6307 Chipset Intel 825471I CD1 MODEM1 AUX1 Audio Codec FP_AUDIO SPDIF_OUT Accelerated Graphics Port (AGP1) ® CHA_FAN1 P4P800S-E PCI1 SATA2 Intel ICH5R SATA1 PCI2 PCI3 USBPW56 USBPW78 SMB20 USB56 CLRTC1 USB78 4Mbit Firmware Hub PCI4 TRPWR1 CR2032 3V Lithium Cell CMOS Power PCI5...

Motherboard DIY Troubleshooting Guide
Page 29
... by the edges to avoid touching the ICs on a grounded antistatic pad or in any motherboard component. ® P4P800S-E SB_PWR1 P4P800S-E Onboard LED ON Standby Power OFF Powered Off ASUS P4P800S-E motherboard user guide 2-3 Whenever you install motherboard components or change any motherboard settings. 1. Unplug the power cord from the power supply. 2.3 Before you proceed Take note of...
... by the edges to avoid touching the ICs on a grounded antistatic pad or in any motherboard component. ® P4P800S-E SB_PWR1 P4P800S-E Onboard LED ON Standby Power OFF Powered Off ASUS P4P800S-E motherboard user guide 2-3 Whenever you install motherboard components or change any motherboard settings. 1. Unplug the power cord from the power supply. 2.3 Before you proceed Take note of...

Motherboard DIY Troubleshooting Guide
Page 30
...Pentium® 4 Processor in BIOS before installing a supported operating system. 5. The socket also supports the Intel® Prescott CPU. This motherboard supports Intel Pentium 4 CPUs with a surface mount 478-pin Zero Insertion Force (ZIF) socket. Make sure to enable the Hyper-Threading ...Technology item in the 478-pin package with 512KB L2 cache. Gold Arrow ® P4P800S-E P4P800S-E Socket 478 Incorrect installation of up to ensure system stability and performance. 3. Notes on Hyper-Threading Technology, visit www.intel.com/ ...
...Pentium® 4 Processor in BIOS before installing a supported operating system. 5. The socket also supports the Intel® Prescott CPU. This motherboard supports Intel Pentium 4 CPUs with a surface mount 478-pin Zero Insertion Force (ZIF) socket. Make sure to enable the Hyper-Threading ...Technology item in the 478-pin package with 512KB L2 cache. Gold Arrow ® P4P800S-E P4P800S-E Socket 478 Incorrect installation of up to ensure system stability and performance. 3. Notes on Hyper-Threading Technology, visit www.intel.com/ ...

Motherboard DIY Troubleshooting Guide
Page 31
... Technology. Unlock the socket by pressing the lever sideways, then lift it up the system and enter BIOS Setup (see Chapter 4). Socket Lever 90 - 100 ASUS P4P800S-E motherboard user guide 2-5 Power up to install a CPU. 1. To use the Hyper-Threading Technology on the...
... Technology. Unlock the socket by pressing the lever sideways, then lift it up the system and enter BIOS Setup (see Chapter 4). Socket Lever 90 - 100 ASUS P4P800S-E motherboard user guide 2-5 Power up to install a CPU. 1. To use the Hyper-Threading Technology on the...

Motherboard DIY Troubleshooting Guide
Page 32
Gold Mark The CPU fits only in place. The lever clicks on the motherboard. 2-6 Chapter 2: Hardware information DO NOT force the CPU into the socket until it is in place, push down the socket lever to indicate that came ...
Gold Mark The CPU fits only in place. The lever clicks on the motherboard. 2-6 Chapter 2: Hardware information DO NOT force the CPU into the socket until it is in place, push down the socket lever to indicate that came ...

Motherboard DIY Troubleshooting Guide
Page 33
...the instructions in this section do not have to remove the retention module base when installing the CPU or installing other motherboard components. ASUS P4P800S-E motherboard user guide 2-7 The retention module base is already installed on the retention module base. Follow these steps to ensure ... the CPU documentation, follow the latter. In case you buy a CPU separately, make sure that the heatsink fits properly on the motherboard upon purchase. 2.4.3 Installing the heatsink and fan The Intel® Pentium® 4 Processor requires a specially designed heatsink and fan ...
...the instructions in this section do not have to remove the retention module base when installing the CPU or installing other motherboard components. ASUS P4P800S-E motherboard user guide 2-7 The retention module base is already installed on the retention module base. Follow these steps to ensure ... the CPU documentation, follow the latter. In case you buy a CPU separately, make sure that the heatsink fits properly on the motherboard upon purchase. 2.4.3 Installing the heatsink and fan The Intel® Pentium® 4 Processor requires a specially designed heatsink and fan ...


