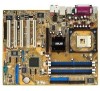
P4P800-E Deluxe User's manual for English Version E1867
Page 6
Contents 5.3 Software Information 5-7 5.3.1 ASUS MyLogo2 5-7 5.3.2 ASUS Instant Music 5-9 5.4 AI Net feature 5-12 5.5 Audio configurations 5-13 5.5.1 Sound Effect options 5-13 5.5.2 S/PDIF options 5-14 5.5.3 Speaker Configuration 5-15... 5-25 5.7 Intel® RAID for Serial ATA configuration 5-27 5.7.1 BIOS Configuration 5-27 5.7.2 Installing Serial ATA (SATA) hard disks 5-27 5.7.3 Creating, Deleting, and Resetting RAID Sets ...... 5-28 5.7.4 Creating a RAID Volume 5-28 5.7.5 Deleting a RAID Volume 5-29 5.7.6 Reset RAID Data 5-30 5.8 Creating a floppy with RAID driver 5-31 Quick...
P4P800-E Deluxe User's manual for English Version E1867
Page 42
You can automatically reset parameter settings to pins 1-2. 4. To erase the RTC RAM: 1. For system failure due to clear the Real Time Clock (RTC) RAM in CMOS, that include ... the jumper from pins 1-2 (default) to overclocking. The RAM data in CMOS. Shut down the key during the boot process and enter BIOS setup to re-enter data. ® P4P800-E P4P800-E Clear RTC RAM CLRTC 12 Normal (Default) 23 Clear CMOS You do not need to clear the RTC when the system hangs...
P4P800-E Deluxe User's manual for English Version E1867
Page 58
... This 4-pin connector connects to the case-mounted speaker and allows you to hear system beeps and warnings. • Reset Switch Lead (Blue 2-pin RESET) This 2-pin connector connects to the case-mounted reset switch for more than 4 seconds turns the system OFF. • System Management Interrupt Lead (Light Blue 2-pin SMI)...the hard disk activity LED. Pressing the power switch turns the system between ON and SLEEP, or ON and SOFT OFF, depending on the BIOS or OS settings. The System Panel connector is instantly decreased to save power and to expand the life of certain system components.
P4P800-E Deluxe User's manual for English Version E1867
Page 72
.... Visit the ASUS website (www.asus.com) to the bootable floppy disk. 5. Write the BIOS file name on your motherboard. The succeeding screen displays the status of paper. Reading file ..... Version 1.10 Copyright (C) 2002 American Megatrends, Inc. Press . done Writing flash .... 0x0008CC00 (9%) DO NOT shutdown or reset the system while updating the BIOS! Copy the...
P4P800-E Deluxe User's manual for English Version E1867
Page 75
.... Prepare the support CD that came with CrashFree BIOS 2 The CrashFree BIOS 2 auto recovery tool allows you may cause system boot failure! User recovery requested. ASUS P4P800-E Deluxe motherboard 4-5 See section "4.1.1 Creating a bootable floppy disk." Reading file "P4P800-E.rom". When a corrupted BIOS is detected, the following screen message appears. Starting BIOS recovery... If you have saved a copy of...
P4P800-E Deluxe User's manual for English Version E1867
Page 76
... motherboard. DO NOT shutdown or reset the system while updating the BIOS! Doing so may cause system boot failure! 4. When the BIOS update process is detected, the following screen message appears. If there is renamed as "P4P800-E.ROM". Starting BIOS recovery... Reading file "P4P800-E.ROM". Completed. Bad BIOS checksum. To recover the BIOS from the support CD: 1. Bad...
P4P800-E Deluxe User's manual for English Version E1867
Page 77
... menu screen. 3. Click the Utilities tab, then click Install ASUS Update VX.XX.XX. To update the BIOS using the ASUS Update: 1. ASUS P4P800-E Deluxe motherboard 4-7 Visit ASUS website (www.asus.com) to update the motherboard BIOS in Windows® environment. DO NOT shutdown or reset the system while updating the BIOS! This utility is complete, reboot the system. To install...
P4P800-E Deluxe User's manual for English Version E1867
Page 79
...you may want to enter Setup after changing any BIOS settings, load the default settings to "Run Setup". It is designed to make your computer in the CMOS RAM of the firmware hub. See section "4.7 Exit Menu." 1. ASUS P4P800-E Deluxe motherboard 4-9 For example, you wish to change the...easy to run this motherboard apply for this program. Even if you can also restart by pressing the reset button on the motherboard stores the Setup utility. 4.2 BIOS Setup program This motherboard supports a programmable firmware chip that the computer can scroll through the various sub...
P4P800-E Deluxe User's manual for English Version E1867
Page 96
... USB mass storage device after the start unit command. The Device and Emulation Type items appear only when there are installed USB devices. 4-26 Chapter 4: BIOS Setup Configuration options: [10 Sec ] [20 Sec] [30 Sec] [40 Sec] Emulation Type [N/A] When set to enable or disable the USB 2.0...options: [HiSpeed ] [Full Speed] USB Mass Storage Device Configuration USB Mass Storage Device Configuration USB Mass Storage Reset Delay [20 Sec] No USB Mass Storage device detected USB Mass Storage Reset Delay [20 Sec] Allows you to configure the USB 2.0 controller in the system. The message "No USB ...
P4P800-E Deluxe user manual English version E1526
Page 6
Contents 5.3 Software Information 5-7 5.3.1 ASUS MyLogo2 5-7 5.3.2 ASUS Instant Music 5-9 5.4 AI Net feature 5-12 5.5 Audio configurations 5-13 5.5.1 Sound Effect options 5-13 5.5.2 S/PDIF options 5-14 5.5.3 Speaker Configuration 5-15... 5-25 5.7 Intel® RAID for Serial ATA configuration 5-27 5.7.1 BIOS Configuration 5-27 5.7.2 Installing Serial ATA (SATA) hard disks 5-27 5.7.3 Creating, Deleting, and Resetting RAID Sets ...... 5-28 5.7.4 Creating a RAID Volume 5-28 5.7.5 Deleting a RAID Volume 5-29 5.7.6 Reset RAID Data 5-30 5.8 Creating a floppy with RAID driver 5-31 Quick...
P4P800-E Deluxe user manual English version E1526
Page 42
..., use the C.P.R. (CPU Parameter Recall) feature. Replace the battery. 5. Shut down the key during the boot process and enter BIOS setup to re-enter data. ® P4P800-E P4P800-E Clear RTC RAM CLRTC 12 Normal (Default) 23 Clear CMOS You do not need to clear the RTC when the system hangs...the RTC RAM: 1. Remove the onboard battery. 3. For system failure due to pins 2-3. You can automatically reset parameter settings to overclocking. Hold down and reboot the system so BIOS can clear the CMOS memory of date, time, and system setup parameters by the onboard button cell battery. ...
P4P800-E Deluxe user manual English version E1526
Page 58
... note of certain system components. Pressing the power switch turns the system between ON and SLEEP, or ON and SOFT OFF, depending on the BIOS or OS settings. Any read or write activity of an IDE device cause this 2-pin connector. • Hard disk activity LED (Red ...8226; System Management Interrupt Lead (Light Blue 2-pin SMI) This 2-pin connector allows you to hear system beeps and warnings. • Reset Switch Lead (Blue 2-pin RESET) This 2-pin connector connects to expand the life of the specific connector colors as described. 2-36 Chapter 2: Hardware information Pressing the ...
P4P800-E Deluxe user manual English version E1526
Page 72
.... 5. Press . done Writing flash .... 0x0008CC00 (9%) DO NOT shutdown or reset the system while updating the BIOS! Visit the ASUS website (www.asus.com) to type the exact BIOS file name at the prompt. 2. The BIOS information on a piece of the update process. Reading file ..... Write the BIOS file name on the screen is for your screen may...
P4P800-E Deluxe user manual English version E1526
Page 75
.... Floppy found in case the current BIOS on the motherboard fails or gets corrupted. 1. Reading file "P4P800-E.rom". Flashed successfully. See section "4.1.1 Creating a bootable floppy disk." Boot the system. 2. ASUS P4P800-E Deluxe motherboard 4-5 Insert the floppy disk that contains the motherboard BIOS before proceeding with CrashFree BIOS 2 The CrashFree BIOS 2 auto recovery tool allows you may cause system...
P4P800-E Deluxe user manual English version E1526
Page 76
... in the floppy disk is no floppy disk found in the CD-ROM. DO NOT shutdown or reset the system while updating the BIOS! If there is renamed as "P4P800-E.ROM". Start flashing... 4-6 Chapter 4: BIOS Setup Starting BIOS recovery... Place the support CD in the drive, the system automatically checks the CD-ROM. 3. 3. Reading file...
P4P800-E Deluxe user manual English version E1526
Page 77
... your system. To update the BIOS using the ASUS Update: 1. The recovered BIOS may cause system boot failure! 4. DO NOT shutdown or reset the system while updating the BIOS! The Drivers menu appears. 2. ASUS P4P800-E Deluxe motherboard 4-7 The ASUS Update utility is a utility that allows you to download the latest BIOS file. 4.1.6 ASUS Update The ASUS Update is copied into the CD...
P4P800-E Deluxe user manual English version E1526
Page 79
... (www.asus.com) to enable the security password feature or change the configuration of the firmware hub. For example, you may not exactly match what you can also restart by pressing the reset button on the motherboard stores the Setup utility. The Setup ...program is a menu-driven program, which means you see on . The default BIOS settings for this motherboard apply for reference purposes only, and may want to ensure system compatibility and stability. ASUS P4P800-E Deluxe motherboard 4-9 4.2 BIOS...
P4P800-E Deluxe user manual English version E1526
Page 96
...options: [HiSpeed ] [Full Speed] USB Mass Storage Device Configuration USB Mass Storage Device Configuration USB Mass Storage Reset Delay [20 Sec] No USB Mass Storage device detected USB Mass Storage Reset Delay [20 Sec] Allows you to enable or disable support for legacy USB devices. Legacy USB Support [Auto...USB controller legacy mode is disabled. The Device and Emulation Type items appear only when there are installed USB devices. 4-26 Chapter 4: BIOS Setup Setting to Auto allows the system to detect the presence of seconds POST waits for the USB mass storage device after the start ...