
P11C-C4L User Manual
Page 4
... 4: BIOS Setup 4.1 Managing and updating your BIOS 4-2 4.1.1 ASUS CrashFree BIOS 3 utility 4-2 4.1.2 ASUS EZ Flash Utility 4-3 4.1.3 BUPDATER utility 4-4 4.2 BIOS setup ...program 4-6 4.2.1 BIOS menu screen 4-7 4.2.2 Menu bar 4-7 4.2.3 Menu items 4-8 4.2.4 Submenu items 4-8 4.2.5 Navigation keys 4-8 4.2.6 General help 4-8 4.2.7 Configuration fields 4-8 4.2.8 Pop-up window 4-8 4.2.9 Scroll bar 4-8 4.3 Main menu 4-9 4.4 Advanced menu 4-10 4.4.1 CPU Configuration 4-11 4.4.2 Power & Performance 4-13 4.4.3 Server...
... 4: BIOS Setup 4.1 Managing and updating your BIOS 4-2 4.1.1 ASUS CrashFree BIOS 3 utility 4-2 4.1.2 ASUS EZ Flash Utility 4-3 4.1.3 BUPDATER utility 4-4 4.2 BIOS setup ...program 4-6 4.2.1 BIOS menu screen 4-7 4.2.2 Menu bar 4-7 4.2.3 Menu items 4-8 4.2.4 Submenu items 4-8 4.2.5 Navigation keys 4-8 4.2.6 General help 4-8 4.2.7 Configuration fields 4-8 4.2.8 Pop-up window 4-8 4.2.9 Scroll bar 4-8 4.3 Main menu 4-9 4.4 Advanced menu 4-10 4.4.1 CPU Configuration 4-11 4.4.2 Power & Performance 4-13 4.4.3 Server...

P11C-C4L User Manual
Page 5
... 4.8 Monitor menu 4-37 4.9 Tool menu 4-38 4.10 Event Logs menu 4-38 4.10.1 Change Smbios Event Log Settings 4-38 4.10.2 View Smbios Event Log 4-39 4.11 Server Mgmt menu 4-40 4.11.1 System Event Log 4-41 4.11.2 Bmc self test log 4-42 4.11.3 BMC network configuration 4-43 4.11.4 View System Event Log 4-44...
... 4.8 Monitor menu 4-37 4.9 Tool menu 4-38 4.10 Event Logs menu 4-38 4.10.1 Change Smbios Event Log Settings 4-38 4.10.2 View Smbios Event Log 4-39 4.11 Server Mgmt menu 4-40 4.11.1 System Event Log 4-41 4.11.2 Bmc self test log 4-42 4.11.3 BMC network configuration 4-43 4.11.4 View System Event Log 4-44...

P11C-C4L User Manual
Page 10
... Location Slot Location 5 number) Slot Location 6 PCI-E x8 (x8 Gen3 Link) PCI-E x16 (x16 Gen3 Link) (Auto switch to ASUS server AVL for the latest memory AVL update. P11C-C/4L specifications summary Model Name P11C-C/4L 1 x Socket LGA1151 Processor Support / System Bus Intel® Xeon® processor E-21xx/E-22xx product family Intel® 8th/9th Generation...
... Location Slot Location 5 number) Slot Location 6 PCI-E x8 (x8 Gen3 Link) PCI-E x16 (x16 Gen3 Link) (Auto switch to ASUS server AVL for the latest memory AVL update. P11C-C/4L specifications summary Model Name P11C-C/4L 1 x Socket LGA1151 Processor Support / System Bus Intel® Xeon® processor E-21xx/E-22xx product family Intel® 8th/9th Generation...

P11C-C4L User Manual
Page 31
... ISA or PCI devices. 2.5.4 PCI Express x16 slot (x16 Gen3 link) The onboard PCIE6 slot provides one x8 Gen3 link. P11C-C/4L 2-15 This slot supports VGA cards and various server class high performance add-on cards. 2.5.6 PCI slot The PCI1 slot supports cards such as LAN, USB, and other cards that... comply with PCI specifications. This slot supports VGA cards and various server class high performance add-on cards. 2.5.5 PCI Express x8 slot (x8 Gen3 link) The onboard PCIE5 slot provides one x16 Gen3 link and auto...
... ISA or PCI devices. 2.5.4 PCI Express x16 slot (x16 Gen3 link) The onboard PCIE6 slot provides one x8 Gen3 link. P11C-C/4L 2-15 This slot supports VGA cards and various server class high performance add-on cards. 2.5.6 PCI slot The PCI1 slot supports cards such as LAN, USB, and other cards that... comply with PCI specifications. This slot supports VGA cards and various server class high performance add-on cards. 2.5.5 PCI Express x8 slot (x8 Gen3 link) The onboard PCIE5 slot provides one x16 Gen3 link and auto...

P11C-C4L User Manual
Page 59
... to sleep mode or to shut down the computer. 4. In the What do you want the computer to shut down function Using Windows® Server 2012 R2: 1. Pressing the power switch for less than four seconds lets the system enter the soft-off the computer 3.2.1 Using the OS shut...(Planned) option in the selection list. Select Shut down . 3. Otherwise, select the option that best describes why you want to do?, select Shut down . 4. P11C-C/4L 3-3 Using Windows® Server 2016: 1. Press ++. 2. Click Continue. 3.2 Powering off mode regardless of the screen. 3.
... to sleep mode or to shut down the computer. 4. In the What do you want the computer to shut down function Using Windows® Server 2012 R2: 1. Pressing the power switch for less than four seconds lets the system enter the soft-off the computer 3.2.1 Using the OS shut...(Planned) option in the selection list. Select Shut down . 3. Otherwise, select the option that best describes why you want to do?, select Shut down . 4. P11C-C/4L 3-3 Using Windows® Server 2016: 1. Press ++. 2. Click Continue. 3.2 Powering off mode regardless of the screen. 3.

P11C-C4L User Manual
Page 67
P11C-C/4L 4-7 4.2.1 BIOS menu screen Menu items Menu bar Configuration fields General help 4.2.2 Menu bar The menu bar on top of the screen has the following main ... temperature, power status, and changing the fan settings Tool For configuring options for special functions Event Logs For changing the event log settings Server Mgmt For changing the server mgmt settings Save & Exit For selecting the save & exit options To select an item on the menu bar, press the right or left...
P11C-C/4L 4-7 4.2.1 BIOS menu screen Menu items Menu bar Configuration fields General help 4.2.2 Menu bar The menu bar on top of the screen has the following main ... temperature, power status, and changing the fan settings Tool For configuring options for special functions Event Logs For changing the event log settings Server Mgmt For changing the server mgmt settings Save & Exit For selecting the save & exit options To select an item on the menu bar, press the right or left...

P11C-C4L User Manual
Page 68
... or / keys to display a pop-up window Select a menu item and press to display the other items (Advanced, Chipset, Security, Boot, Monitor, Tool, Event Logs, Server Mgmt, and Save & Exit) on the menu bar have their respective menu items. 4.2.4 Submenu items A solid triangle before each item on the screen. 4-8 Chapter 4: BIOS...
... or / keys to display a pop-up window Select a menu item and press to display the other items (Advanced, Chipset, Security, Boot, Monitor, Tool, Event Logs, Server Mgmt, and Save & Exit) on the menu bar have their respective menu items. 4.2.4 Submenu items A solid triangle before each item on the screen. 4-8 Chapter 4: BIOS...

P11C-C4L User Manual
Page 74
...] [CPU Default] [Auto] Thermal Monitor [Enabled] Allows you to select the TPM device. Configuration options: [PTT] [dTPM] 4-14 Chapter 4: BIOS Setup Configuration options: [Disabled] [Enabled] 4.4.3 Server ME Configuration TPM Device Selection [PTT] Allows you to enable or disable Thermal Monitoring. Configuration options: [Disabled] [C1] [C3] [C1 and C3] C-State Un-demotion...
...] [CPU Default] [Auto] Thermal Monitor [Enabled] Allows you to select the TPM device. Configuration options: [PTT] [dTPM] 4-14 Chapter 4: BIOS Setup Configuration options: [Disabled] [Enabled] 4.4.3 Server ME Configuration TPM Device Selection [PTT] Allows you to enable or disable Thermal Monitoring. Configuration options: [Disabled] [C1] [C3] [C1 and C3] C-State Un-demotion...

P11C-C4L User Manual
Page 79
... menu. Configuration options: [Disabled] [Enabled] The following item appears only when you to [Enabled]. P11C-C/4L 4-19 Console Redirection Settings Out-of-Band Mgmt Port [COM1] Microsoft Windows Emergency Management Services (EMS) allow for remote management of a Windows Server OS through a serial port. Configuration options: [9600] [19200] [57600] [115200] Flow Control [None] Microsoft...
... menu. Configuration options: [Disabled] [Enabled] The following item appears only when you to [Enabled]. P11C-C/4L 4-19 Console Redirection Settings Out-of-Band Mgmt Port [COM1] Microsoft Windows Emergency Management Services (EMS) allow for remote management of a Windows Server OS through a serial port. Configuration options: [9600] [19200] [57600] [115200] Flow Control [None] Microsoft...

P11C-C4L User Manual
Page 100
...-2 Timer [Enabled] Allows you to select the FRB-2 Timer Expiration value. Configuration options: [Do Nothing] [Reset] [Power Down] [Power Cycle] 4-40 Chapter 4: BIOS Setup 4.11 Server Mgmt menu BMC Support [Enabled] This item allows you to select the how the system should respond in FRB-2 Timer expires. Configuration options: [3 minutes] [4 minutes...
...-2 Timer [Enabled] Allows you to select the FRB-2 Timer Expiration value. Configuration options: [Do Nothing] [Reset] [Power Down] [Power Cycle] 4-40 Chapter 4: BIOS Setup 4.11 Server Mgmt menu BMC Support [Enabled] This item allows you to select the how the system should respond in FRB-2 Timer expires. Configuration options: [3 minutes] [4 minutes...

P11C-C4L User Manual
Page 112
... field indicates the maximum allowed capacity. 8. From the following are typical values: RAID 0: 128KB RAID 10: 64KB RAID 5: 64KB We recommend a lower stripe size for server systems, and a higher stripe size for multimedia computer systems used mainly for RAID 0, 10 and 5 only) then press . The available stripe size values range from...
... field indicates the maximum allowed capacity. 8. From the following are typical values: RAID 0: 128KB RAID 10: 64KB RAID 5: 64KB We recommend a lower stripe size for server systems, and a higher stripe size for multimedia computer systems used mainly for RAID 0, 10 and 5 only) then press . The available stripe size values range from...

P11C-C4L User Manual
Page 121
The following are typical values: RAID 0: 128KB RAID 10: 64KB RAID 5: 64KB We recommend a lower stripe size for server systems, and a higher stripe size for multimedia computer systems used mainly for RAID 0, 10 and 5 only), and click OK. From the Volume Properties field, select ... if needed. 4. Click the SATA array items you want to change the Name, Select the new volume type, and Select additional disks to 128 KB. P11C-C/4L 5-15 You can change in Volume Properties: 1. 5.3.2 Changing a Volume Type To change the volume type in Volumes field. 2.
The following are typical values: RAID 0: 128KB RAID 10: 64KB RAID 5: 64KB We recommend a lower stripe size for server systems, and a higher stripe size for multimedia computer systems used mainly for RAID 0, 10 and 5 only), and click OK. From the Volume Properties field, select ... if needed. 4. Click the SATA array items you want to change the Name, Select the new volume type, and Select additional disks to 128 KB. P11C-C/4L 5-15 You can change in Volume Properties: 1. 5.3.2 Changing a Volume Type To change the volume type in Volumes field. 2.

P11C-C4L User Manual
Page 126
...to a USB flash drive in the optical drive. 2. Connect a USB flash drive to your server system, you can create a USB flash drive with RAID drive When installing Windows® Server OS, you are now ready to install an operating system to the USB flash drive. Click...Creating a USB flash drive with RAID driver in Windows by copying the files from a USB flash drive. When prompted to start installing Windows® Server. 2. Place the motherboard support DVD in Windows environment: 1. Follow the onscreen instructions to choose a type of the support DVD. 4. Boot the ...
...to a USB flash drive in the optical drive. 2. Connect a USB flash drive to your server system, you can create a USB flash drive with RAID drive When installing Windows® Server OS, you are now ready to install an operating system to the USB flash drive. Click...Creating a USB flash drive with RAID driver in Windows by copying the files from a USB flash drive. When prompted to start installing Windows® Server. 2. Place the motherboard support DVD in Windows environment: 1. Follow the onscreen instructions to choose a type of the support DVD. 4. Boot the ...
P11C-C4L User Manual
Page 128
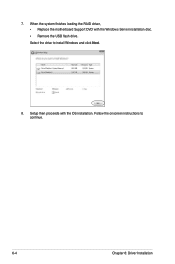
7. Follow the onscreen instructions to install Windows and click Next. 8. Setup then proceeds with the Windows Server installation disc. • Remove the USB flash drive. Select the drive to continue. 6-4 Chapter 6: Driver Installation When the system finishes loading the RAID driver, • Replace the motherboard Support DVD with the OS installation.
7. Follow the onscreen instructions to install Windows and click Next. 8. Setup then proceeds with the Windows Server installation disc. • Remove the USB flash drive. Select the drive to continue. 6-4 Chapter 6: Driver Installation When the system finishes loading the RAID driver, • Replace the motherboard Support DVD with the OS installation.

P11C-C4L User Manual
Page 129
... any time without notice. Onscreen display and content vary depending on Windows® Server 2012 R2 and Windows® Server 2016. 6.3 Running the Support DVD When you can install to maximize the features of your computer. P11C-C/4L 6-5 Visit the ASUS website (www.asus.com) for reference only. The screenshots are subject to run the support...
... any time without notice. Onscreen display and content vary depending on Windows® Server 2012 R2 and Windows® Server 2016. 6.3 Running the Support DVD When you can install to maximize the features of your computer. P11C-C/4L 6-5 Visit the ASUS website (www.asus.com) for reference only. The screenshots are subject to run the support...

