User Guide
Page 10
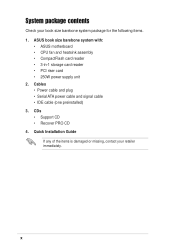
... contents Check your retailer immediately. CDs • Support CD • Recover PRO CD 4. Quick Installation Guide If any of the items is damaged or missing, contact your book size barebone system package for the following items. 1. ASUS book size barebone system with: • ASUS motherboard • CPU fan and heatsink assembly • CompactFlash card...
... contents Check your retailer immediately. CDs • Support CD • Recover PRO CD 4. Quick Installation Guide If any of the items is damaged or missing, contact your book size barebone system package for the following items. 1. ASUS book size barebone system with: • ASUS motherboard • CPU fan and heatsink assembly • CompactFlash card...
User Guide
Page 20
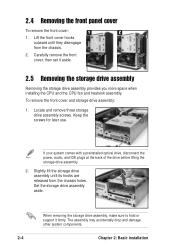
... screws for later use. When removing the storage drive assembly, make sure to hold or support it aside. 2.5 Removing the storage drive assembly Removing the storage drive assembly provides you more space when installing the CPU and the CPU fan and heatsink assembly. To remove the front cover and storage drive assembly: 1. Slightly...
... screws for later use. When removing the storage drive assembly, make sure to hold or support it aside. 2.5 Removing the storage drive assembly Removing the storage drive assembly provides you more space when installing the CPU and the CPU fan and heatsink assembly. To remove the front cover and storage drive assembly: 1. Slightly...
User Guide
Page 28
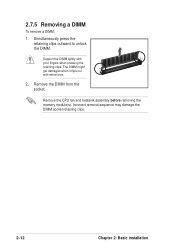
Remove the DIMM from the socket. Incorrect removal sequence may damage the DIMM socket retaining clips. 2-12 Chapter 2: Basic installation Simultaneously press the retaining clips outward to unlock the DIMM. Support the DIMM lightly with extra force. 2. 2.7.5 Removing a DIMM To remove a DIMM: 1. The DIMM might get damaged when it flips out with your fingers when pressing the retaining clips. Remove the CPU fan and heatsink assembly before removing the memory module(s).
Remove the DIMM from the socket. Incorrect removal sequence may damage the DIMM socket retaining clips. 2-12 Chapter 2: Basic installation Simultaneously press the retaining clips outward to unlock the DIMM. Support the DIMM lightly with extra force. 2. 2.7.5 Removing a DIMM To remove a DIMM: 1. The DIMM might get damaged when it flips out with your fingers when pressing the retaining clips. Remove the CPU fan and heatsink assembly before removing the memory module(s).
User Guide
Page 47
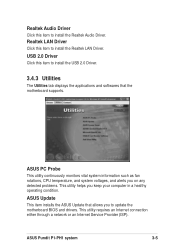
... the ASUS Update that the motherboard supports. USB 2.0 Driver Click this item to install the USB 2.0 Driver. 3.4.3 Utilities The Utilities tab displays the applications and softwares that allows you keep your computer in a healthy operating condition. ASUS Pundit P1-PH1 system 3-5 ASUS PC Probe This utility continuously monitors vital system information such as fan rotations, CPU temperature...
... the ASUS Update that the motherboard supports. USB 2.0 Driver Click this item to install the USB 2.0 Driver. 3.4.3 Utilities The Utilities tab displays the applications and softwares that allows you keep your computer in a healthy operating condition. ASUS Pundit P1-PH1 system 3-5 ASUS PC Probe This utility continuously monitors vital system information such as fan rotations, CPU temperature...
User Guide
Page 58
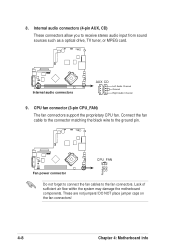
... CD Left Audio Channel Ground Right Audio Channel 9. 8. DO NOT place jumper caps on the fan connectors! 4-8 Chapter 4: Motherboard info CPU fan connector (3-pin CPU_FAN) The fan connectors support the proprietary CPU fan. Internal audio connectors (4-pin AUX, CD) These connectors allow you to the fan connectors. Connect the fan cable to the...
... CD Left Audio Channel Ground Right Audio Channel 9. 8. DO NOT place jumper caps on the fan connectors! 4-8 Chapter 4: Motherboard info CPU fan connector (3-pin CPU_FAN) The fan connectors support the proprietary CPU fan. Internal audio connectors (4-pin AUX, CD) These connectors allow you to the fan connectors. Connect the fan cable to the...

