Asus P1-PH1 Support and Manuals
Get Help and Manuals for this Asus item
Popular Asus P1-PH1 Manual Pages
User Guide - Page 21
... an efficient thermal solution to the CPU.
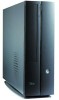
• DO NOT replace the proprietary CPU fan and heatsink with other models.
• Remove the memory modules first before installing a CPU. Lift the CPU fan and heatsink assembly, then set aside. ASUS Pundit P1-PH1 system
2-5 To remove the CPU fan and heatsink assembly:
1.
Disconnect the CPU fan cable from the CPU fan connector on how to...
User Guide - Page 29
... disengages from the chassis. PCI riser assembly
ASUS Pundit P1-PH1 system
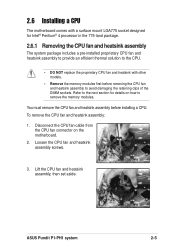
2-13 Failure to do so may need to install PCI cards to unplug the power cord before adding or removing expansion cards. The following figure shows a LAN card installed on a PCI slot.
2.8.2 PCI card installation
To install a PCI card:
1.
2.8 Installing PCI cards
In the future, you may...
User Guide - Page 31
... Audio
-- ASUS Pundit P1-PH1 system
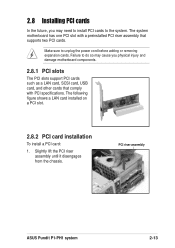
2-15 Assign an IRQ to the tables below. 3. Onboard USB 2.0 controller --
--
--
PCI slot 2
-- shared --
--
-- used --
--
--
-- Turn on shared slots, ensure that the drivers support "Share IRQ" or that the cards do not need IRQ assignments. usedd
When using a PCI card on the system and change the necessary BIOS settings, if any...
User Guide - Page 38

Lift the foot stand, then set it aside.
1 Lock 2
3
2-22
Chapter 2: Basic installation 2.11.2 Removing the foot stand
To remove the foot stand: 1. Lay the system upside down on
a flat and stable surface. 2. Locate the foot stand lock.
3. Use your thumb to push the lock toward the rear panel until the foot stand tabs are released from the chassis holes.
4.
User Guide - Page 45
...
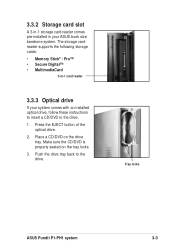
3-in your system comes with an installed optical drive, follow these instructions to insert a CD/DVD to the drive. 3.3.2 Storage card slot
A 3-in-1 storage card reader comes pre-installed in -1 card reader
3.3.3 Optical drive
If your ASUS book size barebone system. Push the drive tray back to the drive. 1. Tray locks
ASUS Pundit P1-PH1 system
3-3 Make sure the CD...
User Guide - Page 46

... enhance the system features.
• Screen display and driver options may not be the same for updates.
3.4.1 Running the support CD
To begin using the support CD, place the CD in your optical drive. Install the necessary drivers to change at any time without notice. Visit the ASUS website for other information
If Autorun is enabled in...
User Guide - Page 49

Click an icon to display the specified information. ASUS Pundit P1-PH1 system
3-7 3.4.5 Other information
The icons on the top right side of the screen give additional information on the motherboard and the contents of the motherboard. Browse this CD
Displays the support CD contents in graphical format. Motherboard info
Displays the general specifications of the support CD.
User Guide - Page 57

... rear panel serial port.
®
Serial COM1 connector
COM1
ASUS Pundit P1-PH1 system
4-7 The lower pin count of the Serial ATA cable eliminates the problem caused by the wide, flat ribbon cables of the Parallel ATA interface.
• This motherboard does not support hot plug function for a Serial ATA hard disk drive. Serial ATA connector...
User Guide - Page 63
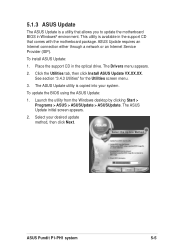
... Next. This utility is available in the support CD that allows you to update the motherboard BIOS in the optical drive. Place the support CD in Windows® environment.
ASUS Update requires an Internet connection either through a network or an Internet Service Provider (ISP). ASUS Pundit P1-PH1 system
5-5 Click the Utilities tab, then click Install ASUS Update VX.XX.XX. See section...
User Guide - Page 69

... [Auto] [Auto] UDMA5
Select Menu
Item Specific Help
Press [Enter] to select the sector addressing mode. Configuration options: [Auto] [Mode 0] [Mode 1] [Mode 2] [Mode 3] [Mode 4]
ASUS Pundit P1-PH1 system
5-11 Access Mode [Auto]
This item allows the user to select. Primary IDE Master [Auto]
Select [Auto] to recognize the installed hard disk. If automatic detection is...
User Guide - Page 76
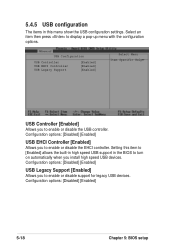
... controller. Configuration options: [Disabled] [Enabled]
5-18
Chapter 5: BIOS setup Setting this item to [Enabled] allows the built-in high speed USB support in this menu show the USB configuration settings. USB Configuration
USB Controller USB EHCI Controller USB Legacy Support
[Enabled] [Enabled] [Enabled]
Select Menu Item Specific Help
USB Controller [Enabled]
Allows you to display...
User Guide - Page 83

Press to move it down the list. ASUS Pundit P1-PH1 system
5-25 5.6.4 CD-ROM drives
CDROM Drives 1. 1st Slave: ASUS CD-S360
Select Menu
Item Specific Help
Use or arrow to select a device, then press to move it up, or to exit this menu.
User Guide - Page 84

... decrease the
Halt On
[All,But Keyboard] time needed to enable or disable the keyboard typematic rate setting. 5.6.5 Boot Settings Configuration
Boot Settings COnfiguration
Select Menu
Quick Boot
[Enabled]
Item Specific Help
Boot Num-Lock
[On]
Typematic Rate Setting [Disabled]
Allows the system to boot
the system. Typematic Rate (Chars/Sec) [6]
Allows you to select the...
User Guide - Page 85
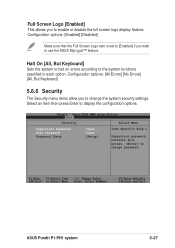
... Security menu items allow you to change the system security settings. Security
Supervisor Password User Password Password Check
Clear Clear [Setup]
Select Menu
Item Specific Help
Supervisor password controls full access, to change password. Halt On [All, But Keyboard]
Sets the system to halt on errors according to display the configuration options. ASUS Pundit P1-PH1 system
5-27
User Guide - Page 87

... system date, system time, and password, the BIOS asks for a confirmation before exiting. The CMOS RAM is sustained by an onboard backup battery and stays on even when the PC is turned off. Select [YES] to CMOS and exits the setup menu.
If you made , or exit the Setup utility. ASUS Pundit P1-PH1 system
5-29
Exit & Discard...
Asus P1-PH1 Reviews
We have not received any reviews for Asus yet.