User Manual
Page 2
... in this manual or product. Manual revisions are mentioned for identification purposes only. Product Name: ASUS P/I-XP6NP5 Manual Revision: 1.82 Release Date: February 1997 II ASUS P/I-XP6NP5 User's Manual In no event shall ASUS be liable for any loss or profits, loss of business, loss of use or data, ...interruption of business, or for indirect, special, incidental, or consequential damages of any kind, even if ASUS has been advised of...
... in this manual or product. Manual revisions are mentioned for identification purposes only. Product Name: ASUS P/I-XP6NP5 Manual Revision: 1.82 Release Date: February 1997 II ASUS P/I-XP6NP5 User's Manual In no event shall ASUS be liable for any loss or profits, loss of business, loss of use or data, ...interruption of business, or for indirect, special, incidental, or consequential damages of any kind, even if ASUS has been advised of...
User Manual
Page 3
....tw Technical Support: Fax: 886-2-895-9254 BBS: 886-2-896-4667 Email: tsd@asus.com.tw WWW: http://www.asus.com.tw/ Gopher: gopher.asus.com.tw FTP: ftp.asus.com.tw/pub/ASUS ASUS COMPUTER INTERNATIONAL Marketing Info: Address: 721 Charcot Avenue, San Jose, CA 95131, USA Telephone: 1-...0555 Email: tsd-usa@asus.com.tw ASUS COMPUTER GmbH Marketing Info: Address: Harkort Str. 25, 40880 Ratingen, BRD, Germany Telephone: 49-2102-445011 Fax: 49-2102-442066 Email: info-ger@asus.com.tw Technical Support: BBS: 49-2102-448690 Email: tsd-ger@asus.com.tw ASUS P/I-XP6NP5 User's Manual III
....tw Technical Support: Fax: 886-2-895-9254 BBS: 886-2-896-4667 Email: tsd@asus.com.tw WWW: http://www.asus.com.tw/ Gopher: gopher.asus.com.tw FTP: ftp.asus.com.tw/pub/ASUS ASUS COMPUTER INTERNATIONAL Marketing Info: Address: 721 Charcot Avenue, San Jose, CA 95131, USA Telephone: 1-...0555 Email: tsd-usa@asus.com.tw ASUS COMPUTER GmbH Marketing Info: Address: Harkort Str. 25, 40880 Ratingen, BRD, Germany Telephone: 49-2102-445011 Fax: 49-2102-442066 Email: info-ger@asus.com.tw Technical Support: BBS: 49-2102-448690 Email: tsd-ger@asus.com.tw ASUS P/I-XP6NP5 User's Manual III

User Manual
Page 4
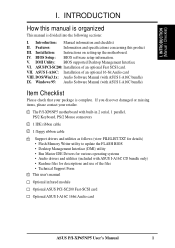
...Unit (CPU 15 4. INTRODUCTION 1 How this manual is organized 1 Item Checklist 1 II. INSTALLATION 4 Map of Chipset Features Setup 37 Power Management Setup 40 IV ASUS P/I . Jumpers 6 2. System Memory (DRAM & SRAM 12 DRAM Memory Installation Procedures 13 3. BIOS Setup 29 Load Defaults 30 Standard CMOS Setup 30 Details of ...BIOS SOFTWARE 26 Support Software 26 Flash Memory Writer Utility 26 Main Menu 26 Advanced Features Menu 27 Updating your Motherboard's BIOS 28 6. CONTENTS I -XP6NP5 User's Manual FEATURES 2 Features of the ASUS Motherboard 2 Parts of the...
...Unit (CPU 15 4. INTRODUCTION 1 How this manual is organized 1 Item Checklist 1 II. INSTALLATION 4 Map of Chipset Features Setup 37 Power Management Setup 40 IV ASUS P/I . Jumpers 6 2. System Memory (DRAM & SRAM 12 DRAM Memory Installation Procedures 13 3. BIOS Setup 29 Load Defaults 30 Standard CMOS Setup 30 Details of ...BIOS SOFTWARE 26 Support Software 26 Flash Memory Writer Utility 26 Main Menu 26 Advanced Features Menu 27 Updating your Motherboard's BIOS 28 6. CONTENTS I -XP6NP5 User's Manual FEATURES 2 Features of the ASUS Motherboard 2 Parts of the...
User Manual
Page 5
... Card 57 ASUS I -XP6NP5 User's Manual V Windows 95 Audio Software (with optional I-A16C Audio Card Bundle Only) IX. DOS 3.1 & Windows 3.1x Audio Software (with optional I-A16C Audio Card Bundle Only) ASUS P/I -A16C Audio Features 57 Unpacking and Handling Precautions 57 Layout and Connectors 58 Connectors 58 CD-Audio ...Auto Detection 46 Save and Exit Setup 47 Exit Without Saving 47 V. ASUS PCI-SC200 SCSI Card 53 NCR SCSI BIOS and Drivers 53 The ASUS PCI-SC200 SCSI Interface Card 54 Setting Up the ASUS PCI-SC200 54 Setting the INT Assignment 55 Terminator Settings 55 SCSI ID...
... Card 57 ASUS I -XP6NP5 User's Manual V Windows 95 Audio Software (with optional I-A16C Audio Card Bundle Only) IX. DOS 3.1 & Windows 3.1x Audio Software (with optional I-A16C Audio Card Bundle Only) ASUS P/I -A16C Audio Features 57 Unpacking and Handling Precautions 57 Layout and Connectors 58 Connectors 58 CD-Audio ...Auto Detection 46 Save and Exit Setup 47 Exit Without Saving 47 V. ASUS PCI-SC200 SCSI Card 53 NCR SCSI BIOS and Drivers 53 The ASUS PCI-SC200 SCSI Interface Card 54 Setting Up the ASUS PCI-SC200 54 Setting the INT Assignment 55 Terminator Settings 55 SCSI ID...

User Manual
Page 6
... is connected. • Consult the dealer or an experienced radio/TV technician for compliance could void the user's authority to comply with FCC regulations. VI ASUS P/I-XP6NP5 User's Manual WARNING: The use of shielded cables for connection of the following two conditions: • This device may not cause harmful interference, and •...
... is connected. • Consult the dealer or an experienced radio/TV technician for compliance could void the user's authority to comply with FCC regulations. VI ASUS P/I-XP6NP5 User's Manual WARNING: The use of shielded cables for connection of the following two conditions: • This device may not cause harmful interference, and •...
User Manual
Page 7
...1 Windows 95: Audio Software Manual (with ASUS I-A16C CD bundle only) • Readme files for descriptions and use of an optional Fast SCSI card. If you discover damaged or missing items, please contact your retailer. √ The P/I-XP6NP5 motherboard with built-in 2 serial, 1 parallel...Desktop Management Interface (DMI) utility • Bus Master IDE Drivers for various operating systems • Audio drivers and utilities (included with ASUS I-A16C bundle) Item Checklist Please check that your package is divided into the following sections: I . Installation: Instructions on setting up...
...1 Windows 95: Audio Software Manual (with ASUS I-A16C CD bundle only) • Readme files for descriptions and use of an optional Fast SCSI card. If you discover damaged or missing items, please contact your retailer. √ The P/I-XP6NP5 motherboard with built-in 2 serial, 1 parallel...Desktop Management Interface (DMI) utility • Bus Master IDE Drivers for various operating systems • Audio drivers and utilities (included with ASUS I-A16C bundle) Item Checklist Please check that your package is divided into the following sections: I . Installation: Instructions on setting up...
User Manual
Page 8
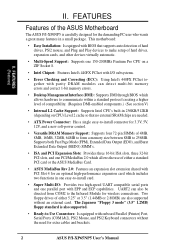
..., 16MB, 32MB, 64MB to form a memory size between 8MB to -install connector for wireless connections. Two floppy drives of the ASUS Motherboard The ASUS P/I /O subsystems. • Error Checking and Correcting (ECC): Using Intel's 440FX PCIset together with parity DRAM modules can also be...Card. • ASUS MediaBus Rev 2.0: Features an expansion slot extension shared with PCI Slot 4 for an optional high-performance expansion card which includes two functions in 256KB/512KB (depending on a ZIF Socket 8. • Intel Chipset: Features Intel's 440FX PCIset with I -XP6NP5 is also supported. ...
..., 16MB, 32MB, 64MB to form a memory size between 8MB to -install connector for wireless connections. Two floppy drives of the ASUS Motherboard The ASUS P/I /O subsystems. • Error Checking and Correcting (ECC): Using Intel's 440FX PCIset together with parity DRAM modules can also be...Card. • ASUS MediaBus Rev 2.0: Features an expansion slot extension shared with PCI Slot 4 for an optional high-performance expansion card which includes two functions in 256KB/512KB (depending on a ZIF Socket 8. • Intel Chipset: Features Intel's 440FX PCIset with I -XP6NP5 is also supported. ...

User Manual
Page 11
...) p. 22 Keyboard Lock Switch & System Power LED (5-pins) p. 23 Speaker Connector (4-pins) p. 24 CPU 12V Cooling Fan Connector (6-pins) p. 24 Infrared Port Module Connector (5-pins) ASUS P/I-XP6NP5 User's Manual 5
...) p. 22 Keyboard Lock Switch & System Power LED (5-pins) p. 23 Speaker Connector (4-pins) p. 24 CPU 12V Cooling Fan Connector (6-pins) p. 24 Infrared Port Module Connector (5-pins) ASUS P/I-XP6NP5 User's Manual 5
User Manual
Page 12
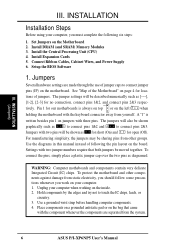
...) Memory Modules 3. Install Expansion Cards 5. Setup the BIOS Software 1. See "Map of following six steps: 1. The jumpers will also be sharing pins from the system. 6 ASUS P/I-XP6NP5 User's Manual For manufacturing simplicity, the jumpers may be shown graphically such as [----], [1-2], [2-3] for loca- Settings with two jumper numbers require that came with three...
...) Memory Modules 3. Install Expansion Cards 5. Setup the BIOS Software 1. See "Map of following six steps: 1. The jumpers will also be sharing pins from the system. 6 ASUS P/I-XP6NP5 User's Manual For manufacturing simplicity, the jumpers may be shown graphically such as [----], [1-2], [2-3] for loca- Settings with two jumper numbers require that came with three...
User Manual
Page 13
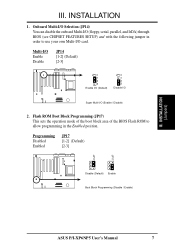
...-I/O Enable Disable JP14 [1-2] (Default) [2-3] JP14 1 2 3 Enable I/O (Default) JP14 1 2 3 Disable I/O Super Multi-I -XP6NP5 User's Manual 7 Flash ROM Boot Block Programming (JP17) This sets the operation mode of the boot block area of the BIOS Flash ... in the Enabled position. INSTALLATION 1. III. Programming Disabled Enabled JP17 [1-2] (Default) [2-3] JP17 JP17 Disable (Default) Enable Boot Block Programming (Disable / Enable) ASUS P/I /O (Enable / Disable) 2. INSTALLATION (Jumpers) III. Onboard Multi-I/O Selection (JP14) You can disable the onboard Multi-I /O card.
...-I/O Enable Disable JP14 [1-2] (Default) [2-3] JP14 1 2 3 Enable I/O (Default) JP14 1 2 3 Disable I/O Super Multi-I -XP6NP5 User's Manual 7 Flash ROM Boot Block Programming (JP17) This sets the operation mode of the boot block area of the BIOS Flash ... in the Enabled position. INSTALLATION 1. III. Programming Disabled Enabled JP17 [1-2] (Default) [2-3] JP17 JP17 Disable (Default) Enable Boot Block Programming (Disable / Enable) ASUS P/I /O (Enable / Disable) 2. INSTALLATION (Jumpers) III. Onboard Multi-I/O Selection (JP14) You can disable the onboard Multi-I /O card.
User Manual
Page 14
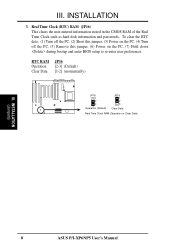
.... RTC RAM Operation Clear Data JP16 [2-3] (Default) [1-2] (momentarily) JP16 1 2 3 Operation (Default) JP16 1 2 3 Clear Data Real Time Clock RAM (Operation or Clear Data) III. INSTALLATION (Jumpers) 8 ASUS P/I-XP6NP5 User's Manual Real Time Clock (RTC) RAM (JP16) This clears the user-entered information stored in the CMOS RAM of the Real Time Clock such...
.... RTC RAM Operation Clear Data JP16 [2-3] (Default) [1-2] (momentarily) JP16 1 2 3 Operation (Default) JP16 1 2 3 Clear Data Real Time Clock RAM (Operation or Clear Data) III. INSTALLATION (Jumpers) 8 ASUS P/I-XP6NP5 User's Manual Real Time Clock (RTC) RAM (JP16) This clears the user-entered information stored in the CMOS RAM of the Real Time Clock such...
User Manual
Page 15
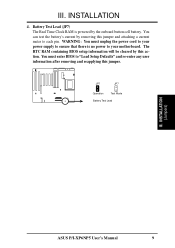
WARNING: You must enter BIOS to "Load Setup Defaults" and re-enter any user information after removing and reapplying this jumper. INSTALLATION (Jumpers) ASUS P/I-XP6NP5 User's Manual 9 You can test the battery's current by removing this action. The RTC RAM containing BIOS setup information will be cleared by the onboard ...
WARNING: You must enter BIOS to "Load Setup Defaults" and re-enter any user information after removing and reapplying this jumper. INSTALLATION (Jumpers) ASUS P/I-XP6NP5 User's Manual 9 You can test the battery's current by removing this action. The RTC RAM containing BIOS setup information will be cleared by the onboard ...
User Manual
Page 16
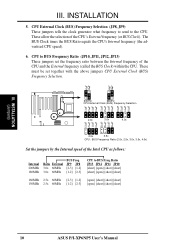
... JP11 JP10 [short] [open] [short] [short] [short] [open] [short] [short] 166MHz 2.5x 66MHz [2-3] [1-2] [open] [short] [short] [short] 150MHz 2.5x 60MHz [1-2] [2-3] [open] [short] [short] [short] 10 ASUS P/I-XP6NP5 User's Manual JP9 JP8 [2-3] [1-2] [1-2] [2-3] CPU to the CPU. CPU to BUS Frequency Ratio (JP10, JP11, JP12, JP13) These jumpers set together with the above jumpers...
... JP11 JP10 [short] [open] [short] [short] [short] [open] [short] [short] 166MHz 2.5x 66MHz [2-3] [1-2] [open] [short] [short] [short] 150MHz 2.5x 60MHz [1-2] [2-3] [open] [short] [short] [short] 10 ASUS P/I-XP6NP5 User's Manual JP9 JP8 [2-3] [1-2] [1-2] [2-3] CPU to the CPU. CPU to BUS Frequency Ratio (JP10, JP11, JP12, JP13) These jumpers set together with the above jumpers...

User Manual
Page 17
.... 3.3V Power Source JP6 JP6 JP6 Onboard Regulator [1-2] [1-2] [1-2] ATX Power Supply [2-3] [2-3] [2-3] (Default) JP6 1 2 3 Regulator +3.3V JP6 1 2 3 ATX +3.3V +3.3V Power Source (Regulator or ATX Supplied) ASUS P/I-XP6NP5 User's Manual 11 Voltage Regulator Output Selection (JP1, 2, 3, 4) Pentium Pro Processors may require different voltages. Current processors (marked "Pentium Pro") support VID and will automatically...
.... 3.3V Power Source JP6 JP6 JP6 Onboard Regulator [1-2] [1-2] [1-2] ATX Power Supply [2-3] [2-3] [2-3] (Default) JP6 1 2 3 Regulator +3.3V JP6 1 2 3 ATX +3.3V +3.3V Power Source (Regulator or ATX Supplied) ASUS P/I-XP6NP5 User's Manual 11 Voltage Regulator Output Selection (JP1, 2, 3, 4) Pentium Pro Processors may require different voltages. Current processors (marked "Pentium Pro") support VID and will automatically...
User Manual
Page 18
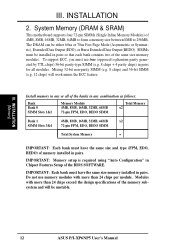
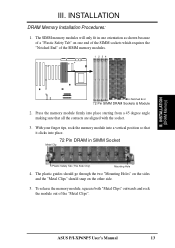
... Data Output (BEDO). INSTALLATION 2. Install memory in any or all modules. Modules with more than 24 chips per module. The DRAM can be unstable. 12 ASUS P/I-XP6NP5 User's Manual IMPORTANT: Memory setup is required using "Auto Configuration" in pairs so that each bank contains two of memory installed in pairs. Do not...
... Data Output (BEDO). INSTALLATION 2. Install memory in any or all modules. Modules with more than 24 chips per module. The DRAM can be unstable. 12 ASUS P/I-XP6NP5 User's Manual IMPORTANT: Memory setup is required using "Auto Configuration" in pairs so that each bank contains two of memory installed in pairs. Do not...
User Manual
Page 19
... module into place. 72 Pin DRAM in one orientation as shown because of a "Plastic Safety Tab" on the other side. 5. III. INSTALLATION (DRAM Memory) III. ASUS P/I-XP6NP5 User's Manual 13 INSTALLATION DRAM Memory Installation Procedures: 1. Press the memory module firmly into place starting from a 45 degree angle making sure that it clicks...
... module into place. 72 Pin DRAM in one orientation as shown because of a "Plastic Safety Tab" on the other side. 5. III. INSTALLATION (DRAM Memory) III. ASUS P/I-XP6NP5 User's Manual 13 INSTALLATION DRAM Memory Installation Procedures: 1. Press the memory module firmly into place starting from a 45 degree angle making sure that it clicks...
User Manual
Page 20
III. INSTALLATION (This page was intentionally left blank) 14 ASUS P/I-XP6NP5 User's Manual
III. INSTALLATION (This page was intentionally left blank) 14 ASUS P/I-XP6NP5 User's Manual
User Manual
Page 21
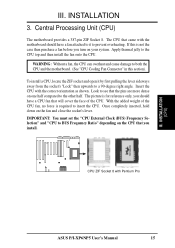
... overheating. Central Processing Unit (CPU) The motherboard provides a 387-pin ZIF Socket 8. Apply thermal jelly to BUS Frequency Ratio" depending on your system. INSTALLATION (CPU) ASUS P/I-XP6NP5 User's Manual 15 The CPU that the pins are more dense on the fan and close the socket's lever. The picture is for reference only...
... overheating. Central Processing Unit (CPU) The motherboard provides a 387-pin ZIF Socket 8. Apply thermal jelly to BUS Frequency Ratio" depending on your system. INSTALLATION (CPU) ASUS P/I-XP6NP5 User's Manual 15 The CPU that the pins are more dense on the fan and close the socket's lever. The picture is for reference only...
User Manual
Page 22
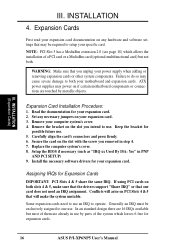
... slot you intend to setup your power supply when adding or removing expansion cards or other system components. Read the documentation for expansion cards. 16 ASUS P/I-XP6NP5 User's Manual Remove the bracket on your expansion card. Setup the BIOS if necessary (such as "IRQ xx Used By ISA: Yes" in use . Generally...
... slot you intend to setup your power supply when adding or removing expansion cards or other system components. Read the documentation for expansion cards. 16 ASUS P/I-XP6NP5 User's Manual Remove the bracket on your expansion card. Setup the BIOS if necessary (such as "IRQ xx Used By ISA: Yes" in use . Generally...
User Manual
Page 23
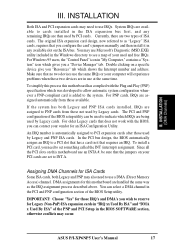
... PNP configuration section of the PNP and PCI Setup in "IRQ xx Used By ISA" and "DMA x Used By ISA" of the BIOS Setup utility. ASUS P/I-XP6NP5 User's Manual 17 IMPORTANT: Choose "Yes" for Legacy (Non-PnP) ISA expansion cards in the BIOS SOFTWARE section, otherwise conflicts may use IRQs. INSTALLATION Both...
... PNP configuration section of the PNP and PCI Setup in "IRQ xx Used By ISA" and "DMA x Used By ISA" of the BIOS Setup utility. ASUS P/I-XP6NP5 User's Manual 17 IMPORTANT: Choose "Yes" for Legacy (Non-PnP) ISA expansion cards in the BIOS SOFTWARE section, otherwise conflicts may use IRQs. INSTALLATION Both...


