

MX299 Series User Guide for English Edition
Page 2
.... SPECIFICATIONS AND INFORMATION CONTAINED IN THIS MANUAL ARE FURNISHED FOR INFORMATIONAL USE ONLY, AND ARE SUBJECT TO CHANGE AT ANY TIME WITHOUT NOTICE, AND SHOULD NOT BE CONSTRUED AS A COMMITMENT BY ASUS. or (2) the serial number of contents Notices...iii Safety information iv Care & Cleaning v 1.1 Welcome 1-1 1.2 Package contents 1-1 1.3 Monitor introduction 1-2 1.3.1 Front view 1-2 1.3.2 Back view 1-4 1.3.3 QuickFit function 1-5 2.1 Assembling the base 2-1 2.2 Connecting cables 2-1 2.3 Detaching the base 2-2 2.4 Adjusting the monitor 2-3 3.1 OSD (On-Screen Display) menu...
.... SPECIFICATIONS AND INFORMATION CONTAINED IN THIS MANUAL ARE FURNISHED FOR INFORMATIONAL USE ONLY, AND ARE SUBJECT TO CHANGE AT ANY TIME WITHOUT NOTICE, AND SHOULD NOT BE CONSTRUED AS A COMMITMENT BY ASUS. or (2) the serial number of contents Notices...iii Safety information iv Care & Cleaning v 1.1 Welcome 1-1 1.2 Package contents 1-1 1.3 Monitor introduction 1-2 1.3.1 Front view 1-2 1.3.2 Back view 1-4 1.3.3 QuickFit function 1-5 2.1 Assembling the base 2-1 2.2 Connecting cables 2-1 2.3 Detaching the base 2-2 2.4 Adjusting the monitor 2-3 3.1 OSD (On-Screen Display) menu...

MX299 Series User Guide for English Edition
Page 3
... Rules. This equipment generates, uses and can be determined by turning the equipment off and on a circuit different from digital apparatus set out in a residential installation. Canadian Department of Communications Statement This digital apparatus does not exceed the Class B limits for energy efficiency. This class B digital apparatus complies with the limits for help. Operation is subject to the...
... Rules. This equipment generates, uses and can be determined by turning the equipment off and on a circuit different from digital apparatus set out in a residential installation. Canadian Department of Communications Statement This digital apparatus does not exceed the Class B limits for energy efficiency. This class B digital apparatus complies with the limits for help. Operation is subject to the...

MX299 Series User Guide for English Edition
Page 4
... wet. Safety information • Before setting up the monitor, carefully read all cables are correctly connected and the power cables are not damaged. This will not be operated only from damage due to open the monitor cabinet. If you encounter technical problems with the monitor, contact a qualified service technician or your retailer. • Before using the product, make sure all the documentation that...
... wet. Safety information • Before setting up the monitor, carefully read all cables are correctly connected and the power cables are not damaged. This will not be operated only from damage due to open the monitor cabinet. If you encounter technical problems with the monitor, contact a qualified service technician or your retailer. • Before using the product, make sure all the documentation that...

MX299 Series User Guide for English Edition
Page 5
.... Turn off and unplug the power cord. When lifting or carrying the monitor, grasp the edges of the fluorescent light. Stubborn stains may be removed with a cloth dampened with the monitor: • The screen may flicker during the initial use . • When the same image is displayed for hours. • When the screen becomes black or flashes, or cannot work anymore, contact your dealer or service center...
.... Turn off and unplug the power cord. When lifting or carrying the monitor, grasp the edges of the fluorescent light. Stubborn stains may be removed with a cloth dampened with the monitor: • The screen may flicker during the initial use . • When the same image is displayed for hours. • When the screen becomes black or flashes, or cannot work anymore, contact your dealer or service center...

MX299 Series User Guide for English Edition
Page 7
... LCD monitor from ASUS provides a crisper, broader, and brighter display, plus a host of the above items is damaged or missing, contact your viewing experience. 1.1 Welcome! With these features, you can enjoy the convenience and delightful visual experience that the monitor brings you for the following items: LCD Monitor Monitor Base Quick Start Guide Warranty Card 1x Power Cord 1x Power Adapter 1x DVI Cable (Dual Link) 1x HDMI Cable 1x MHL Cable 1x Audio Cable...
... LCD monitor from ASUS provides a crisper, broader, and brighter display, plus a host of the above items is damaged or missing, contact your viewing experience. 1.1 Welcome! With these features, you can enjoy the convenience and delightful visual experience that the monitor brings you for the following items: LCD Monitor Monitor Base Quick Start Guide Warranty Card 1x Power Cord 1x Power Adapter 1x DVI Cable (Dual Link) 1x HDMI Cable 1x MHL Cable 1x Audio Cable...

MX299 Series User Guide for English Edition
Page 8
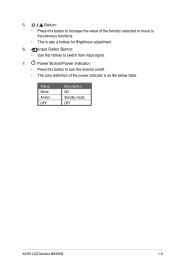
...; This is a hotkey to the previous menu as the OSD menu is activated. 1-2 Chapter 1: Product Introduction QuickFit Button: • This is also a hotkey for Volume adjustment. 4. Button: • Press this hotkey to switch from six video preset modes ({Scenery Mode}, {Standard Mode}, {Theater Mode}, {Game Mode}, {Night View Mode}, and {sRGB}) with SPLENDID™ Video Intelligence Technology. • Exit the OSD menu or go back to activate the QuickFit...
...; This is a hotkey to the previous menu as the OSD menu is activated. 1-2 Chapter 1: Product Introduction QuickFit Button: • This is also a hotkey for Volume adjustment. 4. Button: • Press this hotkey to switch from six video preset modes ({Scenery Mode}, {Standard Mode}, {Theater Mode}, {Game Mode}, {Night View Mode}, and {sRGB}) with SPLENDID™ Video Intelligence Technology. • Exit the OSD menu or go back to activate the QuickFit...
MX299 Series User Guide for English Edition
Page 9
Button: • Press this hotkey to switch from input signal. 7. 5. Input Select Button: • Use this button to the previous functions. • This is as the below table. Power Button/Power Indicator: • Press this button to turn the monitor on/off. • The color definition of the function selected or move to increase the value of the power indicator is also a hotkey for Brightness adjustment. 6. Status White Amber OFF Description ON Standby mode OFF ASUS LCD Monitor MX299Q 1-3
Button: • Press this hotkey to switch from input signal. 7. 5. Input Select Button: • Use this button to the previous functions. • This is as the below table. Power Button/Power Indicator: • Press this button to turn the monitor on/off. • The color definition of the function selected or move to increase the value of the power indicator is also a hotkey for Brightness adjustment. 6. Status White Amber OFF Description ON Standby mode OFF ASUS LCD Monitor MX299Q 1-3

MX299 Series User Guide for English Edition
Page 10
DC-in Port 6. Earphone-out Port 7. Control Buttons 8. HDMI/MHL Port 5. Kensington Lock 4 56 1-4 Chapter 1: Product Introduction DVI Port 4. DisplayPort 2. 1.3.2 Back view 7 8 12 3 1. Audio-in Port 3.
DC-in Port 6. Earphone-out Port 7. Control Buttons 8. HDMI/MHL Port 5. Kensington Lock 4 56 1-4 Chapter 1: Product Introduction DVI Port 4. DisplayPort 2. 1.3.2 Back view 7 8 12 3 1. Audio-in Port 3.
MX299 Series User Guide for English Edition
Page 11
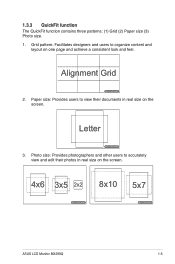
Paper size: Provides users to organize content and layout on one page and achieve a consistent look and feel. 1.3.3 QuickFit function The QuickFit function contains three patterns: (1) Grid (2) Paper size (3) Photo size. 1. Grid pattern: Facilitates designers and users to view their photos in real size on the screen. 4x6 3x5 2x2 EXIT QuickFit 8x10 5x7 EXIT QuickFit ASUS LCD Monitor MX299Q 1-5 Photo size: Provides photographers and other users to accurately view and edit their documents in real size on the screen. Alignment Grid EXIT QuickFit 2. Letter EXIT QuickFit 3.
Paper size: Provides users to organize content and layout on one page and achieve a consistent look and feel. 1.3.3 QuickFit function The QuickFit function contains three patterns: (1) Grid (2) Paper size (3) Photo size. 1. Grid pattern: Facilitates designers and users to view their photos in real size on the screen. 4x6 3x5 2x2 EXIT QuickFit 8x10 5x7 EXIT QuickFit ASUS LCD Monitor MX299Q 1-5 Photo size: Provides photographers and other users to accurately view and edit their documents in real size on the screen. Alignment Grid EXIT QuickFit 2. Letter EXIT QuickFit 3.

MX299 Series User Guide for English Edition
Page 12
Carefully put the front of the monitor face down on chapter 1.3.2, page 1-4. 2-1 Chapter 2: Setup The monitor is now ready for connection. 1 2 3 • We recommend that you cover the table surface with soft cloth to prevent damage to the monitor. 2.2 Connecting cables Connect the cables you need based on the introductions on a clean table. 2. 2.1 Assembling the base To assemble the base: 1. Use a coin to lock the base to the stand. 3. Attach the base to the stand tightly.
Carefully put the front of the monitor face down on chapter 1.3.2, page 1-4. 2-1 Chapter 2: Setup The monitor is now ready for connection. 1 2 3 • We recommend that you cover the table surface with soft cloth to prevent damage to the monitor. 2.2 Connecting cables Connect the cables you need based on the introductions on a clean table. 2. 2.1 Assembling the base To assemble the base: 1. Use a coin to lock the base to the stand. 3. Attach the base to the stand tightly.
MX299 Series User Guide for English Edition
Page 13
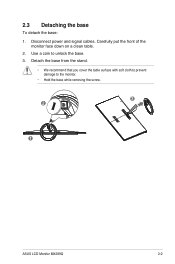
Carefully put the front of the monitor face down on a clean table. 2. 2.3 Detaching the base To detach the base: 1. Detach the base from the stand. • We recommend that you cover the table surface with soft cloth to prevent damage to unlock the base. 3. Disconnect power and signal cables. Use a coin to the monitor. • Hold the base while removing the screw. 3 2 1 ASUS LCD Monitor MX299Q 2-2
Carefully put the front of the monitor face down on a clean table. 2. 2.3 Detaching the base To detach the base: 1. Detach the base from the stand. • We recommend that you cover the table surface with soft cloth to prevent damage to unlock the base. 3. Disconnect power and signal cables. Use a coin to the monitor. • Hold the base while removing the screw. 3 2 1 ASUS LCD Monitor MX299Q 2-2

MX299 Series User Guide for English Edition
Page 14
2.4 Adjusting the monitor • For optimal viewing, we recommend that you look at the full face of the monitor, then adjust the monitor to the angle that is most comfortable for you. • Hold the stand to prevent the monitor from falling while changing its angle. • You can adjust the monitor's angle from -5˚ to +20˚. -5 ~ +20 2-3 Chapter 2: Setup
2.4 Adjusting the monitor • For optimal viewing, we recommend that you look at the full face of the monitor, then adjust the monitor to the angle that is most comfortable for you. • Hold the stand to prevent the monitor from falling while changing its angle. • You can adjust the monitor's angle from -5˚ to +20˚. -5 ~ +20 2-3 Chapter 2: Setup
MX299 Series User Guide for English Edition
Page 15
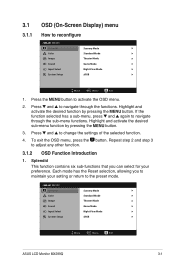
... setting or return to navigate through the sub-menu functions. Highlight and activate the desired sub-menu function by pressing the button. MX299 Splendid Color Image Sound Input Select System Setup Scenery Mode Standard Mode Theater Mode Game Mode Night View Mode sRGB Move Menu Exit ASUS LCD Monitor MX299Q 3-1 Splendid This function contains six sub-functions that you to maintain your preference. 3.1 3.1.1 OSD (On-Screen Display) menu How to activate the OSD menu. 2. Press the button...
... setting or return to navigate through the sub-menu functions. Highlight and activate the desired sub-menu function by pressing the button. MX299 Splendid Color Image Sound Input Select System Setup Scenery Mode Standard Mode Theater Mode Game Mode Night View Mode sRGB Move Menu Exit ASUS LCD Monitor MX299Q 3-1 Splendid This function contains six sub-functions that you to maintain your preference. 3.1 3.1.1 OSD (On-Screen Display) menu How to activate the OSD menu. 2. Press the button...
MX299 Series User Guide for English Edition
Page 16
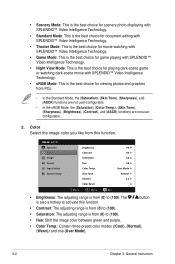
... green and purple. • Color Temp.: Contain three preset color modes ({Cool}, {Normal}, {Warm}) and one {User Mode}. 3-2 Chapter 3: General Instruction MX299 Splendid Color Image Sound Input Select System Setup Brightness Contrast Saturation Hue Color Temp. button • Contrast: The adjusting range is from {0} to {100}. • Saturation: The adjusting range is the best choice for playing dark-scene game or watching dark-scene movie with SPLENDID™ Video Intelligence Technology. • Night View Mode...
... green and purple. • Color Temp.: Contain three preset color modes ({Cool}, {Normal}, {Warm}) and one {User Mode}. 3-2 Chapter 3: General Instruction MX299 Splendid Color Image Sound Input Select System Setup Brightness Contrast Saturation Hue Color Temp. button • Contrast: The adjusting range is from {0} to {100}. • Saturation: The adjusting range is the best choice for playing dark-scene game or watching dark-scene movie with SPLENDID™ Video Intelligence Technology. • Night View Mode...
MX299 Series User Guide for English Edition
Page 17
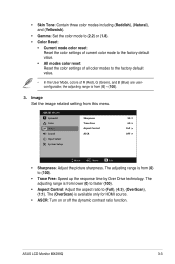
... {0} to the factory default value. • In the User Mode, colors of R (Red), G (Green), and B (Blue) are userconfigurable; the adjusting range is available only for HDMI source. • ASCR: Turn on or off the dynamic contrast ratio function. MX299 Splendid Sharpness 50 Color Trace Free 60 Image Aspect Control Full Sound ASCR OFF Input Select System Setup Move Menu Exit • Sharpness: Adjust the picture sharpness. • Skin Tone: Contain three color modes including {Reddish}, {Natural...
... {0} to the factory default value. • In the User Mode, colors of R (Red), G (Green), and B (Blue) are userconfigurable; the adjusting range is available only for HDMI source. • ASCR: Turn on or off the dynamic contrast ratio function. MX299 Splendid Sharpness 50 Color Trace Free 60 Image Aspect Control Full Sound ASCR OFF Input Select System Setup Move Menu Exit • Sharpness: Adjust the picture sharpness. • Skin Tone: Contain three color modes including {Reddish}, {Natural...
MX299 Series User Guide for English Edition
Page 18
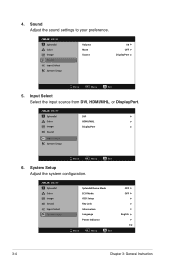
...Splendid Color Image Sound Input Select System Setup Volume Mute Source 50 OFF DisplayPort Move Menu Exit 5. Input Select Select the input source from DVI, HDMI/MHL, or DisplayPort. Sound Adjust the sound settings to your preference. MX299 Splendid Color Image Sound Input Select System Setup DVI HDMI/MHL DisplayPort Move Menu Exit 6. MX299 Splendid Color Image Sound Input Select System Setup Splendid Demo Mode ECO Mode OSD Setup Key Lock Information Language Power Indicator Move Menu Exit OFF OFF English 1/2 3-4 Chapter 3: General Instruction System Setup Adjust the...
...Splendid Color Image Sound Input Select System Setup Volume Mute Source 50 OFF DisplayPort Move Menu Exit 5. Input Select Select the input source from DVI, HDMI/MHL, or DisplayPort. Sound Adjust the sound settings to your preference. MX299 Splendid Color Image Sound Input Select System Setup DVI HDMI/MHL DisplayPort Move Menu Exit 6. MX299 Splendid Color Image Sound Input Select System Setup Splendid Demo Mode ECO Mode OSD Setup Key Lock Information Language Power Indicator Move Menu Exit OFF OFF English 1/2 3-4 Chapter 3: General Instruction System Setup Adjust the...
MX299 Series User Guide for English Edition
Page 19
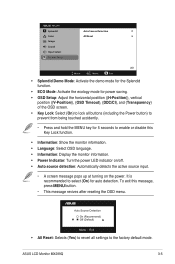
... auto detection. Auto Source Detection On (Recommend) Off (Default) Menu : Exit • All Reset: Selects {Yes} to revert all buttons (including the Power button) to prevent from being touched accidently. • Press and hold the MENU key for 5 seconds to select {On} for power saving. • OSD Setup: Adjust the horizontal postition ({H-Position}), vertical position ({V-Position}), {OSD Timeout}, {DDC/CI}, and {Transparency} of the OSD screen. • Key Lock: Select {On} to lock all settings to the factory default mode. ASUS LCD Monitor MX299Q...
... auto detection. Auto Source Detection On (Recommend) Off (Default) Menu : Exit • All Reset: Selects {Yes} to revert all buttons (including the Power button) to prevent from being touched accidently. • Press and hold the MENU key for 5 seconds to select {On} for power saving. • OSD Setup: Adjust the horizontal postition ({H-Position}), vertical position ({V-Position}), {OSD Timeout}, {DDC/CI}, and {Transparency} of the OSD screen. • Key Lock: Select {On} to lock all settings to the factory default mode. ASUS LCD Monitor MX299Q...

MX299 Series User Guide for English Edition
Page 20
3.2 Specifications Model Panel Size Max. Resolution Brightness (Typ.) Intrisinc Contrast Ratio (Typ.) Dynamic Contrast Ratio (Typ.) Viewing Angle (CR=10) Color Saturation (NTSC) Display Colors Response Time (Typ.) DisplayPort input HDMI/MHL Port DVI Input Speaker Earphone Power Consumption Tilt Phys. Dimension (WxHxD) Box Dimension (WxHxD) Net Weight (Esti.) Gross Weight (Esti.) Voltage Rating Regulation Approvals MX299Q 29" W (73.025 cm) 2560 x 1080 300 cd/m2 ≧1000:1 ≧80,000,000:1 178...
3.2 Specifications Model Panel Size Max. Resolution Brightness (Typ.) Intrisinc Contrast Ratio (Typ.) Dynamic Contrast Ratio (Typ.) Viewing Angle (CR=10) Color Saturation (NTSC) Display Colors Response Time (Typ.) DisplayPort input HDMI/MHL Port DVI Input Speaker Earphone Power Consumption Tilt Phys. Dimension (WxHxD) Box Dimension (WxHxD) Net Weight (Esti.) Gross Weight (Esti.) Voltage Rating Regulation Approvals MX299Q 29" W (73.025 cm) 2560 x 1080 300 cd/m2 ≧1000:1 ≧80,000,000:1 178...
MX299 Series User Guide for English Edition
Page 21
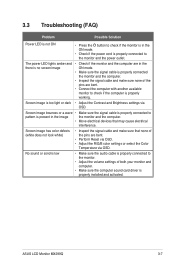
... properly connected the monitor and the computer. • Inspect the signal cable and make sure that may cause electrical interference. Screen image is too light or dark • Adjust the Contrast and Brightness settings via OSD. 3.3 Troubleshooting (FAQ) Problem Possible Solution Power LED is not ON • Press the button to check if the monitor is in the ON mode. • Check if the power cord is properly connected to check if the computer is properly working.
... properly connected the monitor and the computer. • Inspect the signal cable and make sure that may cause electrical interference. Screen image is too light or dark • Adjust the Contrast and Brightness settings via OSD. 3.3 Troubleshooting (FAQ) Problem Possible Solution Power LED is not ON • Press the button to check if the monitor is in the ON mode. • Check if the power cord is properly connected to check if the computer is properly working.
MX299 Series User Guide for English Edition
Page 22
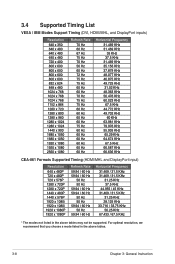
For optimal resolution, we recommend that you choose a mode listed in the above tables. 3-8 Chapter 3: General Instruction 3.4 Supported Timing List VESA / IBM Modes Support Timing (DVI, HDMI/MHL, and DisplayPort inputs) Resolution 640 x 350 640 x 480 640 x 480 640 x 480 720 x 400 800 x 600 800 x 600 800 x 600 800 x 600 832 x 624 848 x 480 1024 x 768 1024 x... x 1080i 1920 x 1080i 1920 x 1080P 1920 x 1080P Refresh Rate 59.94 / 60 Hz 59.94 / 60 Hz 50 Hz 50 Hz 59.94 / 60 Hz 59.94 / 60 Hz 50 Hz 50 Hz 59.94 / 60 Hz 50 Hz 59.94 / 60 Hz Horizontal Frequency 31.469 / 31.5 KHz 31.469 / 31.5 KHz...
For optimal resolution, we recommend that you choose a mode listed in the above tables. 3-8 Chapter 3: General Instruction 3.4 Supported Timing List VESA / IBM Modes Support Timing (DVI, HDMI/MHL, and DisplayPort inputs) Resolution 640 x 350 640 x 480 640 x 480 640 x 480 720 x 400 800 x 600 800 x 600 800 x 600 800 x 600 832 x 624 848 x 480 1024 x 768 1024 x... x 1080i 1920 x 1080i 1920 x 1080P 1920 x 1080P Refresh Rate 59.94 / 60 Hz 59.94 / 60 Hz 50 Hz 50 Hz 59.94 / 60 Hz 59.94 / 60 Hz 50 Hz 50 Hz 59.94 / 60 Hz 50 Hz 59.94 / 60 Hz Horizontal Frequency 31.469 / 31.5 KHz 31.469 / 31.5 KHz...


