
User Manual
Page 3
... cords. opening or removing covers can result in a bookcase or cabinet unless proper ventilation is equipped with a three-pronged grounded plug, a plug with UL listed computers which have an electrician install the correct outlet, or use an adapter to power surges. l Do not place the monitor on a bed, sofa, rug, or...
... cords. opening or removing covers can result in a bookcase or cabinet unless proper ventilation is equipped with a three-pronged grounded plug, a plug with UL listed computers which have an electrician install the correct outlet, or use an adapter to power surges. l Do not place the monitor on a bed, sofa, rug, or...
User Manual
Page 7
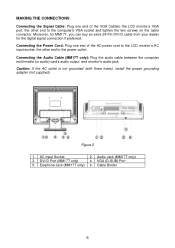
...) Port 6. MAKING THE CONNECTIONS Connecting the Signal Cable: Plug one end of the VGA Cableto the LCD monitor's VGA port, the other end to the computer's VGA socket and tighten the two screws on the cable connector. Caution: If the AC outlet is not grounded (with three holes), install the proper... the power outlet. Earphone Jack (MM17T only) 2. Cable Binder 6 Audio Jack (MM17T only) 4. Connecting the Audio Cable (MM17T only): Plug the audio cable between the computer multi-media (or audio) card's audio output and monitor's audio jack.
...) Port 6. MAKING THE CONNECTIONS Connecting the Signal Cable: Plug one end of the VGA Cableto the LCD monitor's VGA port, the other end to the computer's VGA socket and tighten the two screws on the cable connector. Caution: If the AC outlet is not grounded (with three holes), install the proper... the power outlet. Earphone Jack (MM17T only) 2. Cable Binder 6 Audio Jack (MM17T only) 4. Connecting the Audio Cable (MM17T only): Plug the audio cable between the computer multi-media (or audio) card's audio output and monitor's audio jack.
User Manual
Page 9
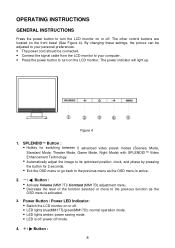
... can be adjusted to your personal preferences. • The power cord should be connected. • Connect the signal cable from the LCD monitor to your computer. • Press the power button to turn the LCD monitor on the LCD monitor. SPLENDID™ Button : • Hotkey for switching between 5 advanced video preset...
... can be adjusted to your personal preferences. • The power cord should be connected. • Connect the signal cable from the LCD monitor to your computer. • Press the power button to turn the LCD monitor on the LCD monitor. SPLENDID™ Button : • Hotkey for switching between 5 advanced video preset...
User Manual
Page 13
... be 125 volts AC. TO OPERATE PROPERLY, THERE MUST BE VIDEO INPUT SIGNAL. The voltage rating for connection to inform the host system of personal computer: Please use VDE 0602, 0625, 0821 approval power cord in European counties. 12 PLUG AND PLAY Plug & Play DDC2B Feature This monitor is no video...
... be 125 volts AC. TO OPERATE PROPERLY, THERE MUST BE VIDEO INPUT SIGNAL. The voltage rating for connection to inform the host system of personal computer: Please use VDE 0602, 0625, 0821 approval power cord in European counties. 12 PLUG AND PLAY Plug & Play DDC2B Feature This monitor is no video...
User Manual
Page 14
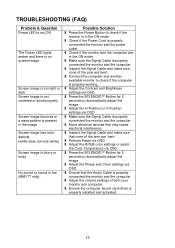
... Signal Cable is properly installed and activated. 13 l Adjust the Phase and Clock settings via OSD. l Ensure the computer sound card driver is properly connected the monitor and the computer. l Check if the Power Cord is in the ON mode. l Inspect the Signal Cable and make sure that ...Adjust the H-Position or V-Position settings via OSD. l Perform Reset via OSD l Make sure the Signal Cable is properly connected the monitor and the computer. l Adjust the R/G/B color settings or select the Color Temperature via OSD. l Press the SPLENDID™ Button for 2 seconds to check if the...
... Signal Cable is properly installed and activated. 13 l Adjust the Phase and Clock settings via OSD. l Ensure the computer sound card driver is properly connected the monitor and the computer. l Check if the Power Cord is in the ON mode. l Inspect the Signal Cable and make sure that ...Adjust the H-Position or V-Position settings via OSD. l Perform Reset via OSD l Make sure the Signal Cable is properly connected the monitor and the computer. l Adjust the R/G/B color settings or select the Color Temperature via OSD. l Press the SPLENDID™ Button for 2 seconds to check if the...
User Manual
Page 15
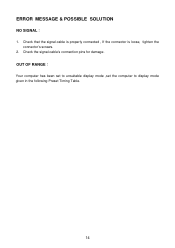
Check that the signal-cable is properly connected , If the connector is loose, tighten the connector's screws. 2. ERROR MESSAGE & POSSIBLE SOLUTION NO SIGNAL︰ 1. Check the signal-cable's connection pins for damage. OUT OF RANGE︰ Your computer has been set to unsuitable display mode ,set the computer to display mode given in the following Preset Timing Table. 14
Check that the signal-cable is properly connected , If the connector is loose, tighten the connector's screws. 2. ERROR MESSAGE & POSSIBLE SOLUTION NO SIGNAL︰ 1. Check the signal-cable's connection pins for damage. OUT OF RANGE︰ Your computer has been set to unsuitable display mode ,set the computer to display mode given in the following Preset Timing Table. 14

