Asus MM17TG Support and Manuals
Get Help and Manuals for this Asus item

Popular Asus MM17TG Manual Pages
User Manual - Page 1
... NOTES 3 TAKE CARE OF THE MONITOR 3
BEFORE YOU OPERATE THE MONITOR 4 FEATURES 4 PACKING LIST 4 INSTALLATION INSTRUCTIONS 5 ADJUSTING THE VIEWING ANGLE 7
OPERATING INSTRUCTIONS 8 GENERAL INSTRUCTIONS 8 HOW TO RECONFIGURE 9 OSD MENU TABLE 10 PLUG AND PLAY 12
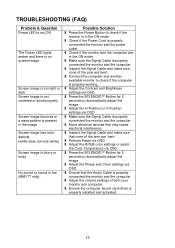
TROUBLESHOOTING (FAQ 13 ERROR MESSAGE & POSSIBLE SOLUTION 14
APPENDIX 15 SPECIFICATIONS 15 PRESET TIMING TABLE 16 CONNECTOR...
User Manual - Page 2
... occur in order to comply
with the instructions, may cause harmful interference to Part 15 of the FCC Rules. Refer servicing to provide reasonable protection against harmful interference... Guide thoroughly. These limits are present inside the monitor. The manufacturer is the responsibilities of the following measures: 1.
This User Guide should be used in a residential installation....
User Manual - Page 3
... cause serious damage to qualified service personnel. l The monitor should be installed near a bathtub, washbowl, kitchen sink, laundry tub, swimming pool or in the back and bottom of the cabinet are provided for long period of power source indicated on a wall or shelf, use the monitor only with UL listed computers which have an electrician...
User Manual - Page 4

...repair the screen by any more . TAKE CARE OF THE MONITOR
• Do not install the monitor... symptoms are normal with the monitor and do not indicate a problem.
• Due to the...service center to the nature of the LCD screen, an afterimage of 0.01% or less such as a missing pixel or a pixel lit all the time.
• Due to replace parts.
As a safety precaution, always unplug the monitor...
User Manual - Page 6
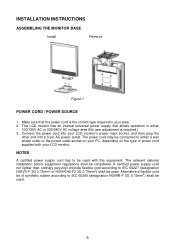
... (designation H05RR-F 3G 0.75mm2) shall be used with your PC, depending on the type of synthetic rubber according to be considered...LCD monitor. The relevant national installation and/or equipment regulations shall be used . INSTALLATION INSTRUCTIONS
ASSEMBLING THE MONITOR BASE
Install
Remove
Figure 1
POWER CORD / POWER SOURCE 1. Make sure that allows operation in your LCD monitor...
User Manual - Page 7
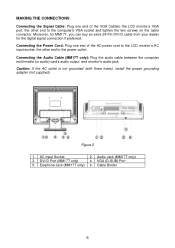
...), install the proper grounding adapter (not supplied). Moreover, for MM17T, you can buy an extra 24-Pin DVI-D cable from your dealer for the digital signal connection if preferred.
MAKING THE CONNECTIONS
Connecting the Signal Cable: Plug one end of the VGA Cableto the LCD monitor's VGA port, the other end to the computer's VGA...
User Manual - Page 9
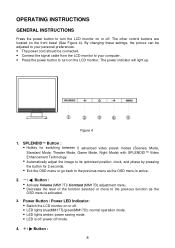
By changing these settings, the picture can be adjusted to your personal preferences. • The power cord should be connected. • Connect the signal cable from the LCD monitor to your computer. • Press the power button to turn the LCD monitor on the LCD monitor. The power indicator will light up. SPLENDID™ Button : • Hotkey for switching...
User Manual - Page 10

... (On-Screen Display) main menu. • Enter/select the icon(function) highlighted as the OSD
menu is highlighted,
press the MENU-button to change the settings of the function selected or move to activate it . Press or to activate it . 3.
Once the desired function is activated. 5. HOW TO RECONFIGURE
1.
User Manual - Page 11
...
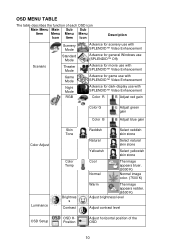
The image appears bluer. (9300°K)
Normal image color. (7500°K)
Warm
The image appears redder. (6500°K)
Adjust brightness level
Adjust contrast level
OSD Setup
OSD HPosition
Adjust horizontal position of the OSD
10
User Manual - Page 12
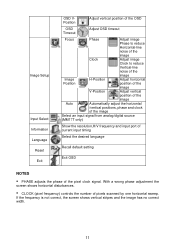
...• CLOCK (pixel frequency) controls the number of the pixel clock signal. Image Setup
Input Select Information Language
Reset Exit
OSD VPosition
Adjust vertical position of the OSD
OSD ... signal from analog/digital source
(MM17T only)
Show the resolution,H/V frequency and input port of current input timing
Select the desired language
Recall default setting
Exit OSD
NOTES
• PHASE...
User Manual - Page 13
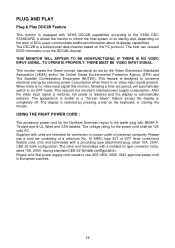
...set by pressing a key on the keyboard, or clicking the mouse. The voltage rating for the Northern American region is equipped with VESA DDC2B capabilities according to power outlet of personal computer...AWG, type SJT or SVT three conductors flexible cord. This monitor meets the Green monitor standards as set consisting of DDC used, communicate additional information about its display ...
User Manual - Page 14
... Power Button to check if the computer
is
properly installed and activated.
13 l Ensure that the Audio Cable is low (MM17T only). TROUBLESHOOTING (FAQ)
Problem & Question Power LED is not ...sound or sound is properly
connected the monitor and the computer l Adjust the volume settings of both your
monitor and computer. l Check if the monitor and the computer are bent. l Inspect the Signal ...
User Manual - Page 15
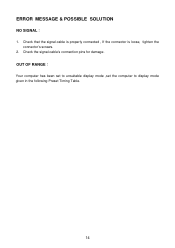
OUT OF RANGE︰ Your computer has been set to unsuitable display mode ,set the computer to display mode given in the following Preset Timing Table.
14 Check the signal-cable's connection pins for damage. ERROR MESSAGE & POSSIBLE SOLUTION
NO SIGNAL︰ 1. Check that the signal-cable is properly connected , If the connector is loose, tighten the
connector's screws. 2.
User Manual - Page 16
...
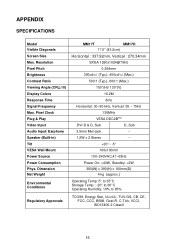
SPECIFICATIONS
Model Visible Diagonals Screen Size Max. Resolution Pixel Pitch Brightness Contrast Ratio Viewing Angle (CR≧10) Display Colors Response Time Signal Frequency Max. Pixel Clock Plug & Play Video Input Audio Input/ Earphone Speaker (Built-in) Tilt VESA Wall Mount Power Source Power Consumption Phys. Dimension Net Weight
Environmental Conditions
MM17T
MM17D
17...
User Manual - Page 18
...)
Shield
4.
DDC Data
19.
TMDS Clock Shield
11.
TMDS Clock +
Shield
12. TMDS Clock -
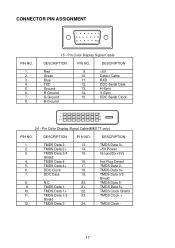
17 CONNECTOR PIN ASSIGNMENT
1
5
6
10
11
15
PIN NO.
1. 2. 3. 4. 5. 6. 7. 8....Blue TXD Ground R-Ground G-Ground B-Ground
9.
+5V
10. DDC-Serial Data
13. Pin Color Display Signal Cable(MM17T only)
PIN NO.
Hot Plug Detect
5. TMDS Data 0-
6.
TMDS Data 5-
9. TMDS Data 5+
10.
RXD...
Asus MM17TG Reviews
We have not received any reviews for Asus yet.