
User Manual
Page 4
... , contact your LCD display, wipe it periodically with clean and soft cloth. The screen may find slightly uneven brightness on the screen depending on again to replace parts. Turn off the Power Switch for hours. SPECIAL NOTES The following symptoms are normal with the monitor and do not ...sure the flicker disappears. • You may be removed with a cloth lightly dampened with a soft cloth. TAKE CARE OF THE MONITOR • Do not install the monitor in a location near heat sources such as radiators or air ducts, or in a place subject to direct sunlight, or excessive ...
... , contact your LCD display, wipe it periodically with clean and soft cloth. The screen may find slightly uneven brightness on the screen depending on again to replace parts. Turn off the Power Switch for hours. SPECIAL NOTES The following symptoms are normal with the monitor and do not ...sure the flicker disappears. • You may be removed with a cloth lightly dampened with a soft cloth. TAKE CARE OF THE MONITOR • Do not install the monitor in a location near heat sources such as radiators or air ducts, or in a place subject to direct sunlight, or excessive ...

User Manual
Page 5
... The product package should include the following items: 1. User Guide (CD) 4. VGA Cable 6. Quick Start Guide 3. Power Cord 5. BEFORE YOU OPERATE THE MONITOR FEATURES • 43.2cm(17") TFT Color LCD Monitor. • Recommended Resolutions: SXGA 1280 X 1024 @60Hz. • 8ms (Tr+Tf) Quick Response Time. • SPLENDID™ Video Enhancement Technology. •... and Compact Case Design for Space Saving. • Both VGA and DVI-D Inputs. (for MM17T only) • 1.2Wx2 Stereo Speakers / Earphone Jack. (for MM17T only) 4 LCD Monitor 2.
... The product package should include the following items: 1. User Guide (CD) 4. VGA Cable 6. Quick Start Guide 3. Power Cord 5. BEFORE YOU OPERATE THE MONITOR FEATURES • 43.2cm(17") TFT Color LCD Monitor. • Recommended Resolutions: SXGA 1280 X 1024 @60Hz. • 8ms (Tr+Tf) Quick Response Time. • SPLENDID™ Video Enhancement Technology. •... and Compact Case Design for Space Saving. • Both VGA and DVI-D Inputs. (for MM17T only) • 1.2Wx2 Stereo Speakers / Earphone Jack. (for MM17T only) 4 LCD Monitor 2.
User Manual
Page 6
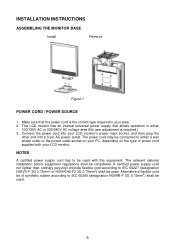
... according to be connected to either 100/120V AC or 220/240V AC voltage area (No user adjustment is the correct type required in your LCD monitor's power input socket, and then plug the other end into a 3-pin AC power outlet. Make sure that allows operation in either a wall power outlet ...or the power outlet socket on your LCD monitor. NOTES A certified power supply cord has to IEC 60227 (designation H05VV-F 3G 0.75mm2 or H05VVH2-F2 3G 0.75mm2) shall be used with your PC, ...
... according to be connected to either 100/120V AC or 220/240V AC voltage area (No user adjustment is the correct type required in your LCD monitor's power input socket, and then plug the other end into a 3-pin AC power outlet. Make sure that allows operation in either a wall power outlet ...or the power outlet socket on your LCD monitor. NOTES A certified power supply cord has to IEC 60227 (designation H05VV-F 3G 0.75mm2 or H05VVH2-F2 3G 0.75mm2) shall be used with your PC, ...
User Manual
Page 7
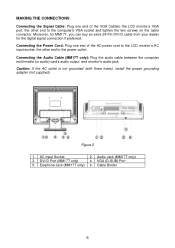
MAKING THE CONNECTIONS Connecting the Signal Cable: Plug one end of the VGA Cableto the LCD monitor's VGA port, the other end to the computer's VGA socket and tighten the two screws on the cable connector. Caution: If the AC outlet is .... AC Input Socket 3. VGA (D-SUB) Port 6. Figure 2 1. DVI-D Port (MM17T only) 5. Connecting the Power Cord: Plug one end of the AC-power cord to the LCD monitor's AC input socket, the other end to the power outlet. Moreover, for MM17T, you can buy an extra 24-Pin DVI-D cable from your dealer...
MAKING THE CONNECTIONS Connecting the Signal Cable: Plug one end of the VGA Cableto the LCD monitor's VGA port, the other end to the computer's VGA socket and tighten the two screws on the cable connector. Caution: If the AC outlet is .... AC Input Socket 3. VGA (D-SUB) Port 6. Figure 2 1. DVI-D Port (MM17T only) 5. Connecting the Power Cord: Plug one end of the AC-power cord to the LCD monitor's AC input socket, the other end to the power outlet. Moreover, for MM17T, you can buy an extra 24-Pin DVI-D cable from your dealer...
User Manual
Page 8
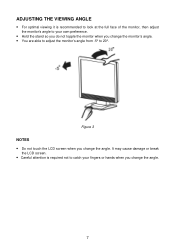
Figure 3 NOTES • Do not touch the LCD screen when you change the angle. ADJUSTING THE VIEWING ANGLE • For optimal viewing it is required not to 20°. It may cause damage or break the LCD screen. • Careful attention is recommended to look at the full face of the monitor, then adjust the monitor's angle to your own preference. • Hold the stand so you do not topple the monitor when you change the monitor's angle. • You are able to adjust the monitor's angle from -5° to catch your fingers or hands when you change the angle. 7
Figure 3 NOTES • Do not touch the LCD screen when you change the angle. ADJUSTING THE VIEWING ANGLE • For optimal viewing it is required not to 20°. It may cause damage or break the LCD screen. • Careful attention is recommended to look at the full face of the monitor, then adjust the monitor's angle to your own preference. • Hold the stand so you do not topple the monitor when you change the monitor's angle. • You are able to adjust the monitor's angle from -5° to catch your fingers or hands when you change the angle. 7
User Manual
Page 9
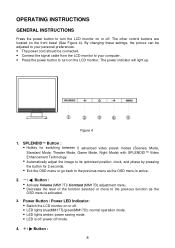
Power Button / Power LED Indicator: • Switch the LCD monitor on or off. • LED lights blue(MM17T)/green(MM17D): normal operation mode. • LED lights amber: power ... function as the OSD menu is off: power off . OPERATING INSTRUCTIONS GENERAL INSTRUCTIONS Press the power button to turn on the LCD monitor. The other control buttons are located on or off mode. 4. +/ Button : 8 The power indicator will light up... • The power cord should be connected. • Connect the signal cable from the LCD monitor to your computer. • Press the power button to turn the...
Power Button / Power LED Indicator: • Switch the LCD monitor on or off. • LED lights blue(MM17T)/green(MM17D): normal operation mode. • LED lights amber: power ... function as the OSD menu is off: power off . OPERATING INSTRUCTIONS GENERAL INSTRUCTIONS Press the power button to turn on the LCD monitor. The other control buttons are located on or off mode. 4. +/ Button : 8 The power indicator will light up... • The power cord should be connected. • Connect the signal cable from the LCD monitor to your computer. • Press the power button to turn the...


