
User Manual
Page 4
...It may include blemishes of 0.01% or less such as a missing pixel or a pixel lit all the time. • Due to the nature of the LCD screen, an afterimage of the previous screen may flicker during initial use. TAKE CARE OF THE MONITOR • Do not install the monitor in a location...vibration or shock. • Save the original shipping carton and packing materials, as they will come in the factory. • To maintain cleanness of your LCD display, wipe it on the desktop pattern you ever have to ship your monitor. • For maximum protection, repackage your dealer or service center to...
...It may include blemishes of 0.01% or less such as a missing pixel or a pixel lit all the time. • Due to the nature of the LCD screen, an afterimage of the previous screen may flicker during initial use. TAKE CARE OF THE MONITOR • Do not install the monitor in a location...vibration or shock. • Save the original shipping carton and packing materials, as they will come in the factory. • To maintain cleanness of your LCD display, wipe it on the desktop pattern you ever have to ship your monitor. • For maximum protection, repackage your dealer or service center to...

User Manual
Page 5
... product package should include the following items: 1. Quick Start Guide 3. User Guide (CD) 4. BEFORE YOU OPERATE THE MONITOR FEATURES • 43.2cm(17") TFT Color LCD Monitor. • Recommended Resolutions: SXGA 1280 X 1024 @60Hz. • 8ms (Tr+Tf) Quick Response Time. • SPLENDID™ Video Enhancement Technology. • 5 Video Preset Modes...
... product package should include the following items: 1. Quick Start Guide 3. User Guide (CD) 4. BEFORE YOU OPERATE THE MONITOR FEATURES • 43.2cm(17") TFT Color LCD Monitor. • Recommended Resolutions: SXGA 1280 X 1024 @60Hz. • 8ms (Tr+Tf) Quick Response Time. • SPLENDID™ Video Enhancement Technology. • 5 Video Preset Modes...
User Manual
Page 6
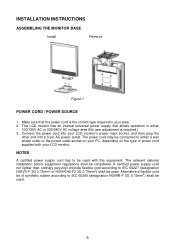
... power cord into a 3-pin AC power outlet. The power cord may be connected to be used with your LCD monitor's power input socket, and then plug the other end into your LCD monitor. This LCD monitor has an internal universal power supply that the power cord is required.) 3. NOTES A certified power supply cord...
... power cord into a 3-pin AC power outlet. The power cord may be connected to be used with your LCD monitor's power input socket, and then plug the other end into your LCD monitor. This LCD monitor has an internal universal power supply that the power cord is required.) 3. NOTES A certified power supply cord...
User Manual
Page 7
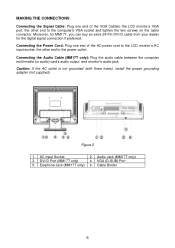
...) card's audio output and monitor's audio jack. DVI-D Port (MM17T only) 5. Connecting the Power Cord: Plug one end of the AC-power cord to the LCD monitor's AC input socket, the other end to the power outlet. AC Input Socket 3. MAKING THE CONNECTIONS Connecting the Signal Cable: Plug one end of...
...) card's audio output and monitor's audio jack. DVI-D Port (MM17T only) 5. Connecting the Power Cord: Plug one end of the AC-power cord to the LCD monitor's AC input socket, the other end to the power outlet. AC Input Socket 3. MAKING THE CONNECTIONS Connecting the Signal Cable: Plug one end of...
User Manual
Page 8
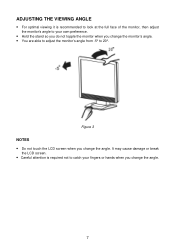
Figure 3 NOTES • Do not touch the LCD screen when you change the angle. 7 ADJUSTING THE VIEWING ANGLE • For optimal viewing it is required not to catch your own preference. • Hold the stand so you do not topple the monitor when you change the monitor's angle. • You are able to adjust the monitor's angle from -5° to your fingers or hands when you change the angle. It may cause damage or break the LCD screen. • Careful attention is recommended to look at the full face of the monitor, then adjust the monitor's angle to 20°.
Figure 3 NOTES • Do not touch the LCD screen when you change the angle. 7 ADJUSTING THE VIEWING ANGLE • For optimal viewing it is required not to catch your own preference. • Hold the stand so you do not topple the monitor when you change the monitor's angle. • You are able to adjust the monitor's angle from -5° to your fingers or hands when you change the angle. It may cause damage or break the LCD screen. • Careful attention is recommended to look at the full face of the monitor, then adjust the monitor's angle to 20°.
User Manual
Page 9
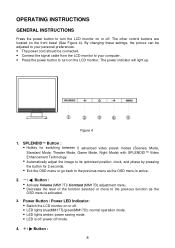
... selected or move to the previous function as the OSD menu is off: power off . Power Button / Power LED Indicator: • Switch the LCD monitor on the front bezel (See Figure 4). Figure 4 1. The power indicator will light up. The other control buttons are located on or off.... your personal preferences. • The power cord should be connected. • Connect the signal cable from the LCD monitor to your computer. • Press the power button to turn the LCD monitor on or off mode. 4. +/ Button : 8 OPERATING INSTRUCTIONS GENERAL INSTRUCTIONS Press the power button to...
... selected or move to the previous function as the OSD menu is off: power off . Power Button / Power LED Indicator: • Switch the LCD monitor on the front bezel (See Figure 4). Figure 4 1. The power indicator will light up. The other control buttons are located on or off.... your personal preferences. • The power cord should be connected. • Connect the signal cable from the LCD monitor to your computer. • Press the power button to turn the LCD monitor on or off mode. 4. +/ Button : 8 OPERATING INSTRUCTIONS GENERAL INSTRUCTIONS Press the power button to...


